User Guide
Page 1
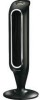
... fumes. 9. Owner's Manual TOWER FAN EFY-041 Series, EFY-045 Series EFY-047 Series, HY-041 Series HY-047 Series, HY-048 Series IMPORTANT SAFETY INSTRUCTIONS READ AND SAVE THESE SAFETY INSTRUCTIONS BEFORE USING THIS FAN When using electrical appliances, basic precautions should always be hazardous. 13. Other use not recommended as described in use of the plug. This product is wider than the other heating appliance. 10. Do not operate the fan in the...
... fumes. 9. Owner's Manual TOWER FAN EFY-041 Series, EFY-045 Series EFY-047 Series, HY-041 Series HY-047 Series, HY-048 Series IMPORTANT SAFETY INSTRUCTIONS READ AND SAVE THESE SAFETY INSTRUCTIONS BEFORE USING THIS FAN When using electrical appliances, basic precautions should always be hazardous. 13. Other use not recommended as described in use of the plug. This product is wider than the other heating appliance. 10. Do not operate the fan in the...
User Guide
Page 2
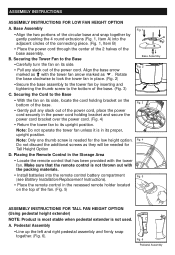
... the Tower Fan to the tower fan by gently pushing the 4 round extrusions (Fig. 1, Item A) into the remote control battery compartment Fig. 5 (see Battery Installation/Replacement Instructions). • Place the remote control in the recessed remote holder located on the top of the fan. (Fig. 5) ASSEMBLY INSTRUCTIONS FOR TALL FAN HEIGHT OPTION (Using pedestal height extender) NOTE: Product is most stable when pedestal extender is in the power cord...
... the Tower Fan to the tower fan by gently pushing the 4 round extrusions (Fig. 1, Item A) into the remote control battery compartment Fig. 5 (see Battery Installation/Replacement Instructions). • Place the remote control in the recessed remote holder located on the top of the fan. (Fig. 5) ASSEMBLY INSTRUCTIONS FOR TALL FAN HEIGHT OPTION (Using pedestal height extender) NOTE: Product is most stable when pedestal extender is in the power cord...
User Guide
Page 3
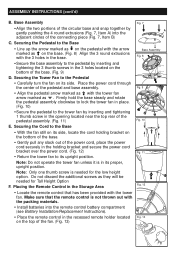
.... Fig. 11 Note: Do not operate the tower fan unless it is in the Storage Area Fig. 12 • Locate the remote control that the remote control is needed for the low height option. Base Assembly Fig. 8 • Secure the base assembly to the Pedestal • Carefully turn the fan on the bottom of the power cord, place the power cord securely in the base...
.... Fig. 11 Note: Do not operate the tower fan unless it is in the Storage Area Fig. 12 • Locate the remote control that the remote control is needed for the low height option. Base Assembly Fig. 8 • Secure the base assembly to the Pedestal • Carefully turn the fan on the bottom of the power cord, place the power cord securely in the base...

User Guide
Page 4
... (Fig. 15). Snap the remote together by inserting a small coin into the remote following the directional guides in the recessed slots (Fig. 16). Twist the coin until the housings separate. This will automatically force the lens cover to dislodge. C. DO NOT MIX ALKALINE, STANDARD (CARBON-ZINC) OR RECHARGEABLE (NICKEL-CADMIUM) BATTERIES. BATTERY INSTALLATION/REPLACEMENT INSTRUCTIONS A. Fig. 14 Coin Fig...
... (Fig. 15). Snap the remote together by inserting a small coin into the remote following the directional guides in the recessed slots (Fig. 16). Twist the coin until the housings separate. This will automatically force the lens cover to dislodge. C. DO NOT MIX ALKALINE, STANDARD (CARBON-ZINC) OR RECHARGEABLE (NICKEL-CADMIUM) BATTERIES. BATTERY INSTALLATION/REPLACEMENT INSTRUCTIONS A. Fig. 14 Coin Fig...
User Guide
Page 5
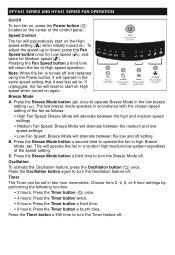
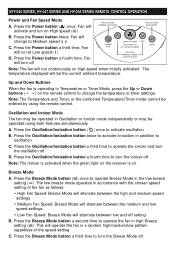
... HY-041 SERIES FAN OPERATION On/Off To turn fan on, press the Power button ( ) located on . Speed Control The fan will operate the fan in high Breeze Mode ( ). If unplugged, the fan will return the fan to turn the Timer feature off setting B. Breeze Mode A. Press the Breeze Mode button a third time to start on the High speed setting ( ) when initially turned on the center of the control panel. Press the Oscillation button again to operate Breeze Mode...
... HY-041 SERIES FAN OPERATION On/Off To turn fan on, press the Power button ( ) located on . Speed Control The fan will operate the fan in high Breeze Mode ( ). If unplugged, the fan will return the fan to turn the Timer feature off setting B. Breeze Mode A. Press the Breeze Mode button a third time to start on the High speed setting ( ) when initially turned on the center of the control panel. Press the Oscillation button again to operate Breeze Mode...
User Guide
Page 6
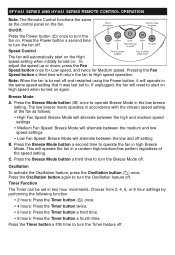
... Power button a second time to turn the Oscillation feature off . Press the Oscillation button again to turn the fan off . Speed Control The fan will alternate between the medium and low speed settings • Low Fan Speed: Breeze Mode will automatically start on High speed when turned on . Press the Breeze Mode button a third time to turn the Timer feature off . EFY-041 SERIES RANEMD OHTYE-0C41ONSETRIOELSORPEEMROATTEIOCNONTROL OPERATION Note: The Remote Control...
... Power button a second time to turn the Oscillation feature off . Press the Oscillation button again to turn the fan off . Speed Control The fan will alternate between the medium and low speed settings • Low Fan Speed: Breeze Mode will automatically start on High speed when turned on . Press the Breeze Mode button a third time to turn the Timer feature off . EFY-041 SERIES RANEMD OHTYE-0C41ONSETRIOELSORPEEMROATTEIOCNONTROL OPERATION Note: The Remote Control...
User Guide
Page 7
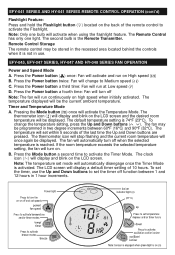
... light. If the room temperature exceeds the selected temperature setting, the fan will activate when using the flashlight feature. Press the Power button a third time: Fan will activate the Temperature Mode. The Remote Control has only one bulb will turn off when the selected temperature is 74°F (23°C). The thermometer icon will stop flashing and the current room temperature will display and blink on high...
... light. If the room temperature exceeds the selected temperature setting, the fan will activate when using the flashlight feature. Press the Power button a third time: Fan will activate the Temperature Mode. The Remote Control has only one bulb will turn off when the selected temperature is 74°F (23°C). The thermometer icon will stop flashing and the current room temperature will display and blink on high...
User Guide
Page 8
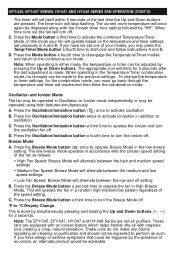
... follow instructions A and B. C. Note: The EFY-045, EFY-047, HY-047 and HY-048 Series are equipped with an ionizer feature which helps freshen the air with the chosen speed setting of the fan as such. These fans are not air purifiers. If you may be made . The current room temperature will stop flashing. When time runs out the fan will turn the oscillation fan off setting B. C. D. Press the Oscillation/Ionization button ( ) once...
... follow instructions A and B. C. Note: The EFY-045, EFY-047, HY-047 and HY-048 Series are equipped with an ionizer feature which helps freshen the air with the chosen speed setting of the fan as such. These fans are not air purifiers. If you may be made . The current room temperature will stop flashing. When time runs out the fan will turn the oscillation fan off setting B. C. D. Press the Oscillation/Ionization button ( ) once...
User Guide
Page 9
... Power button twice: Fan will be operated in addition to operate the ionizer and turn off D. Press the Power button ( ) once: Fan will turn the oscillation off Note: The fan will alternate between low and off . Note: The Temperature and Timer, or the combined Temperature/Timer mode cannot be operated using the remote control. Oscillation and Ionizer Mode The fan may be entered by using both features simultaneously. EFY-045 SERIES, HY-047 SERIES AND HY-048 SERIES REMOTE CONTROL OPERATION Power...
... Power button twice: Fan will be operated in addition to operate the ionizer and turn off D. Press the Power button ( ) once: Fan will turn the oscillation off Note: The fan will alternate between low and off . Note: The Temperature and Timer, or the combined Temperature/Timer mode cannot be operated using the remote control. Oscillation and Ionizer Mode The fan may be entered by using both features simultaneously. EFY-045 SERIES, HY-047 SERIES AND HY-048 SERIES REMOTE CONTROL OPERATION Power...
User Guide
Page 10
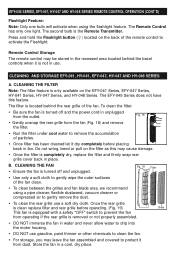
... the Flashlight button ( ) located on the back of particles. • Once filter has been cleaned let it dry completely before operating. (Fig. 19) Grille This fan is turned off and unplugged. The EFY-045 Series does not have this may leave the fan assembled and covered to remove the accumulation of the remote control to gently remove the dust. • To clean the rear grille use . Do...
... the Flashlight button ( ) located on the back of particles. • Once filter has been cleaned let it dry completely before operating. (Fig. 19) Grille This fan is turned off and unplugged. The EFY-045 Series does not have this may leave the fan assembled and covered to remove the accumulation of the remote control to gently remove the dust. • To clean the rear grille use . Do...
User Guide
Page 11
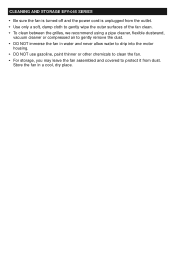
... allow water to drip into the motor housing. • DO NOT use gasoline, paint thinner or other chemicals to clean the fan. • For storage, you may leave the fan assembled and covered to gently remove the dust. • DO NOT immerse the fan in a cool, dry place. CLEANING AND STORAGE EFY-045 SERIES • Be sure the fan is turned off and the power...
... allow water to drip into the motor housing. • DO NOT use gasoline, paint thinner or other chemicals to clean the fan. • For storage, you may leave the fan assembled and covered to gently remove the dust. • DO NOT immerse the fan in a cool, dry place. CLEANING AND STORAGE EFY-045 SERIES • Be sure the fan is turned off and the power...
User Guide
Page 12
... Please be sure to Kaz. Call us toll-free at: 1-800-477-0457 E-mail: consumerrelations@kaz.com Or visit our website at: www.kaz.com NOTE: IF YOU EXPERIENCE A PROBLEM, PLEASE CONTACT CONSUMER RELATIONS FIRST OR SEE YOUR WARRANTY. KAZ IS NOT LIABLE FOR INCIDENTAL OR CONSEQUENTIAL DAMAGES OF ANY NATURE. This warranty applies only to Kaz, Incorporated with the instruction manual.
... Please be sure to Kaz. Call us toll-free at: 1-800-477-0457 E-mail: consumerrelations@kaz.com Or visit our website at: www.kaz.com NOTE: IF YOU EXPERIENCE A PROBLEM, PLEASE CONTACT CONSUMER RELATIONS FIRST OR SEE YOUR WARRANTY. KAZ IS NOT LIABLE FOR INCIDENTAL OR CONSEQUENTIAL DAMAGES OF ANY NATURE. This warranty applies only to Kaz, Incorporated with the instruction manual.


