Owners Guide
Page 2
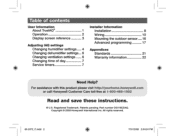
... © 2008 Honeywell International Inc. Patents pending. Part number DG115EZIAQ. All rights reserved. 69-2072_C.indd 2 v./ 7/31/2008 2:04:24 PM U.S. Table of contents User Information About TruelAQ® .1 Operation 2 Display screen reference 3 Adjusting IAQ settings Changing humidifier settings 4 Changing dehumidifier settings 6 Changing ventilation settings 6 Changing time of day 7 Service timers 7 Installer Information Installation 8 Wiring...
... © 2008 Honeywell International Inc. Patents pending. Part number DG115EZIAQ. All rights reserved. 69-2072_C.indd 2 v./ 7/31/2008 2:04:24 PM U.S. Table of contents User Information About TruelAQ® .1 Operation 2 Display screen reference 3 Adjusting IAQ settings Changing humidifier settings 4 Changing dehumidifier settings 6 Changing ventilation settings 6 Changing time of day 7 Service timers 7 Installer Information Installation 8 Wiring...
Owners Guide
Page 3
Having too little humidity can leave you have both a humidifier and dehumidifier installed, the TruelAQ can also trap indoor air pollutants, such as cooking odors, cleaning agents, radon, and carbon dioxide/monoxide. In addition, the TruelAQ can be ...
Having too little humidity can leave you have both a humidifier and dehumidifier installed, the TruelAQ can also trap indoor air pollutants, such as cooking odors, cleaning agents, radon, and carbon dioxide/monoxide. In addition, the TruelAQ can be ...

Owners Guide
Page 4
... displayed if the outdoor sensor is operating at a given time. Equipment Operation: Displays what equipment is installed. 69-2072-05 2 69-2072_C.indd 2 %.! 7/31/2008 2:04:24 PM Done: Saves changes. More: Advances between installed IAQ equipment control options. - - D*.ry Wet Window Frost Rig l e , Auto Tine (kat Deteenittily Ventilate/ s1et2ue:S1ayi5ng Ltenn Tank Mune...
... displayed if the outdoor sensor is operating at a given time. Equipment Operation: Displays what equipment is installed. 69-2072-05 2 69-2072_C.indd 2 %.! 7/31/2008 2:04:24 PM Done: Saves changes. More: Advances between installed IAQ equipment control options. - - D*.ry Wet Window Frost Rig l e , Auto Tine (kat Deteenittily Ventilate/ s1et2ue:S1ayi5ng Ltenn Tank Mune...
Owners Guide
Page 6
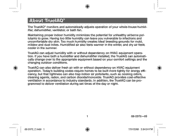
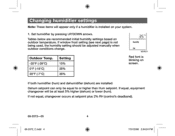
Changing humidifier settings Note: These items will be at setpoint plus 2% RH (control's deadband). 69-2072-05 69-2072_C.indd 4 4 riN 7/31/2008 2:04:24 PM Tables below are installed: Dehum setpoint can only be adjusted manually when outdoor conditions change. If both humidifier (hum) and dehumidifier (dehum) are recommended initial humidity ...blinking on screen. If not equal, changeover occurs at least 5% higher (dehum) or lower (hum). If equal, equipment changeover will appear only if a humidifier is installed on outdoor temperature. Set humidifier by pressing UP/DOWN arrows.
Changing humidifier settings Note: These items will be at setpoint plus 2% RH (control's deadband). 69-2072-05 69-2072_C.indd 4 4 riN 7/31/2008 2:04:24 PM Tables below are installed: Dehum setpoint can only be adjusted manually when outdoor conditions change. If both humidifier (hum) and dehumidifier (dehum) are recommended initial humidity ...blinking on screen. If not equal, changeover occurs at least 5% higher (dehum) or lower (hum). If equal, equipment changeover will appear only if a humidifier is installed on outdoor temperature. Set humidifier by pressing UP/DOWN arrows.
Owners Guide
Page 7
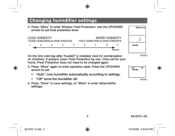
... Frost LESS HUMIDITY LOOSE HOME/SINGLE-PANE WINDOWS 1 2 3 4 5 MORE HUMIDITY TIGHT HOME/TRIPLE-PANE WINDOWS 6 7 8 9 M24830 On the first cold day after TruelAQ® is installed, look for your home, Frost Protection does not need to enter operation style. If present, lower Frost Protection by one. Press "More" to settings. •...
... Frost LESS HUMIDITY LOOSE HOME/SINGLE-PANE WINDOWS 1 2 3 4 5 MORE HUMIDITY TIGHT HOME/TRIPLE-PANE WINDOWS 6 7 8 9 M24830 On the first cold day after TruelAQ® is installed, look for your home, Frost Protection does not need to enter operation style. If present, lower Frost Protection by one. Press "More" to settings. •...
Owners Guide
Page 8
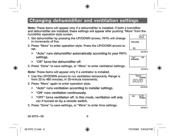
... 6 69-2072_C.indd 6 7/31/2008 2:04:25 PM Changing dehumidifier and ventilation settings Note: These items will appear only if a dehumidifier is installed. Set dehumidifier by a remote switch. Use the UP/DOWN arrows to your RH% Set M24834 settings. • "Off" turns the dehumidifier off... . Press "More" again to installer settings. Press "Done" to save settings, or "More" to enter time settings. DeHumidify 2. Press "Done" to save settings, or "More" to...
... 6 69-2072_C.indd 6 7/31/2008 2:04:25 PM Changing dehumidifier and ventilation settings Note: These items will appear only if a dehumidifier is installed. Set dehumidifier by a remote switch. Use the UP/DOWN arrows to your RH% Set M24834 settings. • "Off" turns the dehumidifier off... . Press "More" again to installer settings. Press "Done" to save settings, or "More" to enter time settings. DeHumidify 2. Press "Done" to save settings, or "More" to...
Owners Guide
Page 9
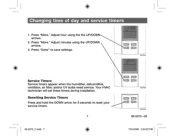
Press "More." Your HVAC technician will set these timers during installation. Resetting Service Timers Press and hold the DOWN arrow for 5 seconds to save settings. Adjust hour using the UP/DOWN arrows. 3. Adjust minutes using the the UP/DOWN arrows. 2. Press "Done" to reset your service timers. 7 69-2072_C.indd 7 0 M24934 "It ii i MED M24935 M24933 69-2072-05 7/31/2008 2:04:25 PM Changing time of day and service timers 1. Press "More." Service Timers Service timers appear when the humidifier, dehumidifier, ventilator, air filter, and/or UV bulbs need service.
Press "More." Your HVAC technician will set these timers during installation. Resetting Service Timers Press and hold the DOWN arrow for 5 seconds to save settings. Adjust hour using the UP/DOWN arrows. 3. Adjust minutes using the the UP/DOWN arrows. 2. Press "Done" to reset your service timers. 7 69-2072_C.indd 7 0 M24934 "It ii i MED M24935 M24933 69-2072-05 7/31/2008 2:04:25 PM Changing time of day and service timers 1. Press "More." Service Timers Service timers appear when the humidifier, dehumidifier, ventilator, air filter, and/or UV bulbs need service.
Owners Guide
Page 10
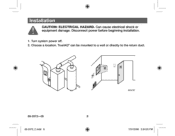
TruelA►Q® can be mounted to a wall or directly to the return duct. 69-2072-05 69-2072_C.indd 8 a M24787 8 7/31/2008 2:04:25 PM Can cause electrical shock or equipment damage. Turn system power off. 2. Choose a location. Disconnect power before beginning installation. 1. Installation a CAUTION: ELECTRICAL HAZARD.
TruelA►Q® can be mounted to a wall or directly to the return duct. 69-2072-05 69-2072_C.indd 8 a M24787 8 7/31/2008 2:04:25 PM Can cause electrical shock or equipment damage. Turn system power off. 2. Choose a location. Disconnect power before beginning installation. 1. Installation a CAUTION: ELECTRICAL HAZARD.
Owners Guide
Page 11
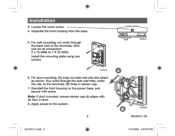
...from the base. 5. For duct mounting, (A) snap out side wall clip and attach as shown. Wire size for all connectors: 2 x 18 AWG to the terminals. Installation 3. For wall mounting, run wires through the side wall hole, under the clip, to the system. 9 M24814 A fQ, B M24854 69-2072-05 69-2072_C.... 2:04:25 PM Run wires through the back hole to 1 X 22 AWG. M24818 6. Note: If duct mounted, ensure sensor cap tip aligns with screw. Install the mounting plate using two screws. Reinstall the front housing on the power base, and secure with air flow in sensor cap. 7. Apply power to...
...from the base. 5. For duct mounting, (A) snap out side wall clip and attach as shown. Wire size for all connectors: 2 x 18 AWG to the terminals. Installation 3. For wall mounting, run wires through the side wall hole, under the clip, to the system. 9 M24814 A fQ, B M24854 69-2072-05 69-2072_C.... 2:04:25 PM Run wires through the back hole to 1 X 22 AWG. M24818 6. Note: If duct mounted, ensure sensor cap tip aligns with screw. Install the mounting plate using two screws. Reinstall the front housing on the power base, and secure with air flow in sensor cap. 7. Apply power to...
Owners Guide
Page 14
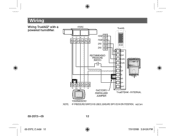
HVAC TruelAC R CWY G HUM ETI@ HUM 24V 24V RECOMMENDED PRESSURE SWITCH R Rc W Y G FACTORY INSTALLED JUMPER [ 1 24V 24V I HUM 1 HUM I 1C I 1 GT t 1 1 RT J GF EXT TrueSTEAM - M27341 69-2072-05 12 69-2072_C.indd 12 1'1 tJ 7/31/2008 2:04:26 PM Wiring Wiring TruelAQ® with a powered humidifier. INTERNAL THERMOSTAT NOTE: IF PRESSURE SWITCH IS USED, ENSURE DIP 5 IS IN ON POSITION.
HVAC TruelAC R CWY G HUM ETI@ HUM 24V 24V RECOMMENDED PRESSURE SWITCH R Rc W Y G FACTORY INSTALLED JUMPER [ 1 24V 24V I HUM 1 HUM I 1C I 1 GT t 1 1 RT J GF EXT TrueSTEAM - M27341 69-2072-05 12 69-2072_C.indd 12 1'1 tJ 7/31/2008 2:04:26 PM Wiring Wiring TruelAQ® with a powered humidifier. INTERNAL THERMOSTAT NOTE: IF PRESSURE SWITCH IS USED, ENSURE DIP 5 IS IN ON POSITION.

Owners Guide
Page 16
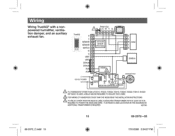
... DEHUM L® BLACK GREEN HUM - Wiring Wiring TruelAQ® with a humidifier and HRV/ERV ventilator. A FOR WIRING OF HUMIDIFIER OTHER THAN THE HE265 READ THE INSTALLATION INSTRUCTIONS, M27391 69-2072-05 14 69-2072_C.indd 14 7/31/2008 2:04:26 PM
... DEHUM L® BLACK GREEN HUM - Wiring Wiring TruelAQ® with a humidifier and HRV/ERV ventilator. A FOR WIRING OF HUMIDIFIER OTHER THAN THE HE265 READ THE INSTALLATION INSTRUCTIONS, M27391 69-2072-05 14 69-2072_C.indd 14 7/31/2008 2:04:26 PM
Owners Guide
Page 17
FOR WIRING OF HUMIDIFIER OTHER THAN THE HE265 READ THE INSTALLATION INSTRUCTIONS. IF AN R8239 IS USED (AS SHOWN IN THIS DIAGRAM) NO ADDITIONAL TRANSFORMER IS REQURED. M27392 15 69-2072-05 69-2072_C.indd 15 ...
FOR WIRING OF HUMIDIFIER OTHER THAN THE HE265 READ THE INSTALLATION INSTRUCTIONS. IF AN R8239 IS USED (AS SHOWN IN THIS DIAGRAM) NO ADDITIONAL TRANSFORMER IS REQURED. M27392 15 69-2072-05 69-2072_C.indd 15 ...
Owners Guide
Page 19
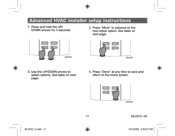
Press and hold the UP/ DOWN arrows for 3 seconds. 2. See table on next page. 4. Press "More" to advance to the home screen. 69-2072_C.indd 17 M24825 17 69-2072-05 7/31/2008 2:04:27 PM IF_ M24823 M24824 3. Press "Done" at any time to save and return to the next setup option. Advanced HVAC installer setup instructions 1. See table on next page. Use the UP/DOWN arrows to select options.
Press and hold the UP/ DOWN arrows for 3 seconds. 2. See table on next page. 4. Press "More" to advance to the home screen. 69-2072_C.indd 17 M24825 17 69-2072-05 7/31/2008 2:04:27 PM IF_ M24823 M24824 3. Press "Done" at any time to save and return to the next setup option. Advanced HVAC installer setup instructions 1. See table on next page. Use the UP/DOWN arrows to select options.
Owners Guide
Page 20
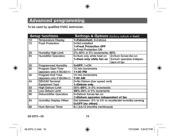
... Limit 55 Low Dehum Limit 60 Dehumidifier Operation 65 Humidity Display Offset 80 Hum Service Timer Settings & Options (factory default in bold) 1=Fahrenheit; 2=Celcius 0=Not installed 1=Frost Protection OFF 2=Frost Protection ON 5%-80% in 5% increments; 40% 0=Hum only while heat on 2=Hum forces fan on 1=Hum only while fan on 1=Dehum...
... Limit 55 Low Dehum Limit 60 Dehumidifier Operation 65 Humidity Display Offset 80 Hum Service Timer Settings & Options (factory default in bold) 1=Fahrenheit; 2=Celcius 0=Not installed 1=Frost Protection OFF 2=Frost Protection ON 5%-80% in 5% increments; 40% 0=Hum only while heat on 2=Hum forces fan on 1=Hum only while fan on 1=Dehum...
Owners Guide
Page 21
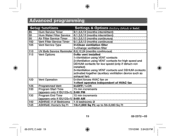
...Service Type 0=Clean ventilation filter 1=Change ventilation filter 110 UV Bulb Service Reminder 0,6,12,24 (months continuous) 115 Vent Options 0=No vent installed 1=Ventilation using VENT contacts 2=Ventilation using VENT contacts for high speed and DEHUM contacts for low speed (only if dehum not... installed) 3=Ventilation using VENT contacts and DEHUM contacts activated together (auxiliary ventilation device such as exhaust fan) 120 Vent Operation 0=Vent forces ...
...Service Type 0=Clean ventilation filter 1=Change ventilation filter 110 UV Bulb Service Reminder 0,6,12,24 (months continuous) 115 Vent Options 0=No vent installed 1=Ventilation using VENT contacts 2=Ventilation using VENT contacts for high speed and DEHUM contacts for low speed (only if dehum not... installed) 3=Ventilation using VENT contacts and DEHUM contacts activated together (auxiliary ventilation device such as exhaust fan) 120 Vent Operation 0=Vent forces ...
Owners Guide
Page 22
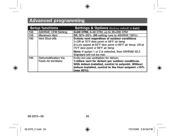
... Settings & Options (factory default in bold) 3=30 CFM; 4=40 CFM, up to 20=200 CFM 00; 30%-95%. (00 setting runs to setpoint. With dehum installed, control to ASHRAE 100%) 0-Auto vent regardless of outdoor conditions 1=Off at 75°F dew point or 99°F air temp 2=Low speed at 75°... 2 is selected, then ASHRAE 62.2 Standard will not be met. 0=Do not use ventilation for dehum 1=Allow vent for dehum per outdoor conditions. Without dehum installed, control to the Hum setpoint +10% (max 60%). 69-2072-05 69-2072_C.indd 20 20 7131/2008 2:04:28 PM
... Settings & Options (factory default in bold) 3=30 CFM; 4=40 CFM, up to 20=200 CFM 00; 30%-95%. (00 setting runs to setpoint. With dehum installed, control to ASHRAE 100%) 0-Auto vent regardless of outdoor conditions 1=Off at 75°F dew point or 99°F air temp 2=Low speed at 75°... 2 is selected, then ASHRAE 62.2 Standard will not be met. 0=Do not use ventilation for dehum 1=Allow vent for dehum per outdoor conditions. Without dehum installed, control to the Hum setpoint +10% (max 60%). 69-2072-05 69-2072_C.indd 20 20 7131/2008 2:04:28 PM


