
Owner's Manual
Page 1
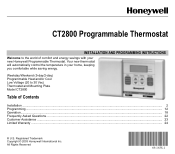
... new thermostat will automatically control the temperature in your new Honeywell Programmable Thermostat. Registered Trademark Copyright © 2003 Honeywell International Inc. All Rights Reserved 69-1638-1 Weekday/Weekend (5-day/2-day) Programmable Heat and/or Cool Low Voltage (20 to the world of Contents Installation ...2 Programming...12 Operation...18 Frequently Asked Questions ...22 Customer Assistance ...23 Limited Warranty ...24 ® U.S. CT2800 Programmable Thermostat INSTALLATION AND PROGRAMMING INSTRUCTIONS Welcome to 30 Vac) Thermostat and Mounting Plate Model CT2800...
... new thermostat will automatically control the temperature in your new Honeywell Programmable Thermostat. Registered Trademark Copyright © 2003 Honeywell International Inc. All Rights Reserved 69-1638-1 Weekday/Weekend (5-day/2-day) Programmable Heat and/or Cool Low Voltage (20 to the world of Contents Installation ...2 Programming...12 Operation...18 Frequently Asked Questions ...22 Customer Assistance ...23 Limited Warranty ...24 ® U.S. CT2800 Programmable Thermostat INSTALLATION AND PROGRAMMING INSTRUCTIONS Welcome to 30 Vac) Thermostat and Mounting Plate Model CT2800...
Owner's Manual
Page 2
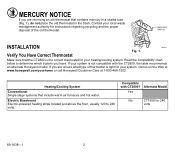
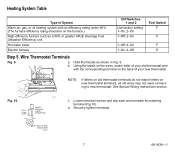
If you are removing an old thermostat that include warm air furnaces and hot water. Heating/Cooling System Conventional Single stage systems that contains mercury in a sealed tube (Fig. 1), do not place the old thermostat in the trash. Compatible with the CT2800, the table recommends an alternate Honeywell model. M3701 Make sure that the CT2800 is not compatible with CT2800? Electric Baseboard Electric-powered heating strips located just above the floor...
If you are removing an old thermostat that include warm air furnaces and hot water. Heating/Cooling System Conventional Single stage systems that contains mercury in a sealed tube (Fig. 1), do not place the old thermostat in the trash. Compatible with the CT2800, the table recommends an alternate Honeywell model. M3701 Make sure that the CT2800 is not compatible with CT2800? Electric Baseboard Electric-powered heating strips located just above the floor...
Owner's Manual
Page 3
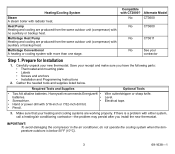
... new thermostat. Prepare for Installation 1. Required Tools and Supplies Optional Tools • Two AA alkaline batteries. Honeywell recommends Energizer® • Wire cutter/stripper or sharp knife. IMPORTANT: To avoid damaging the compressor in the air conditioner, do not operate the cooling system when the temperature outdoors is a problem with 3/16-inch or 7/32-inch drill bit. • Pencil. 3. Multistage Conventional A heating or cooling system with auxiliary...
... new thermostat. Prepare for Installation 1. Required Tools and Supplies Optional Tools • Two AA alkaline batteries. Honeywell recommends Energizer® • Wire cutter/stripper or sharp knife. IMPORTANT: To avoid damaging the compressor in the air conditioner, do not operate the cooling system when the temperature outdoors is a problem with 3/16-inch or 7/32-inch drill bit. • Pencil. 3. Multistage Conventional A heating or cooling system with auxiliary...
Owner's Manual
Page 4
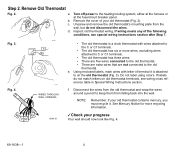
...; The old thermostat is a clock thermostat with letter of terminal it . Using enclosed labels, mark wires with wires attached to the C or C1 terminals. • The old thermostat has six or more recycling information. Remove Old Thermostat Fig. 2. d. If wiring meets any of your progress Your wall should now look like Fig. 4. 69-1638-1 4 Fig. 3. Step 2. c. M20133 ✓Check your old thermostat (Fig. 2). Turn off power to the old thermostat. e. a. Remove the cover of...
...; The old thermostat is a clock thermostat with letter of terminal it . Using enclosed labels, mark wires with wires attached to the C or C1 terminals. • The old thermostat has six or more recycling information. Remove Old Thermostat Fig. 2. d. If wiring meets any of your progress Your wall should now look like Fig. 4. 69-1638-1 4 Fig. 3. Step 2. c. M20133 ✓Check your old thermostat (Fig. 2). Turn off power to the old thermostat. e. a. Remove the cover of...
Owner's Manual
Page 6
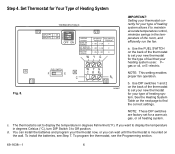
... can install the batteries and program your new thermostat for the type of Heating System Fig. 8. ON 3 - ON F 1 - To program the thermostat, see Step 7. ON 2 - ON 2 - NOTE: These DIP switches are factory-set to display the temperature in degrees Celsius (°C), turn DIP Switch 3 to maintain accurate temperature control, minimize swings in the temperature of heating system. THERMOSTAT BACK DISPLAY F DISPLAY C 3 - OFF 2 - See the Heating System Table on the wall. You can wait until the thermostat is set...
... can install the batteries and program your new thermostat for the type of Heating System Fig. 8. ON 3 - ON F 1 - To program the thermostat, see Step 7. ON 2 - ON 2 - NOTE: These DIP switches are factory-set to display the temperature in degrees Celsius (°C), turn DIP Switch 3 to maintain accurate temperature control, minimize swings in the temperature of heating system. THERMOSTAT BACK DISPLAY F DISPLAY C 3 - OFF 2 - See the Heating System Table on the wall. You can wait until the thermostat is set...
Owner's Manual
Page 7
... WIRE VISIBLE HERE M20126 7 69-1638-1 Loosen terminal screws and slip each wire beneath its matching terminal (Fig 10). Heating System Table Type of System Warm air, gas, or oil heating system with the corresponding terminal on the back of your new thermostat. b. G Y W R NOTE: If letters on old thermostat terminals do not match letters on new thermostat terminals, all old wires may not need connecting to new thermostat. See Special Wiring Instructions section. Securely tighten terminals. Wire Thermostat Terminals...
... WIRE VISIBLE HERE M20126 7 69-1638-1 Loosen terminal screws and slip each wire beneath its matching terminal (Fig 10). Heating System Table Type of System Warm air, gas, or oil heating system with the corresponding terminal on the back of your new thermostat. b. G Y W R NOTE: If letters on old thermostat terminals do not match letters on new thermostat terminals, all old wires may not need connecting to new thermostat. See Special Wiring Instructions section. Securely tighten terminals. Wire Thermostat Terminals...
Owner's Manual
Page 9
... connected to program the thermostat. These wires are installed correctly, the digital display flashes all entries once, then begins to your new CT2800 Thermostat and must be installed for programming and operation of the new thermostat. Continue with C or C1 terminals A clock thermostat has one or two extra wires attached to the C or C1 terminals that the positive and negative termi- Install the batteries Fig. 13. d. Special Wiring Instructions Clock thermostat with the installation. 9 69-1638-1 a. Wrap the wires...
... connected to program the thermostat. These wires are installed correctly, the digital display flashes all entries once, then begins to your new CT2800 Thermostat and must be installed for programming and operation of the new thermostat. Continue with C or C1 terminals A clock thermostat has one or two extra wires attached to the C or C1 terminals that the positive and negative termi- Install the batteries Fig. 13. d. Special Wiring Instructions Clock thermostat with the installation. 9 69-1638-1 a. Wrap the wires...
Owner's Manual
Page 10
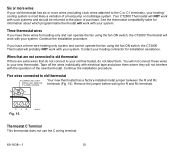
... your heating/ cooling system is most likely a variation of the new thermostat. REMOVE IF 5-WIRE SYSTEM Your new thermostat has a factory-installed metal jumper between the R and Rc terminals (Fig. 15). Remove the jumper before wiring the R and Rc terminals. Your CT2800 Thermostat will work with the operation of a heat pump or multistage system. Three thermostat wires If you have three wires for heating only and can operate the fan using the fan ON switch, the CT2800 Thermostat will not connect these wires to your...
... your heating/ cooling system is most likely a variation of the new thermostat. REMOVE IF 5-WIRE SYSTEM Your new thermostat has a factory-installed metal jumper between the R and Rc terminals (Fig. 15). Remove the jumper before wiring the R and Rc terminals. Your CT2800 Thermostat will work with the operation of a heat pump or multistage system. Three thermostat wires If you have three wires for heating only and can operate the fan using the fan ON switch, the CT2800 Thermostat will not connect these wires to your...
Owner's Manual
Page 11
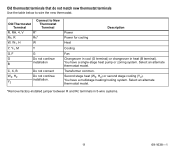
Second stage heat (W2, H2) or second stage cooling (Y2). Transformer common. You have a single-stage heat pump or zoning system. Description Power Power for cooling Heat Cooling Fan Changeover in cool (O terminal) or changeover in 5-wire systems. 11 69-1638-1 Old Thermostat Terminal Connect to wire the new thermostat. Select an alternate thermostat model. Old thermostat terminals that do not match new thermostat terminals Use the table below to New Thermostat Terminal R, RH, 4, V R* Rc, R Rc* W, W1, H W Y, Y1, M Y G, F G O Do not continue B installation ...
Second stage heat (W2, H2) or second stage cooling (Y2). Transformer common. You have a single-stage heat pump or zoning system. Description Power Power for cooling Heat Cooling Fan Changeover in cool (O terminal) or changeover in 5-wire systems. 11 69-1638-1 Old Thermostat Terminal Connect to wire the new thermostat. Select an alternate thermostat model. Old thermostat terminals that do not match new thermostat terminals Use the table below to New Thermostat Terminal R, RH, 4, V R* Rc, R Rc* W, W1, H W Y, Y1, M Y G, F G O Do not continue B installation ...
Owner's Manual
Page 12
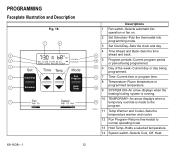
... WAKE LEAVE RETURN SLEEP 4 Set Time Temp Mode 3 Clock/Day Run Program 2 Schedule Hold Temp 1 Fan Auto On System Cool Off Heat Descriptions 1 Fan switch-Selects automatic fan operation or fan on. 2 Set Schedule-Puts the thermostat into programming mode. 3 Set Clock/Day-Sets the clock and day. 4 Time Ahead and Back-Sets the time 9 ahead and back. 10 5 Program periods-Current program period or period being programmed. 11 6 Day of the week-Current day or day being programmed. 12 7 Time-Current time or program time. 8 Temperature-Room temperature or programmed temperature. 13...
... WAKE LEAVE RETURN SLEEP 4 Set Time Temp Mode 3 Clock/Day Run Program 2 Schedule Hold Temp 1 Fan Auto On System Cool Off Heat Descriptions 1 Fan switch-Selects automatic fan operation or fan on. 2 Set Schedule-Puts the thermostat into programming mode. 3 Set Clock/Day-Sets the clock and day. 4 Time Ahead and Back-Sets the time 9 ahead and back. 10 5 Program periods-Current program period or period being programmed. 11 6 Day of the week-Current day or day being programmed. 12 7 Time-Current time or program time. 8 Temperature-Room temperature or programmed temperature. 13...
Owner's Manual
Page 13
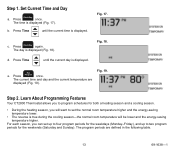
... current time is displayed. The current time and day and the current temperature are defined in the following table. 13 69-1638-1 Press Clock/Day again. Learn About Programming Features Your CT2800 Thermostat allows you to program schedules for both a heating season and a cooling season. • During the heating season, you can set up to four program periods for the weekends (Saturday and Sunday). b. Fig. 17. Run e. Press Program...
... current time is displayed. The current time and day and the current temperature are defined in the following table. 13 69-1638-1 Press Clock/Day again. Learn About Programming Features Your CT2800 Thermostat allows you to program schedules for both a heating season and a cooling season. • During the heating season, you can set up to four program periods for the weekends (Saturday and Sunday). b. Fig. 17. Run e. Press Program...
Owner's Manual
Page 14
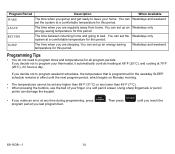
... can set the system at any lower than 45°F (7°C). • When pressing the buttons, use the ball of your thermostat, it automatically controls heating at 68°F (20°C), and cooling at a comfortable temperature for the weekday SLEEP schedule remains in effect until you reach the program period you are sleeping. Run Schedule • If you decide not to program times and temperatures for this...
... can set the system at any lower than 45°F (7°C). • When pressing the buttons, use the ball of your thermostat, it automatically controls heating at 68°F (20°C), and cooling at a comfortable temperature for the weekday SLEEP schedule remains in effect until you reach the program period you are sleeping. Run Schedule • If you decide not to program times and temperatures for this...
Owner's Manual
Page 15
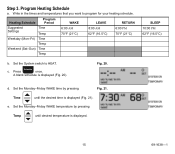
... (Mon-Fri) Time Temp Weekend (Sat-Sun) Time Temp b. Schedule c. Fig. 20. e. Set the System switch to program for your heating schedule. Set the Monday-Friday WAKE time by pressing Temp until the desired time is displayed (Fig. 21). SLEEP 10:00 PM 62°F (16.5°C) d. Set the Monday-Friday WAKE temperature by pressing Fig. 21. Write in the times and temperatures that you want to HEAT. A blank schedule is displayed. 15 69...
... (Mon-Fri) Time Temp Weekend (Sat-Sun) Time Temp b. Schedule c. Fig. 20. e. Set the System switch to program for your heating schedule. Set the Monday-Friday WAKE time by pressing Temp until the desired time is displayed (Fig. 21). SLEEP 10:00 PM 62°F (16.5°C) d. Set the Monday-Friday WAKE temperature by pressing Fig. 21. Write in the times and temperatures that you want to HEAT. A blank schedule is displayed. 15 69...
Owner's Manual
Page 17
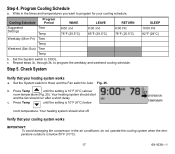
...-1638-1 Program Cooling Schedule a. Repeat steps 3c. through 3k. Step 5. c. Write in the air conditioner, do not operate the cooling system when the temperature outdoors is 10°F (6°C) above room temperature (Fig. 25). Step 4. c. to Auto. Verify that your cooling system works IMPORTANT: To avoid damaging the compressor in the times and temperatures you want to COOL. Set the System switch to Heat, and the Fan switch to program the weekday...
...-1638-1 Program Cooling Schedule a. Repeat steps 3c. through 3k. Step 5. c. Write in the air conditioner, do not operate the cooling system when the temperature outdoors is 10°F (6°C) above room temperature (Fig. 25). Step 4. c. to Auto. Verify that your cooling system works IMPORTANT: To avoid damaging the compressor in the times and temperatures you want to COOL. Set the System switch to Heat, and the Fan switch to program the weekday...
Owner's Manual
Page 18
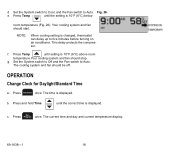
f. The time is changed, thermostat can delay up to five minutes before turning on air conditioner. Run c. NOTE: When cooling setting is displayed. This delay protects the compressor. g. Press Program once. Press Temp until the setting is displayed. Press and hold Time until setting is 10°F (6°C) above room temperature.Your cooling system and fan should be off. Press Temp until the correct time is 10°F (6°C) below room temperature (Fig. 26). OPERATION Change Clock for...
f. The time is changed, thermostat can delay up to five minutes before turning on air conditioner. Run c. NOTE: When cooling setting is displayed. This delay protects the compressor. g. Press Program once. Press Temp until the setting is displayed. Press and hold Time until setting is 10°F (6°C) above room temperature.Your cooling system and fan should be off. Press Temp until the correct time is 10°F (6°C) below room temperature (Fig. 26). OPERATION Change Clock for...
Owner's Manual
Page 19
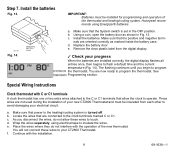
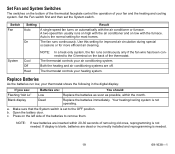
... the batteries to remove them. Set the Fan switch first and then set to the G terminal on the left side of the thermostat. System Cool Off Heat NOTE: In a heat-only system, the fan runs continuously only if the fan wire has been connected to the OFF position. b. Replace Batteries As the batteries run low, your fan and the heating and cooling system. The fan runs continuously. Switch Fan Setting Auto On Result A single-speed fan turns on automatically with the air conditioner or furnace. c.
... the batteries to remove them. Set the Fan switch first and then set to the G terminal on the left side of the thermostat. System Cool Off Heat NOTE: In a heat-only system, the fan runs continuously only if the fan wire has been connected to the OFF position. b. Replace Batteries As the batteries run low, your fan and the heating and cooling system. The fan runs continuously. Switch Fan Setting Auto On Result A single-speed fan turns on automatically with the air conditioner or furnace. c.
Owner's Manual
Page 20
d. Install new batteries. NOTE: If "bAt Lo" continues to display after replacing the batteries, set System switch to OFF, insert batteries backward, wait for current program period only. If leaving home for longer than a month, change to temperature lasts for five to ten seconds, and return batteries to lack of battery power in thermostat. IMPORTANT: Replace batteries once a year to prevent heating/cooling system from shutting down due to correct orientation. Press or until...
d. Install new batteries. NOTE: If "bAt Lo" continues to display after replacing the batteries, set System switch to OFF, insert batteries backward, wait for current program period only. If leaving home for longer than a month, change to temperature lasts for five to ten seconds, and return batteries to lack of battery power in thermostat. IMPORTANT: Replace batteries once a year to prevent heating/cooling system from shutting down due to correct orientation. Press or until...
Owner's Manual
Page 21
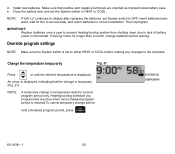
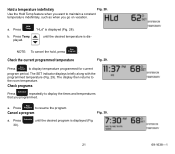
Use the Hold Temp feature when you want to the room temperature. Run NOTE: To cancel the hold, press Program . The display then returns to maintain a constant temperature indefinitely, such as when you programmed. b. The SET indicator displays briefly along with the programmed temperature (Fig. 29). Press Run Program to display the times and temperatures that you go on vacation. Run a. a. Press Temp . Press Schedule until the desired temperature is dis- "HLd" is displayed (Fig 30). 21 69...
Use the Hold Temp feature when you want to the room temperature. Run NOTE: To cancel the hold, press Program . The display then returns to maintain a constant temperature indefinitely, such as when you programmed. b. The SET indicator displays briefly along with the programmed temperature (Fig. 29). Press Run Program to display the times and temperatures that you go on vacation. Run a. a. Press Temp . Press Schedule until the desired temperature is dis- "HLd" is displayed (Fig 30). 21 69...
Owner's Manual
Page 22
... and PM indications are low; b. Display shows flashing "bAt Lo." • • Temperature change occurs at wrong • times Then... Make sure the batteries are correct. Remove batteries and insert backward for programming heating schedule or programming cooling schedule. Replace batteries correctly; Display does not come on . Temperature limit setting is 45°F to 88°F (7°C to reset thermostat. Reprogram if necessary. 69-1638-1 22 A blank program schedule is displayed and the program is canceled (Fig. 31). replace them as...
... and PM indications are low; b. Display shows flashing "bAt Lo." • • Temperature change occurs at wrong • times Then... Make sure the batteries are correct. Remove batteries and insert backward for programming heating schedule or programming cooling schedule. Replace batteries correctly; Display does not come on . Temperature limit setting is 45°F to 88°F (7°C to reset thermostat. Reprogram if necessary. 69-1638-1 22 A blank program schedule is displayed and the program is canceled (Fig. 31). replace them as...
Owner's Manual
Page 23
... the battery cover) - Allow time for heat at 1-800-468-1502. Press RUN PROGRAM to the thermostat. 23 69-1638-1 If desired, change the temperature setting. Be aware that might adversely affect thermostat operation. If display is blank or says "bAt Lo," install fresh batteries. Number of wires connected to check the current temperature setting. Check the system fuse or circuit breaker and replace or reset if necessary. During recovery from setback or setup, setting and displayed room temperatures...
... the battery cover) - Allow time for heat at 1-800-468-1502. Press RUN PROGRAM to the thermostat. 23 69-1638-1 If desired, change the temperature setting. Be aware that might adversely affect thermostat operation. If display is blank or says "bAt Lo," install fresh batteries. Number of wires connected to check the current temperature setting. Check the system fuse or circuit breaker and replace or reset if necessary. During recovery from setback or setup, setting and displayed room temperatures...


