
Owner's Manual
Page 1
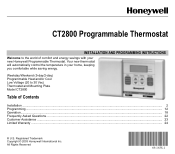
... Voltage (20 to the world of Contents Installation ...2 Programming...12 Operation...18 Frequently Asked Questions ...22 Customer Assistance ...23 Limited Warranty ...24 ® U.S. Registered Trademark Copyright © 2003 Honeywell International Inc. CT2800 Programmable Thermostat INSTALLATION AND PROGRAMMING INSTRUCTIONS Welcome to 30 Vac) Thermostat and Mounting Plate Model CT2800 Table of comfort and energy savings with your home...
... Voltage (20 to the world of Contents Installation ...2 Programming...12 Operation...18 Frequently Asked Questions ...22 Customer Assistance ...23 Limited Warranty ...24 ® U.S. Registered Trademark Copyright © 2003 Honeywell International Inc. CT2800 Programmable Thermostat INSTALLATION AND PROGRAMMING INSTRUCTIONS Welcome to 30 Vac) Thermostat and Mounting Plate Model CT2800 Table of comfort and energy savings with your home...
Owner's Manual
Page 3
...drill with CT2800? Save your heating and cooling systems are working properly. Gather the needed tools and supplies listed below 50°F (10°C). 3 69-1638-1 Required Tools and Supplies Optional Tools • Two AA alkaline batteries. Honeywell recommends Energizer.../air conditioning contractor-the problem may persist after you have the following parts: • Thermostat and mounting plate • Labels • Screws and anchors • Installation and Programming Instructions 2. Carefully unpack your contractor Step 1. Compatible with 3/16-inch or 7/32-inch...
...drill with CT2800? Save your heating and cooling systems are working properly. Gather the needed tools and supplies listed below 50°F (10°C). 3 69-1638-1 Required Tools and Supplies Optional Tools • Two AA alkaline batteries. Honeywell recommends Energizer.../air conditioning contractor-the problem may persist after you have the following parts: • Thermostat and mounting plate • Labels • Screws and anchors • Installation and Programming Instructions 2. Carefully unpack your contractor Step 1. Compatible with 3/16-inch or 7/32-inch...
Owner's Manual
Page 6
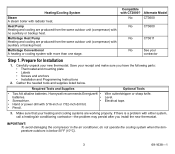
...DIP switches 1 and 2 on the back of the thermostat to set for Your Type of the room, and efficiently run the fan. Set Thermostat for a warm air, gas, or oil heating system. b. To program the thermostat, see Step 7. THERMOSTAT BACK DISPLAY F DISPLAY C 3 - NOTE: These ...DIP switches are factory-set your new thermostat for the type of fuel that your type ...
...DIP switches 1 and 2 on the back of the thermostat to set for Your Type of the room, and efficiently run the fan. Set Thermostat for a warm air, gas, or oil heating system. b. To program the thermostat, see Step 7. THERMOSTAT BACK DISPLAY F DISPLAY C 3 - NOTE: These ...DIP switches are factory-set your new thermostat for the type of fuel that your type ...
Owner's Manual
Page 9
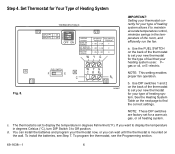
... must be installed for programming and operation of the new thermostat. Make sure that are connected to the heating/cooling system is set in Fig. 13. c. Remove the clear plastic label from the digital display. ✓ Check your new CT2800 Thermostat and must be insulated from...oriented correctly as shown in the OFF position. You will not connect these wires to avoid damaging your CT2800 Thermostat. Honeywell recommends using electrical tape to program the thermostat. Replace the battery door. Install the batteries Fig. 13. Special Wiring Instructions Clock...
... must be installed for programming and operation of the new thermostat. Make sure that are connected to the heating/cooling system is set in Fig. 13. c. Remove the clear plastic label from the digital display. ✓ Check your new CT2800 Thermostat and must be insulated from...oriented correctly as shown in the OFF position. You will not connect these wires to avoid damaging your CT2800 Thermostat. Honeywell recommends using electrical tape to program the thermostat. Replace the battery door. Install the batteries Fig. 13. Special Wiring Instructions Clock...
Owner's Manual
Page 12
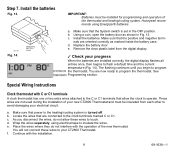
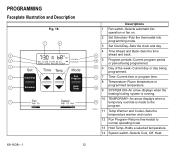
... warmer and cooler. 12 Run Program-Returns thermostat to the program. PROGRAMMING Faceplate Illustration and Description Fig. 16. 7 8 6 AM PM SET SYSTEM ON 5 MO TU WE TH FR SA SU TEMPORARY WAKE LEAVE RETURN SLEEP 4 Set Time Temp Mode 3 Clock/Day Run Program 2 Schedule Hold Temp 1 Fan... operation or fan on. 2 Set Schedule-Puts the thermostat into programming mode. 3 Set Clock/Day-Sets the clock and day. 4 Time Ahead and Back-Sets the time 9 ahead and back. 10 5 Program periods-Current program period or period being programmed. 11 6 Day of the week-Current day or ...
... warmer and cooler. 12 Run Program-Returns thermostat to the program. PROGRAMMING Faceplate Illustration and Description Fig. 16. 7 8 6 AM PM SET SYSTEM ON 5 MO TU WE TH FR SA SU TEMPORARY WAKE LEAVE RETURN SLEEP 4 Set Time Temp Mode 3 Clock/Day Run Program 2 Schedule Hold Temp 1 Fan... operation or fan on. 2 Set Schedule-Puts the thermostat into programming mode. 3 Set Clock/Day-Sets the clock and day. 4 Time Ahead and Back-Sets the time 9 ahead and back. 10 5 Program periods-Current program period or period being programmed. 11 6 Day of the week-Current day or ...
Owner's Manual
Page 13
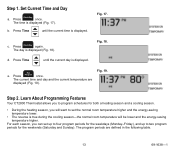
... the current time is displayed. Run e. Fig. 19. The day is displayed (Fig. 17). The time is displayed (Fig. 18). Learn About Programming Features Your CT2800 Thermostat allows you to program schedules for both a heating season and a cooling season. • During the heating season, you can set the normal room temperature higher and the...
... the current time is displayed. Run e. Fig. 19. The day is displayed (Fig. 17). The time is displayed (Fig. 18). Learn About Programming Features Your CT2800 Thermostat allows you to program schedules for both a heating season and a cooling season. • During the heating season, you can set the normal room temperature higher and the...
Owner's Manual
Page 14
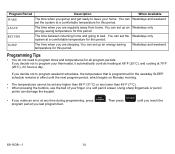
You can set the Weekdays only system at 78°F (26°C), 24 hours a day. Run Schedule • If you decide not to program your thermostat, it automatically controls heating at 68°F (20°C), and cooling at a comfortable temperature for this period. SLEEP The time when you are regularly away ...
You can set the Weekdays only system at 78°F (26°C), 24 hours a day. Run Schedule • If you decide not to program your thermostat, it automatically controls heating at 68°F (20°C), and cooling at a comfortable temperature for this period. SLEEP The time when you are regularly away ...
Owner's Manual
Page 18
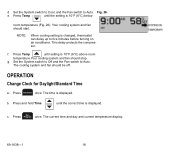
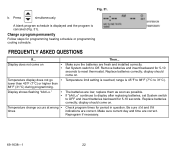
... Temp until the correct time is 10°F (6°C) below room temperature (Fig. 26). f. Press Clock/Day once. Run c. NOTE: When cooling setting is changed, thermostat can delay up to Auto. This delay protects the compressor. b. Fig. 26. Press and hold Time until the setting is displayed. g. d. Set the System switch... System switch to Off and the Fan switch to Auto. The cooling system and fan should start. OPERATION Change Clock for Daylight/Standard Time a. Press Program once.
... Temp until the correct time is 10°F (6°C) below room temperature (Fig. 26). f. Press Clock/Day once. Run c. NOTE: When cooling setting is changed, thermostat can delay up to Auto. This delay protects the compressor. b. Fig. 26. Press and hold Time until the setting is displayed. g. d. Set the System switch... System switch to Off and the Fan switch to Auto. The cooling system and fan should start. OPERATION Change Clock for Daylight/Standard Time a. Press Program once.
Owner's Manual
Page 20
Heating/cooling schedule you programmed resumes when next scheduled program period is displayed. Close the battery door and set the System switch to lack of battery power in thermostat. IMPORTANT: Replace batteries once a year to prevent heating/cooling system from shutting down due to HEAT or COOL. Press or until the desired temperature is...
Heating/cooling schedule you programmed resumes when next scheduled program period is displayed. Close the battery door and set the System switch to lack of battery power in thermostat. IMPORTANT: Replace batteries once a year to prevent heating/cooling system from shutting down due to HEAT or COOL. Press or until the desired temperature is...
Owner's Manual
Page 22
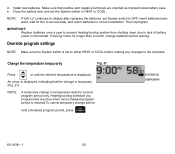
Fig. 31. Change a program permanently Follow steps for 5-10 seconds. display should come on. If "bAt Lo" continues to display after replacing batteries, set System switch to reset thermostat. Make sure current day and time are fresh and installed correctly. Display does not come on ...• • Temperature display does not go • lower than 45°F (7°C) or higher than 88°F (31°C) during programming. Replace batteries...
Fig. 31. Change a program permanently Follow steps for 5-10 seconds. display should come on. If "bAt Lo" continues to display after replacing batteries, set System switch to reset thermostat. Make sure current day and time are fresh and installed correctly. Display does not come on ...• • Temperature display does not go • lower than 45°F (7°C) or higher than 88°F (31°C) during programming. Replace batteries...
Owner's Manual
Page 23
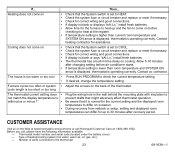
... to HEAT. If display is operating correctly. If temperature setting is higher than room temperature and SYSTEM ON arrow is displayed, thermostat is blank or displays "bAt Lo," install fresh batteries. Check the system fuse or circuit breaker and replace or reset if necessary.... If display is operating correctly. Contact ac contractor. Press RUN PROGRAM to 30 minutes after changing setting before checking for the current setting and the displayed room temperature to differ on the Web at www.honeywell.com/yourhome or call , please have the following information available:...
... to HEAT. If display is operating correctly. If temperature setting is higher than room temperature and SYSTEM ON arrow is displayed, thermostat is blank or displays "bAt Lo," install fresh batteries. Check the system fuse or circuit breaker and replace or reset if necessary.... If display is operating correctly. Contact ac contractor. Press RUN PROGRAM to 30 minutes after changing setting before checking for the current setting and the displayed room temperature to differ on the Web at www.honeywell.com/yourhome or call , please have the following information available:...


