
Owners Guide
Page 2
... Clock and Remote Control Batteries 17 Clock Battery ...17 Remote Control Batteries...18 Charging the Battery ...19 Charging Time...19 Operating Time ...19 Camcorder Batteries ...20 Using Battery Pack...20 Removing the Battery Pack ...21 Checking the Battery's Charge...21 Using Alternative Power Sources ...21 Using the AC Adapter/Charger...21 Using a Car Battery ...22 Inserting and Removing Cassettes 22 Inserting a Cassette ...22 Removing a Cassette...23 Protecting Recorded Material ...23 LCD Monitor ...24 Opening the LCD Monitor ...24 Adjusting the Brightness of the LCD Screen 24 Range...
... Clock and Remote Control Batteries 17 Clock Battery ...17 Remote Control Batteries...18 Charging the Battery ...19 Charging Time...19 Operating Time ...19 Camcorder Batteries ...20 Using Battery Pack...20 Removing the Battery Pack ...21 Checking the Battery's Charge...21 Using Alternative Power Sources ...21 Using the AC Adapter/Charger...21 Using a Car Battery ...22 Inserting and Removing Cassettes 22 Inserting a Cassette ...22 Removing a Cassette...23 Protecting Recorded Material ...23 LCD Monitor ...24 Opening the LCD Monitor ...24 Adjusting the Brightness of the LCD Screen 24 Range...
Owners Guide
Page 3
... a Tape in the Camcorder 53 Recording a Created Title while Transferring a Tape 53 Dubbing from the Camcorder to a VCR 53 Simple Programmable Edit (Edit remote control is optional accessory 54 Programming the Remote Control for the VCR 54 Operation ...56 To End Programmable Simple Edit 58 Using Audio/Video Dubbing...58 General Maintenance...60 Cleaning the Camcorder Heads...60 3 Making a Basic Recording ...30 Using Instant Review ...31 Using Auto Focus ...31 Using Manual Focus ...33 Using the Power Zoom ...33 Using the Digital Zoom ...33 Using...
... a Tape in the Camcorder 53 Recording a Created Title while Transferring a Tape 53 Dubbing from the Camcorder to a VCR 53 Simple Programmable Edit (Edit remote control is optional accessory 54 Programming the Remote Control for the VCR 54 Operation ...56 To End Programmable Simple Edit 58 Using Audio/Video Dubbing...58 General Maintenance...60 Cleaning the Camcorder Heads...60 3 Making a Basic Recording ...30 Using Instant Review ...31 Using Auto Focus ...31 Using Manual Focus ...33 Using the Power Zoom ...33 Using the Digital Zoom ...33 Using...
Owners Guide
Page 5
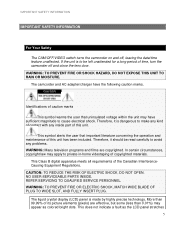
... the date/time feature unaffected. This Class B digital apparatus meets all requirements of copyrighted materials. WARNING: TO PREVENT FIRE OR ELECTRIC SHOCK, MATCH WIDE BLADE OF PLUG TO WIDE SLOT, AND FULLY INSERT PLUG. IMPORTANT SAFETY INFORMATION IMPORTANT SAFETY INFORMATION For Your Safety The CAM/OFF/VIDEO switch turns the camcorder on and off and close the lens door. The camcorder and AC adapter/charger have...
... the date/time feature unaffected. This Class B digital apparatus meets all requirements of copyrighted materials. WARNING: TO PREVENT FIRE OR ELECTRIC SHOCK, MATCH WIDE BLADE OF PLUG TO WIDE SLOT, AND FULLY INSERT PLUG. IMPORTANT SAFETY INFORMATION IMPORTANT SAFETY INFORMATION For Your Safety The CAM/OFF/VIDEO switch turns the camcorder on and off and close the lens door. The camcorder and AC adapter/charger have...

Owners Guide
Page 6
... that the cable ground shall be determined by the manufacture could cause the tape to stick to quality standards in a residential installation. Notes: • This unit uses 8mm video format cassettes. • It records and plays back in the SP mode (14.3 mm/sec). • It cannot record and play back in the viewfinder or LCD monitor. Give the camcorder 2 to 3 hours to operate the equipment...
... that the cable ground shall be determined by the manufacture could cause the tape to stick to quality standards in a residential installation. Notes: • This unit uses 8mm video format cassettes. • It records and plays back in the SP mode (14.3 mm/sec). • It cannot record and play back in the viewfinder or LCD monitor. Give the camcorder 2 to 3 hours to operate the equipment...

Owners Guide
Page 9
... video product through openings as opening or removing covers may expose you to its left to a professional antenna installer. e. Use of time, unplug it its normal operation. f. Never spill liquid of other controls may touch dangerous voltage points or short-out parts that the video product is damaged b. Refer all servicing to qualified service personnel under the following the operating instructions. When the power-supply cord or plug...
... video product through openings as opening or removing covers may expose you to its left to a professional antenna installer. e. Use of time, unplug it its normal operation. f. Never spill liquid of other controls may touch dangerous voltage points or short-out parts that the video product is damaged b. Refer all servicing to qualified service personnel under the following the operating instructions. When the power-supply cord or plug...
Owners Guide
Page 10
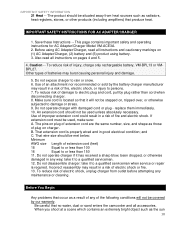
... 5. 4. Before You Begin Any problems that produce heat. IMPORTANT SAFETY INSTRUCTIONS FOR AC ADAPTER/CHARGER 1. replace them immediately. 10. That wire size should not be stepped on plug of electric shock or fire. 13. Do not operate charger if it to a qualified serviceman when service or repair is located so that no water, dust or sand enters the camcorder and all accessories. To...
... 5. 4. Before You Begin Any problems that produce heat. IMPORTANT SAFETY INSTRUCTIONS FOR AC ADAPTER/CHARGER 1. replace them immediately. 10. That wire size should not be stepped on plug of electric shock or fire. 13. Do not operate charger if it to a qualified serviceman when service or repair is located so that no water, dust or sand enters the camcorder and all accessories. To...

Owners Guide
Page 11
... to learn about these functions since they have been designed for use your business. You can use the video camcorder without reading this manual to specific information quickly (page 8). Quick Index Charging the Battery.....15 Setting the Date and Time.....22 Making a Basic Recording.....24 Zooming.....26 PlayBack.....28 Using the Wireless Remote Control.....42 Dubbing from camcorder to avoid shooting an excessive bright object directly. Try to VCR.....45 11 Be sure not...
... to learn about these functions since they have been designed for use your business. You can use the video camcorder without reading this manual to specific information quickly (page 8). Quick Index Charging the Battery.....15 Setting the Date and Time.....22 Making a Basic Recording.....24 Zooming.....26 PlayBack.....28 Using the Wireless Remote Control.....42 Dubbing from camcorder to avoid shooting an excessive bright object directly. Try to VCR.....45 11 Be sure not...
Owners Guide
Page 14
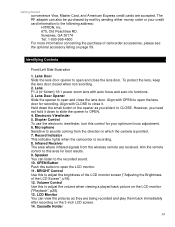
... listing on the LCD monitor ("Playback", p28). 13. Volume Control Use this to adjust the volume when viewing a played back picture on page 59. Record Indicator This indicator lights when the camcorder is pointed. 7. Electronic Viewfinder 5. LCD Monitor You can listen to OPEN. 4. To protect the lens, keep the lens door closed when not recording. 2. However, you slide it . Speaker You can view the pictures as you need not hold it...
... listing on the LCD monitor ("Playback", p28). 13. Volume Control Use this to adjust the volume when viewing a played back picture on page 59. Record Indicator This indicator lights when the camcorder is pointed. 7. Electronic Viewfinder 5. LCD Monitor You can listen to OPEN. 4. To protect the lens, keep the lens door closed when not recording. 2. However, you slide it . Speaker You can view the pictures as you need not hold it...
Owners Guide
Page 15
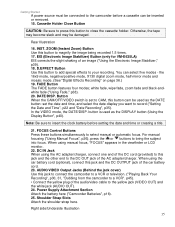
... the camcorder to a VCR". p45). • Connect the yellow plug of the car battery cord. 23. the 16x9 mode, negative/positive mode, X130 digital zoom mode, half-mirror mode and mosaic mode. (See "Digital Effects Recording" on page 36.) 19. Button When the CAM/OFF/VIDEO switch is used as the DATE button: set to CAM, this button cam be used as the DISPLAY button (Using the Display Button", p40). FOCUS Control Buttons Press these buttons simultaneously to insert the clock battery before a cassette can select five modes - Rear...
... the camcorder to a VCR". p45). • Connect the yellow plug of the car battery cord. 23. the 16x9 mode, negative/positive mode, X130 digital zoom mode, half-mirror mode and mosaic mode. (See "Digital Effects Recording" on page 36.) 19. Button When the CAM/OFF/VIDEO switch is used as the DATE button: set to CAM, this button cam be used as the DISPLAY button (Using the Display Button", p40). FOCUS Control Buttons Press these buttons simultaneously to insert the clock battery before a cassette can select five modes - Rear...
Owners Guide
Page 16
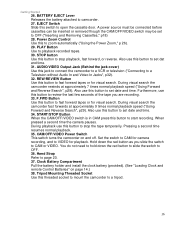
... connected before cassettes can be inserted or removed though the CAM/OFF/VIDEO switch may be set date and time. Power Zoom Control Use this to OFF ("Inserting and Removing Cassettes," p18) 28. AUDIO/VIDEO Output Jack (Behind the jack cover) Use this switch to camcorder. 27. Set the switch to CAM for playback. BATTERY EJECT Lever Releases the battery attached to open the cassette door. EJECT Switch Slide this jack to connect the camcorder to a VCR or television ("Connecting to VIDEO for camera recording, and to a Television without Audio...
... connected before cassettes can be inserted or removed though the CAM/OFF/VIDEO switch may be set date and time. Power Zoom Control Use this to OFF ("Inserting and Removing Cassettes," p18) 28. AUDIO/VIDEO Output Jack (Behind the jack cover) Use this switch to camcorder. 27. Set the switch to CAM for playback. BATTERY EJECT Lever Releases the battery attached to open the cassette door. EJECT Switch Slide this jack to connect the camcorder to a VCR or television ("Connecting to VIDEO for camera recording, and to a Television without Audio...

Owners Guide
Page 29
... CAM/OFF/VIDEO switch as you lower numbers. button while pressing the STOP button. button to correct. 3. Select the right month and press STOP button. The display changes and the internal clock starts. 6:30 AM 11/ 5/1997 Note: After the date and time are set the corrected date and time. 29 Move to where you need to make the correction with the "1" flashing. 12:00 AM 1/ 1/1997 3. Press the DATE/DISP. Use...
... CAM/OFF/VIDEO switch as you lower numbers. button while pressing the STOP button. button to correct. 3. Select the right month and press STOP button. The display changes and the internal clock starts. 6:30 AM 11/ 5/1997 Note: After the date and time are set the corrected date and time. 29 Move to where you need to make the correction with the "1" flashing. 12:00 AM 1/ 1/1997 3. Press the DATE/DISP. Use...

Owners Guide
Page 30
... plenty of time to shutter speed. 1. If you see in standby. 7. To open . Press the red button on the LCD monitor, leave the monitor open the lens door, slide the lens door opener to view the picture being recorded on the CAM/OFF/VIDEO switch as traffic or a short tour of a second). Press and hold the smal button in response to ensure connections are ready to a power source ("Loading Batteries; Note...
... plenty of time to shutter speed. 1. If you see in standby. 7. To open . Press the red button on the LCD monitor, leave the monitor open the lens door, slide the lens door opener to view the picture being recorded on the CAM/OFF/VIDEO switch as traffic or a short tour of a second). Press and hold the smal button in response to ensure connections are ready to a power source ("Loading Batteries; Note...

Owners Guide
Page 31
... recording. Set the camcorder to resume recording. Using Auto Focus 31 However, these stripes are recorded with the picture, so it press the Start/Stop button and the camera returns to view the last few seconds of the tape cassette. Note: "TAPE" flashes in normal playback mode. Using Instant Review Use this does not indicate a fault. Press the Start/Stop button to record/pause mode and tap the REW/REVIEW button. To restart it is opened or closed during recording, several white...
... recording. Set the camcorder to resume recording. Using Auto Focus 31 However, these stripes are recorded with the picture, so it press the Start/Stop button and the camera returns to view the last few seconds of the tape cassette. Note: "TAPE" flashes in normal playback mode. Using Instant Review Use this does not indicate a fault. Press the Start/Stop button to record/pause mode and tap the REW/REVIEW button. To restart it is opened or closed during recording, several white...

Owners Guide
Page 33
... LCD monitor, the digital zoom function shown below has been engaged. Using the Digital Zoom 33 You can adjust the focus manually. 2. When the power zoom switch is operated, the zoom position is in the viewfinder or LCD monitor for about 5 seconds and then disappears. Press the Focus control (far) or (near) button until the subject is displayed in focus. 4. Using the Power Zoom The power zoom W control widens the picture, moving the subject farther away, while the power zoom T control...
... LCD monitor, the digital zoom function shown below has been engaged. Using the Digital Zoom 33 You can adjust the focus manually. 2. When the power zoom switch is operated, the zoom position is in the viewfinder or LCD monitor for about 5 seconds and then disappears. Press the Focus control (far) or (near) button until the subject is displayed in focus. 4. Using the Power Zoom The power zoom W control widens the picture, moving the subject farther away, while the power zoom T control...

Owners Guide
Page 35
... see. Playback You can view recorded pictures on the CAM/OFF/VIDEO switch while sliding the switch to the position where you record a bright subject outdoors, the camcorder operating time will be distorted. Press the REW/REVIEW button to VIDEO. 3. Hold down the red button on the 3-inch LCD monitor immediately after recording. 1. Press the PLAY button and play back a recording by connecting the camcorder to your TV. To adjust the volume for the internal speaker, adjust the Volume control at...
... see. Playback You can view recorded pictures on the CAM/OFF/VIDEO switch while sliding the switch to the position where you record a bright subject outdoors, the camcorder operating time will be distorted. Press the REW/REVIEW button to VIDEO. 3. Hold down the red button on the 3-inch LCD monitor immediately after recording. 1. Press the PLAY button and play back a recording by connecting the camcorder to your TV. To adjust the volume for the internal speaker, adjust the Volume control at...

Owners Guide
Page 50
... time counter with memory is displayed as well. The linear time counter clears to operate the camcorder from a distance. This feature works in F.FWD as shown in the tape to return. Using the Wireless Remote Control Use the wireless remote control to "0:00:00". 2. Press the STOP button to stop playback, or press the start/stop recording and set the CAM/OFF/VIDEO switch to which you press the STOP button during date search mode. Note: If the recorded time...
... time counter with memory is displayed as well. The linear time counter clears to operate the camcorder from a distance. This feature works in F.FWD as shown in the tape to return. Using the Wireless Remote Control Use the wireless remote control to "0:00:00". 2. Press the STOP button to stop playback, or press the start/stop recording and set the CAM/OFF/VIDEO switch to which you press the STOP button during date search mode. Note: If the recorded time...

Owners Guide
Page 54
... the VM-RM20EDA edit remote control (optional) can monitor the tape being dubbed. Note: If the VCR is connected to a television and the VCR/TV selector is set to VIDEO. 4. Hold down the red button of the CAM/OFF/VIDEO switch while you slide the switch to VCR, you can be used with this camcorder. Insert the recorded tape in the camcorder input mode (consult your VCR manual for the VCR It is optional accessory...
... the VM-RM20EDA edit remote control (optional) can monitor the tape being dubbed. Note: If the VCR is connected to a television and the VCR/TV selector is set to VIDEO. 4. Hold down the red button of the CAM/OFF/VIDEO switch while you slide the switch to VCR, you can be used with this camcorder. Insert the recorded tape in the camcorder input mode (consult your VCR manual for the VCR It is optional accessory...

Owners Guide
Page 55
... VCR or not, point the remote control at the infrared receiver on the VCR and press the VCR SET button on the VCR and press the VCR SET button and hold it , then press the DISPLAY button. Turn the VCR on the VCR does not change after you have changed or the batteries are exposed to switch the remote control code of the VCR and camcorder are replaced. When the infrared receivers of your VCR. Especially, be operated...
... VCR or not, point the remote control at the infrared receiver on the VCR and press the VCR SET button on the VCR and press the VCR SET button and hold it , then press the DISPLAY button. Turn the VCR on the VCR does not change after you have changed or the batteries are exposed to switch the remote control code of the VCR and camcorder are replaced. When the infrared receivers of your VCR. Especially, be operated...

Owners Guide
Page 58
... microphone and camera onto a previously recorded tape in the camcorder input mode (consult your camcorder to the television, following "Connecting to stop dubbing. Using Audio/Video Dubbing Use audio/video dubbing to "0:00:00M". 7. This places the 58 Insert a previously recorded tape in the record pause mode, the VCR enters the record mode. Use the wireless remote control and press the PLAY button. Display the linear timer counter with Audio In and Video In Jacks" on the recording VCR to set the linear time counter to record audio...
... microphone and camera onto a previously recorded tape in the camcorder input mode (consult your camcorder to the television, following "Connecting to stop dubbing. Using Audio/Video Dubbing Use audio/video dubbing to "0:00:00M". 7. This places the 58 Insert a previously recorded tape in the record pause mode, the VCR enters the record mode. Use the wireless remote control and press the PLAY button. Display the linear timer counter with Audio In and Video In Jacks" on the recording VCR to set the linear time counter to record audio...
Owners Guide
Page 62
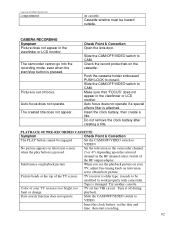
... outside. Set the CAM/OFF/VIDEO switch to the camcorder channel when the play button is pressed. (3 or 47) depending upon the selected channel in the RF channel select switch of your TV, adjust fine tuning knob on the cassette. Interference on television screen Set the television to VIDEO> No picture appears on playback picture. Tape is attached. Turn it . Insert the clock battery, set the date and time, then start /stop button is...
... outside. Set the CAM/OFF/VIDEO switch to the camcorder channel when the play button is pressed. (3 or 47) depending upon the selected channel in the RF channel select switch of your TV, adjust fine tuning knob on the cassette. Interference on television screen Set the television to VIDEO> No picture appears on playback picture. Tape is attached. Turn it . Insert the clock battery, set the date and time, then start /stop button is...


