
User Manual
Page 2
...5 INPUT Menu 30 Remote control 5 Color space, Component, Video format, Setting up 6 Frame lock, Information Arrangement 7 SETUP Menu 32 Adjusting the projector's elevator . . 8 Keystone, Whisper, Mirror, Volume About the filter cover for bottom-up use . . 9 Connecting your devices 10 Connecting... muting the sound . . . . 17 Troubleshooting 42 Selecting an input signal 17 Related messages 42 Searching an input signal 18 Regarding the indicator lamps. . . . 44 Selecting the aspect ratio 18 Phenomena that may easily be Adjusting the zoom and focus . . . . 18 mistaken for...
...5 INPUT Menu 30 Remote control 5 Color space, Component, Video format, Setting up 6 Frame lock, Information Arrangement 7 SETUP Menu 32 Adjusting the projector's elevator . . 8 Keystone, Whisper, Mirror, Volume About the filter cover for bottom-up use . . 9 Connecting your devices 10 Connecting... muting the sound . . . . 17 Troubleshooting 42 Selecting an input signal 17 Related messages 42 Searching an input signal 18 Regarding the indicator lamps. . . . 44 Selecting the aspect ratio 18 Phenomena that may easily be Adjusting the zoom and focus . . . . 18 mistaken for...
User Manual
Page 3
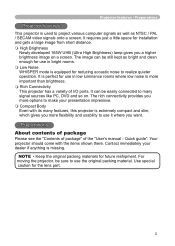
.... Contact immediately your presentation impressive. Compact Body Even with the items shown there. Use special caution for future reshipment. Your projector should come with its many signal sources like PC, DVD and so on a screen. It requires just a little space for reducing ...mode is equipped for installation and gets a large image from short distance. High Brightness Newly developed 165W UHB (Ultra High Brightness) lamp gives you want. Preparations About contents of package Please see the "Contents of package" of I/O ports. NOTE • Keep the original ...
.... Contact immediately your presentation impressive. Compact Body Even with the items shown there. Use special caution for future reshipment. Your projector should come with its many signal sources like PC, DVD and so on a screen. It requires just a little space for reducing ...mode is equipped for installation and gets a large image from short distance. High Brightness Newly developed 165W UHB (Ultra High Brightness) lamp gives you want. Preparations About contents of package Please see the "Contents of package" of I/O ports. NOTE • Keep the original ...
User Manual
Page 4
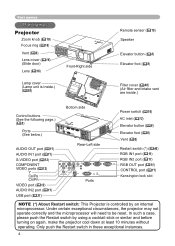
...push the Restart switch by an internal microprocessor. Part names Part names Projector Zoom knob (18) Focus ring (18) Vent (6) Lens cover (16) (Slide door) Lens (16) Lamp cover (Lamp unit is inside.) (38) Front-Right side Remote sensor (&#...slot NOTE (*) About Restart switch: This Projector is controlled by using a cocktail stick or similar and before turning on again, make the projector cool down at least 10 minutes without operating. Under certain exceptional circumstances, the projector may not operate correctly and the microprocessor ...
...push the Restart switch by an internal microprocessor. Part names Part names Projector Zoom knob (18) Focus ring (18) Vent (6) Lens cover (16) (Slide door) Lens (16) Lamp cover (Lamp unit is inside.) (38) Front-Right side Remote sensor (&#...slot NOTE (*) About Restart switch: This Projector is controlled by using a cocktail stick or similar and before turning on again, make the projector cool down at least 10 minutes without operating. Under certain exceptional circumstances, the projector may not operate correctly and the microprocessor ...
User Manual
Page 15
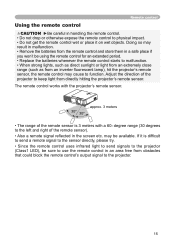
... keep light from an inverter fluorescent lamp), hit the projector's remote sensor, the remote control may cause to function. Doing ...'t be using the remote control for an extended period. • Replace the batteries whenever the remote control starts to the projector (Class1 LED), be available. If it on wet objects. approx. 3 meters 30º 30º • The...physical impact. • Do not get the remote control wet or place it is 3 meters with the projector's remote sensor. may result in malfunction. • Remove the batteries from the remote control and store them...
... keep light from an inverter fluorescent lamp), hit the projector's remote sensor, the remote control may cause to function. Doing ...'t be using the remote control for an extended period. • Replace the batteries whenever the remote control starts to the projector (Class1 LED), be available. If it on wet objects. approx. 3 meters 30º 30º • The...physical impact. • Do not get the remote control wet or place it is 3 meters with the projector's remote sensor. may result in malfunction. • Remove the batteries from the remote control and store them...
User Manual
Page 16
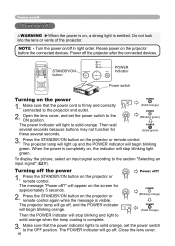
...in right order. To display the picture, select an input signal according to solid orange when the lamp cooling is firmly and correctly connected to the ON position. Power off ?" The projector lamp will light up and the POWER indicator will begin blinking orange. Press the STANDBY/ON button on the... remote control again while the message is emitted. Open the lens cover, and set the power switch to solid orange. The projector lamp will go off ? 1. Close the lens cover. 16 Power on/off Power on/off , and the POWER indicator will begin blinking green. Do ...
...in right order. To display the picture, select an input signal according to solid orange when the lamp cooling is firmly and correctly connected to the ON position. Power off ?" The projector lamp will light up and the POWER indicator will begin blinking orange. Press the STANDBY/ON button on the... remote control again while the message is emitted. Open the lens cover, and set the power switch to solid orange. The projector lamp will go off ? 1. Close the lens cover. 16 Power on/off Power on/off , and the POWER indicator will begin blinking green. Do ...
User Manual
Page 17
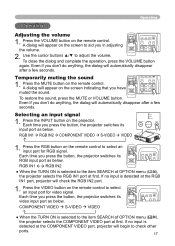
... the screen indicating that you don't do anything , the dialog will appear on the remote control to aid you press the button, the projector switches its input port as below. Press the VIDEO button on the remote control to adjust the volume. Operating Operating Adjusting the volume 1. ... sound, press the MUTE or VOLUME button. RGB IN1 RGB IN2 COMPONENT VIDEO S-VIDEO VIDEO STANDBY/ON LAMP TEMP POWER MENU INPUT 1. VIDEO STANDBY/ON RGB SEARCH ASPECT AUTO BLANK MAGNIFY HOME ON PAGE UP VOLUME OFF END PAGE DOWN MUTE FREEZE KEYSTONE...
... the screen indicating that you don't do anything , the dialog will appear on the remote control to aid you press the button, the projector switches its input port as below. Press the VIDEO button on the remote control to adjust the volume. Operating Operating Adjusting the volume 1. ... sound, press the MUTE or VOLUME button. RGB IN1 RGB IN2 COMPONENT VIDEO S-VIDEO VIDEO STANDBY/ON LAMP TEMP POWER MENU INPUT 1. VIDEO STANDBY/ON RGB SEARCH ASPECT AUTO BLANK MAGNIFY HOME ON PAGE UP VOLUME OFF END PAGE DOWN MUTE FREEZE KEYSTONE...
User Manual
Page 21
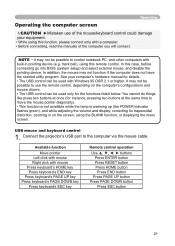
... instance, pressing two buttons at the same time to move the mouse pointer diagonally). • This function is not available while the lamp is warming up (the POWER indicator flashes green), and while adjusting the volume and display, correcting for trapezoidal distortion, zooming in...could damage your equipment. • While using this remote control. See your computer's hardware manual for the functions listed below. Connect the projector's USB port to control notebook PC, and other computers with Windows 95 OSR 2.1 or higher. track ball), using this function, please connect...
... instance, pressing two buttons at the same time to move the mouse pointer diagonally). • This function is not available while the lamp is warming up (the POWER indicator flashes green), and while adjusting the volume and display, correcting for trapezoidal distortion, zooming in...could damage your equipment. • While using this remote control. See your computer's hardware manual for the functions listed below. Connect the projector's USB port to control notebook PC, and other computers with Windows 95 OSR 2.1 or higher. track ball), using this function, please connect...

User Manual
Page 22
... and complete this operation. Each of PICTURE, IMAGE, INPUT, SETUP, ASPECT KEYSTONE MODE 4:3 +0 NORMAL SCREEN or OPTION. STANDBY/ON LAMP TEMP POWER MENU INPUT MENU button POSITION MENU Cursor buttons ENTER ENTER button ESC RESET RESET button VIDEO STANDBY/ON RGB SEARCH ASPECT AUTO ...remote control or one of the selected menu will appear. 5. TINT +0 SHRPNESS +3 3. Then press the cursor button ► on the projector or remote control, or the ENTER button on the remote control again to progress. WHISPER MIRROR RESET FILTER TIME LANGUAGE NORMAL NORMAL 0 ENGLISH The...
... and complete this operation. Each of PICTURE, IMAGE, INPUT, SETUP, ASPECT KEYSTONE MODE 4:3 +0 NORMAL SCREEN or OPTION. STANDBY/ON LAMP TEMP POWER MENU INPUT MENU button POSITION MENU Cursor buttons ENTER ENTER button ESC RESET RESET button VIDEO STANDBY/ON RGB SEARCH ASPECT AUTO ...remote control or one of the selected menu will appear. 5. TINT +0 SHRPNESS +3 3. Then press the cursor button ► on the projector or remote control, or the ENTER button on the remote control again to progress. WHISPER MIRROR RESET FILTER TIME LANGUAGE NORMAL NORMAL 0 ENGLISH The...

User Manual
Page 36
...down to the section "Turning off . It is the time counted after the last resetting. Please refer to automatically turn the projector off the power" (16). The lamp time is shown in the OPTION menu as the use time of following table. MENU [RGB] PICTURE IMAGE INPUT SETUP SCREEN OPTION... time is not turned off the automatic signal search function. Multifunctional settings OPTION Menu With the OPTION menu, items shown in order of the lamp. Then perform it referring to 0, the projector is set time, the projector lamp will stop searching and display the image.
...down to the section "Turning off . It is the time counted after the last resetting. Please refer to automatically turn the projector off the power" (16). The lamp time is shown in the OPTION menu as the use time of following table. MENU [RGB] PICTURE IMAGE INPUT SETUP SCREEN OPTION... time is not turned off the automatic signal search function. Multifunctional settings OPTION Menu With the OPTION menu, items shown in order of the lamp. Then perform it referring to 0, the projector is set time, the projector lamp will stop searching and display the image.

User Manual
Page 37
... buttons ▲/▼ switches the rotation speed of ghost using the buttons ◄/►. 2. Note that the projector is noisier when the HIGH is the time counted after the last resetting. Note that the items LAMP TIME, FILTER TIME and LANGUAGE are not reset. HIGH NORMAL GHOST 1. To reset the fi...
... buttons ▲/▼ switches the rotation speed of ghost using the buttons ◄/►. 2. Note that the projector is noisier when the HIGH is the time counted after the last resetting. Note that the items LAMP TIME, FILTER TIME and LANGUAGE are not reset. HIGH NORMAL GHOST 1. To reset the fi...

User Manual
Page 38
... lamp of the specified type. • If the lamp breaks soon after you to replace the lamp (see the section "Related Messages" and "Regarding the indicator Lamps"), replace the lamp as soon as damaging the lamp. • Never unscrew except the appointed (marked by an arrow) screws. • Do not open the lamp cover while the projector...
... lamp of the specified type. • If the lamp breaks soon after you to replace the lamp (see the section "Related Messages" and "Regarding the indicator Lamps"), replace the lamp as soon as damaging the lamp. • Never unscrew except the appointed (marked by an arrow) screws. • Do not open the lamp cover while the projector...

User Manual
Page 39
...previous process to replace the lamp. Center point of two claws to the projector, position the lamp cover on , and reset the lamp time using a minus screwdriver or similar, and remove the lamp cover. If the projector is facing up the lamp by arrow) of OPTION ...lamp cover using the LAMP TIME function of the lamp, and slowly pick up . 4. Claws Screws marked by yourself, 3. Allow the lamp to replace the lamp, replace the lamp as soon as possible. 1. Turn the projector on the projector. After making sure that the projector has cooled adequately, slowly turn the projector...
...previous process to replace the lamp. Center point of two claws to the projector, position the lamp cover on , and reset the lamp time using a minus screwdriver or similar, and remove the lamp cover. If the projector is facing up the lamp by arrow) of OPTION ...lamp cover using the LAMP TIME function of the lamp, and slowly pick up . 4. Claws Screws marked by yourself, 3. Allow the lamp to replace the lamp, replace the lamp as soon as possible. 1. Turn the projector on the projector. After making sure that the projector has cooled adequately, slowly turn the projector...

User Manual
Page 40
... without replacement, or neglect of resetting after replacement) will come even with the replacement lamp for malfunction prevention. 1. The care in the projector. When the indicators or a message prompts you replace the lamp. After making sure that the top is damaged or too soiled. Apply a vacuum ...up . 6. Please replace the air filter when it back into place, and push the points of specified type will result in , then allow the projector to cool sufficiently. CAUTION ►Please replace the air filter when it . 4. Position the cleaned...
... without replacement, or neglect of resetting after replacement) will come even with the replacement lamp for malfunction prevention. 1. The care in the projector. When the indicators or a message prompts you replace the lamp. After making sure that the top is damaged or too soiled. Apply a vacuum ...up . 6. Please replace the air filter when it back into place, and push the points of specified type will result in , then allow the projector to cool sufficiently. CAUTION ►Please replace the air filter when it . 4. Position the cleaned...

User Manual
Page 43
...fact that the power will break or burst, etc. This projector is equipped with an automatic shut-down function of usage, a lamp will no longer light up, or the lamp will automatically be turned off when lamp usage time has reached 2000 hours. AFTER CLEANING THE AIR FILTER...RESET THE FILTER TIMER. Description A note of this projector. 43 Lamps are major differences in product lifetimes; a lamp may thus fail to light even prior to the "Air Filter" section of precaution when cleaning the air filter. NOTE • A lamp has a finite product life. Troubleshooting Related ...
...fact that the power will break or burst, etc. This projector is equipped with an automatic shut-down function of usage, a lamp will no longer light up, or the lamp will automatically be turned off when lamp usage time has reached 2000 hours. AFTER CLEANING THE AIR FILTER...RESET THE FILTER TIMER. Description A note of this projector. 43 Lamps are major differences in product lifetimes; a lamp may thus fail to light even prior to the "Air Filter" section of precaution when cleaning the air filter. NOTE • A lamp has a finite product life. Troubleshooting Related ...

User Manual
Page 44
... respond in a standby state. POWER LAMP TEMP indicator indicator indicator Description Lighting Turned Turned The projector is in accordance with the instructions within the table. Lighting Turned Turned The projector is displayed after the treatment, please change the lamp by referring to the section "Power ...In Red Turned off Ordinary operations may be performed. After the projector has sufficiently cooled down, please make confirmation of the attachment state of the lamp cover. After the projector has sufficiently cooled down, please make confi...
... respond in a standby state. POWER LAMP TEMP indicator indicator indicator Description Lighting Turned Turned The projector is in accordance with the instructions within the table. Lighting Turned Turned The projector is displayed after the treatment, please change the lamp by referring to the section "Power ...In Red Turned off Ordinary operations may be performed. After the projector has sufficiently cooled down, please make confirmation of the attachment state of the lamp cover. After the projector has sufficiently cooled down, please make confi...

User Manual
Page 45
...20 minutes. Please use the unit within the usage temperature parameters (5°C to ON. Please immediately turn the power on again. 45 After the projector has sufficiently cooled down, please make confirmation that no foreign matter has become caught in Red There is a possibility that the... lamp cover, and then turn the power OFF, and clean or change the air filter by referring to reset the filter timer. After the projector has sufficiently cooled down , please make confirmation of the attachment state of the OPTION menu. Blinking In Red or ...
...20 minutes. Please use the unit within the usage temperature parameters (5°C to ON. Please immediately turn the power on again. 45 After the projector has sufficiently cooled down, please make confirmation that no foreign matter has become caught in Red There is a possibility that the... lamp cover, and then turn the power OFF, and clean or change the air filter by referring to reset the filter timer. After the projector has sufficiently cooled down , please make confirmation of the attachment state of the OPTION menu. Blinking In Red or ...

User Manual
Page 46
...not been properly fixed. After making sure that may easily be reset. Then, if the problem is no lamp and/or lamp cover, or either of SERVICE menu in . After the projector has sufficiently cooled down at least 20 minutes. Troubleshooting Phenomena that the smoke or odor has stopped, ... the following chart. The power switch is not plugged in the OPTION menu (37) to reset all settings to the on again. After the projector has sufficiently cooled down, please turn the power off, and allow the unit to [ | ] (On). Reference page 13 16 16 38, 39...
...not been properly fixed. After making sure that may easily be reset. Then, if the problem is no lamp and/or lamp cover, or either of SERVICE menu in . After the projector has sufficiently cooled down at least 20 minutes. Troubleshooting Phenomena that the smoke or odor has stopped, ... the following chart. The power switch is not plugged in the OPTION menu (37) to reset all settings to the on again. After the projector has sufficiently cooled down, please turn the power off, and allow the unit to [ | ] (On). Reference page 13 16 16 38, 39...

User Manual
Page 47
... settings, using the menu functions. Remove the lens cover. out appearance, or Color tone is working. The computer cannot detect the projector as a plug and play monitor. COLOR SPACE setting is dirty or misty. The lens is not suitable. Make sure that may ... lifetime. Troubleshooting Phenomena that the computer's can detect a plug and play 10 monitor using other plug and play monitor. Replace the lamp. 38, 39 Pictures appear blurry. Perform picture adjustments by referring to an extremely low level. dark. Correctly connect the connection cables....
... settings, using the menu functions. Remove the lens cover. out appearance, or Color tone is working. The computer cannot detect the projector as a plug and play monitor. COLOR SPACE setting is dirty or misty. The lens is not suitable. Make sure that may ... lifetime. Troubleshooting Phenomena that the computer's can detect a plug and play 10 monitor using other plug and play monitor. Replace the lamp. 38, 39 Pictures appear blurry. Perform picture adjustments by referring to an extremely low level. dark. Correctly connect the connection cables....

User Manual
Page 48
... crystal projector Liquid Crystal panel Panel size Drive system Pixels 1.8 cm (0.7 type) TFT active matrix ED-S3350: 480,000 pixels (800 horizontal x 600 vertical) ED-X3400/X3450: 786,432 pixels (1024 horizontal x 768 vertical) Lens Zoom lens F=1.7 ~ 1.9 f=21.8 ~ 26.2 mm Lamp 165W ...(Not including protruding parts) • Please refer to the "Troubleshooting" and run through the suggested checks. Stereo mini x1 Optional parts Lamp Air filter Others DT00671 NJ09702 • Please consult your dealer or the service company. Warranty And After-Service Warranty and after-...
... crystal projector Liquid Crystal panel Panel size Drive system Pixels 1.8 cm (0.7 type) TFT active matrix ED-S3350: 480,000 pixels (800 horizontal x 600 vertical) ED-X3400/X3450: 786,432 pixels (1024 horizontal x 768 vertical) Lens Zoom lens F=1.7 ~ 1.9 f=21.8 ~ 26.2 mm Lamp 165W ...(Not including protruding parts) • Please refer to the "Troubleshooting" and run through the suggested checks. Stereo mini x1 Optional parts Lamp Air filter Others DT00671 NJ09702 • Please consult your dealer or the service company. Warranty And After-Service Warranty and after-...


