Owners Guide
Page 7
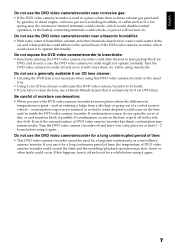
..., the external or internal terminals could corrode, which could corrode, so power will not turn it again. 7 Do not use the DVD video camera/recorder for a long uninterrupted period of time: • This DVD video camera/recorder cannot be faulty. • If you have to operate abnormally. If condensation occurs, do not open the cover of DVD video camera/recorder could exceed the limit and the recording/playback operation may remain inside the DVD video camera/recorder...
..., the external or internal terminals could corrode, which could corrode, so power will not turn it again. 7 Do not use the DVD video camera/recorder for a long uninterrupted period of time: • This DVD video camera/recorder cannot be faulty. • If you have to operate abnormally. If condensation occurs, do not open the cover of DVD video camera/recorder could exceed the limit and the recording/playback operation may remain inside the DVD video camera/recorder...
Owners Guide
Page 8
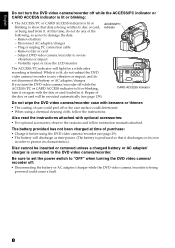
... charged at time of the disc or card will light for a while after recording is lit or blinking, turn the DVD video camera/recorder off or the case surface could deteriorate. • When using the DVD video camera/recorder (see page 29). • The battery will discharge as not to damage the data: − Remove battery − Disconnect AC adapter/charger − Plug or unplug PC connection cable − Remove disc or card − Subject DVD video camera/recorder to protect its characteristics.) Disc...
... charged at time of the disc or card will light for a while after recording is lit or blinking, turn the DVD video camera/recorder off or the case surface could deteriorate. • When using the DVD video camera/recorder (see page 29). • The battery will discharge as not to damage the data: − Remove battery − Disconnect AC adapter/charger − Plug or unplug PC connection cable − Remove disc or card − Subject DVD video camera/recorder to protect its characteristics.) Disc...

Owners Guide
Page 10
..., etc. In this DVD video camera/recorder. ●Cleaning LCD screen and camera lens Use dry, soft cloth to wipe dirt off. English CLEANING Be sure to set the power switch to "OFF" before cleaning this case, the recordable time on disc will decrease. • Be careful when removing the disc since the metal of removal slot of DVD video camera/ recorder, and disc itself, may be hot. ●Storing discs • When storing disc, replace it in the plastic...
..., etc. In this DVD video camera/recorder. ●Cleaning LCD screen and camera lens Use dry, soft cloth to wipe dirt off. English CLEANING Be sure to set the power switch to "OFF" before cleaning this case, the recordable time on disc will decrease. • Be careful when removing the disc since the metal of removal slot of DVD video camera/ recorder, and disc itself, may be hot. ●Storing discs • When storing disc, replace it in the plastic...

Owners Guide
Page 11
... ways to set up the DVD video camera/recorder, battery, and set the date/time. • The section on the LCD monitor or in hard disk; NOTE WHEN TRANSFERRING OR DISCARDING DISCS AND SD MEMORY CARDS • The "Format" function on -screen display of contents directing you , we have included following five chapters. • The section on "Setups" explains how to find the information you need: • A quick index for the information you use most...
... ways to set up the DVD video camera/recorder, battery, and set the date/time. • The section on the LCD monitor or in hard disk; NOTE WHEN TRANSFERRING OR DISCARDING DISCS AND SD MEMORY CARDS • The "Format" function on -screen display of contents directing you , we have included following five chapters. • The section on "Setups" explains how to find the information you need: • A quick index for the information you use most...
Owners Guide
Page 13
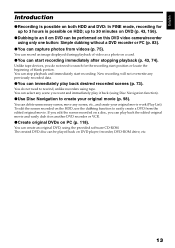
... HDD, use the dubbing function to create your original movie work (Play List). You can immediately play it back (using the provided software CD-ROM. Unlike tape devices, you do not need to search for up to 30 minutes on DVD (p. 43, 156). ●Dubbing to an 8 cm DVD can be performed on this DVD video camera/recorder using tape. The created DVD disc can capture photos from the edited original movie. up to rewind, unlike recorders using...
... HDD, use the dubbing function to create your original movie work (Play List). You can immediately play it back (using the provided software CD-ROM. Unlike tape devices, you do not need to search for up to 30 minutes on DVD (p. 43, 156). ●Dubbing to an 8 cm DVD can be performed on this DVD video camera/recorder using tape. The created DVD disc can capture photos from the edited original movie. up to rewind, unlike recorders using...
Owners Guide
Page 14
... 29 CHARGING BATTERY 29 ATTACHING BATTERY TO DVD VIDEO CAMERA/RECORDER 30 REMOVING BATTERY 30 BATTERY REMAINING LEVEL INDICATOR...... 32 EFFICIENT USE OF BATTERY 32 Turning DVD Video Camera/Recorder On and Off 33 Viewing Images 34 VIEWING IMAGE ON LCD MONITOR SCREEN 34 VIEWING SUBJECT THROUGH VIEWFINDER 34 Setting Date and Time 35 CHANGING DISPLAY FORMAT OF DATE AND TIME 35 Initial Settings 36 SWITCHING OPERATING SOUND ON OR OFF (BEEP 36 TURNING DVD VIDEO CAMERA/RECORDER OFF AUTOMATICALLY (POWER SAVE) ........ 36 CHANGING DISPLAY LANGUAGE (LANGUAGE 36 RESETTING MENU SETTINGS TO...
... 29 CHARGING BATTERY 29 ATTACHING BATTERY TO DVD VIDEO CAMERA/RECORDER 30 REMOVING BATTERY 30 BATTERY REMAINING LEVEL INDICATOR...... 32 EFFICIENT USE OF BATTERY 32 Turning DVD Video Camera/Recorder On and Off 33 Viewing Images 34 VIEWING IMAGE ON LCD MONITOR SCREEN 34 VIEWING SUBJECT THROUGH VIEWFINDER 34 Setting Date and Time 35 CHANGING DISPLAY FORMAT OF DATE AND TIME 35 Initial Settings 36 SWITCHING OPERATING SOUND ON OR OFF (BEEP 36 TURNING DVD VIDEO CAMERA/RECORDER OFF AUTOMATICALLY (POWER SAVE) ........ 36 CHANGING DISPLAY LANGUAGE (LANGUAGE 36 RESETTING MENU SETTINGS TO...
Owners Guide
Page 15
... LCD MONITOR LIGHT 61 ADJUSTING COLOR (WHITE BALANCE).......... 61 USING THE ELECTRONIC IMAGE STABILIZER (EIS 63 RECORDING SUBJECT USING LARGE MAGNIFICATION (DIGITAL ZOOM 63 REDUCING WIND NOISE DURING RECORDING (MIC.FILTER 63 Setting Up Record Functions 64 SWITCHING MOVIE QUALITY (VIDEO MODE 64 SETTING TO WIDE TV SCREEN MODE (16:9 MODE 65 SWITCHING QUALITY OF STILL IMAGE (QUALITY 67 RECEIVING IMAGE FROM ANOTHER DEVICE (INPUT SOURCE 67 SWITCHING EXTERNAL INPUT RECORDING METHOD (PHOTO INPUT 68 SELF-TIMER 68 SETTING ON-SCREEN DISPLAY OUTPUT ON OR OFF (OSD OUTPUT 69 DROP DETECTION (HDD...
... LCD MONITOR LIGHT 61 ADJUSTING COLOR (WHITE BALANCE).......... 61 USING THE ELECTRONIC IMAGE STABILIZER (EIS 63 RECORDING SUBJECT USING LARGE MAGNIFICATION (DIGITAL ZOOM 63 REDUCING WIND NOISE DURING RECORDING (MIC.FILTER 63 Setting Up Record Functions 64 SWITCHING MOVIE QUALITY (VIDEO MODE 64 SETTING TO WIDE TV SCREEN MODE (16:9 MODE 65 SWITCHING QUALITY OF STILL IMAGE (QUALITY 67 RECEIVING IMAGE FROM ANOTHER DEVICE (INPUT SOURCE 67 SWITCHING EXTERNAL INPUT RECORDING METHOD (PHOTO INPUT 68 SELF-TIMER 68 SETTING ON-SCREEN DISPLAY OUTPUT ON OR OFF (OSD OUTPUT 69 DROP DETECTION (HDD...
Owners Guide
Page 17
Power cable: Connect between household AC outlet and AC adapter/charger. Use to control the DVD video camera/ recorder from shoulder. To power the remote control. Used when viewing the picture played back on the DVD video camera/recorder on TV screen, or output video to another video device. Battery (model DZ-BP07PW): For DZ-HS300A only. Infrared remote control (model DZ-RM4W): For DZ-HS303A only. AV/S output cable: For DZ-HS300A only. DVD video camera/recorder to PC. Disc cleaning cloth: Always use . Charge it before use this DVD video camera/recorder. ...
Power cable: Connect between household AC outlet and AC adapter/charger. Use to control the DVD video camera/ recorder from shoulder. To power the remote control. Used when viewing the picture played back on the DVD video camera/recorder on TV screen, or output video to another video device. Battery (model DZ-BP07PW): For DZ-HS300A only. Infrared remote control (model DZ-RM4W): For DZ-HS303A only. AV/S output cable: For DZ-HS300A only. DVD video camera/recorder to PC. Disc cleaning cloth: Always use . Charge it before use this DVD video camera/recorder. ...
Owners Guide
Page 35
.... English HDD 12/3 Setting Date and Time Set the current date and time so that is exhausted, the date and time will appear. Use f / e / d / c buttons to select, and then press A to designate. 1 Press the MENU button, use the f/e/ d/c buttons to the desired date display mode. The screen for verifying the set . CHANGING DISPLAY FORMAT OF DATE AND TIME You can be reset. If this , every 6 months, connect the AC adapter/charger to DVD video camera/recorder and connect them to AC outlet, or attach a charged battery to...
.... English HDD 12/3 Setting Date and Time Set the current date and time so that is exhausted, the date and time will appear. Use f / e / d / c buttons to select, and then press A to designate. 1 Press the MENU button, use the f/e/ d/c buttons to the desired date display mode. The screen for verifying the set . CHANGING DISPLAY FORMAT OF DATE AND TIME You can be reset. If this , every 6 months, connect the AC adapter/charger to DVD video camera/recorder and connect them to AC outlet, or attach a charged battery to...

Owners Guide
Page 41
... not remove the battery or disconnect the AC adapter/charger during removal of the disc or until power is completely turned off even if the power switch is set to use . Se l ec t r eco r d f o rma t . The disc will be made usable on this DVD video camera/recorder. However, if data from PC: While the "Format DVD" screen is displayed, choose "No" and then press A button, or press the C button. When using DVD-RW) When recording data from PC...
... not remove the battery or disconnect the AC adapter/charger during removal of the disc or until power is completely turned off even if the power switch is set to use . Se l ec t r eco r d f o rma t . The disc will be made usable on this DVD video camera/recorder. However, if data from PC: While the "Format DVD" screen is displayed, choose "No" and then press A button, or press the C button. When using DVD-RW) When recording data from PC...
Owners Guide
Page 43
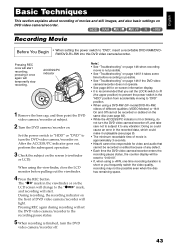
... the screen (viewfinder or LCD). HDD 12/ Recording Movie Before You Begin • When setting the power switch to any defect. • Each time the DVD video camera/recorder enters the recording pause status, the counter display will temporarily stop recording. Pressing REC once will light. Pressing REC again during recording will set the DVD video camera/recorder to the recording pause status. 5 When recording is short or you set the LOCK switch to L (the upper position) to prevent the power switch in the recorded data...
... the screen (viewfinder or LCD). HDD 12/ Recording Movie Before You Begin • When setting the power switch to any defect. • Each time the DVD video camera/recorder enters the recording pause status, the counter display will temporarily stop recording. Pressing REC once will light. Pressing REC again during recording will set the DVD video camera/recorder to the recording pause status. 5 When recording is short or you set the LOCK switch to L (the upper position) to prevent the power switch in the recorded data...
Owners Guide
Page 52
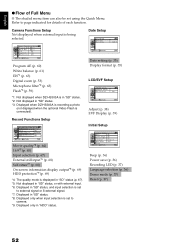
... Eng l i s h Auto Beep (p. 36) Power save (p. 36) Recording LED (p. 37) Language selection (p. 36) Demo mode (p. 37) Reset (p. 37) 52 Date Setup Da t e Se t up Da t e Se t Da t e Mod e M/D/Y ENTER RETURN Date setting (p. 35) Display format (p. 35) LCD/EVF Setup LCD / EVF Se t u p L CD / EVF Ad j u s t EVF D i s p l a y Aut o ENTER RETURN Adjust (p. 38) EVF Display (p. 39) Initial Setup I NE 16:9 On Input Sou r ce CAMERA OSD Ou t pu t On HDD P r o t e c t i o n On ENTER RETURN Movie quality*4 (p. 64...
... Eng l i s h Auto Beep (p. 36) Power save (p. 36) Recording LED (p. 37) Language selection (p. 36) Demo mode (p. 37) Reset (p. 37) 52 Date Setup Da t e Se t up Da t e Se t Da t e Mod e M/D/Y ENTER RETURN Date setting (p. 35) Display format (p. 35) LCD/EVF Setup LCD / EVF Se t u p L CD / EVF Ad j u s t EVF D i s p l a y Aut o ENTER RETURN Adjust (p. 38) EVF Display (p. 39) Initial Setup I NE 16:9 On Input Sou r ce CAMERA OSD Ou t pu t On HDD P r o t e c t i o n On ENTER RETURN Movie quality*4 (p. 64...
Owners Guide
Page 59
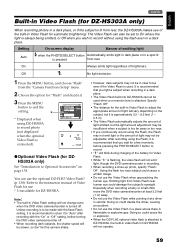
... PHOTO/SELECT button to record. • " ( " will blink during charging of the battery for Video Flash. • While " ( " is flashing, the video flash will not operate. 59 Unless recording is to be in clear focus even if the Video Flash is used when a conversion lens is attached: Specify "Flash: Off" • The distance for the built-in Video Flash to adjust the appropriate amount of light will not change even when the DVD video camera/recorder is turned off. Zoom...
... PHOTO/SELECT button to record. • " ( " will blink during charging of the battery for Video Flash. • While " ( " is flashing, the video flash will not operate. 59 Unless recording is to be in clear focus even if the Video Flash is used when a conversion lens is attached: Specify "Flash: Off" • The distance for the built-in Video Flash to adjust the appropriate amount of light will not change even when the DVD video camera/recorder is turned off. Zoom...

Owners Guide
Page 116
Typical copyright protected images include those of DVD video, LD, recorded video tapes, some parts of this DVD video camera/ recorder. 3 Press the REC button. Press the PHOTO/SELECT button when recording a photo. Note: • Reduce the volume of this line-input recording is the same as when playing back camera images recorded on camcorders for recording movie. "COPY PROTECTED" appears in images recorded on camcorder for Recordable Media) is used. • When recorded images are played back on PC, black bands may appear at the top/bottom and...
Typical copyright protected images include those of DVD video, LD, recorded video tapes, some parts of this DVD video camera/ recorder. 3 Press the REC button. Press the PHOTO/SELECT button when recording a photo. Note: • Reduce the volume of this line-input recording is the same as when playing back camera images recorded on camcorders for recording movie. "COPY PROTECTED" appears in images recorded on camcorder for Recordable Media) is used. • When recorded images are played back on PC, black bands may appear at the top/bottom and...
Owners Guide
Page 118
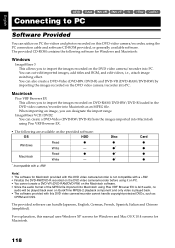
... designate the import range. For explanation, this manual uses Windows XP screens for Windows and Mac OS X 10.4 screens for Windows and Macintosh: Windows ImageMixer 3 This allows you to import the images recorded on the DVD video camera/recorder into PC. English HDD 12/3 Connecting to PC Connecting to PC Software Provided You can utilize on PC the videos and photos recorded on this DVD video camera/recorder, using Pixe VRF Browser EX is AC3 audio, no audio will be played back even...
... designate the import range. For explanation, this manual uses Windows XP screens for Windows and Mac OS X 10.4 screens for Windows and Macintosh: Windows ImageMixer 3 This allows you to import the images recorded on the DVD video camera/recorder into PC. English HDD 12/3 Connecting to PC Connecting to PC Software Provided You can utilize on PC the videos and photos recorded on this DVD video camera/recorder, using Pixe VRF Browser EX is AC3 audio, no audio will be played back even...
Owners Guide
Page 132
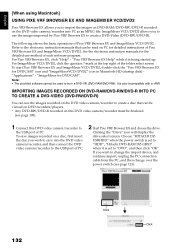
... Pixe VRF Browser EX allows you to import the images on DVD-RAM/DVD-RW/DVD-R recorded on the DVD video camera/recorder into the DVD video camera/recorder, and then connect the DVD video camera/recorder to the USB port of PC. 2 Start Pixe VRF Browser EX and choose the drive. The following shows the basic operations of the folder select screen. See the electronic instruction manuals for DVDCAM" icon and "ImageMixerVCD/DVD2" icon...
... Pixe VRF Browser EX allows you to import the images on DVD-RAM/DVD-RW/DVD-R recorded on the DVD video camera/recorder into the DVD video camera/recorder, and then connect the DVD video camera/recorder to the USB port of PC. 2 Start Pixe VRF Browser EX and choose the drive. The following shows the basic operations of the folder select screen. See the electronic instruction manuals for DVDCAM" icon and "ImageMixerVCD/DVD2" icon...
Owners Guide
Page 137
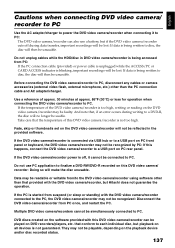
... the PC connection cable (provided) or power cable is unplugged while the ACCESS/PC or CARD ACCESS indicator is blinking, important recordings will be lost : If data is too high, writing or reading on the software provided with the DVD video camera/recorder connected to the PC, the DVD video camera/recorder may be recognized: Disconnect the DVD video camera/recorder from /to PC. Multiple DVD video camera/recorders cannot be simultaneously connected to PC, disconnect any cables or camera accessories (external video flash, external microphone, etc...
... the PC connection cable (provided) or power cable is unplugged while the ACCESS/PC or CARD ACCESS indicator is blinking, important recordings will be lost : If data is too high, writing or reading on the software provided with the DVD video camera/recorder connected to the PC, the DVD video camera/recorder may be recognized: Disconnect the DVD video camera/recorder from /to PC. Multiple DVD video camera/recorders cannot be simultaneously connected to PC, disconnect any cables or camera accessories (external video flash, external microphone, etc...
Owners Guide
Page 147
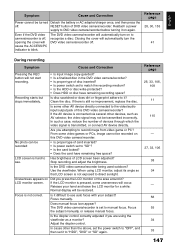
... disc in the DVD video camera/recorder? • Is proper type of card inserted? • Is power switch set to blink. Clean the disc. In such a case, reduce the number of LCD screen been adjusted? Use the viewfinder. Does manual focus icon appear? Reference page 28, 30, 153 41 During recording Symptom Cause and Correction Pressing the REC button will cause the ACCESS/PC indicator to match the recording medium? • Is the HDD or disc write...
... disc in the DVD video camera/recorder? • Is proper type of card inserted? • Is power switch set to blink. Clean the disc. In such a case, reduce the number of LCD screen been adjusted? Use the viewfinder. Does manual focus icon appear? Reference page 28, 30, 153 41 During recording Symptom Cause and Correction Pressing the REC button will cause the ACCESS/PC indicator to match the recording medium? • Is the HDD or disc write...
Owners Guide
Page 150
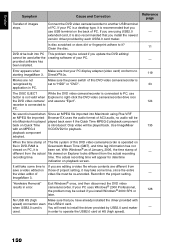
... a desktop type, it is recommended that you use button is operated on file in PC. when USB2.0 card is connected to "HDD" or "DVD". playback component adopted. The actual recording time will need to right-click the DVD video camera/recorder drive icon the DVD video camera/ and execute "Eject". recorder is You will appear for playback. Clean the disc. Make sure the power switch of ImageMixer 3. If your PC display adapter (video card) conforms to another USB terminal of images stops. Reconfirm the project setting.
... a desktop type, it is recommended that you use button is operated on file in PC. when USB2.0 card is connected to "HDD" or "DVD". playback component adopted. The actual recording time will need to right-click the DVD video camera/recorder drive icon the DVD video camera/ and execute "Eject". recorder is You will appear for playback. Clean the disc. Make sure the power switch of ImageMixer 3. If your PC display adapter (video card) conforms to another USB terminal of images stops. Reconfirm the project setting.
Owners Guide
Page 153
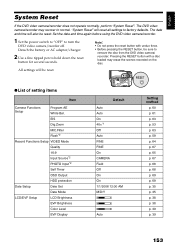
...2 Use a fine tipped pen to turn the DVD video camera/reorder off. All settings will be sure to remove the disc from the DVD video camera/ recorder: Pressing the RESET button with undue force. • Before pressing the RESET button, be reset. ●List of setting items Item Camera Functions Setup Program AE White Bal. ElS Dig.Zoom MIC.Filter Flash*2 Record Functions Setup VIDEO Mode Quality 16:9 Input Source*2 PHOTO Input*2 Self Timer OSD Output HDD protection Date Setup Date Set Date Mode LCD/EVF Setup LCD Brightness EVF Brightness Color Level EVF Display...
...2 Use a fine tipped pen to turn the DVD video camera/reorder off. All settings will be sure to remove the disc from the DVD video camera/ recorder: Pressing the RESET button with undue force. • Before pressing the RESET button, be reset. ●List of setting items Item Camera Functions Setup Program AE White Bal. ElS Dig.Zoom MIC.Filter Flash*2 Record Functions Setup VIDEO Mode Quality 16:9 Input Source*2 PHOTO Input*2 Self Timer OSD Output HDD protection Date Setup Date Set Date Mode LCD/EVF Setup LCD Brightness EVF Brightness Color Level EVF Display...


