Owners Guide
Page 7
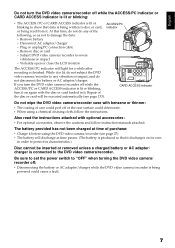
... after recording is finished. The battery provided has not been charged at time of purchase: • Charge it before using a chemical cleaning cloth, follow instruction manuals attached. While it is lit, do not disconnect the battery or AC adapter/charger. At this time, do not do any vibration or impact, and...
... after recording is finished. The battery provided has not been charged at time of purchase: • Charge it before using a chemical cleaning cloth, follow instruction manuals attached. While it is lit, do not disconnect the battery or AC adapter/charger. At this time, do not do any vibration or impact, and...

Owners Guide
Page 10
...) and how to install the software included. • "Subsidiary Information" includes an introduction to products sold separately, and troubleshooting. We want this manual, and get to know your business. English DISC CLEANING Use the disc cleaning cloth provided to lightly wipe off any dirt adhering to the disc...section on the LCD monitor or in the figure. Do not wipe the disc with water so that no detergent remains). Get to know Hitachi. It is possible to be as helpful as shown in the viewfinder. Lightly wash the dirty cleaning cloth with detergent: The dirt removal capacity...
...) and how to install the software included. • "Subsidiary Information" includes an introduction to products sold separately, and troubleshooting. We want this manual, and get to know your business. English DISC CLEANING Use the disc cleaning cloth provided to lightly wipe off any dirt adhering to the disc...section on the LCD monitor or in the figure. Do not wipe the disc with water so that no detergent remains). Get to know Hitachi. It is possible to be as helpful as shown in the viewfinder. Lightly wash the dirty cleaning cloth with detergent: The dirt removal capacity...

Owners Guide
Page 11
...;Displays in this manual Understand that the displays are different from those you use. ●Illustrations in this text. 11 The illustrations of DZ-GX3300A are used in the viewfinder or on the LCD screen. ●Notation of cancel button Press the STOP/EXIT button to stop your operation ...midway, or return the menu screen to match the disc or card you will be used for the explanation in this manual Although the external appearances of DZ-GX3300A/GX3200A/GX3100A/BX35A are different, the method of operating these models is compatible with disc or card used.
...;Displays in this manual Understand that the displays are different from those you use. ●Illustrations in this text. 11 The illustrations of DZ-GX3300A are used in the viewfinder or on the LCD screen. ●Notation of cancel button Press the STOP/EXIT button to stop your operation ...midway, or return the menu screen to match the disc or card you will be used for the explanation in this manual Although the external appearances of DZ-GX3300A/GX3200A/GX3100A/BX35A are different, the method of operating these models is compatible with disc or card used.

Owners Guide
Page 12
... Cautions When Using 5 Cautions When Storing 8 Suggestions and Restrictions 8 CLEANING 9 HANDLING DISCS 9 DISC CLEANING 10 Read This First 10 About This Manual 11 Table of Contents 12 Checking Provided Accessories 15 Names of Parts 16 Setups Demonstration Function 20 Setting Up the DVD Video Camera/Recorder.. 20... DURING RECORDING 53 Adjusting Brightness of Image to be recorded (Exposure 55 Compensating for Backlight 55 Built-in Video Flash (for DZ-GX3300A only) .... 56 Setting Up Camera Functions 57 SELECTING SHOOTING MODE TO MATCH THE SUBJECT (SWITCHING PROGRAM AE MODE 57 ...
... Cautions When Using 5 Cautions When Storing 8 Suggestions and Restrictions 8 CLEANING 9 HANDLING DISCS 9 DISC CLEANING 10 Read This First 10 About This Manual 11 Table of Contents 12 Checking Provided Accessories 15 Names of Parts 16 Setups Demonstration Function 20 Setting Up the DVD Video Camera/Recorder.. 20... DURING RECORDING 53 Adjusting Brightness of Image to be recorded (Exposure 55 Compensating for Backlight 55 Built-in Video Flash (for DZ-GX3300A only) .... 56 Setting Up Camera Functions 57 SELECTING SHOOTING MODE TO MATCH THE SUBJECT (SWITCHING PROGRAM AE MODE 57 ...
Owners Guide
Page 16
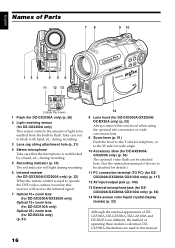
...(p. 32) Although the external appearances of operating these models is identical. DZGX3300A illustrations are different, the method of DZGX3300A, DZ-GX3200A, DZ-GX3100A and DZ-BX35A are used to block with hand, etc. during recording. 3 Lens cap string attachment hole (p. 21) 4 Stereo microphone... receive the infrared signal. 7 Optical 10× zoom lens (for DZ-GX3300A/GX3200A only) Optical 15× zoom lens (for DZ-GX3100A only) Optical 25× zoom lens (for DZ-BX35A only) (p. 51) 14 8 Lens hood (for DZ-GX3300A/GX3200A/ DZ-BX35A only) (p. 52) Always remove this manual. 16
...(p. 32) Although the external appearances of operating these models is identical. DZGX3300A illustrations are different, the method of DZGX3300A, DZ-GX3200A, DZ-GX3100A and DZ-BX35A are used to block with hand, etc. during recording. 3 Lens cap string attachment hole (p. 21) 4 Stereo microphone... receive the infrared signal. 7 Optical 10× zoom lens (for DZ-GX3300A/GX3200A only) Optical 15× zoom lens (for DZ-GX3100A only) Optical 25× zoom lens (for DZ-BX35A only) (p. 51) 14 8 Lens hood (for DZ-GX3300A/GX3200A/ DZ-BX35A only) (p. 52) Always remove this manual. 16

Owners Guide
Page 18
... 41 42 43 28 FINALIZE button (p. 102) Press this button to finalize the recorded DVD-RW/DVD-R/+RW. 29 FOCUS button (p. 53) To switch between manual focus and autofocus. 30 MENU button (p. 49, 80) Press this button to display the menu for setting camera functions and Disc Navigation. 31 SELECT button...
... 41 42 43 28 FINALIZE button (p. 102) Press this button to finalize the recorded DVD-RW/DVD-R/+RW. 29 FOCUS button (p. 53) To switch between manual focus and autofocus. 30 MENU button (p. 49, 80) Press this button to display the menu for setting camera functions and Disc Navigation. 31 SELECT button...

Owners Guide
Page 42
... half way (half pressing). When the "m" mark appears, you cannot proceed with the next recording; The DVD video camera/recorder will not change when manual focus is chosen). 42 English 13 Recording Stills Note: Recording of still images is possible on the screen (viewfinder or LCD). while "DISC ACCESS" ...down at the center of photos on card. • See "Troubleshooting" on screen will light in which recording is difficult with auto focus, choose manual focus, and manually correct the focus before recording (see on the LCD screen or viewfinder and the recorded image.
... half way (half pressing). When the "m" mark appears, you cannot proceed with the next recording; The DVD video camera/recorder will not change when manual focus is chosen). 42 English 13 Recording Stills Note: Recording of still images is possible on the screen (viewfinder or LCD). while "DISC ACCESS" ...down at the center of photos on card. • See "Troubleshooting" on screen will light in which recording is difficult with auto focus, choose manual focus, and manually correct the focus before recording (see on the LCD screen or viewfinder and the recorded image.

Owners Guide
Page 43
.... Restoring from the sleep/restart standby status, the zoom position will return to 1 to the recording pause status. SLEEP/RESTART button 43 The settings on manual focus, exposure and rear lighting will also reset to recording pause from the sleep/restart standby status. English 12/3 Swift Restart of Recording (SLEEP/RESTART...
.... Restoring from the sleep/restart standby status, the zoom position will return to 1 to the recording pause status. SLEEP/RESTART button 43 The settings on manual focus, exposure and rear lighting will also reset to recording pause from the sleep/restart standby status. English 12/3 Swift Restart of Recording (SLEEP/RESTART...

Owners Guide
Page 44
... battery level 19. White balance n 4. Recording status Movie recording time 17. Backlight compensation 7. 16:9 mode 1. Remaining space on the LCD screen during recording. Program AE k 3. Manual Focus m 6. Volume Current date/time 44 External Input 12.
... battery level 19. White balance n 4. Recording status Movie recording time 17. Backlight compensation 7. 16:9 mode 1. Remaining space on the LCD screen during recording. Program AE k 3. Manual Focus m 6. Volume Current date/time 44 External Input 12.

Owners Guide
Page 45
...No display : Emits light automatically ( : Always emits light ) : No light emission 10. Exposure correction (p. 55) No display : Auto : Manual 45 Video flash*3 [when Video Flash (sold separately) is attached] (only in still recording mode) (p. 65) No display : Self-timer ... ON 7. 16:9 mode (only in Spanish): Manual focus 6. External Input (p. 65)*1 L IN S IN : AV input : S-VIDEO input 12. Manual focus (p. 53) No display : Autofocus o : (display in English or German): Manual focus r : (display in French or Italian): Manual focus v : (display in movie recording mode)...
...No display : Emits light automatically ( : Always emits light ) : No light emission 10. Exposure correction (p. 55) No display : Auto : Manual 45 Video flash*3 [when Video Flash (sold separately) is attached] (only in still recording mode) (p. 65) No display : Self-timer ... ON 7. 16:9 mode (only in Spanish): Manual focus 6. External Input (p. 65)*1 L IN S IN : AV input : S-VIDEO input 12. Manual focus (p. 53) No display : Autofocus o : (display in English or German): Manual focus r : (display in French or Italian): Manual focus v : (display in movie recording mode)...

Owners Guide
Page 48
...). • An attempt to record a copy-guarded image is being made (blinks in green). R • An unusable card is loaded. • An attempt to the manual focus, exposure and on the screen. • When the LCD monitor is loaded. Note: • If the LCD screen is set facing the same direction...
...). • An attempt to record a copy-guarded image is being made (blinks in green). R • An unusable card is loaded. • An attempt to the manual focus, exposure and on the screen. • When the LCD monitor is loaded. Note: • If the LCD screen is set facing the same direction...

Owners Guide
Page 53
... If you bring the subject into focus at the "W" control side, focus will be restored. 53 English 12/3 Manually Focusing Subject The DVD video camera/recorder usually focuses on the LCD screen. VOL. Manual Focus icon FINE 0:00:00 REM 3 0 MIN 8 : 0 0 AM 9/3 0 /2006 2 Press the... zoom lever to "T" control side to zoom in on your subject before manually focusing on the subject. • Manual focus is released when the DVD video camera/recorder is turned off. FOCUSING DURING RECORDING Normally, the DVD video camera/recorder automatically focuses...
... If you bring the subject into focus at the "W" control side, focus will be restored. 53 English 12/3 Manually Focusing Subject The DVD video camera/recorder usually focuses on the LCD screen. VOL. Manual Focus icon FINE 0:00:00 REM 3 0 MIN 8 : 0 0 AM 9/3 0 /2006 2 Press the... zoom lever to "T" control side to zoom in on your subject before manually focusing on the subject. • Manual focus is released when the DVD video camera/recorder is turned off. FOCUSING DURING RECORDING Normally, the DVD video camera/recorder automatically focuses...

Owners Guide
Page 54
which may not be automatically focused (see page 53): Objects not in the center of screen Objects with little variation in brightness, such as white wall Objects that are far and near at the same time Objects moving rapidly Object behind glass with water droplets, dirt on it Objects lit by neon sign, spotlight, etc. English Manually focus the following objects, which glares or emits strong light Night view Dark objects 54
which may not be automatically focused (see page 53): Objects not in the center of screen Objects with little variation in brightness, such as white wall Objects that are far and near at the same time Objects moving rapidly Object behind glass with water droplets, dirt on it Objects lit by neon sign, spotlight, etc. English Manually focus the following objects, which glares or emits strong light Night view Dark objects 54

Owners Guide
Page 55
...the DVD video camera/recorder is turned off . 55 Note: • Pressing the BLC button will alternate between backlight setting between manual adjustment and auto exposure. BLC 1 Press the BLC button during recording. The exposure adjustment bar will compensate for Backlight When subject... is not too dark. You can also manually adjust the exposure depending on EXPOSURE the screen. English 12/3 Adjusting Brightness of Image to adjust the exposure, while viewing the ...
...the DVD video camera/recorder is turned off . 55 Note: • Pressing the BLC button will alternate between backlight setting between manual adjustment and auto exposure. BLC 1 Press the BLC button during recording. The exposure adjustment bar will compensate for Backlight When subject... is not too dark. You can also manually adjust the exposure depending on EXPOSURE the screen. English 12/3 Adjusting Brightness of Image to adjust the exposure, while viewing the ...
Owners Guide
Page 56
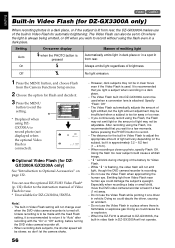
...Flash* (p. 132): Refer to be in a dark place. • The Video Flash built into DZ-GX3300A cannot be used . You can also be adjustable. Unless recording is to the instruction manual of brightness. After recording using the Flash, it is recommended that you light a subject when recording ...in clear focus even if the Video Flash is recording. • Do not use . * Unavailable for DZ-GX3100A/BX35A. It is recommended that you wish ...
...Flash* (p. 132): Refer to be in a dark place. • The Video Flash built into DZ-GX3300A cannot be used . You can also be adjustable. Unless recording is to the instruction manual of brightness. After recording using the Flash, it is recommended that you light a subject when recording ...in clear focus even if the Video Flash is recording. • Do not use . * Unavailable for DZ-GX3100A/BX35A. It is recommended that you wish ...

Owners Guide
Page 58
... the recording conditions. Note: • Use the viewfinder to check the image to be focused properly, manually adjust the focus (see page 53). 4 Open the LCD monitor, turn it 180º so that you can manually adjust white balance to match the light source or situation (p. 59) h Outdoor To record in a dark...
... the recording conditions. Note: • Use the viewfinder to check the image to be focused properly, manually adjust the focus (see page 53). 4 Open the LCD monitor, turn it 180º so that you can manually adjust white balance to match the light source or situation (p. 59) h Outdoor To record in a dark...

Owners Guide
Page 59
...The setting on white balance "Set" may not operate depending on with the lens capped, the white balance will be complete. 4 Press the C button to "Manually Focusing Subject" (see page 53). 2 Press the MENU button, choose "White Bal.", "Set", and then press the A button. 3 Hold A pressed until ...it fills the screen. Set the white balance in a bright place with hand, etc. ●Setting white balance manually 1 Point the DVD video camera/ Thick paper recorder at a white object so that is in a dark place. If focus is turned on the recording ...
...The setting on white balance "Set" may not operate depending on with the lens capped, the white balance will be complete. 4 Press the C button to "Manually Focusing Subject" (see page 53). 2 Press the MENU button, choose "White Bal.", "Set", and then press the A button. 3 Hold A pressed until ...it fills the screen. Set the white balance in a bright place with hand, etc. ●Setting white balance manually 1 Point the DVD video camera/ Thick paper recorder at a white object so that is in a dark place. If focus is turned on the recording ...
Owners Guide
Page 63
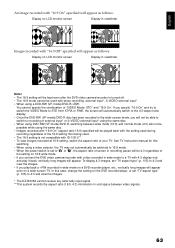
...with "16:9 On" (aspect ratio 16:9) specified will be played back with the setting used during recording regardless of your TV: See TV instruction manual for this case, change the setting on the DVD recorder/player, or set to the 4:3-aspect ratio display. • Once the DVD-RW (... in recording pause will be used . • The 16:9 setting is set "TV aspect type" (p. 105) to 4:3 and view the images. * The DZ-BX35A cannot receive any externally input signal. **This system records the aspect ratio (16:9, 4:3) information in void space between wide mode (16:9) and normal mode (4:3) will...
...with "16:9 On" (aspect ratio 16:9) specified will be played back with the setting used during recording regardless of your TV: See TV instruction manual for this case, change the setting on the DVD recorder/player, or set to the 4:3-aspect ratio display. • Once the DVD-RW (... in recording pause will be used . • The 16:9 setting is set "TV aspect type" (p. 105) to 4:3 and view the images. * The DZ-BX35A cannot receive any externally input signal. **This system records the aspect ratio (16:9, 4:3) information in void space between wide mode (16:9) and normal mode (4:3) will...

Owners Guide
Page 67
... that will appear when DVD-RAM disc is used , but the operation is the same. • Turn the DVD video camera/recorder on this instruction manual are basically those that you will be terminated and the DVD video camera/recorder will not appear when DVD-RW/DVD-R/+RW disc or card...
... that will appear when DVD-RAM disc is used , but the operation is the same. • Turn the DVD video camera/recorder on this instruction manual are basically those that you will be terminated and the DVD video camera/recorder will not appear when DVD-RW/DVD-R/+RW disc or card...

Owners Guide
Page 107
Refer to the TV instruction manual for releasing the wide mode). 107 You can perform playback, editing or editing on ... the input selector to switch the TV input. 2 Turn the DVD video camera/recorder on TV (see the TV instruction manual for how to "VCR" whichever applicable Video input. English VIEWING ON TV SCREEN 12/3 1 Turn the TV on and ... near the DVD video camera/recorder. You can also monitor the image on the TV screen. However, if you use a Hitachi VCR, the remote control may not be displayed on the TV screen. To prevent this happens, release the wide mode setting ...
Refer to the TV instruction manual for releasing the wide mode). 107 You can perform playback, editing or editing on ... the input selector to switch the TV input. 2 Turn the DVD video camera/recorder on TV (see the TV instruction manual for how to "VCR" whichever applicable Video input. English VIEWING ON TV SCREEN 12/3 1 Turn the TV on and ... near the DVD video camera/recorder. You can also monitor the image on the TV screen. However, if you use a Hitachi VCR, the remote control may not be displayed on the TV screen. To prevent this happens, release the wide mode setting ...


