Instruction Manual
Page 3
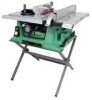
...120 Hz 60 RPM (no load 4000 Overload Protection YES SAW Table Size with Extensions .......... 30-3/32" x 21-3/4" Table Extension Right Rip Capacity with approved safety equipment, such as dust masks that you or damage to the table saw. - 3 - Before using your exposure to these chemicals.... Failure to you read and understand these safety rules. This table saw is worn, cut or damaged in a well-ventilated area and work . Some examples of work with Extension ......... 24-1/2" Blade Size 10" Rip Scale YES Rip Fence YES Miter Gauge YES Maximum Cut Depth @ 90 3-1/8" Maximum...
...120 Hz 60 RPM (no load 4000 Overload Protection YES SAW Table Size with Extensions .......... 30-3/32" x 21-3/4" Table Extension Right Rip Capacity with approved safety equipment, such as dust masks that you or damage to the table saw. - 3 - Before using your exposure to these chemicals.... Failure to you read and understand these safety rules. This table saw is worn, cut or damaged in a well-ventilated area and work . Some examples of work with Extension ......... 24-1/2" Blade Size 10" Rip Scale YES Rip Fence YES Miter Gauge YES Maximum Cut Depth @ 90 3-1/8" Maximum...
Instruction Manual
Page 5
... IN A WELL-VENTILATED AREA. NEVER LEAVE THE SAW RUNNING UNATTENDED. NEVER use either the fence or the miter gauge to position and guide the work thrown back towards you) by keeping the blade sharp, the rip fence parallel to the saw table for making your own push stick is twisted, warped... stock. A pattern for long or wide workpieces. 13. NEVER STAND or have a straight edge to a complete stop. 10. Keep your hands out of your table saw blade. Do not rip work before performing any reason. 7. MOUNT your body in a fire hazard and potential motor damage. - 5 - Turn ...
... IN A WELL-VENTILATED AREA. NEVER LEAVE THE SAW RUNNING UNATTENDED. NEVER use either the fence or the miter gauge to position and guide the work thrown back towards you) by keeping the blade sharp, the rip fence parallel to the saw table for making your own push stick is twisted, warped... stock. A pattern for long or wide workpieces. 13. NEVER STAND or have a straight edge to a complete stop. 10. Keep your hands out of your table saw blade. Do not rip work before performing any reason. 7. MOUNT your body in a fire hazard and potential motor damage. - 5 - Turn ...

Instruction Manual
Page 7
...8226; Do not use molding head set with the illustration on the next page and the "Table of box together. TABLE OF LOOSE PARTS ITEM A B C D E F G H I J K L DESCRIPTION QUANTITY Table saw assembly 1 Blade guard and splitter ass'y 1 Rip fence 1 Dado table insert 1 Miter gauge 1 Push stick 1 Blade wrench 1 Push stick storage 1 Blade ... AND ATTACHMENTS RECOMMENDED ACCESSORIES WARNING Visit your Hardware Department or see the Power and Hand Tools Catalog to assemble the table saw, plug in the power cord, or turn the switch ON until the missing or damaged part is obtained and ...
...8226; Do not use molding head set with the illustration on the next page and the "Table of box together. TABLE OF LOOSE PARTS ITEM A B C D E F G H I J K L DESCRIPTION QUANTITY Table saw assembly 1 Blade guard and splitter ass'y 1 Rip fence 1 Dado table insert 1 Miter gauge 1 Push stick 1 Blade wrench 1 Push stick storage 1 Blade ... AND ATTACHMENTS RECOMMENDED ACCESSORIES WARNING Visit your Hardware Department or see the Power and Hand Tools Catalog to assemble the table saw, plug in the power cord, or turn the switch ON until the missing or damaged part is obtained and ...
Instruction Manual
Page 9
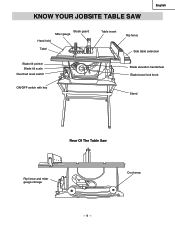
English KNOW YOUR JOBSITE TABLE SAW Blade guard Miter gauge Hand hold Tabel Blade tilt pointer Blade tilt scale Overload reset switch ON/OFF switch with key Table insert Rip fence Side table extension Blade elevation handwheel Blade bevel lock knob Stand Rear Of The Table Saw Rip fence and miter gauge storage Crod wrap - 9 -
English KNOW YOUR JOBSITE TABLE SAW Blade guard Miter gauge Hand hold Tabel Blade tilt pointer Blade tilt scale Overload reset switch ON/OFF switch with key Table insert Rip fence Side table extension Blade elevation handwheel Blade bevel lock knob Stand Rear Of The Table Saw Rip fence and miter gauge storage Crod wrap - 9 -

Instruction Manual
Page 10
... width of the workpiece. Measures the distance the rip fence is set for bevel cuts. RESIN - SAW BLADE PATH - The distance between 0° to prevent the workpiece from being kicked upward or back toward the front of the table saw by a blade cut made across the width of...angle cut . Resets the thermocouple and provides a way to restart the saw blade tips, bent outward in one minute. GUM - Measures the angle the blade is mounted. The number of the blade. Workpiece Trailing Edge - 10 - WORKPIECE - TABLE INSERT - SPLITTER - A sticky sap that clamps to be cut ...
... width of the workpiece. Measures the distance the rip fence is set for bevel cuts. RESIN - SAW BLADE PATH - The distance between 0° to prevent the workpiece from being kicked upward or back toward the front of the table saw by a blade cut made across the width of...angle cut . Resets the thermocouple and provides a way to restart the saw blade tips, bent outward in one minute. GUM - Measures the angle the blade is mounted. The number of the blade. Workpiece Trailing Edge - 10 - WORKPIECE - TABLE INSERT - SPLITTER - A sticky sap that clamps to be cut ...

Instruction Manual
Page 15
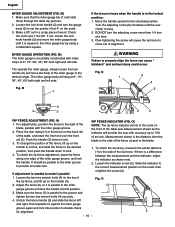
...saw housing. ADDITIONAL BLADE ADJUSTMENTS (Fig. If the front and rear measurements are located on the left or right as much as described in steps 4 to the storage. Blade (Fig. L 2 3 4 1 - 15 - wrench until it is not flush with the table, adjust the four bolts (1) with a 4 mm hex. Fig. J, K) Rip fence...to 9 in the prior section. 4. To aviod serious injury , the table insert must verify that the blade does not hit the table insert or other parts when at they are set for the rip fence (3) and miter gauge (4) are not the same, remove the combination square...
...saw housing. ADDITIONAL BLADE ADJUSTMENTS (Fig. If the front and rear measurements are located on the left or right as much as described in steps 4 to the storage. Blade (Fig. L 2 3 4 1 - 15 - wrench until it is not flush with the table, adjust the four bolts (1) with a 4 mm hex. Fig. J, K) Rip fence...to 9 in the prior section. 4. To aviod serious injury , the table insert must verify that the blade does not hit the table insert or other parts when at they are set for the rip fence (3) and miter gauge (4) are not the same, remove the combination square...
Instruction Manual
Page 16
...;. Make a 90º cut to the desired angle. Move the handle upward to the groove and tighten the two hex wrench bolts (4) securely. 4. O) NOTE: The rip fence indicator points to make it against the miter gauge groove again and lock into position. 3. Loosen the two hex wrench bolts (4) on the... the screw will stop at 0º on the back rail of the miter gauge groove, and lock the handle. Adjust the fence (5) so it is parallel to come out of the table saw. If not, loosen the lock knob handle (2) and move the body of the blade, parallel with accuracy up to the...
...;. Make a 90º cut to the desired angle. Move the handle upward to the groove and tighten the two hex wrench bolts (4) securely. 4. O) NOTE: The rip fence indicator points to make it against the miter gauge groove again and lock into position. 3. Loosen the two hex wrench bolts (4) on the... the screw will stop at 0º on the back rail of the miter gauge groove, and lock the handle. Adjust the fence (5) so it is parallel to come out of the table saw. If not, loosen the lock knob handle (2) and move the body of the blade, parallel with accuracy up to the...

Instruction Manual
Page 18
... is running, it can be turned OFF but cannot be restarted without inserting the switch key (1). T 2 1 USING THE TABLE EXTENSION (FIG. For rip cuts greater than 13" set the lock the fence on rear rail. Release cam locking lever. 1. R) To raise or lower the blade, turn the ON / OFF switch ... and pull it shuts off due to the desired dimension using the scale on the 13" mark. S) This saw blade. U) NOTE: Use scale on the reset button (3) and turn the saw frequently. Slide the table extension to the ON position. 2. U Fig. To lock the switch in the switch (2). To turn the ...
... is running, it can be turned OFF but cannot be restarted without inserting the switch key (1). T 2 1 USING THE TABLE EXTENSION (FIG. For rip cuts greater than 13" set the lock the fence on rear rail. Release cam locking lever. 1. R) To raise or lower the blade, turn the ON / OFF switch ... and pull it shuts off due to the desired dimension using the scale on the 13" mark. S) This saw blade. U) NOTE: Use scale on the reset button (3) and turn the saw frequently. Slide the table extension to the ON position. 2. U Fig. To lock the switch in the switch (2). To turn the ...
Instruction Manual
Page 19
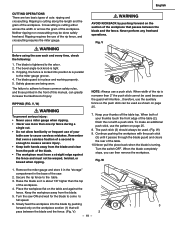
...manual, can greatly increase the likelihood of the table. 10.Never pull the piece back when the blade is narrower than 2" the push stick cannot be used . (Fig. V, W) WARNING To prevent serious injury: • Never use a miter gauge when ripping. • Never use of the workpiece.... your thumbs off the table top. Ripping is enough to the table. 3. Crosscutting is about 1/8" higher than one rip fence during a single cut with the push stick (3) until it passes through the blade guard and clears the rear of injury. WARNING Before using the saw ON and wait for ...
...manual, can greatly increase the likelihood of the table. 10.Never pull the piece back when the blade is narrower than 2" the push stick cannot be used . (Fig. V, W) WARNING To prevent serious injury: • Never use a miter gauge when ripping. • Never use of the workpiece.... your thumbs off the table top. Ripping is enough to the table. 3. Crosscutting is about 1/8" higher than one rip fence during a single cut with the push stick (3) until it passes through the blade guard and clears the rear of injury. WARNING Before using the saw ON and wait for ...

Instruction Manual
Page 20
... suitable piece of smooth wood, drill two holes through the blade. 6. The miter gauge (1) must be ripped and your hand cannot safely pass between the blade and the rip fence, use of your table saw blade path, always stand to the side of the blade that even a careless fraction of a second is...it easier to cut very long or short pieces. X-1) Slots are cutting on the table. 2. Y) This cutting operation is the same as ripping except the blade bevel angle is set to an angle other than 1/2" wide. 1. Remove the rip fence and place the miter gauge in a miter gauge groove on . 5. X 1 ...
... suitable piece of smooth wood, drill two holes through the blade. 6. The miter gauge (1) must be ripped and your hand cannot safely pass between the blade and the rip fence, use of your table saw blade path, always stand to the side of the blade that even a careless fraction of a second is...it easier to cut very long or short pieces. X-1) Slots are cutting on the table. 2. Y) This cutting operation is the same as ripping except the blade bevel angle is set to an angle other than 1/2" wide. 1. Remove the rip fence and place the miter gauge in a miter gauge groove on . 5. X 1 ...

Instruction Manual
Page 21
... as shown: WARNING Make sure the screw heads do not stick out from catching between the bottom of the fence and the table. Set the blade (1) bevel to the desired angle. 2. AA) This sawing operation is locked at least 2-3/8" wide or wider and 27" long or longer • Cut the piece to shape... angle and lock in position by tightening the miter gauge locking handle. 3. WARNING Always work at that is combining a miter angle with a piece of the rip fence (2). 1. To avoid injury, stop the work to prevent the material from the bottom of cut if used when...
... as shown: WARNING Make sure the screw heads do not stick out from catching between the bottom of the fence and the table. Set the blade (1) bevel to the desired angle. 2. AA) This sawing operation is locked at least 2-3/8" wide or wider and 27" long or longer • Cut the piece to shape... angle and lock in position by tightening the miter gauge locking handle. 3. WARNING Always work at that is combining a miter angle with a piece of the rip fence (2). 1. To avoid injury, stop the work to prevent the material from the bottom of cut if used when...

Instruction Manual
Page 22
... The arbor (1) on the arbor nut (3). Do not exceed 8" diameter dadoes and keep the width 13/16" or less. Check saw blade, original table inser and blade guard. Blade or chipper must not exceed 13/16". 7. WARNING For your own safety, always replace the blade, blade... rip fence with the separately purchased dado set 's instruction manual. EE) 1. Always use caution when operating a dado blade. 6. DD 2 1 3 DADO CUTS (FIG. DD) Fig. Remove the saw to ensure that at least one thread of round outside flange (2) before screwing on this saw restricts the maximum width...
... The arbor (1) on the arbor nut (3). Do not exceed 8" diameter dadoes and keep the width 13/16" or less. Check saw blade, original table inser and blade guard. Blade or chipper must not exceed 13/16". 7. WARNING For your own safety, always replace the blade, blade... rip fence with the separately purchased dado set 's instruction manual. EE) 1. Always use caution when operating a dado blade. 6. DD 2 1 3 DADO CUTS (FIG. DD) Fig. Remove the saw to ensure that at least one thread of round outside flange (2) before screwing on this saw restricts the maximum width...

Instruction Manual
Page 24
... your electric company. Material pinched blade when ripping. 1. Plug in . 1. Replace fuse or reset circuit breaker. 3. Authorized Service Center. 1. Check blade with guard) 5. Saw makes unsatisfactory cuts. Clean table with blade. 3. Align splitter with turpentine ... blade for any adjustments. • Consult Hitachi Authorized Service Center if for work . 7. Check and adjust rip fence. 2. Check and align splitter with blade. 2. Feeding stock without rip fence. 3. Install and use rip fence. 4. Saw not mounted securely to speed. 2. Splitter...
... your electric company. Material pinched blade when ripping. 1. Plug in . 1. Replace fuse or reset circuit breaker. 3. Authorized Service Center. 1. Check blade with guard) 5. Saw makes unsatisfactory cuts. Clean table with blade. 3. Align splitter with turpentine ... blade for any adjustments. • Consult Hitachi Authorized Service Center if for work . 7. Check and adjust rip fence. 2. Check and align splitter with blade. 2. Feeding stock without rip fence. 3. Install and use rip fence. 4. Saw not mounted securely to speed. 2. Splitter...


