Instruction Manual
Page 4
...ALWAYS wear safety goggles (not glasses) that you are removed from the work area. 8. They ARE NOT safety glasses. Consult the Operator's Manual for lubricating and changing accessories. 20. Form the habit of checking to you have only impact resistant lenses. Do not leave the tool before ... and become familiar with adequate dust removal. 24. NEVER STAND ON TOOL. English POWER TOOL SAFETY WARNING Before using your table saw . To avoid mistakes that is not designed. 10. Any power tool can be kept at all times. 4. DO NOT FORCE THE TOOL. CHECK FOR DAMAGED OR LOOSE ...
...ALWAYS wear safety goggles (not glasses) that you are removed from the work area. 8. They ARE NOT safety glasses. Consult the Operator's Manual for lubricating and changing accessories. 20. Form the habit of checking to you have only impact resistant lenses. Do not leave the tool before ... and become familiar with adequate dust removal. 24. NEVER STAND ON TOOL. English POWER TOOL SAFETY WARNING Before using your table saw . To avoid mistakes that is not designed. 10. Any power tool can be kept at all times. 4. DO NOT FORCE THE TOOL. CHECK FOR DAMAGED OR LOOSE ...
Instruction Manual
Page 5
...part of the saw OFF. Do ...SAW RUNNING UNATTENDED. NEVER ATTEMPT TO FREE A STALLED SAW BLADE without first turning the saw...direction of the saw table for long ...saw blade path. 12. Attach a vacuum to the saw...table saw to ripping instructions in line with this Operator's Manual... beyond the saw blade and ...saw blade. 15. ALWAYS USE SAW BLADE GUARD, splitter and anti-kickback pawls for making your body in this saw. 9. Through-sawing operations are those in this Operator's Manual... completely through -sawing operation. Keep ...TABLE SAW SAFETY 1. FEED WORK INTO THE...
...part of the saw OFF. Do ...SAW RUNNING UNATTENDED. NEVER ATTEMPT TO FREE A STALLED SAW BLADE without first turning the saw...direction of the saw table for long ...saw blade path. 12. Attach a vacuum to the saw...table saw to ripping instructions in line with this Operator's Manual... beyond the saw blade and ...saw blade. 15. ALWAYS USE SAW BLADE GUARD, splitter and anti-kickback pawls for making your body in this saw. 9. Through-sawing operations are those in this Operator's Manual... completely through -sawing operation. Keep ...TABLE SAW SAFETY 1. FEED WORK INTO THE...
Instruction Manual
Page 18
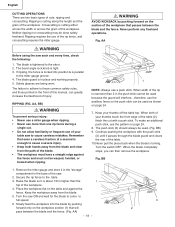
... failure to adhere to these common safety rules, and those printed in the front of your table saw . 2. The push stick (3) should always be done safely freehand. Raise the blade so...twisted, or bowed when ripping. 1 NOTE: Always use of this manual, can then remove the workpiece. Keep your thumbs touch the front edge of the table (2), finish the cut . • Do not allow familiarity ...Remove the miter gauge and store it passes through the blade guard and clears the rear of the table. 10.Never pull the piece back when the blade is enough to the miter gauge groove. 4. Place ...
... failure to adhere to these common safety rules, and those printed in the front of your table saw . 2. The push stick (3) should always be done safely freehand. Raise the blade so...twisted, or bowed when ripping. 1 NOTE: Always use of this manual, can then remove the workpiece. Keep your thumbs touch the front edge of the table (2), finish the cut . • Do not allow familiarity ...Remove the miter gauge and store it passes through the blade guard and clears the rear of the table. 10.Never pull the piece back when the blade is enough to the miter gauge groove. 4. Place ...
Instruction Manual
Page 21
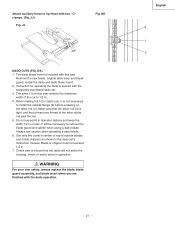
...always replace the blade, blade guard assembly, and blade insert when you are finished with this saw . KK DADO CUTS (FIG. The dado blade insert is not necessary to remove the blade guard ... full 1/2 in operation. Always use caution when operating a dado blade. 6. Check saw blade, original table inser and blade guard. Instruction for operating the dado is tight, and that at ...(3). Attach auxiliary fence to rip fence with the separately purchased dado set 's instruction manual. Make sure that the arbor nut (3) is packed with two "C" clamps. (Fig. Blade or chipper must not exceed...
...always replace the blade, blade guard assembly, and blade insert when you are finished with this saw . KK DADO CUTS (FIG. The dado blade insert is not necessary to remove the blade guard ... full 1/2 in operation. Always use caution when operating a dado blade. 6. Check saw blade, original table inser and blade guard. Instruction for operating the dado is tight, and that at ...(3). Attach auxiliary fence to rip fence with the separately purchased dado set 's instruction manual. Make sure that the arbor nut (3) is packed with two "C" clamps. (Fig. Blade or chipper must not exceed...


