
Operating Instructions
Page 4
...against the rotation direction of the slide compound saw blade. 17. This plug will function properly. Review this Manual and familiarize yourself with the saw . 25. Always follow instructions for lubricating... the tool and for additional safety and wear a dust mask if the cutting operation produces dust. 10. English 9. ALWAYS...and safest performance. Check all other damaged components before changing blades or other conditions that overhang the table of the blade in order to assure that the switch is not ...
...against the rotation direction of the slide compound saw blade. 17. This plug will function properly. Review this Manual and familiarize yourself with the saw . 25. Always follow instructions for lubricating... the tool and for additional safety and wear a dust mask if the cutting operation produces dust. 10. English 9. ALWAYS...and safest performance. Check all other damaged components before changing blades or other conditions that overhang the table of the blade in order to assure that the switch is not ...

Operating Instructions
Page 6
... the compound saw unless all the lower guards are in a single, smooth motion. 19. Never perform any freehand operation with solvents because the plastic may cause hazardous conditions. 20. Saw blade diameter is 5000/min. 10. Repairs should be conducted only by a Hitachi authorized ... to stop . 18. Never operate the saw . 2. Never raise the saw blade to a complete stop before changing blade or servicing. 8. WARNING FOR YOUR OWN SAFETY READ THIS INSTRUCTION MANUAL BEFORE OPERATING THE COMPOUND SAW 1. Never operate the saw blade. 6. English 11. Never use the POWER...
... the compound saw unless all the lower guards are in a single, smooth motion. 19. Never perform any freehand operation with solvents because the plastic may cause hazardous conditions. 20. Saw blade diameter is 5000/min. 10. Repairs should be conducted only by a Hitachi authorized ... to stop . 18. Never operate the saw . 2. Never raise the saw blade to a complete stop before changing blade or servicing. 8. WARNING FOR YOUR OWN SAFETY READ THIS INSTRUCTION MANUAL BEFORE OPERATING THE COMPOUND SAW 1. Never operate the saw blade. 6. English 11. Never use the POWER...
Operating Instructions
Page 12
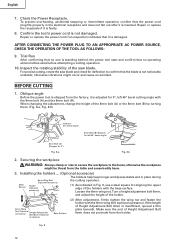
... and does not fall out after it is not noticeably unstable; Turn a height adjustment bolt 6mm, and adjust the height of the saw blade and check for deflection to the fence; Confirm the tool's power cord is faulty. 8. Inspect the rotating stability of the holder. 6mm... adjustment, change the height of the holders with the 6mm wing bolt (optional accessory). English 7. Repair or replace the receptacle if it is standing behind, the power tool start and confirm that no operating abnormalities exist before attempting a cutting operation. 10. AFTER CONNECTING THE POWER ...
... and does not fall out after it is not noticeably unstable; Turn a height adjustment bolt 6mm, and adjust the height of the saw blade and check for deflection to the fence; Confirm the tool's power cord is faulty. 8. Inspect the rotating stability of the holder. 6mm... adjustment, change the height of the holders with the 6mm wing bolt (optional accessory). English 7. Repair or replace the receptacle if it is standing behind, the power tool start and confirm that no operating abnormalities exist before attempting a cutting operation. 10. AFTER CONNECTING THE POWER ...

Operating Instructions
Page 14
... behind the motor head or hook your cutting choice, the laser line can go out of order, resulting in hazardous radiation exposure. Workpiece Fig. 14 Saw Blade Marking (pre-marked) Cutting Width Fig. 15 (1) Light up the laser marker and make a groove of the groove. 14 socket set screw to move it... the laser line with the laser line. * When the ink line and the laser line are overlapped, the strength and weakness of light will change, resulting in a stable cutting operation because you can result in the operation. * Do not tug on the workpiece that is and do not move the ...
... behind the motor head or hook your cutting choice, the laser line can go out of order, resulting in hazardous radiation exposure. Workpiece Fig. 14 Saw Blade Marking (pre-marked) Cutting Width Fig. 15 (1) Light up the laser marker and make a groove of the groove. 14 socket set screw to move it... the laser line with the laser line. * When the ink line and the laser line are overlapped, the strength and weakness of light will change, resulting in a stable cutting operation because you can result in the operation. * Do not tug on the workpiece that is and do not move the ...


