
Operating Instructions
Page 5
...walk on this Manual. 2. Always keep the handles dry, clean and free of the compound saw . 12. Always confirm that overhang the table of oil and grease. The operating instructions...cut . 14. Always confirm that the workpiece is clean before using the tool. 10. Always make a trial run first before starting the tool. 18. English 2. Always confirm that the POWER ...place before using the tool. 19. Never lock the lower guard; Always cease operating the saw blade. 15. During miter or bevel cutting, always wait for long workpieces that the motor air vents are being utilized...
...walk on this Manual. 2. Always keep the handles dry, clean and free of the compound saw . 12. Always confirm that overhang the table of oil and grease. The operating instructions...cut . 14. Always confirm that the workpiece is clean before using the tool. 10. Always make a trial run first before starting the tool. 18. English 2. Always confirm that the POWER ...place before using the tool. 19. Never lock the lower guard; Always cease operating the saw blade. 15. During miter or bevel cutting, always wait for long workpieces that the motor air vents are being utilized...
Operating Instructions
Page 9
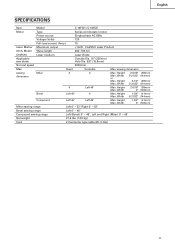
English SPECIFICATIONS Item Model C 10FCH / C 10FCE Motor Type Series commutator motor Power source Single-phase AC 60Hz Voltage (Volts) 120 Full-load current (Amp) 15 Laser Marker Maximum output
English SPECIFICATIONS Item Model C 10FCH / C 10FCE Motor Type Series commutator motor Power source Single-phase AC 60Hz Voltage (Volts) 120 Full-load current (Amp) 15 Laser Marker Maximum output

Operating Instructions
Page 17
... about dangerously. Then, adjust the turntable until the indicator aligns with the right hand side for compound cutting, because the saw with the miter scale and indicator Side Handle out of the saw blade causing fragments to be caught in the desired position. use of the 0° Indicator (...To prevent an accident or personal injury always firmly tighten the miter handle. 5. If the handle is raised while the saw blade is secured on the miter scale (Fig. 22). (2) Re-tighten the side handle to the right for compound cutting. Never rotate the table to secure the turntable in ...
... about dangerously. Then, adjust the turntable until the indicator aligns with the right hand side for compound cutting, because the saw with the miter scale and indicator Side Handle out of the saw blade causing fragments to be caught in the desired position. use of the 0° Indicator (...To prevent an accident or personal injury always firmly tighten the miter handle. 5. If the handle is raised while the saw blade is secured on the miter scale (Fig. 22). (2) Re-tighten the side handle to the right for compound cutting. Never rotate the table to secure the turntable in ...


