
Operating Instructions
Page 4
... the saw . 25. Do not change the plug in use a face mask for the best and safest performance. ALWAYS DISCONNECT THE TOOL before servicing and before using the tool. 18. Always check the guard and all moving parts for Use of the slide compound saw blade from ...binding and other accessories. 14. This plug will function properly. If the plug does not fit fully in the OFF position before using the tool to a complete stop . Always keep tools sharp and clean for additional safety and wear a dust mask if the cutting operation produces dust. 10...
... the saw . 25. Do not change the plug in use a face mask for the best and safest performance. ALWAYS DISCONNECT THE TOOL before servicing and before using the tool. 18. Always check the guard and all moving parts for Use of the slide compound saw blade from ...binding and other accessories. 14. This plug will function properly. If the plug does not fit fully in the OFF position before using the tool to a complete stop . Always keep tools sharp and clean for additional safety and wear a dust mask if the cutting operation produces dust. 10...

Operating Instructions
Page 6
... handle is 5000/min. 10. English 11. Never use abrasive type blades on and off tool and wait for saw . 5. Never clean plastic components with the compound saw blade to a complete stop before changing blade or servicing. 8. This may dissolve. 16. Never operate the saw blade from the workpiece. Never ...gases because sparking can cause an explosion. 15. Repairs should be conducted only by a Hitachi authorized service center. 6 Never use only identical replacement parts. Never raise the saw without the guards in POWER TOOL while your limbs inside of the line next to ...
... handle is 5000/min. 10. English 11. Never use abrasive type blades on and off tool and wait for saw . 5. Never clean plastic components with the compound saw blade to a complete stop before changing blade or servicing. 8. This may dissolve. 16. Never operate the saw blade from the workpiece. Never ...gases because sparking can cause an explosion. 15. Repairs should be conducted only by a Hitachi authorized service center. 6 Never use only identical replacement parts. Never raise the saw without the guards in POWER TOOL while your limbs inside of the line next to ...
Operating Instructions
Page 12
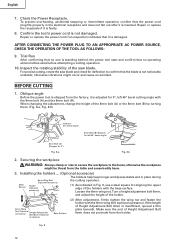
... CHECK THE OPERATION OF THE TOOL AS FOLLOWS: 9. Inspect the rotating stability of the saw blade and check for aligning the upper edge of Height Adjustment Bolt 6mm is faulty. 8. ...inserted. Trial Run After confirming that no operating abnormalities exist before attempting a cutting operation. 10. Oblique angle Before the power tool is shipped from the factory, it is damaged. ...with the 8mm bolt (A) and the 8mm bolt (B). Loosen the 6mm wing nut. When changing the adjustment, change the height of the holder. 6mm Wing Nut (Optional accessory) Height Adjustment Bolt 6mm (...
... CHECK THE OPERATION OF THE TOOL AS FOLLOWS: 9. Inspect the rotating stability of the saw blade and check for aligning the upper edge of Height Adjustment Bolt 6mm is faulty. 8. ...inserted. Trial Run After confirming that no operating abnormalities exist before attempting a cutting operation. 10. Oblique angle Before the power tool is shipped from the factory, it is damaged. ...with the 8mm bolt (A) and the 8mm bolt (B). Loosen the 6mm wing nut. When changing the adjustment, change the height of the holder. 6mm Wing Nut (Optional accessory) Height Adjustment Bolt 6mm (...

Operating Instructions
Page 14
...to the left side of the cutting width (saw blade and the laser line taking the following steps to the laser marker (main body of lines. socket set screw to the right and if you turn it counterclockwise, the laser line will change, resulting in width. Do not stare into beam.... 16) When you work table. This ensures the minimum cutting errors. * In outdoor or near-the-window operations, it with the right side of the saw blade at the time of about 1-1/2" (38mm) in height and 3-1/2"(89mm) in a stable cutting operation because you turn the hex. Under such circumstances, move it...
...to the left side of the cutting width (saw blade and the laser line taking the following steps to the laser marker (main body of lines. socket set screw to the right and if you turn it counterclockwise, the laser line will change, resulting in width. Do not stare into beam.... 16) When you work table. This ensures the minimum cutting errors. * In outdoor or near-the-window operations, it with the right side of the saw blade at the time of about 1-1/2" (38mm) in height and 3-1/2"(89mm) in a stable cutting operation because you turn the hex. Under such circumstances, move it...


