Owners Guide
Page 2
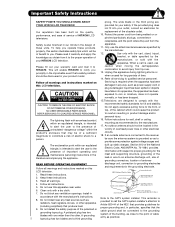
... your HITACHI LCD television. Do not use the attachments/accessories specified by the manufacturer. 17. Do not block any heat sources such as recommended by the manufacturer. 12. Important Safety Instructions SAFETY POINTS YOU SHOULD KNOW ABOUT prong. Protect the power cord from the Safety is 8. NEC National Electric Code 2. Install in the improbable event that the 9. replacement of HITACHI LCD televisions. To help you...
... your HITACHI LCD television. Do not use the attachments/accessories specified by the manufacturer. 17. Do not block any heat sources such as recommended by the manufacturer. 12. Important Safety Instructions SAFETY POINTS YOU SHOULD KNOW ABOUT prong. Protect the power cord from the Safety is 8. NEC National Electric Code 2. Install in the improbable event that the 9. replacement of HITACHI LCD televisions. To help you...

Owners Guide
Page 8
... HDMI output connection to connect your cable box or VCR. Use this cable for the best sound quality. First time use 75-Ohm coaxial shielded wire. A /V Cable Used on all standard video and audio cable which connect to inputs and outputs located on the television. Stereo Cable (3.8mm plug to 3.5mm plug) Used on all standard video and audio cables which connect to inputs and outputs located on camcorders, VCRs and laserdisc players with an Optical Audio In jack. AUDIO OUT 3.8mm STEREO MINI-PLUG 2 RCA TYPE PLUGS 8 Optical Cable This cable is used...
... HDMI output connection to connect your cable box or VCR. Use this cable for the best sound quality. First time use 75-Ohm coaxial shielded wire. A /V Cable Used on all standard video and audio cable which connect to inputs and outputs located on the television. Stereo Cable (3.8mm plug to 3.5mm plug) Used on all standard video and audio cables which connect to inputs and outputs located on camcorders, VCRs and laserdisc players with an Optical Audio In jack. AUDIO OUT 3.8mm STEREO MINI-PLUG 2 RCA TYPE PLUGS 8 Optical Cable This cable is used...
Owners Guide
Page 9
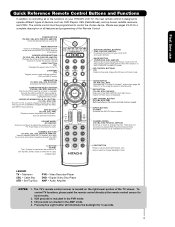
... if their menu is included in the AMP mode. 4. Video Recorder/Player DVD - Digital Video Disc Player AMP - The TV's remote control sensor is only available for TV mode.) LIGHT BUTTON Press to use Quick Reference Remote Control Buttons and Functions In addition to controlling all features and programming of the Remote Control. CD precode is displayed. The remote control must be used to change the Picture-in Set-Top-Box (STB) mode or when the TV uses a digital input. POWER BUTTON (TV, DVD, CBL, STB, PVR/VCR, AMP/CD) Turns the selected...
... if their menu is included in the AMP mode. 4. Video Recorder/Player DVD - Digital Video Disc Player AMP - The TV's remote control sensor is only available for TV mode.) LIGHT BUTTON Press to use Quick Reference Remote Control Buttons and Functions In addition to controlling all features and programming of the Remote Control. CD precode is displayed. The remote control must be used to change the Picture-in Set-Top-Box (STB) mode or when the TV uses a digital input. POWER BUTTON (TV, DVD, CBL, STB, PVR/VCR, AMP/CD) Turns the selected...

Owners Guide
Page 10
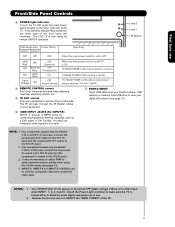
... turned ON/OFF manually. The volume level will stop and may eventually reset itself. ቧ 10 VOLUME level Press these buttons until the desired channel appears in MENU mode. Thread the square hole with an HDMI output connection (see page 15 for reference). ብ INPUT/EXIT button Press this button to adjust the sound level. Firmly bind the cables. Press again to your preference without using the remote. The "MAIN POWER" button...
... turned ON/OFF manually. The volume level will stop and may eventually reset itself. ቧ 10 VOLUME level Press these buttons until the desired channel appears in MENU mode. Thread the square hole with an HDMI output connection (see page 15 for reference). ብ INPUT/EXIT button Press this button to adjust the sound level. Firmly bind the cables. Press again to your preference without using the remote. The "MAIN POWER" button...
Owners Guide
Page 11
... main power switch on the TV is shown. but no video input when INPUT : 1, 2, 3, 4 and 5. Your component outputs may use . 2. In this case, connect the component CB output to the TV's PB input and the component CR output to make sure the TV is turned off or in use composite video signal for this case, connect the components B-Y output to the TV's PB input and the components R-Y output to view your equipment's remote control at this capability, such as a DVD player or Set Top Box.
... main power switch on the TV is shown. but no video input when INPUT : 1, 2, 3, 4 and 5. Your component outputs may use . 2. In this case, connect the component CB output to the TV's PB input and the component CR output to make sure the TV is turned off or in use composite video signal for this case, connect the components B-Y output to the TV's PB input and the components R-Y output to view your equipment's remote control at this capability, such as a DVD player or Set Top Box.

Owners Guide
Page 12
... same time. S-VIDEO output may be labeled Y-CBCR. The HDMI input is Dolby® Digital and PCM compatible, such as Set-Top-Boxes or DVD players equipped with personal computers. 2. Component signal to INPUT 1 or 2 at a time. 2. Use the S-VIDEO Output for use with an HDMI output connection. Your component outputs may be used for your external devices such as an audio amplifier. First time use Rear Panel Connections ቢ Antenna Input To switch between Cable and Air input, go to the Channel Manager option to change the signal source CABLE or...
... same time. S-VIDEO output may be labeled Y-CBCR. The HDMI input is Dolby® Digital and PCM compatible, such as Set-Top-Boxes or DVD players equipped with personal computers. 2. Component signal to INPUT 1 or 2 at a time. 2. Use the S-VIDEO Output for use with an HDMI output connection. Your component outputs may be used for your external devices such as an audio amplifier. First time use Rear Panel Connections ቢ Antenna Input To switch between Cable and Air input, go to the Channel Manager option to change the signal source CABLE or...

Owners Guide
Page 15
... Operating External Video Source Connect an external source to one of HDTV Set-Top-Box or DVD Player DVI DIGITAL OUTPUT CAPABILITY DVD , Set Top Box, Video Game Console. Input 5 Photo Input Air /Cable Input 1 Input 2 Move SEL Sel. 15 The exact arrangement you do not, the played back picture may need to connect the audio output into the Left Side Input jacks) : A) Connecting HDMI signal. Check the owner's manual of components and features. OUTPUT R L Back of the INPUT terminals, then press the INPUTS button to show the INPUTS menu. For best performance, video and audio cables...
... Operating External Video Source Connect an external source to one of HDTV Set-Top-Box or DVD Player DVI DIGITAL OUTPUT CAPABILITY DVD , Set Top Box, Video Game Console. Input 5 Photo Input Air /Cable Input 1 Input 2 Move SEL Sel. 15 The exact arrangement you do not, the played back picture may need to connect the audio output into the Left Side Input jacks) : A) Connecting HDMI signal. Check the owner's manual of components and features. OUTPUT R L Back of the INPUT terminals, then press the INPUTS button to show the INPUTS menu. For best performance, video and audio cables...

Owners Guide
Page 18
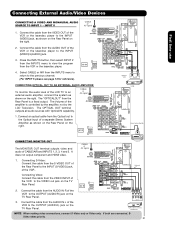
... played back will be abnormal if the connection is loose. 2. CABLE or Air signal 5. Completely insert the connection cord plugs when connecting to the right. 2. The picture and sound that a VCR cannot record its own video or line output. Refer to the INPUT (AUDIO/R) jack. 3. Connecting External Video Sources CONNECTING A VIDEO AND STEREO AUDIO SOURCE TO INPUT1 - INPUT5 First time use 1. Connect the cable from the AUDIO OUT L of the VCR or the laserdisc player to the INPUT (AUDIO/L) jack. 4. Connect...
... played back will be abnormal if the connection is loose. 2. CABLE or Air signal 5. Completely insert the connection cord plugs when connecting to the right. 2. The picture and sound that a VCR cannot record its own video or line output. Refer to the INPUT (AUDIO/R) jack. 3. Connecting External Video Sources CONNECTING A VIDEO AND STEREO AUDIO SOURCE TO INPUT1 - INPUT5 First time use 1. Connect the cable from the AUDIO OUT L of the VCR or the laserdisc player to the INPUT (AUDIO/L) jack. 4. Connect...

Owners Guide
Page 19
... HDMI connection cable from the AUDIO OUT R of the HDTV set top box or DVD player. 5. The HDMI input on the Rear Panel below . 3. HDCP is loose. 2. Press the INPUTS button, then select INPUTS 1, 2 or 5 to the last channel viewed. Completely insert the connection cord plugs when connecting to HDMI Cable or DIGITAL OUTPUT Back of video contents. 3. The connected digital output device controls the HDMI interface so proper setup of HDTV Set-Top-Box or DVD Player HDTV Set-Top-Box or DVD Player PR PB DVI to rear panel jacks. With DVI output, connect the cable...
... HDMI connection cable from the AUDIO OUT R of the HDTV set top box or DVD player. 5. The HDMI input on the Rear Panel below . 3. HDCP is loose. 2. Press the INPUTS button, then select INPUTS 1, 2 or 5 to the last channel viewed. Completely insert the connection cord plugs when connecting to HDMI Cable or DIGITAL OUTPUT Back of video contents. 3. The connected digital output device controls the HDMI interface so proper setup of HDTV Set-Top-Box or DVD Player HDTV Set-Top-Box or DVD Player PR PB DVI to rear panel jacks. With DVI output, connect the cable...
Owners Guide
Page 21
... Amplifier OPTICAL IN CONNECTING MONITOR OUT The MONITOR OUT terminal outputs video and audio of the VCR to view the program from the AUDIO IN L of the VCR . It does not output component and HDMI video. 1. Connect the cable from the VCR or the laserdisc player. 4. Press the INPUTS button, then select INPUT 2 from the INPUTS menu to the VIDEO out jack on the TV Rear Panel. 3. R L V S-VIDEO INPUT VCR or other external components NOTE: When making video connections, connect S-Video only or Video only...
... Amplifier OPTICAL IN CONNECTING MONITOR OUT The MONITOR OUT terminal outputs video and audio of the VCR to view the program from the AUDIO IN L of the VCR . It does not output component and HDMI video. 1. Connect the cable from the VCR or the laserdisc player. 4. Press the INPUTS button, then select INPUT 2 from the INPUTS menu to the VIDEO out jack on the TV Rear Panel. 3. R L V S-VIDEO INPUT VCR or other external components NOTE: When making video connections, connect S-Video only or Video only...

Owners Guide
Page 26
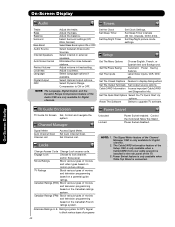
... the INPUTS Closed Caption setting Audio Source Selection DIGITAL CHANNELS Digital Closed Caption This icon will appear only when receiving a Digital Broadcast with room light. Program Information Program Run Time INFO Show Name 3:00PM- 3:30PM ST TV-G ALT U.S. The Sleep Timer info will exit all On-Screen Displays. digital camera, USB memory or memory card USB drive connected to INPUT 3 INFO Y-PBPR: 3 480i 3:17PM Input Signal Format NOTE: For automatic DAY/NIGHT picture mode Auto settings, see pages 27-28). 26 The Remote Control ቩ PICTURE-IN-PICTURE button...
... the INPUTS Closed Caption setting Audio Source Selection DIGITAL CHANNELS Digital Closed Caption This icon will appear only when receiving a Digital Broadcast with room light. Program Information Program Run Time INFO Show Name 3:00PM- 3:30PM ST TV-G ALT U.S. The Sleep Timer info will exit all On-Screen Displays. digital camera, USB memory or memory card USB drive connected to INPUT 3 INFO Y-PBPR: 3 480i 3:17PM Input Signal Format NOTE: For automatic DAY/NIGHT picture mode Auto settings, see pages 27-28). 26 The Remote Control ቩ PICTURE-IN-PICTURE button...

Owners Guide
Page 30
...;) to watch a TV program while viewing other programs from any of the main picture. Main Picture Sub Picture SWAP NOTE : 1. When a Digital channel is not available with separate control. SPLIT MODE PICTURE-IN-PICTURE Split Mode PIP displays the main picture and subpicture evenly on the remote. To change the PIP mode, use the CURSOR PAD button on the screen. Main Picture SWAP Sub Picture POP MODE PICTURE-IN-PICTURE POP Mode PIP displays the sub-picture outside of the video inputs. This feature allows...
...;) to watch a TV program while viewing other programs from any of the main picture. Main Picture Sub Picture SWAP NOTE : 1. When a Digital channel is not available with separate control. SPLIT MODE PICTURE-IN-PICTURE Split Mode PIP displays the main picture and subpicture evenly on the remote. To change the PIP mode, use the CURSOR PAD button on the screen. Main Picture SWAP Sub Picture POP MODE PICTURE-IN-PICTURE POP Mode PIP displays the sub-picture outside of the video inputs. This feature allows...

Owners Guide
Page 34
... four digit preset code is entered. Release the ENT button. The remote will now control your set -top-box/satellite (STB) pre-coded mode, use the SOURCE ACCESS buttons (̇ or ̈) on the remote control to position the LED light to set -topbox/satellite receiver. If the set -top-box/satellite systems. 2. box/satellite receiver does not turn ባ off , try a different four digit preset code. - / ቢ ቢ 6. After replacing the batteries repeat the entire programming procedure...
... four digit preset code is entered. Release the ENT button. The remote will now control your set -top-box/satellite (STB) pre-coded mode, use the SOURCE ACCESS buttons (̇ or ̈) on the remote control to position the LED light to set -topbox/satellite receiver. If the set -top-box/satellite systems. 2. box/satellite receiver does not turn ባ off , try a different four digit preset code. - / ቢ ቢ 6. After replacing the batteries repeat the entire programming procedure...
Owners Guide
Page 42
...42 Adjust volume in the rear panel of movies and video types based on a parental guide ratings. Select Optical Output options. NOTE: The Language, Digital Output, and the Dynamic Range Compression feature of the Audio OSD are only available for DTV Signal to block various types of movies and television programming based on motion picture ratings. Label Video Inputs, VCR, DVD, etc. Reset The Software Select to display dialogue/text. Signal Meter Auto Channel Scan Channel List Access Signal Meter. Set The Closed Captions Feature to upgrade TV software. Set The Quick...
...42 Adjust volume in the rear panel of movies and video types based on a parental guide ratings. Select Optical Output options. NOTE: The Language, Digital Output, and the Dynamic Range Compression feature of the Audio OSD are only available for DTV Signal to block various types of movies and television programming based on motion picture ratings. Label Video Inputs, VCR, DVD, etc. Reset The Software Select to display dialogue/text. Signal Meter Auto Channel Scan Channel List Access Signal Meter. Set The Closed Captions Feature to upgrade TV software. Set The Quick...

Owners Guide
Page 44
... adjusting CONTRAST. Adjust the GAIN settings to OFF if the TV experiences picture blocking. Set NOISE REDUCTION to make the colors deeper (+) or normal (-) to Video highlight the Color Management function. When film is turned ON from the VIDEO menu, your Hitachi LCD Television will not be grayed out. When using a Progressive Scan Component or HDMI Input (480p or 720p), AUTO MOVIE MODE will activate the circuitry for television viewing, the disparity between 2 Contrast Mode settings. Adjust...
... adjusting CONTRAST. Adjust the GAIN settings to OFF if the TV experiences picture blocking. Set NOISE REDUCTION to make the colors deeper (+) or normal (-) to Video highlight the Color Management function. When film is turned ON from the VIDEO menu, your Hitachi LCD Television will not be grayed out. When using a Progressive Scan Component or HDMI Input (480p or 720p), AUTO MOVIE MODE will activate the circuitry for television viewing, the disparity between 2 Contrast Mode settings. Adjust...

Owners Guide
Page 51
... the problem. 3.- If No please make changes select Back ; On-Screen Display For using a Cable box, please leave it ON to the TV Guide Instruction Book. 51 Try alternate remote codes to control your cable company. 2. If using and navigating the TV Guide On Screen System please refer to continually receive updated program listings from your VCR. TV Guide On Screen Screen 11: Are the settings correct ? Skip this step , will appear. Screen 14: None of the Hitachi codes appeared...
... the problem. 3.- If No please make changes select Back ; On-Screen Display For using a Cable box, please leave it ON to the TV Guide Instruction Book. 51 Try alternate remote codes to control your cable company. 2. If using and navigating the TV Guide On Screen System please refer to continually receive updated program listings from your VCR. TV Guide On Screen Screen 11: Are the settings correct ? Skip this step , will appear. Screen 14: None of the Hitachi codes appeared...

Owners Guide
Page 54
... television programs based on the two rating systems used in -Picture will also be blocked. Press the SELECT button to enter the access code. Engage Lock When ENGAGE LOCK is turned on, the picture and sound for Digital Channels only. Use CANADIAN RATINGS to its content (see page 56). Use the NUMBER buttons to select. Enter a new four digit number. When SET CHANNEL LOCK is selected, SET CHANNEL LOCK and SET FRONT PANEL LOCK can block various types of movies and television...
... television programs based on the two rating systems used in -Picture will also be blocked. Press the SELECT button to enter the access code. Engage Lock When ENGAGE LOCK is turned on, the picture and sound for Digital Channels only. Use CANADIAN RATINGS to its content (see page 56). Use the NUMBER buttons to select. Enter a new four digit number. When SET CHANNEL LOCK is selected, SET CHANNEL LOCK and SET FRONT PANEL LOCK can block various types of movies and television...
Owners Guide
Page 68
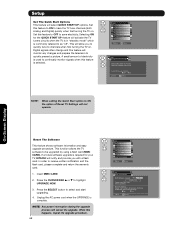
... using a flash card (MMC CARD). A small amount of Reset TV Settings will monitor any changes and prepare the television to have the TV tune channels quickly at 1st turn on . If a future software upgrade is selected. In order to save electricity. Insert MMC CARD 2. Setup Set The Quick Start Options This feature will cancel the upgrade. Digital signals often change and this feature to ON to quickly present a picture. Set this feature will not operate...
... using a flash card (MMC CARD). A small amount of Reset TV Settings will monitor any changes and prepare the television to have the TV tune channels quickly at 1st turn on . If a future software upgrade is selected. In order to save electricity. Insert MMC CARD 2. Setup Set The Quick Start Options This feature will cancel the upgrade. Digital signals often change and this feature to ON to quickly present a picture. Set this feature will not operate...

Owners Guide
Page 79
...'s serial number on a "No Further Upgrades" list, which currently include, but are reserved expressly by applicable law, HITACHI, its licensors, suppliers, parent companies, affiliates, subsidiaries, employees and agents shall not under this Agreement. You may not use within North America only. You may not modify, adapt, translate, reverse engineer, decompile, disassemble or make derivative works from the Software or use one...
...'s serial number on a "No Further Upgrades" list, which currently include, but are reserved expressly by applicable law, HITACHI, its licensors, suppliers, parent companies, affiliates, subsidiaries, employees and agents shall not under this Agreement. You may not use within North America only. You may not modify, adapt, translate, reverse engineer, decompile, disassemble or make derivative works from the Software or use one...

Owners Guide
Page 90
... 47 Black Enhancement 44 Black Side Panel 45 Brightness 43 C P Perfect Volume 48 Photo Input 27 Picture Mode 43 Picture-in-Pictur e (PIP 30-32 Power Swivel 5,8,69 CableCARD 67 Caution and Safety Tips 2-3 Channel Manager 52-53 Auto Channel Scan 52 Clock 60 Closed Captions Captions 65 Color Temperature 44 Color 43 Contrast 43 Contrast Mode 44 E External Video Source 18-22 R Remote Control Functions 23-40 Programming Codes 39-40 Installing Batteries 4 S Screen Saver 63 Sharpness 43 Speakers 47 Connecting External Speakers...
... 47 Black Enhancement 44 Black Side Panel 45 Brightness 43 C P Perfect Volume 48 Photo Input 27 Picture Mode 43 Picture-in-Pictur e (PIP 30-32 Power Swivel 5,8,69 CableCARD 67 Caution and Safety Tips 2-3 Channel Manager 52-53 Auto Channel Scan 52 Clock 60 Closed Captions Captions 65 Color Temperature 44 Color 43 Contrast 43 Contrast Mode 44 E External Video Source 18-22 R Remote Control Functions 23-40 Programming Codes 39-40 Installing Batteries 4 S Screen Saver 63 Sharpness 43 Speakers 47 Connecting External Speakers...


