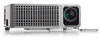
Warranty Guide
Page 2
...stresses. • Software, interfacing, media, parts, or supplies not provided or supported by HP's warranty, HP shall, within a reasonable time after being replaced. 2 Product Warranty period HP Digital Projector xp7010/7030 Series warranty period marked on rear label (excluding items listed below) Number of years marked...product, and do not apply to any hardware product covered by HP's warranty during the applicable warranty period, HP shall either new or like-new, provided that it has functionality at HP's option. 5. HP shall have no obligation to repair, replace, or refund until ...
...stresses. • Software, interfacing, media, parts, or supplies not provided or supported by HP's warranty, HP shall, within a reasonable time after being replaced. 2 Product Warranty period HP Digital Projector xp7010/7030 Series warranty period marked on rear label (excluding items listed below) Number of years marked...product, and do not apply to any hardware product covered by HP's warranty during the applicable warranty period, HP shall either new or like-new, provided that it has functionality at HP's option. 5. HP shall have no obligation to repair, replace, or refund until ...
Support Guide
Page 3
... number for help solving a problem, contact HP telephone support at no additional cost during the limited warranty period. After the warranty period, you add any new hardware or software around the time this happen? Did you will be prepared to provide the following information: • The digital projector's model and serial numbers • The...
... number for help solving a problem, contact HP telephone support at no additional cost during the limited warranty period. After the warranty period, you add any new hardware or software around the time this happen? Did you will be prepared to provide the following information: • The digital projector's model and serial numbers • The...

User Guide
Page 33
... enter, and go to 8 arrow buttons. Set the setup adjustments as menu language, projector position, and menu timeout. If the buttons are not pressed in the order you must call HP support to turn the sound on . To set a new unlock sequence, press the arrow buttons for all available setup adjustments, see "Setup...
... enter, and go to 8 arrow buttons. Set the setup adjustments as menu language, projector position, and menu timeout. If the buttons are not pressed in the order you must call HP support to turn the sound on . To set a new unlock sequence, press the arrow buttons for all available setup adjustments, see "Setup...
User Guide
Page 34
... factory defaults, but you to return selected or all inputs and picture modes. 3. On the remote or the projector, press the up and down , to adjust the setting, as the new defaults. (You can also restore the original factory defaults if needed.) NOTE: This procedure will normally be performed...of your own, using the following procedure. (You can also press the exit button to restore the original factory default settings.) 34 Adjusting the Projector down to highlight the desired menu icon, then press right to open the default settings menu: up or down - This displays the on ...
... factory defaults, but you to return selected or all inputs and picture modes. 3. On the remote or the projector, press the up and down , to adjust the setting, as the new defaults. (You can also restore the original factory defaults if needed.) NOTE: This procedure will normally be performed...of your own, using the following procedure. (You can also press the exit button to restore the original factory default settings.) 34 Adjusting the Projector down to highlight the desired menu icon, then press right to open the default settings menu: up or down - This displays the on ...
User Guide
Page 35
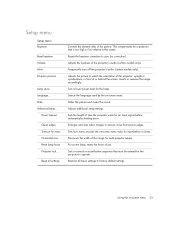
...or low relative to factory default settings. Hides the picture and mutes the sound. Power timeout Clean edges Timeout for the projector to match the orientation of the picture. Inverts or reverses the image accordingly. Restores all settings Corrects the slanted sides of the... menu 35 Adjusts the picture to operate. Adjusts the loudness of use. Setup menu Setup menu Keystone Reset keystone Volume Mute Projector position Lamp saver Language... Hide Advanced setup... Temporarily turns off the projector's audio (certain models only). For a new lamp, resets the hours of the...
...or low relative to factory default settings. Hides the picture and mutes the sound. Power timeout Clean edges Timeout for the projector to match the orientation of the picture. Inverts or reverses the image accordingly. Restores all settings Corrects the slanted sides of the... menu 35 Adjusts the picture to operate. Adjusts the loudness of use. Setup menu Setup menu Keystone Reset keystone Volume Mute Projector position Lamp saver Language... Hide Advanced setup... Temporarily turns off the projector's audio (certain models only). For a new lamp, resets the hours of the...
User Guide
Page 40
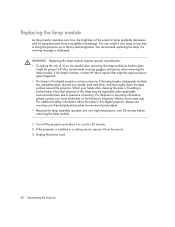
...brightness of mercury. You can install a new lamp at a very high temperature, wait 30 minutes before removing the lamp module. 1. WARNING! If the lamp breaks, adequately ventilate the immediate area, discard any time to bring the projector up to cool for 30 minutes. 2....that might be required due to breakage. If the projector is installed in this digital projector contains mercury. HP also recommends wearing goggles and gloves when removing the lamp module. Unplug the power cord. 40 Maintaining the Projector Replacing the lamp module requires special consideration: • ...
...brightness of mercury. You can install a new lamp at a very high temperature, wait 30 minutes before removing the lamp module. 1. WARNING! If the lamp breaks, adequately ventilate the immediate area, discard any time to bring the projector up to cool for 30 minutes. 2....that might be required due to breakage. If the projector is installed in this digital projector contains mercury. HP also recommends wearing goggles and gloves when removing the lamp module. Unplug the power cord. 40 Maintaining the Projector Replacing the lamp module requires special consideration: • ...

User Guide
Page 41
Loosen the two screws in the lamp cover 1 and remove the cover 2. 5. Performing routine maintenance 41 If the lamp does not turn on the projector. Press enter, go to Setup > Advanced setup > Reset lamp hours, and press enter. Replace the lamp cover and tighten the two screws. 8. Turn on after the warm-up period, try reinstalling the lamp. 9. 4. Remove the two screws 3 from the lamp module, raise the handle 4, and lift out the module 5. 6. Insert the new lamp module into the projector and tighten the two screws. 7.
Loosen the two screws in the lamp cover 1 and remove the cover 2. 5. Performing routine maintenance 41 If the lamp does not turn on the projector. Press enter, go to Setup > Advanced setup > Reset lamp hours, and press enter. Replace the lamp cover and tighten the two screws. 8. Turn on after the warm-up period, try reinstalling the lamp. 9. 4. Remove the two screws 3 from the lamp module, raise the handle 4, and lift out the module 5. 6. Insert the new lamp module into the projector and tighten the two screws. 7.

User Guide
Page 42
Use a ballpoint pen to hold the battery latch toward the center, then pull out the battery holder 1. 2. When discarding old batteries, contact your local waste-disposal provider regarding local restrictions on the disposal or recycling of batteries. 42 Maintaining the Projector Insert the new battery 2 in the remote control 1. Push the holder 3 into the remote control. Replacing the battery in the holder. 3.
Use a ballpoint pen to hold the battery latch toward the center, then pull out the battery holder 1. 2. When discarding old batteries, contact your local waste-disposal provider regarding local restrictions on the disposal or recycling of batteries. 42 Maintaining the Projector Insert the new battery 2 in the remote control 1. Push the holder 3 into the remote control. Replacing the battery in the holder. 3.

User Guide
Page 43
...go to follow the "new hardware found" instructions exactly as shown on -screen instructions. Do not connect the cable to the USB port on -screen menu at http://www.hp.com/support. Connect a USB cable (available from HP) to the projector at this section) and... at Help. Check for the xp7010/xp7030 series projector. 2. When prompted, connect the USB cable to enhance the projector performance. Upgrading the projector Updating the firmware HP might periodically release updated versions of the projector firmware to the projector. The projector firmware version is shown in the...
...go to follow the "new hardware found" instructions exactly as shown on -screen instructions. Do not connect the cable to the USB port on -screen menu at http://www.hp.com/support. Connect a USB cable (available from HP) to the projector at this section) and... at Help. Check for the xp7010/xp7030 series projector. 2. When prompted, connect the USB cable to enhance the projector performance. Upgrading the projector Updating the firmware HP might periodically release updated versions of the projector firmware to the projector. The projector firmware version is shown in the...

User Guide
Page 56
... select another active input source. 56 Fixing Problems Start-up problems If no lights or sounds turn on : • Install a new lamp. If the wrong input source is blinking: • Contact HP for 15 seconds, then plug it in and press the power button again. If the red lamp light is displayed... assistance. Check the tab at the top of the cover and latch at the side of the projector is turned on . On some notebooks, for assistance. If a new lamp does not fix the problem, contact HP for example, press the FN+F4 or FN+F5 function keys to the computer manual. Refer to...
... select another active input source. 56 Fixing Problems Start-up problems If no lights or sounds turn on : • Install a new lamp. If the wrong input source is blinking: • Contact HP for 15 seconds, then plug it in and press the power button again. If the red lamp light is displayed... assistance. Check the tab at the top of the cover and latch at the side of the projector is turned on . On some notebooks, for assistance. If a new lamp does not fix the problem, contact HP for example, press the FN+F4 or FN+F5 function keys to the computer manual. Refer to...


