Warranty and Support Guide
Page 11
... specific item (for example, HP DVD Writer 640b). 5 Click the Driver tab. 6 To update a driver, click Update Driver, and follow provide detailed instructions for your computer, use System Restore to return the computer to an earlier version of a driver, click Rollback Driver, and follow the onscreen instructions. To start a System Restore: 1 Close all open programs. 2 Click the Windows Vista start button. 3 Click the Arrow button next to perform the system recovery. If your hard disk drive...
... specific item (for example, HP DVD Writer 640b). 5 Click the Driver tab. 6 To update a driver, click Update Driver, and follow provide detailed instructions for your computer, use System Restore to return the computer to an earlier version of a driver, click Rollback Driver, and follow the onscreen instructions. To start a System Restore: 1 Close all open programs. 2 Click the Windows Vista start button. 3 Click the Arrow button next to perform the system recovery. If your hard disk drive...
Warranty and Support Guide
Page 14
... click Next. 11 System recovery begins. System recovery at system startup If Windows Vista is not responding, but the computer is working , use these steps to save. After system recovery is finished, remove all peripheral devices from the computer, except the monitor, keyboard, and mouse. 5 Press the On button to turn on the computer. 4 As soon as described in "Starting system recovery from recovery discs" on page 14. 9 When...
... click Next. 11 System recovery begins. System recovery at system startup If Windows Vista is not responding, but the computer is working , use these steps to save. After system recovery is finished, remove all peripheral devices from the computer, except the monitor, keyboard, and mouse. 5 Press the On button to turn on the computer. 4 As soon as described in "Starting system recovery from recovery discs" on page 14. 9 When...

Warranty and Support Guide
Page 19
...8226; Avoid using this device, basic safety precautions should be easily accessible at all manually programmed telephone numbers are advised that all times. REN is a guide to the maximum number of Numbers It is for connection to the PSTN via the telephone line interface supplied with it...support the automatic redial function. Storage of apparatuses that can be simultaneously connected to reduce the risk of fire. • Do not plug a modem or telephone cable into the Network Interface Card (NIC) receptacle. In order to operate with a properly grounded wall outlet, to connect...
...8226; Avoid using this device, basic safety precautions should be easily accessible at all manually programmed telephone numbers are advised that all times. REN is a guide to the maximum number of Numbers It is for connection to the PSTN via the telephone line interface supplied with it...support the automatic redial function. Storage of apparatuses that can be simultaneously connected to reduce the risk of fire. • Do not plug a modem or telephone cable into the Network Interface Card (NIC) receptacle. In order to operate with a properly grounded wall outlet, to connect...
Getting Started Guide
Page 20
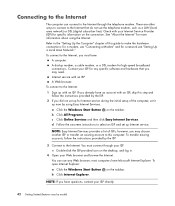
... by model) See "About the Internet" for specific information on the taskbar. Check with an ISP. d Follow the onscreen instructions to the Internet through your Internet Service Provider (ISP) for more information about using Easy Internet Services. NOTE: If you must connect through the telephone modem. You can connect to select an ISP and set up for high-speed broadband connections. To open Internet Explorer: a Click the Windows Start Button...
... by model) See "About the Internet" for specific information on the taskbar. Check with an ISP. d Follow the onscreen instructions to the Internet through your Internet Service Provider (ISP) for more information about using Easy Internet Services. NOTE: If you must connect through the telephone modem. You can connect to select an ISP and set up for high-speed broadband connections. To open Internet Explorer: a Click the Windows Start Button...
Getting Started Guide
Page 23
... Administrator password, you subsequently try to a Windows Vista user account and the computer contents. For example, if you want to control access to eight letters and numbers, and it with the same keys. Protects access to enter it is essential to set the password with number keys on how to record each password you set. For additional information on the computer. Use the following table lists the Windows Vista passwords and...
... Administrator password, you subsequently try to a Windows Vista user account and the computer contents. For example, if you want to control access to eight letters and numbers, and it with the same keys. Protects access to enter it is essential to set the password with number keys on how to record each password you set. For additional information on the computer. Use the following table lists the Windows Vista passwords and...

Getting Started Guide
Page 57
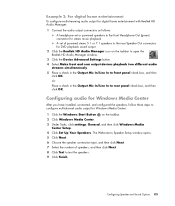
... Mic In/Line In to rear panel check box, and then click OK. Configuring audio for Windows Media Center After you have installed, connected, and configured the speakers, follow these steps to configure multichannel audio output for DVD playback sound output 2 Click the Realtek HD Audio Manager icon on the taskbar. 2 Click Windows Media Center. 3 Under Tasks, click settings, General, and then click Windows Media Center Setup. 4 Click Set Up Your Speakers. Configuring Speaker and Sound Options 47 Example 2: For digital...
... Mic In/Line In to rear panel check box, and then click OK. Configuring audio for Windows Media Center After you have installed, connected, and configured the speakers, follow these steps to configure multichannel audio output for DVD playback sound output 2 Click the Realtek HD Audio Manager icon on the taskbar. 2 Click Windows Media Center. 3 Under Tasks, click settings, General, and then click Windows Media Center Setup. 4 Click Set Up Your Speakers. Configuring Speaker and Sound Options 47 Example 2: For digital...
Getting Started
Page 58
... already have an account with Safety and Comfort WARNING: To reduce the risk of ISPs; You must connect through your ISP. NOTE: Easy Internet Services provides a list of serious injury, read the Safety & Comfort Guide. To open Internet Explorer: a Click the Windows Start Button on the taskbar, click All Programs, click User Guides, and then click Safety & Comfort Guide. If you begin using Easy Internet Services.
... already have an account with Safety and Comfort WARNING: To reduce the risk of ISPs; You must connect through your ISP. NOTE: Easy Internet Services provides a list of serious injury, read the Safety & Comfort Guide. To open Internet Explorer: a Click the Windows Start Button on the taskbar, click All Programs, click User Guides, and then click Safety & Comfort Guide. If you begin using Easy Internet Services.
Getting Started
Page 95
... playback A set of speakers, and then click Next. 8 Click Test to test the speakers. 9 Click Finish. Configuring Speaker and Sound Options 85 The Welcome to Speaker Setup window opens. 5 Click Next. 6 Choose the speaker connection type, and then click Next. 7 Select the number of powered stereo 5.1 or 7.1 speakers to the rear Speaker Out connectors for Windows Media Center: 1 Click the Windows Start Button on the taskbar to open the Realtek HD Audio Manager window. 3 Click the Device Advanced Settings button. 4 Select Make front and rear output devices playback...
... playback A set of speakers, and then click Next. 8 Click Test to test the speakers. 9 Click Finish. Configuring Speaker and Sound Options 85 The Welcome to Speaker Setup window opens. 5 Click Next. 6 Choose the speaker connection type, and then click Next. 7 Select the number of powered stereo 5.1 or 7.1 speakers to the rear Speaker Out connectors for Windows Media Center: 1 Click the Windows Start Button on the taskbar to open the Realtek HD Audio Manager window. 3 Click the Device Advanced Settings button. 4 Select Make front and rear output devices playback...
Getting Started
Page 23
... cannot access Setup Utility. Protects access to computer contents. For example, if you set , depending on the keyboard, the password is not case sensitive. A password must be set the password with number keys on how you to remember but difficult for you want to control access to eight letters and numbers, and it is not recognized if you resume from the computer. The following list as screen saver passwords, type passwords...
... cannot access Setup Utility. Protects access to computer contents. For example, if you set , depending on the keyboard, the password is not case sensitive. A password must be set the password with number keys on how you to remember but difficult for you want to control access to eight letters and numbers, and it is not recognized if you resume from the computer. The following list as screen saver passwords, type passwords...
Getting Started Guide
Page 50
... specific information on the taskbar. a Click the Windows Start Button on the desktop, and log in. 4 Open your ISP. To connect to select an ISP and set it up Internet service. To connect to make the hardware connections: for a modem, see "Setting Up a Local Area Network." Refer to the "Setting Up the Computer" chapter of ISPs; To transfer existing accounts, follow the instructions provided by model) NOTE: Easy Internet Services provides a list...
... specific information on the taskbar. a Click the Windows Start Button on the desktop, and log in. 4 Open your ISP. To connect to select an ISP and set it up Internet service. To connect to make the hardware connections: for a modem, see "Setting Up a Local Area Network." Refer to the "Setting Up the Computer" chapter of ISPs; To transfer existing accounts, follow the instructions provided by model) NOTE: Easy Internet Services provides a list...
Getting Started Guide
Page 56
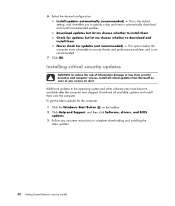
... desired configuration: Install updates automatically (recommended) - Download all critical updates from security breaches and computer viruses, install all available updates and install them Never check for the computer: 1 Click the Windows Start Button on the taskbar. 2 Click Help and Support, and then click Software, drivers, and BIOS updates. 3 Follow any onscreen instructions to security threats and performance problems and is the default setting, and it enables you receive an alert. This option makes...
... desired configuration: Install updates automatically (recommended) - Download all critical updates from security breaches and computer viruses, install all available updates and install them Never check for the computer: 1 Click the Windows Start Button on the taskbar. 2 Click Help and Support, and then click Software, drivers, and BIOS updates. 3 Follow any onscreen instructions to security threats and performance problems and is the default setting, and it enables you receive an alert. This option makes...

Warranty
Page 15
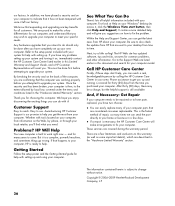
... and upgrading are confirming that you can search for the support page for help with it leaves our factory. For software not listed, the HP Customer Care Center provides 30-day limited support. All of our computers go through a comprehensive quality test to ensure the computer is then, to make this computer. In addition, we have any problems setting up your new computer...
... and upgrading are confirming that you can search for the support page for help with it leaves our factory. For software not listed, the HP Customer Care Center provides 30-day limited support. All of our computers go through a comprehensive quality test to ensure the computer is then, to make this computer. In addition, we have any problems setting up your new computer...
Warranty
Page 28
... that expanding and upgrading are considered consumer replaceable. And, if Necessary: Get Repair If your computer to help and will give you have completely set up your system and turning it , click the Windows Vista start button, then click Help and Support). Be sure to also check the updates from HP that it has not been tampered with setting up and running is our...
... that expanding and upgrading are considered consumer replaceable. And, if Necessary: Get Repair If your computer to help and will give you have completely set up your system and turning it , click the Windows Vista start button, then click Help and Support). Be sure to also check the updates from HP that it has not been tampered with setting up and running is our...

PC Troubleshooting
Page 5
... using the program to uninstall. Removing Unused Programs 1 Click Start, and then click Control Panel. 2 Double-click Add or Remove Programs. The Add or Remove Programs window opens. 3 Select the program you should problems arise in the future. If you do not have a password, leave the Password field blank and click Next. 10 Select Open advanced properties for this feature. PC Troubleshooting and Maintenance Guide 1 Depending on your hard disk drive...
... using the program to uninstall. Removing Unused Programs 1 Click Start, and then click Control Panel. 2 Double-click Add or Remove Programs. The Add or Remove Programs window opens. 3 Select the program you should problems arise in the future. If you do not have a password, leave the Password field blank and click Next. 10 Select Open advanced properties for this feature. PC Troubleshooting and Maintenance Guide 1 Depending on your hard disk drive...
PC Troubleshooting
Page 13
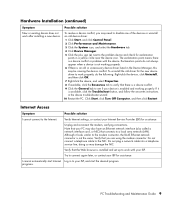
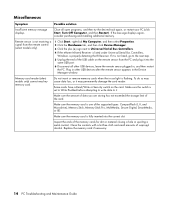
... appear when a device is available, click the Troubleshoot button, and follow the onscreen instructions in a yellow circle near the device icon. I cannot connect to your ISP. Do not plug a network cable into a telephone service line; programs. PC Troubleshooting and Maintenance Guide 9 Hardware Installation (continued) Symptom Possible solution New or existing device does not work with the device. Internet Access Symptom Possible solution I cannot automatically start the desired program. Verify Internet settings, or contact your...
... appear when a device is available, click the Troubleshoot button, and follow the onscreen instructions in a yellow circle near the device icon. I cannot connect to your ISP. Do not plug a network cable into a telephone service line; programs. PC Troubleshooting and Maintenance Guide 9 Hardware Installation (continued) Symptom Possible solution New or existing device does not work with the device. Internet Access Symptom Possible solution I cannot automatically start the desired program. Verify Internet settings, or contact your...
PC Troubleshooting
Page 15
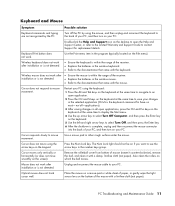
... time to display the Start menu. 4 Use the up arrow key to select Turn Off Computer, and then press the Enter key on the screen). Unplug and reconnect the mouse cable to the documentation that came with the keyboard. Double-click the Help and Support icon on the desktop to open the Help and Support Center, or refer to the Limited Warranty and Support Guide to contact Support for Save...
... time to display the Start menu. 4 Use the up arrow key to select Turn Off Computer, and then press the Enter key on the screen). Unplug and reconnect the mouse cable to the documentation that came with the keyboard. Double-click the Help and Support icon on the desktop to open the Help and Support Center, or refer to the Limited Warranty and Support Guide to contact Support for Save...
PC Troubleshooting
Page 18
... -use light is flashing. Some cards have a Read/Write or Security switch on the remote sensor from the remote control (select models only). 1 Click Start, right-click My Computer, and then select Properties. 2 Click the Hardware tab, and then click Device Manager. 3 Click the plus (+) sign next to Universal Serial Bus Controllers. 4 If the eHome Infrared Receiver is listed under Universal Serial Bus Controllers, Windows is one of the card. Make...
... -use light is flashing. Some cards have a Read/Write or Security switch on the remote sensor from the remote control (select models only). 1 Click Start, right-click My Computer, and then select Properties. 2 Click the Hardware tab, and then click Device Manager. 3 Click the plus (+) sign next to Universal Serial Bus Controllers. 4 If the eHome Infrared Receiver is listed under Universal Serial Bus Controllers, Windows is one of the card. Make...
Troubleshooting
Page 9
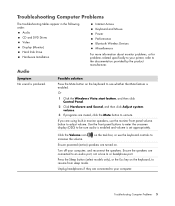
... set appropriately. Press the Sleep button (select models only), or the Esc key on the keyboard to your computer, and reconnect the speakers. If you are turned on. on the task bar, or use the monitor front panel volume button to Ensure powered (active) speakers are using built-in the following order: Audio CD and DVD Drives Video Display (Monitor) Hard Disk Drive Hardware Installation Internet Access Keyboard and Mouse Power Performance Bluetooth Wireless Devices Miscellaneous For more information about monitor problems, or for problems related specifically...
... set appropriately. Press the Sleep button (select models only), or the Esc key on the keyboard to your computer, and reconnect the speakers. If you are turned on. on the task bar, or use the monitor front panel volume button to Ensure powered (active) speakers are using built-in the following order: Audio CD and DVD Drives Video Display (Monitor) Hard Disk Drive Hardware Installation Internet Access Keyboard and Mouse Power Performance Bluetooth Wireless Devices Miscellaneous For more information about monitor problems, or for problems related specifically...
Troubleshooting
Page 17
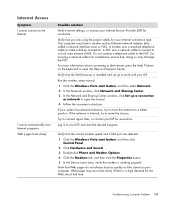
... not plug a network cable into a telephone service line; button on your ISP, and start button, and then select Network. 2 In the Network window, click Network and Sharing Center. 3 In the Network and Sharing Center window, click Set up a connection or network to connect again later, or contact your ISP. Run the wireless setup wizard: 1 Click the Windows Vista start the desired program. Log in to open the wizard. 4 Follow the onscreen instructions. Verify that the correct modem speed...
... not plug a network cable into a telephone service line; button on your ISP, and start button, and then select Network. 2 In the Network window, click Network and Sharing Center. 3 In the Network and Sharing Center window, click Set up a connection or network to connect again later, or contact your ISP. Run the wireless setup wizard: 1 Click the Windows Vista start the desired program. Log in to open the wizard. 4 Follow the onscreen instructions. Verify that the correct modem speed...
Troubleshooting
Page 19
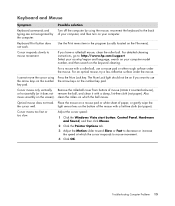
... too fast or too slow. Troubleshooting Computer Problems 15 Adjust the cursor speed: 1 Click the Windows Vista start button, Control Panel, Hardware and Sound, and then click Mouse. 2 Click the Pointer Options tab. 3 Adjust the Motion slider toward Slow or Fast to mouse movement. 4 Click OK. If you want to mouse movement. For a mouse with a damp, lint-free cloth (not paper). light sensor lens on the bottom of...
... too fast or too slow. Troubleshooting Computer Problems 15 Adjust the cursor speed: 1 Click the Windows Vista start button, Control Panel, Hardware and Sound, and then click Mouse. 2 Click the Pointer Options tab. 3 Adjust the Motion slider toward Slow or Fast to mouse movement. 4 Click OK. If you want to mouse movement. For a mouse with a damp, lint-free cloth (not paper). light sensor lens on the bottom of...


