User Guide
Page 3
... features 8 Projector at a glance 8 Projector buttons and lights 9 Back panel 10 Remote control 11 Accessories 12 Setting up the projector 13 Positioning the projector 13 Connecting power 15 Connecting a computer 16 Connecting a handheld organizer 17 Connecting a video source 18 Turning the projector on and off 22 Removing the lens cover 22 Turning the projector on 23 Turning the projector off 24 Moving the projector 24 Making basic adjustments 25 Aiming the projector 25 Adjusting the focus and zoom 26 Using the remote control 27 2 Showing...
... features 8 Projector at a glance 8 Projector buttons and lights 9 Back panel 10 Remote control 11 Accessories 12 Setting up the projector 13 Positioning the projector 13 Connecting power 15 Connecting a computer 16 Connecting a handheld organizer 17 Connecting a video source 18 Turning the projector on and off 22 Removing the lens cover 22 Turning the projector on 23 Turning the projector off 24 Moving the projector 24 Making basic adjustments 25 Aiming the projector 25 Adjusting the focus and zoom 26 Using the remote control 27 2 Showing...
User Guide
Page 4
... menu 36 Changing settings using the on-screen menu 36 Quick choice menu 37 Input menu 37 Picture menu 38 Setup menu 39 Help menu 39 4 Maintaining the Projector Performing routine maintenance 41 Getting the projector status 41 Cleaning the projector and lens 41 Replacing the lamp module 42 Replacing the battery in the remote control 44 Upgrading the projector 45 Updating the firmware 45 5 Installing Permanently Installing the projector 47 Choosing cables 47 Installing on a table 47 Installing for rear projection 48 Locking the projector 48 6 Fixing Problems Troubleshooting...
... menu 36 Changing settings using the on-screen menu 36 Quick choice menu 37 Input menu 37 Picture menu 38 Setup menu 39 Help menu 39 4 Maintaining the Projector Performing routine maintenance 41 Getting the projector status 41 Cleaning the projector and lens 41 Replacing the lamp module 42 Replacing the battery in the remote control 44 Upgrading the projector 45 Updating the firmware 45 5 Installing Permanently Installing the projector 47 Choosing cables 47 Installing on a table 47 Installing for rear projection 48 Locking the projector 48 6 Fixing Problems Troubleshooting...
User Guide
Page 9
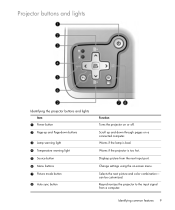
Projector buttons and lights Identifying the projector buttons and lights Item 1 Power button 2 Page-up and down buttons 3 Lamp warning light 4 Temperature warning light 5 Source button 6 Menu buttons 7 Picture mode button 8 Auto sync button Function Turns the projector on -screen menu. Change settings using the on or off. Resynchronizes the projector to the input signal from the next input port. Scroll up and Page-down through pages on a connected computer. Warns if the lamp is too hot. Selects the next picture and color combination- Displays picture from a computer. can be ...
Projector buttons and lights Identifying the projector buttons and lights Item 1 Power button 2 Page-up and down buttons 3 Lamp warning light 4 Temperature warning light 5 Source button 6 Menu buttons 7 Picture mode button 8 Auto sync button Function Turns the projector on -screen menu. Change settings using the on or off. Resynchronizes the projector to the input signal from the next input port. Scroll up and Page-down through pages on a connected computer. Warns if the lamp is too hot. Selects the next picture and color combination- Displays picture from a computer. can be ...

User Guide
Page 11
Turns the projector on a connected computer. Remote control TIP: Before using the remote control, remove the battery protector by pulling the plastic tab until it comes out of the remote control Item 1 Hide button 2 Mouse pad 3 Power button 4 Left-click and right-click mouse buttons 5 Page-up and down buttons Function Blanks the picture. Requires USB cable. Requires USB cable. Requires USB cable. Identifying common features 11 Scroll up and Page-down through pages...
Turns the projector on a connected computer. Remote control TIP: Before using the remote control, remove the battery protector by pulling the plastic tab until it comes out of the remote control Item 1 Hide button 2 Mouse pad 3 Power button 4 Left-click and right-click mouse buttons 5 Page-up and down buttons Function Blanks the picture. Requires USB cable. Requires USB cable. Requires USB cable. Identifying common features 11 Scroll up and Page-down through pages...
User Guide
Page 12
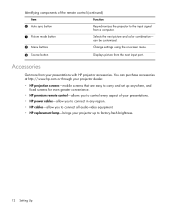
...; HP power cables-allow you to connect in any region. • HP cables-allow you to connect all audio-video equipment. • HP replacement lamp-brings your projector up anywhere, and fixed screens for even greater convenience. • HP premium remote control-allows you to control every aspect of the remote control (continued) Item Function 6 Auto sync button Resynchronizes the projector to factory-fresh brightness. 12 Setting Up You can be customized. 8 Menu buttons Change settings using the on-screen menu. 9 Source button Displays picture from your projector dealer...
...; HP power cables-allow you to connect in any region. • HP cables-allow you to connect all audio-video equipment. • HP replacement lamp-brings your projector up anywhere, and fixed screens for even greater convenience. • HP premium remote control-allows you to control every aspect of the remote control (continued) Item Function 6 Auto sync button Resynchronizes the projector to factory-fresh brightness. 12 Setting Up You can be customized. 8 Menu buttons Change settings using the on-screen menu. 9 Source button Displays picture from your projector dealer...
User Guide
Page 23
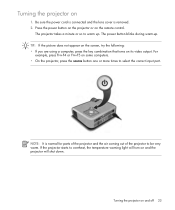
... video output. TIP: If the picture does not appear on the screen, try the following: • If you are using a computer, press the key combination that turns on 1. NOTE: It is removed. 2. Be sure the power cord is connected and the lens cover is normal for parts of the projector and the air coming out of the projector to overheat, the temperature warning light will shut down. Press the power button...
... video output. TIP: If the picture does not appear on the screen, try the following: • If you are using a computer, press the key combination that turns on 1. NOTE: It is removed. 2. Be sure the power cord is connected and the lens cover is normal for parts of the projector and the air coming out of the projector to overheat, the temperature warning light will shut down. Press the power button...
User Guide
Page 25
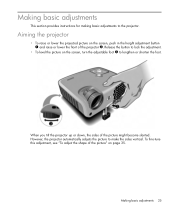
... projected picture on the screen, push in the height adjustment button 1 and raise or lower the front of the picture" on the screen, turn the adjustable foot 3 to lock the adjustment. • To level the picture on page 35. However, the projector automatically adjusts the picture to the projector. Release the button to lengthen or shorten the foot. Making basic adjustments 25 To fine-tune this adjustment, see "To adjust...
... projected picture on the screen, push in the height adjustment button 1 and raise or lower the front of the picture" on the screen, turn the adjustable foot 3 to lock the adjustment. • To level the picture on page 35. However, the projector automatically adjusts the picture to the projector. Release the button to lengthen or shorten the foot. Making basic adjustments 25 To fine-tune this adjustment, see "To adjust...
User Guide
Page 29
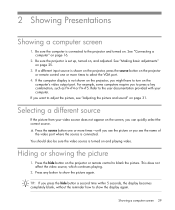
... to adjust the picture, see the name of the video port where the source is connected to show the picture again. TIP: If you see "Adjusting the picture and sound" on the computer's video output port. This does not affect the video source, which continues playing. 2. Press any button to turn on page 31. 2 Showing Presentations Showing a computer screen 1. If the computer display is turned on the projector or remote control one...
... to adjust the picture, see the name of the video port where the source is connected to show the picture again. TIP: If you see "Adjusting the picture and sound" on the computer's video output port. This does not affect the video source, which continues playing. 2. Press any button to turn on page 31. 2 Showing Presentations Showing a computer screen 1. If the computer display is turned on the projector or remote control one...

User Guide
Page 34
... the picture settings on page 38. 34 Adjusting the Projector Do them in bright areas. Go to Customize picture mode > Color temperature. Adjust to the setting where colors look most natural. 9. Go to Customize picture mode > White intensity. Adjust this setting above 0 as customize the picture modes. You should have minimal effect on -screen menu provides many picture options, such as brightness, contrast, and picture shape, as well as needed . You can view...
... the picture settings on page 38. 34 Adjusting the Projector Do them in bright areas. Go to Customize picture mode > Color temperature. Adjust to the setting where colors look most natural. 9. Go to Customize picture mode > White intensity. Adjust this setting above 0 as customize the picture modes. You should have minimal effect on -screen menu provides many picture options, such as brightness, contrast, and picture shape, as well as needed . You can view...
User Guide
Page 38
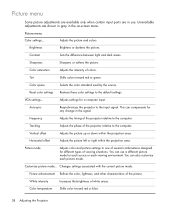
...blue. 38 Adjusting the Projector Color space Selects the color standard used by the source. Adjusts settings for any change in the signal. Auto-sync Resynchronizes the projector to the computer. This can compensate for a computer input. Frequency Adjusts the timing of viewing situations. Customize picture mode... Picture menu Some picture adjustments are available only when certain input ports are shown in gray in the on-screen menu. Picture mode Adjusts color and picture settings to the default settings. Color temperature Shifts color toward red or green...
...blue. 38 Adjusting the Projector Color space Selects the color standard used by the source. Adjusts settings for any change in the signal. Auto-sync Resynchronizes the projector to the computer. This can compensate for a computer input. Frequency Adjusts the timing of viewing situations. Customize picture mode... Picture menu Some picture adjustments are available only when certain input ports are shown in gray in the on-screen menu. Picture mode Adjusts color and picture settings to the default settings. Color temperature Shifts color toward red or green...
User Guide
Page 39
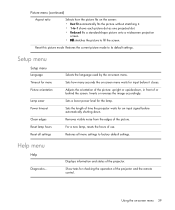
... the on-screen menu waits for input before automatically shutting down , in front of or behind the screen. Sets the length of the projector and the remote control. For a new lamp, resets the hours of the picture. Help menu Help Diagnostics... Using the on-screen menu 39 Reset this picture mode Restores the current picture mode to factory default settings. Sets a lower power level for checking the operation of time the projector waits for menu Picture orientation Lamp saver Power timeout Clean edges Reset lamp hours Reset all menu settings to its default settings. Show tests...
... the on-screen menu waits for input before automatically shutting down , in front of or behind the screen. Sets the length of the projector and the remote control. For a new lamp, resets the hours of the picture. Help menu Help Diagnostics... Using the on-screen menu 39 Reset this picture mode Restores the current picture mode to factory default settings. Sets a lower power level for checking the operation of time the projector waits for menu Picture orientation Lamp saver Power timeout Clean edges Reset lamp hours Reset all menu settings to its default settings. Show tests...
User Guide
Page 42
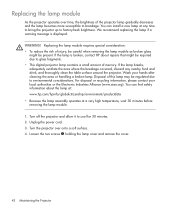
WARNING! If the lamp is displayed. Disposal of this lamp may be required due to glass fragments. • This digital projector lamp contains a small amount of mercury. Loosen the two screws 1 holding the lamp cover and remove the cover. 42 Maintaining the Projector We recommend replacing the lamp if a warning message is broken, contact HP about the lamp at: www.hp.com/hpinfo/globalcitizenship/environment/productdata • Because the lamp assembly operates at...
WARNING! If the lamp is displayed. Disposal of this lamp may be required due to glass fragments. • This digital projector lamp contains a small amount of mercury. Loosen the two screws 1 holding the lamp cover and remove the cover. 42 Maintaining the Projector We recommend replacing the lamp if a warning message is broken, contact HP about the lamp at: www.hp.com/hpinfo/globalcitizenship/environment/productdata • Because the lamp assembly operates at...

User Guide
Page 49
... you restart the projector, remove and reinstall the lamp module. • Install a new lamp. Observe temperature and altitude limits (see "Specifications" on or blinks after it turns off. Remove any sources of this chapter: • "Warning light problems" on page 49 • "Start-up problems" on page 50 • "Picture problems" on page 50 • "Sound problems" on page 53 • "Interruption problems" on page 53 • "Remote control problems" on the projector, and that section...
... you restart the projector, remove and reinstall the lamp module. • Install a new lamp. Observe temperature and altitude limits (see "Specifications" on or blinks after it turns off. Remove any sources of this chapter: • "Warning light problems" on page 49 • "Start-up problems" on page 50 • "Picture problems" on page 50 • "Sound problems" on page 53 • "Interruption problems" on page 53 • "Remote control problems" on the projector, and that section...
User Guide
Page 50
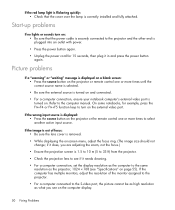
... display resolution as the computer to the same resolution as what you are adjusting the zoom, not the focus.) • Ensure the projection screen is turned on. If the red lamp light is flickering quickly: • Check that the power cable is securely connected to the projector and the other end is removed. • While displaying the on the external video port. Start-up problems If no lights or sounds turn on -screen menu, adjust the focus ring. (The image size should not change...
... display resolution as the computer to the same resolution as what you are adjusting the zoom, not the focus.) • Ensure the projection screen is turned on. If the red lamp light is flickering quickly: • Check that the power cable is securely connected to the projector and the other end is removed. • While displaying the on the external video port. Start-up problems If no lights or sounds turn on -screen menu, adjust the focus ring. (The image size should not change...
User Guide
Page 52
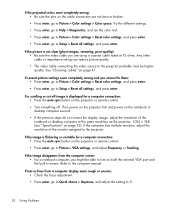
... projector or remote control. • Press enter, go to Picture > VGA settings, and adjust Frequency or Tracking. If the picture is not clear (ghost images, smearing, poor quality): • Be sure the video cable you are using is displayed for a computer connection: • Press the auto sync button on the cable connectors are not bent or broken. • Press enter, go to Quick choice > Keystone, and adjust the setting to Setup > Reset all settings...
... projector or remote control. • Press enter, go to Picture > VGA settings, and adjust Frequency or Tracking. If the picture is not clear (ghost images, smearing, poor quality): • Be sure the video cable you are using is displayed for a computer connection: • Press the auto sync button on the cable connectors are not bent or broken. • Press enter, go to Quick choice > Keystone, and adjust the setting to Setup > Reset all settings...
User Guide
Page 53
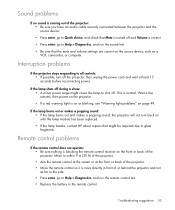
... replaced. • If the lamp breaks, contact HP about repairs that might be required due to Help > Diagnostics, and run the remote control test. • Replace the battery in front of or behind the projector and not as far to the side. • Press enter, go to Help > Diagnostics, and run the sound test. • Be sure that Mute is turned off . Sound problems...
... replaced. • If the lamp breaks, contact HP about repairs that might be required due to Help > Diagnostics, and run the remote control test. • Replace the battery in front of or behind the projector and not as far to the side. • Press enter, go to Help > Diagnostics, and run the sound test. • Be sure that Mute is turned off . Sound problems...
User Guide
Page 55
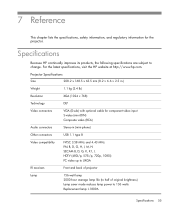
...) Resolution XGA (1024 × 768) Technology DLP Video connectors VGA (D-sub) with optional cable for the projector. Specifications Because HP continually improves its products, the following specifications are subject to 136 watts Replacement lamp: L1809A Specifications 55 For the latest specifications, visit the HP website at http://www.hp.com. 7 Reference This chapter lists the specifications, safety information, and regulatory information for component-video input S-video (mini-DIN) Composite video (RCA) Audio...
...) Resolution XGA (1024 × 768) Technology DLP Video connectors VGA (D-sub) with optional cable for the projector. Specifications Because HP continually improves its products, the following specifications are subject to 136 watts Replacement lamp: L1809A Specifications 55 For the latest specifications, visit the HP website at http://www.hp.com. 7 Reference This chapter lists the specifications, safety information, and regulatory information for component-video input S-video (mini-DIN) Composite video (RCA) Audio...
User Guide
Page 58
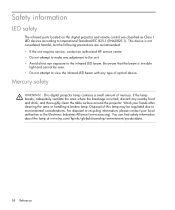
... The infrared ports located on the digital projector and remote control are recommended: • If the unit requires service, contact an authorized HP service center. • Do not attempt to make any adjustment to the unit. • Avoid direct eye exposure to the infrared LED beam. For disposal or recycling information, please contact your hands after cleaning the area or handling a broken lamp.
... The infrared ports located on the digital projector and remote control are recommended: • If the unit requires service, contact an authorized HP service center. • Do not attempt to make any adjustment to the unit. • Avoid direct eye exposure to the infrared LED beam. For disposal or recycling information, please contact your hands after cleaning the area or handling a broken lamp.
User Guide
Page 63
... L lamp, replacing 42 LED safety 58 lens, cleaning 41 lights. warning lights locking projector 48 M menu language 39 listing 36 using 27 replacing lamp 42 room layout 13 Index 63 See lamp; See menu P PC. See computer picture focus 26 hiding and showing 29 quality of picture 13, 18, 52 R rear projection installation 48 regulatory information 59 remote control buttons 11 installing batteries 44 opening menu 36 C cables choosing 47 connections 18 choosing cables 47 cleaning 5, 41 component-video connecting source 19 port 10 composite-video connecting source...
... L lamp, replacing 42 LED safety 58 lens, cleaning 41 lights. warning lights locking projector 48 M menu language 39 listing 36 using 27 replacing lamp 42 room layout 13 Index 63 See lamp; See menu P PC. See computer picture focus 26 hiding and showing 29 quality of picture 13, 18, 52 R rear projection installation 48 regulatory information 59 remote control buttons 11 installing batteries 44 opening menu 36 C cables choosing 47 connections 18 choosing cables 47 cleaning 5, 41 component-video connecting source 19 port 10 composite-video connecting source...

User Guide
Page 64
...18 screen positioning 14 security locking cable 48 selecting video source 29 setting up 13 shape, adjusting 32 showing picture 29 showing presentations 29 slanted picture, adjusting 33 specifications 55 S-video connecting source 20 port 10 T table installation 13, 47 troubleshooting audio 53 interruptions 53 picture 50 remote control 53 start-up 50 warning lights 49 turning on and off 22 U updating firmware 45 upgrading projector 45 USB, connecting 16 using remote control 27 V VGA connecting source 16, 17 port 10 video mode compatibility 57 video source, selecting 29 W warning lights location...
...18 screen positioning 14 security locking cable 48 selecting video source 29 setting up 13 shape, adjusting 32 showing picture 29 showing presentations 29 slanted picture, adjusting 33 specifications 55 S-video connecting source 20 port 10 T table installation 13, 47 troubleshooting audio 53 interruptions 53 picture 50 remote control 53 start-up 50 warning lights 49 turning on and off 22 U updating firmware 45 upgrading projector 45 USB, connecting 16 using remote control 27 V VGA connecting source 16, 17 port 10 video mode compatibility 57 video source, selecting 29 W warning lights location...


