
2011 Business LCD Monitor Quick Reference Guide
Page 1
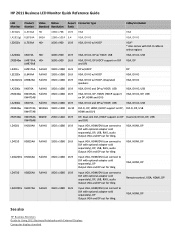
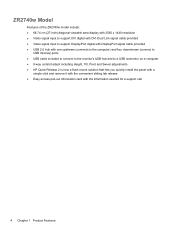
HP 2011 Business LCD Monitor Quick Reference Guide LCD Product Video Native Aspect Connector type Monitor Number Standard Resolution Ratio Cable/s included LE1902x LL574AA HD 1366 x 768 16:9 VGA VGA LA1951gl XL875AA SXGA 1280 x 1024 5:4 VGA, DVI-D VGA, DVI-D LE2002x LL763AA HD+ 1600 x 900 16:9 VGA, DVI-D w/ HDCP VGA* * Also comes with DVI-D cable in select regions LA2006x XN374A HD+ 1600 x 900 16:9 VGA, DVI-D, DP w/ HDCP, USB VGA, DVI-D, USB ZR2040w LM975A4, HD+ LM975A8 1600 x 900 16:9 VGA, DVI-D, DP (HDCP support on...
HP 2011 Business LCD Monitor Quick Reference Guide LCD Product Video Native Aspect Connector type Monitor Number Standard Resolution Ratio Cable/s included LE1902x LL574AA HD 1366 x 768 16:9 VGA VGA LA1951gl XL875AA SXGA 1280 x 1024 5:4 VGA, DVI-D VGA, DVI-D LE2002x LL763AA HD+ 1600 x 900 16:9 VGA, DVI-D w/ HDCP VGA* * Also comes with DVI-D cable in select regions LA2006x XN374A HD+ 1600 x 900 16:9 VGA, DVI-D, DP w/ HDCP, USB VGA, DVI-D, USB ZR2040w LM975A4, HD+ LM975A8 1600 x 900 16:9 VGA, DVI-D, DP (HDCP support on...
User Guide
Page 5
... and Connecting the Cables 11 ZR2040w Model ...11 ZR2240w, ZR2440w, and ZR2740w Models 13 Mounting the Monitor to User-Supplied Support Hardware 14 Mounting the ZR2040w Panel 15 Mounting a Quick-Release Panel 16 Locating the Information Card (Select Models 18 Installing a Cable Lock ...19 Turning on the Monitor ...19 Adjusting the Monitor ...20 Portrait Orientation ...22 3 Operating the Monitor ...23 Overview of Operation ...23 ZR2040w and ZR2240w Model 23 ZR2440w Model ...25 ZR2740w Model ...26 Using the On-Screen Display Menu (Select Models 27...
... and Connecting the Cables 11 ZR2040w Model ...11 ZR2240w, ZR2440w, and ZR2740w Models 13 Mounting the Monitor to User-Supplied Support Hardware 14 Mounting the ZR2040w Panel 15 Mounting a Quick-Release Panel 16 Locating the Information Card (Select Models 18 Installing a Cable Lock ...19 Turning on the Monitor ...19 Adjusting the Monitor ...20 Portrait Orientation ...22 3 Operating the Monitor ...23 Overview of Operation ...23 ZR2040w and ZR2240w Model 23 ZR2440w Model ...25 ZR2740w Model ...26 Using the On-Screen Display Menu (Select Models 27...
User Guide
Page 7
... optimization ● HP Display Assistant utility software for adjusting monitor settings and enabling the theft deterrence feature ● Auto-adjustment Pattern Utility ● Privacy filter slots to insert filters (purchased separately) to support DisplayPort digital with DisplayPort signal cable provided ● Landscape and portrait orientations ● Tilt adjustment ● On-Screen Display (OSD) adjustments in several languages for lower resolutions ● Video signal input to support VGA analog with VGA signal cable provided ● Video signal input to support DVI digital...
... optimization ● HP Display Assistant utility software for adjusting monitor settings and enabling the theft deterrence feature ● Auto-adjustment Pattern Utility ● Privacy filter slots to insert filters (purchased separately) to support DisplayPort digital with DisplayPort signal cable provided ● Landscape and portrait orientations ● Tilt adjustment ● On-Screen Display (OSD) adjustments in several languages for lower resolutions ● Video signal input to support VGA analog with VGA signal cable provided ● Video signal input to support DVI digital...

User Guide
Page 8
... support DVI digital with DVI-D signal cable provided ● Video signal input to support HDMI digital ● Dynamic Contrast Ratio: 2,000,000:1 ● Video signal input to support DisplayPort digital with DisplayPort signal cable provided ● USB 2.0 hub with one upstream (connects to the computer) and four downstream (connect to USB devices) ports ● USB cable included to connect to the monitor's USB hub and to a USB connector on a computer ● 8-way comfort adjust including Height, Tilt, Pivot and Swivel adjustments ● HP Quick Release 2 is now a flush mount...
... support DVI digital with DVI-D signal cable provided ● Video signal input to support HDMI digital ● Dynamic Contrast Ratio: 2,000,000:1 ● Video signal input to support DisplayPort digital with DisplayPort signal cable provided ● USB 2.0 hub with one upstream (connects to the computer) and four downstream (connect to USB devices) ports ● USB cable included to connect to the monitor's USB hub and to a USB connector on a computer ● 8-way comfort adjust including Height, Tilt, Pivot and Swivel adjustments ● HP Quick Release 2 is now a flush mount...
User Guide
Page 9
... comfort adjust including Height, Tilt, Pivot and Swivel adjustments ● HP Quick Release 2 is now a flush mount solution that lets you quickly install the panel with a simple click and remove it with the convenient sliding tab release ● Easy access pull-out information card with the information needed for a support call ● On-Screen Display (OSD) adjustments in several languages for ease of setup and screen optimization ● HP Display Assistant utility software for adjusting monitor settings and...
... comfort adjust including Height, Tilt, Pivot and Swivel adjustments ● HP Quick Release 2 is now a flush mount solution that lets you quickly install the panel with a simple click and remove it with the convenient sliding tab release ● Easy access pull-out information card with the information needed for a support call ● On-Screen Display (OSD) adjustments in several languages for ease of setup and screen optimization ● HP Display Assistant utility software for adjusting monitor settings and...
User Guide
Page 10
...-inch) diagonal viewable area display with 2560 x 1440 resolution ● Video signal input to support DVI digital with DVI-Dual Link signal cable provided ● Video signal input to support DisplayPort digital with DisplayPort signal cable provided ● USB 2.0 hub with one upstream (connects to the computer) and four downstream (connect to USB devices) ports ● USB cable included to connect to the monitor's USB hub and to a USB connector on a computer ● 8-way comfort adjust including Height, Tilt, Pivot and Swivel adjustments ● HP Quick Release...
...-inch) diagonal viewable area display with 2560 x 1440 resolution ● Video signal input to support DVI digital with DVI-Dual Link signal cable provided ● Video signal input to support DisplayPort digital with DisplayPort signal cable provided ● USB 2.0 hub with one upstream (connects to the computer) and four downstream (connect to USB devices) ports ● USB cable included to connect to the monitor's USB hub and to a USB connector on a computer ● 8-way comfort adjust including Height, Tilt, Pivot and Swivel adjustments ● HP Quick Release...
User Guide
Page 11
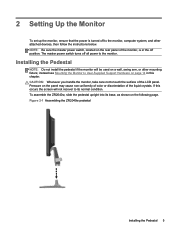
... screen will be used on the rear panel of the liquid crystals. Installing the Pedestal NOTE: Do not install the pedestal if the monitor will not recover to the monitor, computer system, and other mounting fixture; NOTE: Be sure the master power switch, located on a wall, swing arm, or other attached devices, then follow the instructions below. Pressure on the following page. The master power switch turns...
... screen will be used on the rear panel of the liquid crystals. Installing the Pedestal NOTE: Do not install the pedestal if the monitor will not recover to the monitor, computer system, and other mounting fixture; NOTE: Be sure the master power switch, located on a wall, swing arm, or other attached devices, then follow the instructions below. Pressure on the following page. The master power switch turns...

User Guide
Page 12
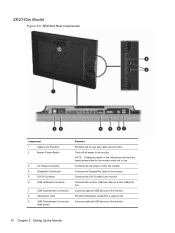
.... The HP Quick Release 2 latch pops up when the monitor is locked in the back of the monitor. Connects the DisplayPort cable to the monitor. Figure 2-2 Mounting the Panel onto the HP Quick Release 2 Rear Components ZR2040w Model Figure 2-3 ZR2040w Rear Components Component 1 AC Power Connector 2 Cable Lock Provision 3 DisplayPort Connector 4 DVI-D Connector 5 VGA Connector 6 Chapter 2 Setting Up the Monitor Function Connects the AC power cord to the monitor. Models ZR2240w, ZR2440w, and ZR2740w use the HP Quick Release 2 mechanism for use with cable security locks...
.... The HP Quick Release 2 latch pops up when the monitor is locked in the back of the monitor. Connects the DisplayPort cable to the monitor. Figure 2-2 Mounting the Panel onto the HP Quick Release 2 Rear Components ZR2040w Model Figure 2-3 ZR2040w Rear Components Component 1 AC Power Connector 2 Cable Lock Provision 3 DisplayPort Connector 4 DVI-D Connector 5 VGA Connector 6 Chapter 2 Setting Up the Monitor Function Connects the AC power cord to the monitor. Models ZR2240w, ZR2440w, and ZR2740w use the HP Quick Release 2 mechanism for use with cable security locks...
User Guide
Page 13
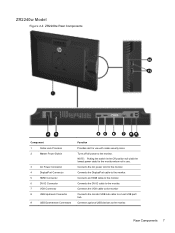
... switch in use with cable security locks. Connects the DisplayPort cable to the monitor. Rear Components 7 Connects the AC power cord to the monitor. Connects optional USB devices to the monitor. Connects an HDMI cable to the monitor. Turns off all power to the monitor. Connects the DVI-D cable to the monitor. Connects the VGA cable to the monitor Connects the monitor USB hub cable to a host USB port/ hub. ZR2240w Model Figure 2-4 ZR2240w Rear Components 10 11 2 321 42 52 62 27 8 9 Component 1 Cable Lock Provision 2 Master Power Switch 3 AC Power Connector...
... switch in use with cable security locks. Connects the DisplayPort cable to the monitor. Rear Components 7 Connects the AC power cord to the monitor. Connects optional USB devices to the monitor. Connects an HDMI cable to the monitor. Turns off all power to the monitor. Connects the DVI-D cable to the monitor. Connects the VGA cable to the monitor Connects the monitor USB hub cable to a host USB port/ hub. ZR2240w Model Figure 2-4 ZR2240w Rear Components 10 11 2 321 42 52 62 27 8 9 Component 1 Cable Lock Provision 2 Master Power Switch 3 AC Power Connector...
User Guide
Page 14
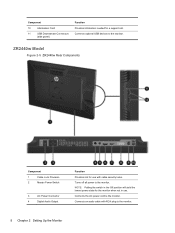
... the lowest power state for the monitor when not in use with RCA plug to the monitor. Connects an audio cable with cable security locks. Connects optional USB devices to the monitor. ZR2440w Model Figure 2-5 ZR2440w Rear Components Component 1 Cable Lock Provision 2 Master Power Switch 3 AC Power Connector 4 Digital Audio Output Function Provides slot for a support call. Connects the AC power cord to the monitor. Component 10 Information Card 11 USB Downstream Connectors (side panel) Function Provides information needed for use . Turns off all power to the...
... the lowest power state for the monitor when not in use with RCA plug to the monitor. Connects an audio cable with cable security locks. Connects optional USB devices to the monitor. ZR2440w Model Figure 2-5 ZR2440w Rear Components Component 1 Cable Lock Provision 2 Master Power Switch 3 AC Power Connector 4 Digital Audio Output Function Provides slot for a support call. Connects the AC power cord to the monitor. Component 10 Information Card 11 USB Downstream Connectors (side panel) Function Provides information needed for use . Turns off all power to the...
User Guide
Page 16
...cable security locks. Connects the DisplayPort cable to the monitor. Connects optional USB devices to a host USB port/ hub. Connects the monitor USB hub cable to the monitor. 10 Chapter 2 Setting Up the Monitor ZR2740w Model Figure 2-6 ZR2740w Rear Components Component 1 Cable Lock Provision 2 Master Power Switch 3 AC Power Connector 4 DisplayPort Connector 5 DVI-D Connector 6 USB Upstream Connector 7 USB Downstream Connectors 8 Information Card 9 USB Downstream Connectors (side panel) Function Provides slot for use . Connects the DVI-D cable to the monitor...
...cable security locks. Connects the DisplayPort cable to the monitor. Connects optional USB devices to a host USB port/ hub. Connects the monitor USB hub cable to the monitor. 10 Chapter 2 Setting Up the Monitor ZR2740w Model Figure 2-6 ZR2740w Rear Components Component 1 Cable Lock Provision 2 Master Power Switch 3 AC Power Connector 4 DisplayPort Connector 5 DVI-D Connector 6 USB Upstream Connector 7 USB Downstream Connectors 8 Information Card 9 USB Downstream Connectors (side panel) Function Provides slot for use . Connects the DVI-D cable to the monitor...

User Guide
Page 20
... end to video sources. 4. The grounding plug is not necessary to the drawings in one may accidentally step on the rear panel of the appropriate cable. Mounting the Monitor to User-Supplied Support Hardware The monitor can be installed to the equipment: Do not disable the power cord grounding plug. 3. Refer to connect all times. For each one, plug in (Rear Components on page 6) to identify the connectors on...
... end to video sources. 4. The grounding plug is not necessary to the drawings in one may accidentally step on the rear panel of the appropriate cable. Mounting the Monitor to User-Supplied Support Hardware The monitor can be installed to the equipment: Do not disable the power cord grounding plug. 3. Refer to connect all times. For each one, plug in (Rear Components on page 6) to identify the connectors on...

User Guide
Page 21
...-party mounting solution to User-Supplied Support Hardware 15 Figure 2-12 Mounting the ZR2040w Model CAUTION: This monitor supports the VESA industry standard 100 mm mounting holes. Remove the four screws holding the panel to mount the monitor panel. Longer screws must not be installed directly to a wall to the pedestal. 2. To protect the panel, lay it is turned off and the power and signal cables are mounting to a wall, HP recommends that the mounting solution is rated to...
...-party mounting solution to User-Supplied Support Hardware 15 Figure 2-12 Mounting the ZR2040w Model CAUTION: This monitor supports the VESA industry standard 100 mm mounting holes. Remove the four screws holding the panel to mount the monitor panel. Longer screws must not be installed directly to a wall to the pedestal. 2. To protect the panel, lay it is turned off and the power and signal cables are mounting to a wall, HP recommends that the mounting solution is rated to...
User Guide
Page 25
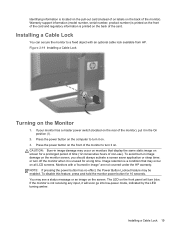
... cable lock available from HP. The LED on all LCD screens. Installing a Cable Lock 19 Press the power button on the computer to a fixed object with a "burned-in the On position (I) . 2. NOTE: If pressing the power button has no effect, the Power Button Lockout feature may occur on the front panel will soon go into low-power mode, indicated by the LED turning amber. If the monitor is not receiving any input, it will turn blue...
... cable lock available from HP. The LED on all LCD screens. Installing a Cable Lock 19 Press the power button on the computer to a fixed object with a "burned-in the On position (I) . 2. NOTE: If pressing the power button has no effect, the Power Button Lockout feature may occur on the front panel will soon go into low-power mode, indicated by the LED turning amber. If the monitor is not receiving any input, it will turn blue...

User Guide
Page 29
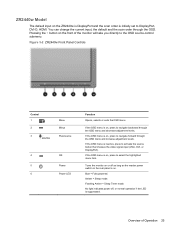
... into low-power mode using the SOURCE button on the front panel. These indicators vary from switching sources. timed sleep, that image. the input calls for an active input in low-power mode and will scan the various inputs to DisplayPort, DVI-D, HDMI, VGA, making it has some models use the following LED indicators: ● Blue - 3 Operating the Monitor Overview of Operation If you control of the scanning order and default source through messages on the screen. It...
... into low-power mode using the SOURCE button on the front panel. These indicators vary from switching sources. timed sleep, that image. the input calls for an active input in low-power mode and will scan the various inputs to DisplayPort, DVI-D, HDMI, VGA, making it has some models use the following LED indicators: ● Blue - 3 Operating the Monitor Overview of Operation If you control of the scanning order and default source through messages on the screen. It...
User Guide
Page 31
... LED is inactive, press to activate the source button that chooses the video signal input (VGA, DVI, or DisplayPort). Blue = Fully powered. Overview of the monitor will take you directly to the OSD source-control submenu. If the OSD menu is initially set to DisplayPort, DVI-D, HDMI. No light indicates power off as long as the master power switch on the rear panel is on , press to navigate backward through the OSD menu and decrease adjustment levels. ZR2440w Model The default input...
... LED is inactive, press to activate the source button that chooses the video signal input (VGA, DVI, or DisplayPort). Blue = Fully powered. Overview of the monitor will take you directly to the OSD source-control submenu. If the OSD menu is initially set to DisplayPort, DVI-D, HDMI. No light indicates power off as long as the master power switch on the rear panel is on , press to navigate backward through the OSD menu and decrease adjustment levels. ZR2440w Model The default input...
User Guide
Page 33
.... Not all menu options below are available on the rear of Operation 27 If the monitor receives a signal outside its range (e.g., too high a frequency), the LED flashes blue continuously. Overview of the panel.) The monitor also enters low-power mode when there is a problem with no video signal input. NOTE: If there is no analog input do not show menus specific to the factory defaults by opening the OSD and selecting Factory Reset from the OSD menu.
.... Not all menu options below are available on the rear of Operation 27 If the monitor receives a signal outside its range (e.g., too high a frequency), the LED flashes blue continuously. Overview of the panel.) The monitor also enters low-power mode when there is a problem with no video signal input. NOTE: If there is no analog input do not show menus specific to the factory defaults by opening the OSD and selecting Factory Reset from the OSD menu.

User Guide
Page 36
... watts One DVI connector with cable included; one VGA connector with cable ZR2240w Model Table A-1 ZR2240w Specifications Display Type Viewable Image Size Tilt range Swivel range Maximum Weight (Unpacked) Dimensions (including base) Height (highest position) Height (lowest position) Depth Width Maximum Graphic Resolution Optimum Graphic Resolution Text Mode Dot Pitch Pixels Per Inch Horizontal Frequency Vertical Refresh Rate Environmental Requirements Temperature Operating Temperature Storage Temperature Relative Humidity: Operating Storage Power Source 54.72 cm diagonal TFT LCD 47.66...
... watts One DVI connector with cable included; one VGA connector with cable ZR2240w Model Table A-1 ZR2240w Specifications Display Type Viewable Image Size Tilt range Swivel range Maximum Weight (Unpacked) Dimensions (including base) Height (highest position) Height (lowest position) Depth Width Maximum Graphic Resolution Optimum Graphic Resolution Text Mode Dot Pitch Pixels Per Inch Horizontal Frequency Vertical Refresh Rate Environmental Requirements Temperature Operating Temperature Storage Temperature Relative Humidity: Operating Storage Power Source 54.72 cm diagonal TFT LCD 47.66...
User Guide
Page 38
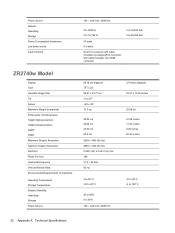
... (maximum) Low-power mode Input Terminal ZR2740w Model Display Type Viewable Image Size Tilt Swivel Maximum Weight (Unpacked) Dimensions (including base) Height (highest position) Height (lowest position) Depth Width Maximum Graphic Resolution Optimum Graphic Resolution Dot Pitch Pixels Per Inch Horizontal Frequency Vertical Refresh Rate Environmental Requirements Temperature Operating Temperature Storage Temperature Relative Humidity: Operating Storage Power Source 100 - 240 VAC, 50/60 Hz 0 to 5000 m 0 to 140º F 32 Appendix A Technical Specifications one HDMI connector 0 to...
... (maximum) Low-power mode Input Terminal ZR2740w Model Display Type Viewable Image Size Tilt Swivel Maximum Weight (Unpacked) Dimensions (including base) Height (highest position) Height (lowest position) Depth Width Maximum Graphic Resolution Optimum Graphic Resolution Dot Pitch Pixels Per Inch Horizontal Frequency Vertical Refresh Rate Environmental Requirements Temperature Operating Temperature Storage Temperature Relative Humidity: Operating Storage Power Source 100 - 240 VAC, 50/60 Hz 0 to 5000 m 0 to 140º F 32 Appendix A Technical Specifications one HDMI connector 0 to...
User Guide
Page 39
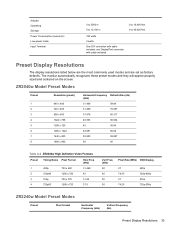
... monitor automatically recognizes these preset modes and they will appear properly sized and centered on the screen. Altitude: Operating Storage Power Consumption (maximum) Low-power mode Input Terminal 0 to 5000 m 0 to 12,192 m 120 watts 2 watts One DVI connector with cable included 0 to 16,400 feet 0 to 40,000 feet Preset Display Resolutions The display resolutions listed below are the most commonly used modes and are set as factory defaults...
... monitor automatically recognizes these preset modes and they will appear properly sized and centered on the screen. Altitude: Operating Storage Power Consumption (maximum) Low-power mode Input Terminal 0 to 5000 m 0 to 12,192 m 120 watts 2 watts One DVI connector with cable included 0 to 16,400 feet 0 to 40,000 feet Preset Display Resolutions The display resolutions listed below are the most commonly used modes and are set as factory defaults...


