
User's Guide w2228h, 2229h w2448h, w2448hc, w2558hc LCD Display
Page 5
Contents Notational Conventions...iii Notes, Cautions, and Warnings...iii 1 Product Features HP LCD Monitors ...1-1 Features ...1-1 2 Safety and Maintenance Guidelines Important Safety Information ...2-1 Safety Precautions ...2-1 Maintenance Guidelines...2-2 Cleaning the Monitor ...2-2 3 Setting Up the Monitor Unpacking the Monitor...3-1 Installing the Monitor ...3-1 Unfolding the monitor ...3-1 Wall-mounting the monitor ...3-2 Preparation ...3-2 Connecting the VGA (Analog) or DVI-D (Digital) Cable 3-3 To connect the VGA cable...3-4 To...
Contents Notational Conventions...iii Notes, Cautions, and Warnings...iii 1 Product Features HP LCD Monitors ...1-1 Features ...1-1 2 Safety and Maintenance Guidelines Important Safety Information ...2-1 Safety Precautions ...2-1 Maintenance Guidelines...2-2 Cleaning the Monitor ...2-2 3 Setting Up the Monitor Unpacking the Monitor...3-1 Installing the Monitor ...3-1 Unfolding the monitor ...3-1 Wall-mounting the monitor ...3-2 Preparation ...3-2 Connecting the VGA (Analog) or DVI-D (Digital) Cable 3-3 To connect the VGA cable...3-4 To...
User's Guide w2228h, 2229h w2448h, w2448hc, w2558hc LCD Display
Page 9
...memory card reader with remote control (select models only) ■ Removable pedestal and Video Electronics Standards Association (VESA) standard mounting holes for flexible mounting solutions, including wall-mounting ■ Security lock slot for a Kensington lock security cable (security cable sold separately) ■ Plug and Play capability... for internal-only use (for webcam and card reader). In models with USB devices. 1 Product Features HP LCD Monitors The HP LCD (liquid crystal display) monitors have an active matrix, thin-film transistor (TFT) screen. User's Guide 1-1
...memory card reader with remote control (select models only) ■ Removable pedestal and Video Electronics Standards Association (VESA) standard mounting holes for flexible mounting solutions, including wall-mounting ■ Security lock slot for a Kensington lock security cable (security cable sold separately) ■ Plug and Play capability... for internal-only use (for webcam and card reader). In models with USB devices. 1 Product Features HP LCD Monitors The HP LCD (liquid crystal display) monitors have an active matrix, thin-film transistor (TFT) screen. User's Guide 1-1
User's Guide w2228h, 2229h w2448h, w2448hc, w2558hc LCD Display
Page 13
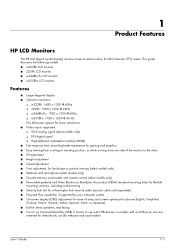
.... 2. Rotate the screen to assemble the monitor. See "Installing the Monitor." 4. Make sure all contents are included. 3 Setting Up the Monitor Unpacking the Monitor 1. You need a flat, soft, protected area for placing the monitor screen-down for wall-mounting. Unpack the monitor. Determine whether the monitor will be desktop mounted or wall-mounted. With the monitor still in a convenient, well-ventilated...
.... 2. Rotate the screen to assemble the monitor. See "Installing the Monitor." 4. Make sure all contents are included. 3 Setting Up the Monitor Unpacking the Monitor 1. You need a flat, soft, protected area for placing the monitor screen-down for wall-mounting. Unpack the monitor. Determine whether the monitor will be desktop mounted or wall-mounted. With the monitor still in a convenient, well-ventilated...
User's Guide w2228h, 2229h w2448h, w2448hc, w2558hc LCD Display
Page 14
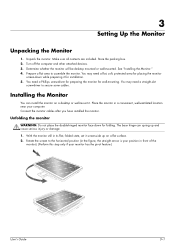
...following warning and caution statements before attaching the monitor. Disconnect the power cable and any other mounting fixture, you need a Phillips screwdriver. Wall-mounting the monitor Before you mount the monitor on a wall, a swing arm, or other cables from the monitor. 2. The base hinge can spring up .... 1. This might entail elongating the hinge and tilting the monitor back to the equipment, check that the wall-mounting fixture is capable of the monitor. 4. Holding the base of damage to ensure the monitor is not supplied. Put the shipping strap in a safe place...
...following warning and caution statements before attaching the monitor. Disconnect the power cable and any other mounting fixture, you need a Phillips screwdriver. Wall-mounting the monitor Before you mount the monitor on a wall, a swing arm, or other cables from the monitor. 2. The base hinge can spring up .... 1. This might entail elongating the hinge and tilting the monitor back to the equipment, check that the wall-mounting fixture is capable of the monitor. 4. Holding the base of damage to ensure the monitor is not supplied. Put the shipping strap in a safe place...
User's Guide w2228h, 2229h w2448h, w2448hc, w2558hc LCD Display
Page 15
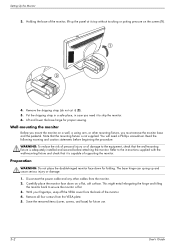
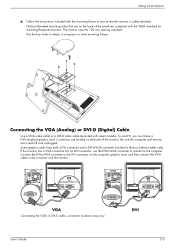
...cable (provided with the VESA standard for mounting flat-panel monitors. Connectors are located on the back of the panel are compliant with select models). The monitor uses the 100 mm spacing standard. The four-threaded mounting holes that the monitor is safely attached. Some graphic cards have ...a DVI-compliant graphic card. Setting Up the Monitor 6. To use the DVI-to-VGA converter...
...cable (provided with the VESA standard for mounting flat-panel monitors. Connectors are located on the back of the panel are compliant with select models). The monitor uses the 100 mm spacing standard. The four-threaded mounting holes that the monitor is safely attached. Some graphic cards have ...a DVI-compliant graphic card. Setting Up the Monitor 6. To use the DVI-to-VGA converter...
HP L2445m LCD Monitor - User Guide
Page 5
...Cleaning the Monitor ...3 Shipping the Monitor ...3 3 Setting Up the Monitor Installing the Monitor Base ...4 Rear Components ...5 Connecting the Cables ...6 Adjusting the Monitor ...8 Turning on the Monitor ...8 Using the Accessory Rails ...9 Removing the Monitor Pedestal Base 10 Mounting the Monitor ...11 Locating the Rating Labels ...11 4 Operating the Monitor Software and ... Internet 13 Using the Auto-Adjustment Function 13 Front Panel Controls ...15 Adjusting the Monitor Settings ...16 Using the On-Screen Display Menu 16 OSD Menu Selections 17 Optimizing Digital Conversion 21 ENWW v
...Cleaning the Monitor ...3 Shipping the Monitor ...3 3 Setting Up the Monitor Installing the Monitor Base ...4 Rear Components ...5 Connecting the Cables ...6 Adjusting the Monitor ...8 Turning on the Monitor ...8 Using the Accessory Rails ...9 Removing the Monitor Pedestal Base 10 Mounting the Monitor ...11 Locating the Rating Labels ...11 4 Operating the Monitor Software and ... Internet 13 Using the Auto-Adjustment Function 13 Front Panel Controls ...15 Adjusting the Monitor Settings ...16 Using the On-Screen Display Menu 16 OSD Menu Selections 17 Optimizing Digital Conversion 21 ENWW v
HP L2445m LCD Monitor - User Guide
Page 7
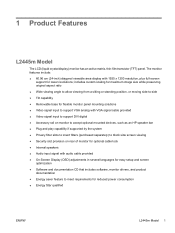
...24-inch) diagonal viewable area display with audio cable provided ● On-Screen Display (OSD) adjustments in several languages for easy setup and screen optimization ● Software and documentation CD that includes software, monitor... monitor to accept optional mounted devices, such as an HP ...monitor for optional cable lock ● Internal speakers ● Audio input signal with 1920 x 1200 resolution, plus full-screen support for reduced power consumption ● Energy Star qualified ENWW L2445m Model 1 1 Product Features L2445m Model The LCD (liquid crystal display) monitor...
...24-inch) diagonal viewable area display with audio cable provided ● On-Screen Display (OSD) adjustments in several languages for easy setup and screen optimization ● Software and documentation CD that includes software, monitor... monitor to accept optional mounted devices, such as an HP ...monitor for optional cable lock ● Internal speakers ● Audio input signal with 1920 x 1200 resolution, plus full-screen support for reduced power consumption ● Energy Star qualified ENWW L2445m Model 1 1 Product Features L2445m Model The LCD (liquid crystal display) monitor...
HP L2445m LCD Monitor - User Guide
Page 15
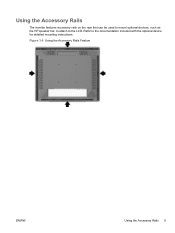
Using the Accessory Rails The monitor features accessory rails on the rear that can be used to mount optional devices, such as the HP speaker bar, to attach to the documentation included with the optional device for detailed mounting instructions. Figure 3-6 Using the Accessory Rails Feature ENWW Using the Accessory Rails 9 Refer to the LCD.
Using the Accessory Rails The monitor features accessory rails on the rear that can be used to mount optional devices, such as the HP speaker bar, to attach to the documentation included with the optional device for detailed mounting instructions. Figure 3-6 Using the Accessory Rails Feature ENWW Using the Accessory Rails 9 Refer to the LCD.

HP L2445m LCD Monitor - User Guide
Page 16
... the pedestal base to remove it . 1. Lift up on the back of the monitor. 2. There are both disconnected. Lay the monitor face down on a wall, a swing arm, or other mounting fixture. CAUTION: Before beginning to disassemble the monitor, be sure the monitor is turned off and the power and signal cables are four screws that...
... the pedestal base to remove it . 1. Lift up on the back of the monitor. 2. There are both disconnected. Lay the monitor face down on a wall, a swing arm, or other mounting fixture. CAUTION: Before beginning to disassemble the monitor, be sure the monitor is turned off and the power and signal cables are four screws that...

HP L2445m LCD Monitor - User Guide
Page 17
...may need these numbers when contacting HP about the monitor model. It is important to verify that the manufacturer's mounting solution is compliant with the mounting fixture to ensure that the monitor is safely attached. 3. To attach the monitor to other mounting fixture. The rating labels are ...rated to support the weight of the monitor display head. You may damage the monitor. Remove the monitor panel from the pedestal base. CAUTION: This monitor supports the VESA industry standard 100 mm mounting holes. To attach the monitor to the monitor panel. Reconnect the cables to a...
...may need these numbers when contacting HP about the monitor model. It is important to verify that the manufacturer's mounting solution is compliant with the mounting fixture to ensure that the monitor is safely attached. 3. To attach the monitor to other mounting fixture. The rating labels are ...rated to support the weight of the monitor display head. You may damage the monitor. Remove the monitor panel from the pedestal base. CAUTION: This monitor supports the VESA industry standard 100 mm mounting holes. To attach the monitor to the monitor panel. Reconnect the cables to a...


