User's Guide w2228h, 2229h w2448h, w2448hc, w2558hc LCD Display
Page 6
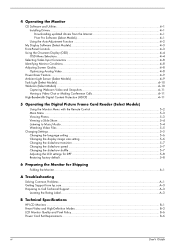
... slideshow speed ...5-7 Changing the slideshow shuffle ...5-7 Adjusting the LCD settings for DPF 5-8 Restoring factory default...5-8 6 Preparing the Monitor for Shipping Folding the Monitor ...6-1 A Troubleshooting Solving Common Problems ...A-1 Getting Support from hp.com ...A-3 Preparing to Call Technical Support ...A-3 Locating the Rating Label...A-3 B Technical Specifications HP LCD Monitors ...B-1 Preset Video and High-Definition Modes B-3 LCD Monitor Quality and Pixel Policy...B-6 Power Cord...
... slideshow speed ...5-7 Changing the slideshow shuffle ...5-7 Adjusting the LCD settings for DPF 5-8 Restoring factory default...5-8 6 Preparing the Monitor for Shipping Folding the Monitor ...6-1 A Troubleshooting Solving Common Problems ...A-1 Getting Support from hp.com ...A-3 Preparing to Call Technical Support ...A-3 Locating the Rating Label...A-3 B Technical Specifications HP LCD Monitors ...B-1 Preset Video and High-Definition Modes B-3 LCD Monitor Quality and Pixel Policy...B-6 Power Cord...

User's Guide w2228h, 2229h w2448h, w2448hc, w2558hc LCD Display
Page 10
Product Features ■ Ambient light sensor (select models only) ■ Task light (select models only) ■ Keyboard parking ■ Power Saver to reduce energy consumption ■ Quick View settings display ■ CD included: ❏ Drivers ❏ Auto-adjustment software ❏ My Display software ❏ Webcam software (select models only) ❏ Documents ❏ Adobe® Acrobat® Reader ■ Double-hinged base design 1-2 User's Guide
Product Features ■ Ambient light sensor (select models only) ■ Task light (select models only) ■ Keyboard parking ■ Power Saver to reduce energy consumption ■ Quick View settings display ■ CD included: ❏ Drivers ❏ Auto-adjustment software ❏ My Display software ❏ Webcam software (select models only) ❏ Documents ❏ Adobe® Acrobat® Reader ■ Double-hinged base design 1-2 User's Guide
User's Guide w2228h, 2229h w2448h, w2448hc, w2558hc LCD Display
Page 26
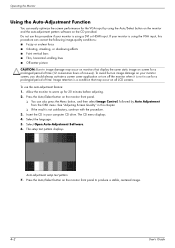
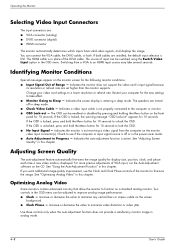
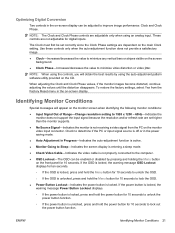
...condition that display the same static image on screen for 20 minutes before adjusting. 2. Allow the monitor to produce a stable, centered image. 4-2 User's Guide Auto-adjustment setup test pattern 7. Operating the Monitor Using the Auto-Adjustment Function You can easily optimize the screen performance for a prolonged period of ... DVI or HDMI input. Press the Auto/Select button on all LCD screens. Insert the CD in image damage on your computer CD drive. Press the Auto/Select button on the CD provided. To avoid burn-in your monitor screen, you should always activate a ...
...condition that display the same static image on screen for 20 minutes before adjusting. 2. Allow the monitor to produce a stable, centered image. 4-2 User's Guide Auto-adjustment setup test pattern 7. Operating the Monitor Using the Auto-Adjustment Function You can easily optimize the screen performance for a prolonged period of ... DVI or HDMI input. Press the Auto/Select button on all LCD screens. Insert the CD in image damage on your computer CD drive. Press the Auto/Select button on the CD provided. To avoid burn-in your monitor screen, you should always activate a ...
User's Guide w2228h, 2229h w2448h, w2448hc, w2558hc LCD Display
Page 27
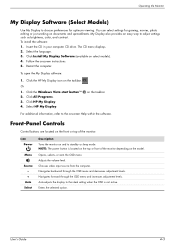
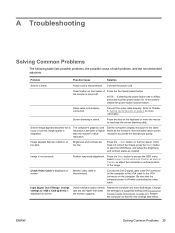
...are located on the front or top of the monitor: Icon Power Menu Source - + Auto Select Description Turns the monitor on and to the ideal setting when the OSD is located on the top or front of the monitor depending on the model. Auto-adjusts the display to standby or sleep mode. User...'s Guide 4-3 You can select settings for optimum viewing. Click the HP My Display icon on documents and spreadsheets. Click All Programs. 3. Navigates...
...are located on the front or top of the monitor: Icon Power Menu Source - + Auto Select Description Turns the monitor on and to the ideal setting when the OSD is located on the top or front of the monitor depending on the model. Auto-adjusts the display to standby or sleep mode. User...'s Guide 4-3 You can select settings for optimum viewing. Click the HP My Display icon on documents and spreadsheets. Click All Programs. 3. Navigates...
User's Guide w2228h, 2229h w2448h, w2448hc, w2558hc LCD Display
Page 28
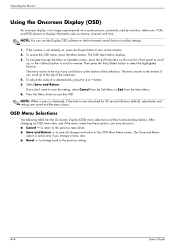
.... Then press the Auto/Select button to adjust settings. 1. Select Save and Return. to save the setting, select Cancel from the Sub-Menu or Exit from the Main Menu. 6. This Save and Return option is an image superimposed on a screen picture, commonly used by monitors, televisions, VCRs,... use My Display OSD software or the front-panel control buttons to select the highlighted function. If the monitor is displayed, if the buttons are untouched for 30 seconds (factory default), adjustments and settings are saved and the menu closes. Press the Menu button to : ■ Cancel - ...
.... Then press the Auto/Select button to adjust settings. 1. Select Save and Return. to save the setting, select Cancel from the Sub-Menu or Exit from the Main Menu. 6. This Save and Return option is an image superimposed on a screen picture, commonly used by monitors, televisions, VCRs,... use My Display OSD software or the front-panel control buttons to select the highlighted function. If the monitor is displayed, if the buttons are untouched for 30 seconds (factory default), adjustments and settings are saved and the menu closes. Press the Menu button to : ■ Cancel - ...
User's Guide w2228h, 2229h w2448h, w2448hc, w2558hc LCD Display
Page 29
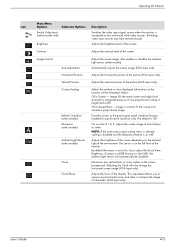
...Image Control Auto-Adjustment Horizontal Position Vertical Position Custom Scaling Refresh Overdrive (select models) Sharpness (select models) Ambient Light Sensor (select models) Clock Clock Phase Description Switches the video input signal source when the monitor is connected to Aspect Ratio - Adjusts the contrast ...level of the picture (VGA Input only). Automatically adjusts the screen image (VGA Input only). Selects the method on how displayed...
...Image Control Auto-Adjustment Horizontal Position Vertical Position Custom Scaling Refresh Overdrive (select models) Sharpness (select models) Ambient Light Sensor (select models) Clock Clock Phase Description Switches the video input signal source when the monitor is connected to Aspect Ratio - Adjusts the contrast ...level of the picture (VGA Input only). Automatically adjusts the screen image (VGA Input only). Selects the method on how displayed...
User's Guide w2228h, 2229h w2448h, w2448hc, w2558hc LCD Display
Page 32
...holding the Menu button on the front panel for 10 seconds. The source of VGA input, run the Auto-Adjustment software on the screen background. ■ Clock Phase - Indicates the monitor does not support the video card's input signal because its resolution or refresh rate are : ■ ... improvement, use the Clock and Clock Phase controls of Range - Increase or decrease the value to function as a standard analog monitor. Indicates the auto-adjustment function is entering a sleep mode. If the OSD is in this chapter. Two controls in this chapter. Increase or decrease ...
...holding the Menu button on the front panel for 10 seconds. The source of VGA input, run the Auto-Adjustment software on the screen background. ■ Clock Phase - Indicates the monitor does not support the video card's input signal because its resolution or refresh rate are : ■ ... improvement, use the Clock and Clock Phase controls of Range - Increase or decrease the value to function as a standard analog monitor. Indicates the auto-adjustment function is entering a sleep mode. If the OSD is in this chapter. Two controls in this chapter. Increase or decrease ...
User's Guide w2228h, 2229h w2448h, w2448hc, w2558hc LCD Display
Page 47
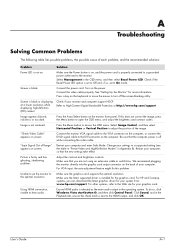
... driver for more information. Image is installed for your monitor and computer support HDCP. For HP and Compaq systems, you are not using an extension cable or switch box. Press the Auto/Select button on the power. We recommend plugging the monitor directly into the graphic card output connector on screen.... OSD menu, and then select Bezel Power LED. Ensure HDMI audio is fuzzy and has ghosting, shadowing problem. For VGA input, the auto-adjustment feature might fix this does not correct the image, press the Menu button to the optimal resolution.
... driver for more information. Image is installed for your monitor and computer support HDCP. For HP and Compaq systems, you are not using an extension cable or switch box. Press the Auto/Select button on the power. We recommend plugging the monitor directly into the graphic card output connector on screen.... OSD menu, and then select Bezel Power LED. Ensure HDMI audio is fuzzy and has ghosting, shadowing problem. For VGA input, the auto-adjustment feature might fix this does not correct the image, press the Menu button to the optimal resolution.
HP L2445m LCD Monitor - User Guide
Page 5
... The Image Color Matching File 12 Installing the .INF and .ICM Files ...13 Installing from the CD ...13 Downloading from the Internet 13 Using the Auto-Adjustment Function 13 Front Panel Controls ...15 Adjusting the Monitor Settings ...16 Using the On-Screen Display Menu 16 OSD Menu Selections 17 Optimizing Digital Conversion 21 ENWW v
... The Image Color Matching File 12 Installing the .INF and .ICM Files ...13 Installing from the CD ...13 Downloading from the Internet 13 Using the Auto-Adjustment Function 13 Front Panel Controls ...15 Adjusting the Monitor Settings ...16 Using the On-Screen Display Menu 16 OSD Menu Selections 17 Optimizing Digital Conversion 21 ENWW v

HP L2445m LCD Monitor - User Guide
Page 18
... computer: ● an .INF (Information) file ● an .ICM (Image Color Matching) file ● auto-adjustment pattern utility ● additional software for the monitor model NOTE: If the monitor does not include a CD, the .INF and .ICM files can be downloaded from scanner to printer, or from... the HP monitors support Web site. 4 Operating the Monitor Software and Utilities The CD that comes with the ...
... computer: ● an .INF (Information) file ● an .ICM (Image Color Matching) file ● auto-adjustment pattern utility ● additional software for the monitor model NOTE: If the monitor does not include a CD, the .INF and .ICM files can be downloaded from scanner to printer, or from... the HP monitors support Web site. 4 Operating the Monitor Software and Utilities The CD that comes with the ...

HP L2445m LCD Monitor - User Guide
Page 19
.... 4. NOTE: You may need to update, you can optimize the screen performance for the monitor to install the digitally signed monitor .INF and .ICM files manually from the HP monitors support Web site: 1. Downloading from the Internet To download the latest version of .INF and... using a DVI input. Using the Auto-Adjustment Function You can install the .INF and .ICM files from the CD: 1. If the monitor is using the -/Auto button on the monitor and the auto-adjustment pattern software utility on -screen instructions. 5. Refer to http://www.hp.com/support and select the country region...
.... 4. NOTE: You may need to update, you can optimize the screen performance for the monitor to install the digitally signed monitor .INF and .ICM files manually from the HP monitors support Web site: 1. Downloading from the Internet To download the latest version of .INF and... using a DVI input. Using the Auto-Adjustment Function You can install the .INF and .ICM files from the CD: 1. If the monitor is using the -/Auto button on the monitor and the auto-adjustment pattern software utility on -screen instructions. 5. Refer to http://www.hp.com/support and select the country region...

HP L2445m LCD Monitor - User Guide
Page 20
... monitor to Adjusting the Monitor Settings on the monitor front panel. ● You can also press the Menu button, then select Image Control from the OSD Main Menu. The setup test pattern is displayed. 4. Press the -/Auto button on page 16 in the disc drive. Refer to warm up for 20 minutes before adjusting. 2. Select Open Auto-Adjustment...
... monitor to Adjusting the Monitor Settings on the monitor front panel. ● You can also press the Menu button, then select Image Control from the OSD Main Menu. The setup test pattern is displayed. 4. Press the -/Auto button on page 16 in the disc drive. Refer to warm up for 20 minutes before adjusting. 2. Select Open Auto-Adjustment...

HP L2445m LCD Monitor - User Guide
Page 21
.... ● If the OSD menu is inactive, press to activate the auto adjustment feature to optimize the screen image. ● Navigates forward through the OSD menu and increases adjustment levels. ● When the OSD menu is on or off. Front Panel Controls Table 4-1 Monitor Front Panel Controls Control 1 Menu 2 Minus 3 Plus 4 Power LED 5 Power...
.... ● If the OSD menu is inactive, press to activate the auto adjustment feature to optimize the screen image. ● Navigates forward through the OSD menu and increases adjustment levels. ● When the OSD menu is on or off. Front Panel Controls Table 4-1 Monitor Front Panel Controls Control 1 Menu 2 Minus 3 Plus 4 Power LED 5 Power...

HP L2445m LCD Monitor - User Guide
Page 22
...preferences. If the monitor is not already on, press the Power button to turn on the monitor's front panel to scroll up, or the - (Minus)/Auto button to scroll in reverse. 4. To navigate through the OSD Menu, press the + (Plus) button on the monitor. 2. Adjust the item using the... + or - To access the OSD, do the following: 1. Adjusting the Monitor Settings The monitor settings...
...preferences. If the monitor is not already on, press the Power button to turn on the monitor's front panel to scroll up, or the - (Minus)/Auto button to scroll in reverse. 4. To navigate through the OSD Menu, press the + (Plus) button on the monitor. 2. Adjust the item using the... + or - To access the OSD, do the following: 1. Adjusting the Monitor Settings The monitor settings...

HP L2445m LCD Monitor - User Guide
Page 23
...Menu screen. Minimizes any horizontal noise and clear or sharpen the image of characters. Volume Adjusts the monitor's speaker volume level. Horizontal Position Adjusts the position of the screen. Adjusts the focus of the screen image up and down. Changes to Screen - The factory default... item, and if the menu screen has these options, you may look sharper or soft. Image Control Adjusts the screen image. (VGA input only) Auto Adjustment Automatically adjusts the screen image. Select: ● Fill to slightly blueish white. image is smaller in the active ...
...Menu screen. Minimizes any horizontal noise and clear or sharpen the image of characters. Volume Adjusts the monitor's speaker volume level. Horizontal Position Adjusts the position of the screen. Adjusts the focus of the screen image up and down. Changes to Screen - The factory default... item, and if the menu screen has these options, you may look sharper or soft. Image Control Adjusts the screen image. (VGA input only) Auto Adjustment Automatically adjusts the screen image. Select: ● Fill to slightly blueish white. image is smaller in the active ...
HP L2445m LCD Monitor - User Guide
Page 25
...Power-On Status Display DDC/CI Support Bezel Power LED Sleep Timer Switch Video Input Auto-Switch Input Description Displays the resolution, refresh rate and frequency information on the screen each time the monitor is powered on. Select the location to display the status to wake up from ...mode Selects the video input signal. Turns off . DVI is DVI. The factory default is On. The factory default is On. ENWW Adjusting the Monitor Settings 19 Turns the system's automatic video signal input to control some OSD menu features such as brightness, contrast and color temperature. Allows ...
...Power-On Status Display DDC/CI Support Bezel Power LED Sleep Timer Switch Video Input Auto-Switch Input Description Displays the resolution, refresh rate and frequency information on the screen each time the monitor is powered on. Select the location to display the status to wake up from ...mode Selects the video input signal. Turns off . DVI is DVI. The factory default is On. The factory default is On. ENWW Adjusting the Monitor Settings 19 Turns the system's automatic video signal input to control some OSD menu features such as brightness, contrast and color temperature. Allows ...
HP L2445m LCD Monitor - User Guide
Page 27
...stripes visible on -screen display. Use these controls only when the auto-adjustment function does not provide a satisfactory image. ● Clock-Increases/decreases the value to lock out the power button function. Identifying Monitor Conditions Special messages will obtain the best results by pressing and ...OSD. ◦ If the OSD is not receiving a video signal from the Factory Reset menu in Progress-Indicates the auto-adjustment function is active. ● Monitor Going to improve image performance: Clock and Clock Phase. If the OSD is locked, the warning message OSD Lockout displays...
...stripes visible on -screen display. Use these controls only when the auto-adjustment function does not provide a satisfactory image. ● Clock-Increases/decreases the value to lock out the power button function. Identifying Monitor Conditions Special messages will obtain the best results by pressing and ...OSD. ◦ If the OSD is not receiving a video signal from the Factory Reset menu in Progress-Indicates the auto-adjustment function is active. ● Monitor Going to improve image performance: Clock and Clock Phase. If the OSD is locked, the warning message OSD Lockout displays...
HP L2445m LCD Monitor - User Guide
Page 31
...Solving Common Problems 25 Refer to Chapter 3, Setting Up the Monitor on screen. Screen blanking is displayed on page 4 for 10 seconds to adjust the horizontal or vertical position of Range. Screen image appears distorted; Press the -/Auto button on the keyboard or move the mouse to open ...the OSD Menu, and adjust the brightness and contrast scales as the monitor's recommended native screen resolution to...
...Solving Common Problems 25 Refer to Chapter 3, Setting Up the Monitor on screen. Screen blanking is displayed on page 4 for 10 seconds to adjust the horizontal or vertical position of Range. Screen image appears distorted; Press the -/Auto button on the keyboard or move the mouse to open ...the OSD Menu, and adjust the brightness and contrast scales as the monitor's recommended native screen resolution to...


