HP Notebook Hard Drives & Solid State Drives Identifying, Preventing, Diagnosing and Recovering from Drive Failures Care and Mai
Page 4
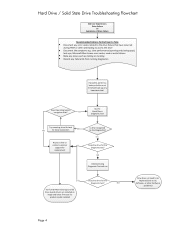
... Run F2 Quick/Short Diagnostic Test Try reseating drive & check NO for loose connectors NO Replace drive or contact customer YES support for End User to OS, Software, or other hardware problems) Page 4 Hard Drive / Solid State Drive Troubleshooting Flowchart End User Experiences: Drive Failure Or Symptoms of drive or at minimum back up any error codes related...
... Run F2 Quick/Short Diagnostic Test Try reseating drive & check NO for loose connectors NO Replace drive or contact customer YES support for End User to OS, Software, or other hardware problems) Page 4 Hard Drive / Solid State Drive Troubleshooting Flowchart End User Experiences: Drive Failure Or Symptoms of drive or at minimum back up any error codes related...
HP Notebook Reference Guide
Page 90
... password entering 55 removing 56 B battery conserving power 26 discharging 25 displaying remaining charge 25 disposing 27 low battery levels 25 replacing 27 storing 26 Battery Check 25 battery information, finding 24 battery power 24 battery temperature 26 BIOS determining version 68 downloading an...removing 32 supported formats 31 Disk Cleanup software 43 Disk Defragmenter software 43 docking connector 40 drive media 21 DriveLock password description 55 drives boot order 72 external 39 handling 42 hard 39 optical 40 using 43 dual graphics 29 E electrostatic discharge 79 eSATA cable, connecting...
... password entering 55 removing 56 B battery conserving power 26 discharging 25 displaying remaining charge 25 disposing 27 low battery levels 25 replacing 27 storing 26 Battery Check 25 battery information, finding 24 battery power 24 battery temperature 26 BIOS determining version 68 downloading an...removing 32 supported formats 31 Disk Cleanup software 43 Disk Defragmenter software 43 docking connector 40 drive media 21 DriveLock password description 55 drives boot order 72 external 39 handling 42 hard 39 optical 40 using 43 dual graphics 29 E electrostatic discharge 79 eSATA cable, connecting...

HP ProtectTools Getting Started
Page 13
... control access to devices based on your computer and periodically bleach the hard drive (write over data that has been previously deleted, but is reformatted or replaced. HP ProtectTools features 3 Computrace for HP ProtectTools (purchased separately) ● Requires separate purchase of tracking and ... Supports third-party applications (such as hardware and software changes. ● Remains active even if the hard drive is still present on the hard drive in order to securely shred digital assets (securely delete sensitive information including application files, historical or Web...
... control access to devices based on your computer and periodically bleach the hard drive (write over data that has been previously deleted, but is reformatted or replaced. HP ProtectTools features 3 Computrace for HP ProtectTools (purchased separately) ● Requires separate purchase of tracking and ... Supports third-party applications (such as hardware and software changes. ● Remains active even if the hard drive is still present on the hard drive in order to securely shred digital assets (securely delete sensitive information including application files, historical or Web...
HP ProtectTools Getting Started
Page 78
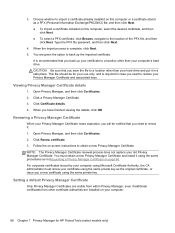
... sure that you save the file to back up your certificate to a location other than your computer's hard drive. When you back up the imported certificate. You must renew your hard drive and put it : 1. You are installed on this computer, select the desired certificate, and then click...the same private key as in case you will be for HP ProtectTools (select models only) Open Privacy Manager, and then click Certificates. 2. NOTE: The Privacy Manager Certificate renewal process does not replace your computer. 68 Chapter 7 Privacy Manager for your Privacy Manager...
... sure that you save the file to back up your certificate to a location other than your computer's hard drive. When you back up the imported certificate. You must renew your hard drive and put it : 1. You are installed on this computer, select the desired certificate, and then click...the same private key as in case you will be for HP ProtectTools (select models only) Open Privacy Manager, and then click Certificates. 2. NOTE: The Privacy Manager Certificate renewal process does not replace your computer. 68 Chapter 7 Privacy Manager for your Privacy Manager...
HP ProtectTools Getting Started
Page 111
... activate Computrace for HP ProtectTools is configured from the Absolute Software Customer Center. The Activation Wizard securely processes the transaction and sets up your credit card payment information, or enter a prepurchased Product Key. If the system is erased or replaced. If configured, Computrace...locating and recovering the computer. To launch the Computrace Activation Wizard, click Get Started. 5. Once complete, you to function even if the hard drive is misplaced or stolen, the Customer Center can : ● Monitor your computers. ● Protect your computer. To log in ....
... activate Computrace for HP ProtectTools is configured from the Absolute Software Customer Center. The Activation Wizard securely processes the transaction and sets up your credit card payment information, or enter a prepurchased Product Key. If the system is erased or replaced. If configured, Computrace...locating and recovering the computer. To launch the Computrace Activation Wizard, click Get Started. 5. Once complete, you to function even if the hard drive is misplaced or stolen, the Customer Center can : ● Monitor your computers. ● Protect your computer. To log in ....
Getting Started HP Notebook
Page 6
... 37 Replacing a hard drive ...37 Replacing an optical drive 39 Adding or replacing memory modules 41 Updating programs and drivers ...43 Cleaning your computer ...44 Cleaning products ...44 Cleaning procedures ...44 Cleaning the display 44 Cleaning the sides and cover 44 Cleaning the TouchPad and keyboard 45 6 Backup and recovery ...46 Creating recovery media with HP Recovery...
... 37 Replacing a hard drive ...37 Replacing an optical drive 39 Adding or replacing memory modules 41 Updating programs and drivers ...43 Cleaning your computer ...44 Cleaning products ...44 Cleaning procedures ...44 Cleaning the display 44 Cleaning the sides and cover 44 Cleaning the TouchPad and keyboard 45 6 Backup and recovery ...46 Creating recovery media with HP Recovery...

Getting Started HP Notebook
Page 26
... To prevent an unresponsive system, replace the wireless module only with a wireless module authorized for use in the computer by the governmental agency that regulates wireless devices in your computer Connects an optional accessory battery. 18 Chapter 2 Getting to the hard drive bay, the wireless LAN (WLAN...) module slot, the WWAN module slot, and the memory module slots. If you replace the module and then receive a warning message, remove the module to restore ...
... To prevent an unresponsive system, replace the wireless module only with a wireless module authorized for use in the computer by the governmental agency that regulates wireless devices in your computer Connects an optional accessory battery. 18 Chapter 2 Getting to the hard drive bay, the wireless LAN (WLAN...) module slot, the WWAN module slot, and the memory module slots. If you replace the module and then receive a warning message, remove the module to restore ...

Getting Started HP Notebook
Page 42
... front of the computer (4) and lift (5) to release the service door. Then shut down the computer before adding or replacing a memory module or hard drive. Remove the battery (see Inserting or removing the battery on by pressing the power button. Removing the service door Remove ... the memory module slot, hard drive, regulatory label, and other components. 34 Chapter 5 Maintenance If you are not sure whether the computer is being used) (2), and then slide the release latch again (3) to remove the service door. Replacing the service door Replace the service door after accessing...
... front of the computer (4) and lift (5) to release the service door. Then shut down the computer before adding or replacing a memory module or hard drive. Remove the battery (see Inserting or removing the battery on by pressing the power button. Removing the service door Remove ... the memory module slot, hard drive, regulatory label, and other components. 34 Chapter 5 Maintenance If you are not sure whether the computer is being used) (2), and then slide the release latch again (3) to remove the service door. Replacing the service door Replace the service door after accessing...

Getting Started HP Notebook
Page 44
...Replacing or upgrading the hard drive CAUTION: To prevent information loss or an unresponsive system: Shut down the computer before removing the hard drive from the illustration in Hibernation, turn the computer on by pressing the power button. Save your work and shut down the computer through the operating system. Loosen the 3 hard drive...see Removing the service door on , in the Sleep state, or in this section. 36 Chapter 5 Maintenance Do not remove the hard drive while the computer is off or in this section. If you are not sure whether the computer is on page 34). 5. To ...
...Replacing or upgrading the hard drive CAUTION: To prevent information loss or an unresponsive system: Shut down the computer before removing the hard drive from the illustration in Hibernation, turn the computer on by pressing the power button. Save your work and shut down the computer through the operating system. Loosen the 3 hard drive...see Removing the service door on , in the Sleep state, or in this section. 36 Chapter 5 Maintenance Do not remove the hard drive while the computer is off or in this section. If you are not sure whether the computer is on page 34). 5. To ...

Getting Started HP Notebook
Page 45
... system. To install the hard drive: 1. Tighten the hard drive screws (4). 4. To remove a hard drive from the upgrade bay. Replacing a drive in the hard drive bay (2). 2. Insert the hard drive into the hard drive bay at an angle (1), and then lay the hard drive flat in the upgrade bay The upgrade bay can hold either a hard drive or an optical drive. Insert the battery (see Replacing the service door on...
... system. To install the hard drive: 1. Tighten the hard drive screws (4). 4. To remove a hard drive from the upgrade bay. Replacing a drive in the hard drive bay (2). 2. Insert the hard drive into the hard drive bay at an angle (1), and then lay the hard drive flat in the upgrade bay The upgrade bay can hold either a hard drive or an optical drive. Insert the battery (see Replacing the service door on...

Getting Started HP Notebook
Page 47
...down the computer before removing the optical drive from the upgrade bay. Replacing a drive in the upgrade bay: 1. Do not remove the optical drive while the computer is off or in Hibernation. To install a hard drive in the upgrade bay 39 Insert the hard drive (1) into the upgrade bay, and then... tighten the upgrade bay screw (2). 2. Replace the service door (see Inserting or removing ...
...down the computer before removing the optical drive from the upgrade bay. Replacing a drive in the upgrade bay: 1. Do not remove the optical drive while the computer is off or in Hibernation. To install a hard drive in the upgrade bay 39 Insert the hard drive (1) into the upgrade bay, and then... tighten the upgrade bay screw (2). 2. Replace the service door (see Inserting or removing ...
Getting Started HP Notebook
Page 63
...48 battery bay 52 battery bay, identifying 17 battery light 10 battery release latch 17 battery, replacing 32 Bluetooth label 52 buttons calculator 8 left pointing stick 4 left TouchPad 4 optical drive eject 11 power 7 right pointing stick 5 right TouchPad 5 C calculator button, identifying 8 ...f11 recovery 49 fingerprint reader, identifying 8 fn key, identifying 9, 23 function keys, identifying 9 H hard drive installing 36 removing 36 hard drive light 10 hard drive recovery 49 hard drive, identifying 18 headphone (audio-out) jack 11 hot keys adjusting volume 24 battery charge 24 decrease screen...
...48 battery bay 52 battery bay, identifying 17 battery light 10 battery release latch 17 battery, replacing 32 Bluetooth label 52 buttons calculator 8 left pointing stick 4 left TouchPad 4 optical drive eject 11 power 7 right pointing stick 5 right TouchPad 5 C calculator button, identifying 8 ...f11 recovery 49 fingerprint reader, identifying 8 fn key, identifying 9, 23 function keys, identifying 9 H hard drive installing 36 removing 36 hard drive light 10 hard drive recovery 49 hard drive, identifying 18 headphone (audio-out) jack 11 hot keys adjusting volume 24 battery charge 24 decrease screen...
Getting Started HP Notebook
Page 64
... 9 L labels Bluetooth 52 HP Mobile Broadband Module 52 Microsoft Certificate of Authenticity 52 regulatory 52 service 52 SIM 52 wireless certification 52 WLAN 52 latch, battery release 17 latches, service door release 17 lights battery 10 calculator 6 caps lock 6 hard drive 10 num lock 6 power ... pinching 30 scrolling 30 zooming 30 TouchPad light, identifying 6 TouchPad zone identifying 4 traveling with the computer 52 U upgrade bay 11 replacing a hard drive 37 replacing an optical drive 39 USB 3.0 port 11 USB ports, identifying 11, 12, 13 eSATA port 13 V vents, identifying 12, 13, 17 volume...
... 9 L labels Bluetooth 52 HP Mobile Broadband Module 52 Microsoft Certificate of Authenticity 52 regulatory 52 service 52 SIM 52 wireless certification 52 WLAN 52 latch, battery release 17 latches, service door release 17 lights battery 10 calculator 6 caps lock 6 hard drive 10 num lock 6 power ... pinching 30 scrolling 30 zooming 30 TouchPad light, identifying 6 TouchPad zone identifying 4 traveling with the computer 52 U upgrade bay 11 replacing a hard drive 37 replacing an optical drive 39 USB 3.0 port 11 USB ports, identifying 11, 12, 13 eSATA port 13 V vents, identifying 12, 13, 17 volume...


