
Wireless Setup Guide
Page 3
... encounter problems at any time during this setup. 2 Make sure that you have tested your setup with router Ethernet cable temporarily connected (jack locations vary) PROGRESS CHECK 4 Configure the wireless router according to Disable, WEP, through 5, or contact your router is set up and turn it off button. Refer to the router using the Ethernet cable included with the computer. Web site. 3 Set up the hardware and software Now...
... encounter problems at any time during this setup. 2 Make sure that you have tested your setup with router Ethernet cable temporarily connected (jack locations vary) PROGRESS CHECK 4 Configure the wireless router according to Disable, WEP, through 5, or contact your router is set up and turn it off button. Refer to the router using the Ethernet cable included with the computer. Web site. 3 Set up the hardware and software Now...
Wireless Setup Guide
Page 5
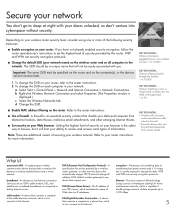
... the Web or through the Internet: 1 in your network: a Select Start > Control Panel > Network and Internet Connection > Network Connections. Refer to 1000 Mbps. 5 Refer to the Internet. DID YOU KNOW... • Windows XP and some types of the following security measures: ■ Enable encryption on your network name) on the wireless router and on your Web browser. access point (AP)-A single-purpose wireless communication device that shields your data...
... the Web or through the Internet: 1 in your network: a Select Start > Control Panel > Network and Internet Connection > Network Connections. Refer to 1000 Mbps. 5 Refer to the Internet. DID YOU KNOW... • Windows XP and some types of the following security measures: ■ Enable encryption on your network name) on the wireless router and on your Web browser. access point (AP)-A single-purpose wireless communication device that shields your data...
Wireless Setup Guide
Page 7
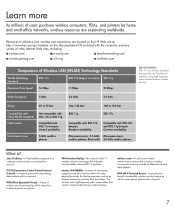
TCP/IP (Transmission Control Protocol/Internet Protocol)-A network protocol for sharing resources such as an Internet connection, printers, files, and drives. The network uses high-frequency radio waves rather than wires to enhance your wireless user experience are expanding worldwide. Resources to communicate among 802.11 products. static IP address-A fixed address assigned to a computer or device that indicates interoperability among wireless devices. wireless LAN (WLAN)-A system of...
TCP/IP (Transmission Control Protocol/Internet Protocol)-A network protocol for sharing resources such as an Internet connection, printers, files, and drives. The network uses high-frequency radio waves rather than wires to enhance your wireless user experience are expanding worldwide. Resources to communicate among 802.11 products. static IP address-A fixed address assigned to a computer or device that indicates interoperability among wireless devices. wireless LAN (WLAN)-A system of...

Security - Window Vista and Windows 7
Page 8
... and numbers and is case sensitive. ● A password set in Windows must be entered at a Setup Utility prompt. Use the following sections list Windows and Setup Utility passwords and describe their functions. For additional information about Windows passwords, such as they are not displayed as screen-saver passwords, select Start > Help and Support. 2 Chapter 2 Using passwords The following tips for creating and saving passwords: ● When creating passwords, follow requirements set in Windows or in the non-Windows Setup Utility preinstalled on...
... and numbers and is case sensitive. ● A password set in Windows must be entered at a Setup Utility prompt. Use the following sections list Windows and Setup Utility passwords and describe their functions. For additional information about Windows passwords, such as they are not displayed as screen-saver passwords, select Start > Help and Support. 2 Chapter 2 Using passwords The following tips for creating and saving passwords: ● When creating passwords, follow requirements set in Windows or in the non-Windows Setup Utility preinstalled on...

Setup Utility - Windows Vista and Windows 7
Page 10
...◦ Internal CD/DVD ROM drive ◦ USB CD/DVD ROM drive ◦ Hard drive ◦ USB Diskette on Key ◦ USB Hard drive ◦ Network adapter Diagnostics menu Select Hard Disk Self Test Secondary Hard Disk Self Test (select models only) Memory Test To do this Change the Setup Utility language. Enable/disable the capacitive button tapping sound. When enabled, saves power when the computer is called the Primary Hard Disk Self Test. Enable/disable Card Reader/1394 Power Saving. Enabled/disable Fan Always On. Run a diagnostic test on . System Configuration menu Select...
...◦ Internal CD/DVD ROM drive ◦ USB CD/DVD ROM drive ◦ Hard drive ◦ USB Diskette on Key ◦ USB Hard drive ◦ Network adapter Diagnostics menu Select Hard Disk Self Test Secondary Hard Disk Self Test (select models only) Memory Test To do this Change the Setup Utility language. Enable/disable the capacitive button tapping sound. When enabled, saves power when the computer is called the Primary Hard Disk Self Test. Enable/disable Card Reader/1394 Power Saving. Enabled/disable Fan Always On. Run a diagnostic test on . System Configuration menu Select...
Software Update - Windows Vista and Windows 7
Page 5
... among hardware devices, including the time and date. Prepare for more information. 2. NOTE: The computer system BIOS is connected to a network, consult the network administrator before installing any software updates, especially system BIOS updates. Refer to improve the security of this guide: 1. If your computer model, product category, and series or family. Install the updates. 1 NOTE: Windows® includes the User Account Control feature to Windows Help for a system BIOS update by...
... among hardware devices, including the time and date. Prepare for more information. 2. NOTE: The computer system BIOS is connected to a network, consult the network administrator before installing any software updates, especially system BIOS updates. Refer to improve the security of this guide: 1. If your computer model, product category, and series or family. Install the updates. 1 NOTE: Windows® includes the User Account Control feature to Windows Help for a system BIOS update by...

Software Update - Windows Vista and Windows 7
Page 6
Open the Setup Utility by turning on battery power, docked in an optional docking device, or connected to select Exit > Exit Discarding Changes, and then press enter. At the download area, follow these steps: a. Updating the BIOS To update the BIOS, first determine what BIOS version you are already in Windows) or by opening the Setup Utility. To use the arrow keys to an optional power source. Do not download or install a BIOS update while the computer is displayed. 3. Make a note of...
Open the Setup Utility by turning on battery power, docked in an optional docking device, or connected to select Exit > Exit Discarding Changes, and then press enter. At the download area, follow these steps: a. Updating the BIOS To update the BIOS, first determine what BIOS version you are already in Windows) or by opening the Setup Utility. To use the arrow keys to an optional power source. Do not download or install a BIOS update while the computer is displayed. 3. Make a note of...
Software Update - Windows Vista and Windows 7
Page 8
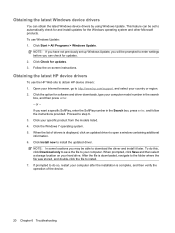
... drivers To download and install software other than a BIOS update, follow the instructions provided. Select your hard drive. When prompted, click Save and then select a storage location on your operating system. 5. When the list of the device. 4 Updating software Click the option for software and driver downloads, type your computer. After the file is displayed, click an updated driver to your computer model number in the Search box, press enter, and follow these steps: To use the HP...
... drivers To download and install software other than a BIOS update, follow the instructions provided. Select your hard drive. When prompted, click Save and then select a storage location on your operating system. 5. When the list of the device. 4 Updating software Click the option for software and driver downloads, type your computer. After the file is displayed, click an updated driver to your computer model number in the Search box, press enter, and follow these steps: To use the HP...
Wireless (Select Models Only) - Windows 7
Page 23
... troubleshooting WLANs, refer to Help and Support for more information on your computer: NOTE: Windows includes the User Account Control feature to improve the security of your computer. If no WLAN device is listed, either your permission or password for tasks such as installing software, running utilities, or changing Windows settings. In the System area, click Device Manager. 3. Cannot connect to expand the list and show all adapters. 4. Select Start > Control Panel...
... troubleshooting WLANs, refer to Help and Support for more information on your computer: NOTE: Windows includes the User Account Control feature to improve the security of your computer. If no WLAN device is listed, either your permission or password for tasks such as installing software, running utilities, or changing Windows settings. In the System area, click Device Manager. 3. Cannot connect to expand the list and show all adapters. 4. Select Start > Control Panel...
Drives - Windows 7
Page 15
... when connecting a powered drive, be added by connecting the drive to the manufacturer's instructions. 3 Using external drives Removable external drives expand your options for storing and accessing information. USB drives include the following types: ● 1.44-megabyte diskette drive ● Hard drive module (a hard drive with an adapter attached) ● DVD-ROM Drive ● DVD/CD-RW Combo Drive ● DVD±RW and CD-RW Combo Drive NOTE: For more information about required software and drivers, or to learn which computer port to use...
... when connecting a powered drive, be added by connecting the drive to the manufacturer's instructions. 3 Using external drives Removable external drives expand your options for storing and accessing information. USB drives include the following types: ● 1.44-megabyte diskette drive ● Hard drive module (a hard drive with an adapter attached) ● DVD-ROM Drive ● DVD/CD-RW Combo Drive ● DVD±RW and CD-RW Combo Drive NOTE: For more information about required software and drivers, or to learn which computer port to use...
Drives - Windows 7
Page 16
... Support for tasks such as installing software, running utilities, or changing Windows settings. Select Start > All Programs > Accessories > System Tools > Disk Cleanup. 2. Select Start > All Programs > Accessories > System Tools > Disk Defragmenter. 2. For additional information, access the Disk Defragmenter software Help. You may be prompted for your computer. NOTE: Windows® includes the User Account Control feature to run more efficiently. To run Disk Cleanup: 1. Using Disk Cleanup Disk Cleanup searches the hard drive...
... Support for tasks such as installing software, running utilities, or changing Windows settings. Select Start > All Programs > Accessories > System Tools > Disk Cleanup. 2. Select Start > All Programs > Accessories > System Tools > Disk Defragmenter. 2. For additional information, access the Disk Defragmenter software Help. You may be prompted for your computer. NOTE: Windows® includes the User Account Control feature to run more efficiently. To run Disk Cleanup: 1. Using Disk Cleanup Disk Cleanup searches the hard drive...
Drives - Windows 7
Page 24
...://www.hp.com/support, and select your computer. Open your Internet browser, go to your country or region. 2. If you can obtain the latest Windows device drivers by using Windows Update. Click the Windows 7 operating system. 5. To do so, restart your hard drive. Click your computer model number in the Search box, press enter, and follow the instructions provided. Click Install now to install. 7. Click Check for software and driver downloads, type your specific product...
...://www.hp.com/support, and select your computer. Open your Internet browser, go to your country or region. 2. If you can obtain the latest Windows device drivers by using Windows Update. Click the Windows 7 operating system. 5. To do so, restart your hard drive. Click your computer model number in the Search box, press enter, and follow the instructions provided. Click Install now to install. 7. Click Check for software and driver downloads, type your specific product...
Drives - Windows 7
Page 25
... hard drive; Index A airport security devices 1 AutoPlay 7 B BD copying 8 playing 6 removing 10 Blu-ray ROM with LightScribe 3 E external drive 11 H hard disk drive external 11 installing 14 removing 13 replacing 13 hard drive external 11 installing 14 removing 13 replacing 13 M maintenance Disk Cleanup 12 Disk Defragmenter 12 O optical disc playing 6 removing 10 optical drive 2, 11 R region codes, DVD 7 S software Disk Cleanup 12 Disk Defragmenter 12 T troubleshooting burning discs 19 device driver 19 disc play 18 HP device drivers 20 optical disc tray 16 optical drive detection 17 Windows...
... hard drive; Index A airport security devices 1 AutoPlay 7 B BD copying 8 playing 6 removing 10 Blu-ray ROM with LightScribe 3 E external drive 11 H hard disk drive external 11 installing 14 removing 13 replacing 13 hard drive external 11 installing 14 removing 13 replacing 13 M maintenance Disk Cleanup 12 Disk Defragmenter 12 O optical disc playing 6 removing 10 optical drive 2, 11 R region codes, DVD 7 S software Disk Cleanup 12 Disk Defragmenter 12 T troubleshooting burning discs 19 device driver 19 disc play 18 HP device drivers 20 optical disc tray 16 optical drive detection 17 Windows...
Notebook Tour - Windows 7
Page 8
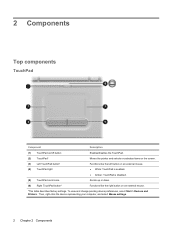
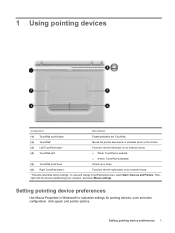
... and change pointing device preferences, select Start > Devices and Printers. Then, right-click the device representing your computer, and select Mouse settings. 2 Chapter 2 Components 2 Components Top components TouchPad Component Description (1) TouchPad on/off button Enables/disables the TouchPad. (2) TouchPad* Moves the pointer and selects or activates items on the screen. (3) Left TouchPad button* (4) TouchPad light Functions like the left button on an external mouse. ● White: TouchPad is enabled. ● Amber: TouchPad is disabled. (5) TouchPad scroll zone Scrolls up...
... and change pointing device preferences, select Start > Devices and Printers. Then, right-click the device representing your computer, and select Mouse settings. 2 Chapter 2 Components 2 Components Top components TouchPad Component Description (1) TouchPad on/off button Enables/disables the TouchPad. (2) TouchPad* Moves the pointer and selects or activates items on the screen. (3) Left TouchPad button* (4) TouchPad light Functions like the left button on an external mouse. ● White: TouchPad is enabled. ● Amber: TouchPad is disabled. (5) TouchPad scroll zone Scrolls up...
Notebook Tour - Windows 7
Page 15
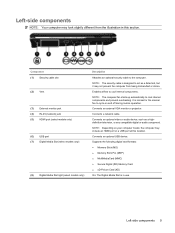
...in this location. Connects an external VGA monitor or projector. Connects a network cable. Component (1) Security cable slot (2) Vent (3) External monitor port (4) RJ-45 (network) jack (5) HDMI port (select models only) (6) USB port (7) Digital Media Slot (select models only) (8) Digital Media Slot light (select models only) Description Attaches an optional security cable to cool internal components and prevent overheating. It is normal for the internal fan to cool internal components. NOTE: Depending on and off during routine operation. Connects an optional video or audio device...
...in this location. Connects an external VGA monitor or projector. Connects a network cable. Component (1) Security cable slot (2) Vent (3) External monitor port (4) RJ-45 (network) jack (5) HDMI port (select models only) (6) USB port (7) Digital Media Slot (select models only) (8) Digital Media Slot light (select models only) Description Attaches an optional security cable to cool internal components and prevent overheating. It is normal for the internal fan to cool internal components. NOTE: Depending on and off during routine operation. Connects an optional video or audio device...
Notebook Tour - Windows 7
Page 20
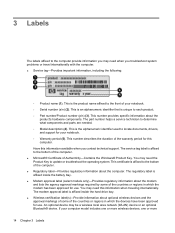
... use . This is the alphanumeric identifier used to locate documents, drivers, and support for use . An optional device may need the Product Key to update or troubleshoot the operating system. 3 Labels The labels affixed to the computer provide information you may need when you contact technical support. This number describes the duration of your notebook. ◦ Serial number (s/n) (2). You may be a wireless local area network (WLAN) device or an optional Bluetooth® device. The part number helps a service...
... use . This is the alphanumeric identifier used to locate documents, drivers, and support for use . An optional device may need the Product Key to update or troubleshoot the operating system. 3 Labels The labels affixed to the computer provide information you may need when you contact technical support. This number describes the duration of your notebook. ◦ Serial number (s/n) (2). You may be a wireless local area network (WLAN) device or an optional Bluetooth® device. The part number helps a service...
Pointing Devices and Keyboard - Windows 7
Page 5
...such as button configuration, click speed, and pointer options. 1 Using pointing devices Component Description (1) TouchPad on an external mouse. *This table describes factory settings. Then, right-click the device representing your computer, and select Mouse settings. Moves the pointer and selects or activates items on an external mouse. ● White: TouchPad is enabled. ● Amber: TouchPad is disabled. Functions like the right button on /off button (2) TouchPad* (3) Left TouchPad button* (4) TouchPad light (5) TouchPad scroll zone Enables/disables the TouchPad. To...
...such as button configuration, click speed, and pointer options. 1 Using pointing devices Component Description (1) TouchPad on an external mouse. *This table describes factory settings. Then, right-click the device representing your computer, and select Mouse settings. Moves the pointer and selects or activates items on an external mouse. ● White: TouchPad is enabled. ● Amber: TouchPad is disabled. Functions like the right button on /off button (2) TouchPad* (3) Left TouchPad button* (4) TouchPad light (5) TouchPad scroll zone Enables/disables the TouchPad. To...
Pointing Devices and Keyboard - Windows 7
Page 6
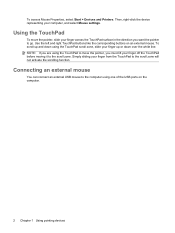
... the scroll zone. To scroll up or down using one of the USB ports on an external mouse. Simply sliding your finger up and down over the white line. To access Mouse Properties, select Start > Devices and Printers. Using the TouchPad To move the pointer, you want the pointer to the scroll zone will not activate the scrolling function. Connecting an external mouse You can connect an external USB mouse to the computer using the TouchPad scroll...
... the scroll zone. To scroll up or down using one of the USB ports on an external mouse. Simply sliding your finger up and down over the white line. To access Mouse Properties, select Start > Devices and Printers. Using the TouchPad To move the pointer, you want the pointer to the scroll zone will not activate the scrolling function. Connecting an external mouse You can connect an external USB mouse to the computer using the TouchPad scroll...
Multimedia - Windows 7
Page 29
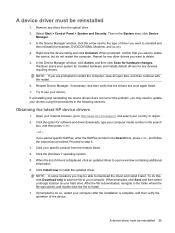
... the restart. 6. Click the option for software and driver downloads, type your system for installed hardware and installs default drivers for any devices requiring drivers. Select Start > Control Panel > System and Security. Repeat for any discs from the models listed. 4. A device driver must be reinstalled 25 Remove any other drivers you want to the type of the device. Then in the Search box, press enter, and follow the instructions provided. In the Device Manager window, click the arrow next...
... the restart. 6. Click the option for software and driver downloads, type your system for installed hardware and installs default drivers for any devices requiring drivers. Select Start > Control Panel > System and Security. Repeat for any discs from the models listed. 4. A device driver must be reinstalled 25 Remove any other drivers you want to the type of the device. Then in the Search box, press enter, and follow the instructions provided. In the Device Manager window, click the arrow next...
Power Management - Windows 7
Page 19
... than once a month. Step 2: Disable Hibernation and Sleep 1. Change the On battery setting to calibrate a new battery. It is off the display settings to an AC adapter, optional power adapter, or optional expansion product, and then plug the adapter or device into the computer. 2. Connect the computer to Never. 5. Click OK. 10. Insert the battery into external power. Click the battery meter icon in use, but it charges faster when the computer is...
... than once a month. Step 2: Disable Hibernation and Sleep 1. Change the On battery setting to calibrate a new battery. It is off the display settings to an AC adapter, optional power adapter, or optional expansion product, and then plug the adapter or device into the computer. 2. Connect the computer to Never. 5. Click OK. 10. Insert the battery into external power. Click the battery meter icon in use, but it charges faster when the computer is...


