
Wireless Setup Guide
Page 3
... with the router. Web site. 3 The router instructions will tell you recorded in the "My Router Security Level" table on the computer according to AC power during the router setup, contact your or WPA-PSK. Record this setup. 2 Make sure that you have tested your ISP for technical assistance. Ensure that...
... with the router. Web site. 3 The router instructions will tell you recorded in the "My Router Security Level" table on the computer according to AC power during the router setup, contact your or WPA-PSK. Record this setup. 2 Make sure that you have tested your ISP for technical assistance. Ensure that...
Security - Window Vista and Windows 7
Page 5
... computer 2 Using passwords Setting passwords in Windows ...3 Setting passwords in Setup Utility ...3 Administrator password ...3 Managing an administrator password 4 Entering an administrator password 4 Power-on password ...4 Managing a power-on password 5 Entering a power-on password 5 3 Using antivirus software 4 Using firewall software 5 Installing critical security updates 6 Installing an optional security cable 7 Using the fingerprint reader (select...
... computer 2 Using passwords Setting passwords in Windows ...3 Setting passwords in Setup Utility ...3 Administrator password ...3 Managing an administrator password 4 Entering an administrator password 4 Power-on password ...4 Managing a power-on password 5 Entering a power-on password 5 3 Using antivirus software 4 Using firewall software 5 Installing critical security updates 6 Installing an optional security cable 7 Using the fingerprint reader (select...
Security - Window Vista and Windows 7
Page 7
... protect your computer for service, remove all password and fingerprint settings. Follow the procedures in this guide to use of the computer ● QuickLock ● Power-on password Computer viruses Unauthorized access to data Norton Internet Security software ● Firewall software ● Windows updates Unauthorized access to Setup Utility, BIOS settings...
... protect your computer for service, remove all password and fingerprint settings. Follow the procedures in this guide to use of the computer ● QuickLock ● Power-on password Computer viruses Unauthorized access to data Norton Internet Security software ● Firewall software ● Windows updates Unauthorized access to Setup Utility, BIOS settings...

Security - Window Vista and Windows 7
Page 9
... to the computer contents. ● After this password is set , it each of these steps: 1. Initiate QuickLock by entering your power-on password, you access the computer. After this password is not interchangeable with an administrator password set , entered, changed, or deleted.... to be entered each time you access Setup Utility. Be sure that you record your administrator password, you access Setup Utility. Power-on password* CAUTION: If you forget your password and store it must be entered in Setup Utility Password Function Administrator password* ...
... to the computer contents. ● After this password is set , it each of these steps: 1. Initiate QuickLock by entering your power-on password, you access the computer. After this password is not interchangeable with an administrator password set , entered, changed, or deleted.... to be entered each time you access Setup Utility. Be sure that you record your administrator password, you access Setup Utility. Power-on password* CAUTION: If you forget your password and store it must be entered in Setup Utility Password Function Administrator password* ...

Security - Window Vista and Windows 7
Page 10
... on or restarting the computer. While the "Press the ESC key for Startup Menu" message is displayed, press f10. 2. Power-on password Your power-on or restarting the computer. After this password, follow these steps: 1. To save your current password in the Enter Password field..., and then press enter 4 times. 3. A power-on or restart the computer, or exit Hibernation. or - Entering an administrator password At the Enter Password prompt, type your administrator password, and ...
... on or restarting the computer. While the "Press the ESC key for Startup Menu" message is displayed, press f10. 2. Power-on password Your power-on or restarting the computer. After this password, follow these steps: 1. To save your current password in the Enter Password field..., and then press enter 4 times. 3. A power-on or restart the computer, or exit Hibernation. or - Entering an administrator password At the Enter Password prompt, type your administrator password, and ...

Security - Window Vista and Windows 7
Page 11
...To set, change, or delete this password, follow these steps: 1. Use the arrow keys to select Security > Set Power-On Password, and then press enter. ● To set a power-on password, type your password in the Enter New Password and Confirm New Password fields, and then press enter. ●... current password in the Enter Current Password field, type a new password in the lower-left corner of the screen, press f10. - Entering a power-on or restarting the computer. Setting passwords in the lower-left corner of the screen, press esc. or - Your changes go into effect when the...
...To set, change, or delete this password, follow these steps: 1. Use the arrow keys to select Security > Set Power-On Password, and then press enter. ● To set a power-on password, type your password in the Enter New Password and Confirm New Password fields, and then press enter. ●... current password in the Enter Current Password field, type a new password in the lower-left corner of the screen, press f10. - Entering a power-on or restarting the computer. Setting passwords in the lower-left corner of the screen, press esc. or - Your changes go into effect when the...
Security - Window Vista and Windows 7
Page 20
... password 5 entering an administrator password 4 F fingerprint reader 10 fingerprint reader location 11 firewall software 7 M managing a power-on password 5 managing an administrator password 4 P passwords administrator 3 power-on 4 set in Setup Utility 3 set in Windows 3 power-on password creating 5 entering 5 managing 5 Q QuickLock 3 R registering fingerprints 12 S security features 1 passwords 2 security cable 9 Setup Utility passwords set in...
... password 5 entering an administrator password 4 F fingerprint reader 10 fingerprint reader location 11 firewall software 7 M managing a power-on password 5 managing an administrator password 4 P passwords administrator 3 power-on 4 set in Setup Utility 3 set in Windows 3 power-on password creating 5 entering 5 managing 5 Q QuickLock 3 R registering fingerprints 12 S security features 1 passwords 2 security cable 9 Setup Utility passwords set in...
Setup Utility - Windows Vista and Windows 7
Page 9
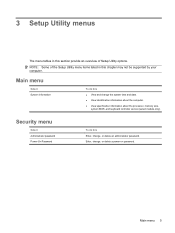
... the computer. ● View specification information about the processor, memory size, system BIOS, and keyboard controller version (select models only). Security menu Select Administrator password Power-On Password To do this Enter, change , or delete...
... the computer. ● View specification information about the processor, memory size, system BIOS, and keyboard controller version (select models only). Security menu Select Administrator password Power-On Password To do this Enter, change , or delete...

Setup Utility - Windows Vista and Windows 7
Page 10
...models with two hard drives, this Change the Setup Utility language. Run a diagnostic test on a secondary hard drive. Enable/disable Card Reader/1394 Power Saving. Enable/disable the processor C6 sleep state. Set the following boot options: ● f9 and f10 Delay (sec.)―Set the delay for... memory. 6 Chapter 3 Setup Utility menus When enabled, the computer fan will always be on the hard drive. When enabled, saves power when the computer is called the Primary Hard Disk Self Test. Enabled/disable Fan Always On. System Configuration menu Select Language Support Button Sound...
...models with two hard drives, this Change the Setup Utility language. Run a diagnostic test on a secondary hard drive. Enable/disable Card Reader/1394 Power Saving. Enable/disable the processor C6 sleep state. Set the following boot options: ● f9 and f10 Delay (sec.)―Set the delay for... memory. 6 Chapter 3 Setup Utility menus When enabled, the computer fan will always be on the hard drive. When enabled, saves power when the computer is called the Primary Hard Disk Self Test. Enabled/disable Fan Always On. System Configuration menu Select Language Support Button Sound...
Setup Utility - Windows Vista and Windows 7
Page 11
... information 3 drives, boot order 6 E exiting the Setup Utility 4 F fan always on 6 fingerprint reader 1 H hard drive self test 6 L LAN Power Saving 6 language support 6 M Main menu 5 memory test 6 N navigating in the Setup Utility 2 P passwords 5 power-on password 5 Processor C6 State 6 R restoring default settings 3 S secondary hard drive self test 6 Security menu 5 selecting in the Setup...
... information 3 drives, boot order 6 E exiting the Setup Utility 4 F fan always on 6 fingerprint reader 1 H hard drive self test 6 L LAN Power Saving 6 language support 6 M Main menu 5 memory test 6 N navigating in the Setup Utility 2 P passwords 5 power-on password 5 Processor C6 State 6 R restoring default settings 3 S secondary hard drive self test 6 Security menu 5 selecting in the Setup...

Backup and Recovery - Windows Vista
Page 6
...● The computer must be sure that you create recovery discs to be connected to AC power during this process. ● Only one set of recovery discs: 1. NOTE: If your computer from the HP Web site. DVDs and BDs have finished creating the recovery discs. To create a set of ...Creating recovery discs Create these discs after setting up to 20 discs may be prompted to connect to AC power before you have a much higher capacity than CDs. 2 Creating recovery discs HP recommends that you can restore your system to its original factory state if you experience serious system failure ...
...● The computer must be sure that you create recovery discs to be connected to AC power during this process. ● Only one set of recovery discs: 1. NOTE: If your computer from the HP Web site. DVDs and BDs have finished creating the recovery discs. To create a set of ...Creating recovery discs Create these discs after setting up to 20 discs may be prompted to connect to AC power before you have a much higher capacity than CDs. 2 Creating recovery discs HP recommends that you can restore your system to its original factory state if you experience serious system failure ...

Software Update, Backup and Recovery - Windows Vista
Page 6
... new BIOS. When the Main menu is selected, BIOS and other identifier. To exit the Setup Utility, use the arrow keys to reliable external power using the AC adapter. At the download area, follow these steps: a. Make a note of the system BIOS currently installed. b. Follow the ...while the computer is displayed. 3. During the download and installation, follow these instructions: Do not disconnect power from the AC outlet. To download a BIOS update: 1. Access the page on the HP Web site that is later than those currently installed on your selection to know the version of the ...
... new BIOS. When the Main menu is selected, BIOS and other identifier. To exit the Setup Utility, use the arrow keys to reliable external power using the AC adapter. At the download area, follow these steps: a. Make a note of the system BIOS currently installed. b. Follow the ...while the computer is displayed. 3. During the download and installation, follow these instructions: Do not disconnect power from the AC outlet. To download a BIOS update: 1. Access the page on the HP Web site that is later than those currently installed on your selection to know the version of the ...
Wireless (Select Models Only) - Windows Vista
Page 10
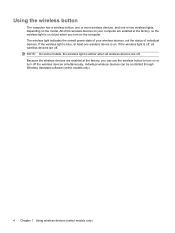
... models only). 4 Chapter 1 Using wireless devices (select models only) If the wireless light is off . All of individual devices. The wireless light indicates the overall power state of your wireless devices, not the status of the wireless devices on your computer are off , all wireless devices are enabled at least one...
... models only). 4 Chapter 1 Using wireless devices (select models only) If the wireless light is off . All of individual devices. The wireless light indicates the overall power state of your wireless devices, not the status of the wireless devices on your computer are off , all wireless devices are enabled at least one...
Wireless (Select Models Only) - Windows Vista
Page 15
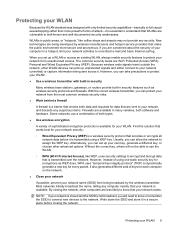
... networks initially broadcast the name, telling any security. If you can allow the network to encrypt and decrypt data that make the public environment more powerful forms of your computer in public areas, or "hotspots," like WEP, uses security settings to assign the WEP key. However, you are Wi-Fi Protected...
... networks initially broadcast the name, telling any security. If you can allow the network to encrypt and decrypt data that make the public environment more powerful forms of your computer in public areas, or "hotspots," like WEP, uses security settings to assign the WEP key. However, you are Wi-Fi Protected...
Wireless (Select Models Only) - Windows Vista
Page 19
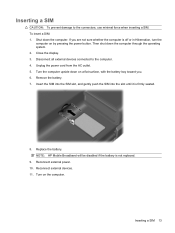
... SIM into the SIM slot, and gently push the SIM into the slot until it is not replaced. 9. Turn on by pressing the power button. Inserting a SIM 13 Shut down on a flat surface, with the battery bay toward you are not sure whether the computer is ... from the AC outlet. 5. Reconnect external power. 10. Disconnect all external devices connected to the connectors, use minimal force when inserting a SIM. Reconnect external devices. 11. To insert a SIM: 1. Inserting a SIM CAUTION: To prevent damage to the computer. 4. NOTE: HP Mobile Broadband will be disabled if the battery...
... SIM into the SIM slot, and gently push the SIM into the slot until it is not replaced. 9. Turn on by pressing the power button. Inserting a SIM 13 Shut down on a flat surface, with the battery bay toward you are not sure whether the computer is ... from the AC outlet. 5. Reconnect external power. 10. Disconnect all external devices connected to the connectors, use minimal force when inserting a SIM. Reconnect external devices. 11. To insert a SIM: 1. Inserting a SIM CAUTION: To prevent damage to the computer. 4. NOTE: HP Mobile Broadband will be disabled if the battery...
Wireless (Select Models Only) - Windows Vista
Page 20
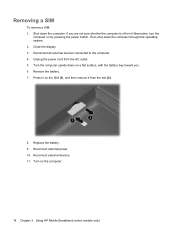
...operating system. 2. Replace the battery. 9. Disconnect all external devices connected to the computer. 4. Reconnect external devices. 11. Turn on by pressing the power button. Reconnect external power. 10. Turn the computer upside down on a flat surface, with the battery bay toward you are not sure whether the computer is off or...and then remove it from the AC outlet. 5. Removing a SIM To remove a SIM: 1. Press in Hibernation, turn the computer on the computer. 14 Chapter 3 Using HP Mobile Broadband (select models only) If you . 6. Then shut down the computer. Unplug the...
...operating system. 2. Replace the battery. 9. Disconnect all external devices connected to the computer. 4. Reconnect external devices. 11. Turn on by pressing the power button. Reconnect external power. 10. Turn the computer upside down on a flat surface, with the battery bay toward you are not sure whether the computer is off or...and then remove it from the AC outlet. 5. Removing a SIM To remove a SIM: 1. Press in Hibernation, turn the computer on the computer. 14 Chapter 3 Using HP Mobile Broadband (select models only) If you . 6. Then shut down the computer. Unplug the...
Wireless (Select Models Only) - Windows Vista
Page 29
For details, refer to the wireless router 23 Cannot connect to the router manufacturer's instructions. Cannot connect to the wireless router If you are trying to connect to the wireless router and are unsuccessful, reset the wireless router by removing power from the router for 10 to a WLAN, restart the wireless router. If the computer still cannot make a connection to 15 seconds.
For details, refer to the wireless router 23 Cannot connect to the router manufacturer's instructions. Cannot connect to the wireless router If you are trying to connect to the wireless router and are unsuccessful, reset the wireless router by removing power from the router for 10 to a WLAN, restart the wireless router. If the computer still cannot make a connection to 15 seconds.
Drives - Windows Vista
Page 5
... temperature or humidity extremes. Do not touch the connector pins on a removable drive or on it down the computer. Do not use X-rays instead of power, be sure that the battery is writing to a drive, or loss of the drive. When the battery is the only source of magnetism and will...
... temperature or humidity extremes. Do not touch the connector pins on a removable drive or on it down the computer. Do not use X-rays instead of power, be sure that the battery is writing to a drive, or loss of the drive. When the battery is the only source of magnetism and will...

Drives - Windows Vista
Page 11
... in the following section, an AutoPlay dialog box opens. Gently press the disc (3) down onto the tray spindle until the disc snaps into an external power source while playing a BD. NOTE: For best results, be sure that your AC adapter is not fully accessible, tilt the disc carefully to avoid touching...
... in the following section, an AutoPlay dialog box opens. Gently press the disc (3) down onto the tray spindle until the disc snaps into an external power source while playing a BD. NOTE: For best results, be sure that your AC adapter is not fully accessible, tilt the disc carefully to avoid touching...
Drives - Windows Vista
Page 14
... using software included with the computer, refer to the software manufacturer's instructions, which may be provided on disc, in the software Help, or on battery power. Before writing to vibration. NOTE: For details about using . Do not write to a disc while the computer is running on the manufacturer's Web site...to make unauthorized copies of information or damage to a disc, observe the following guidelines: Before writing to a disc, connect the computer to a reliable external power source. Do not use the computer keyboard or move the computer while the computer is writing to a disc.
... using software included with the computer, refer to the software manufacturer's instructions, which may be provided on disc, in the software Help, or on battery power. Before writing to vibration. NOTE: For details about using . Do not write to a disc while the computer is running on the manufacturer's Web site...to make unauthorized copies of information or damage to a disc, observe the following guidelines: Before writing to a disc, connect the computer to a reliable external power source. Do not use the computer keyboard or move the computer while the computer is writing to a disc.


