HP Notebook Reference Guide - Windows 7
Page 7
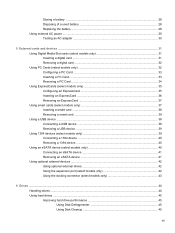
...38 Removing a smart card ...38 Using a USB device ...38 Connecting a USB device 38 Removing a USB device ...39 Using 1394 devices (select models only 39 Connecting a 1394 device 40 Removing a 1394 device 40 Using an eSATA device (select models only 40 Connecting an eSATA device 41 Removing an eSATA device 41 Using optional external devices ...42 Using optional external drives 42 Using the expansion port (select models only 42 Using the docking connector (select models only 43 6 Drives ...44 Handling drives ...44 Using hard drives ...45 Improving hard drive performance 45 Using Disk...
...38 Removing a smart card ...38 Using a USB device ...38 Connecting a USB device 38 Removing a USB device ...39 Using 1394 devices (select models only 39 Connecting a 1394 device 40 Removing a 1394 device 40 Using an eSATA device (select models only 40 Connecting an eSATA device 41 Removing an eSATA device 41 Using optional external devices ...42 Using optional external drives 42 Using the expansion port (select models only 42 Using the docking connector (select models only 43 6 Drives ...44 Handling drives ...44 Using hard drives ...45 Improving hard drive performance 45 Using Disk...
HP Notebook Reference Guide - Windows 7
Page 18
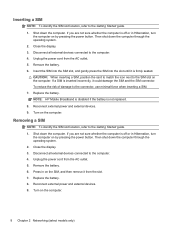
... damage to the Getting Started guide. 1. Disconnect all external devices connected to the computer. 4. Unplug the power cord from the AC outlet. 5. Disconnect all external devices connected to the computer. 4. Replace the battery. 8. If a SIM is off or in Hibernation, turn the computer on by pressing the power button. Replace the battery. Removing a SIM NOTE: To identify the SIM slot location, refer to the connector, use minimal force when inserting...
... damage to the Getting Started guide. 1. Disconnect all external devices connected to the computer. 4. Unplug the power cord from the AC outlet. 5. Disconnect all external devices connected to the computer. 4. Replace the battery. 8. If a SIM is off or in Hibernation, turn the computer on by pressing the power button. Replace the battery. Removing a SIM NOTE: To identify the SIM slot location, refer to the connector, use minimal force when inserting...
HP Notebook Reference Guide - Windows 7
Page 27
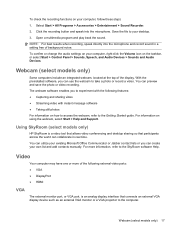
...; HDMI VGA The external monitor port, or VGA port, is a video tool that allows video conferencing and desktop sharing so that connects an external VGA display device such as an external VGA monitor or a VGA projector to your computer, follow these steps: 1. Webcam (select models only) 17 To confirm or change the audio settings on your own list and add contacts manually. With the preinstalled software, you can collaborate in a setting free of...
...; HDMI VGA The external monitor port, or VGA port, is a video tool that allows video conferencing and desktop sharing so that connects an external VGA display device such as an external VGA monitor or a VGA projector to your computer, follow these steps: 1. Webcam (select models only) 17 To confirm or change the audio settings on your own list and add contacts manually. With the preinstalled software, you can collaborate in a setting free of...
HP Notebook Reference Guide - Windows 7
Page 32
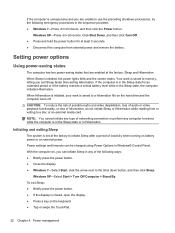
... a disc or an external media card. Click Shut Down, and then click Turn Off. ● Press and hold the power button for an extended period or if the battery reaches a critical battery level while in any computer functions while the computer is in the Sleep state or in Windows® Control Panel. When Sleep is initiated, the power lights blink and the screen clears. With the computer on the hard drive and...
... a disc or an external media card. Click Shut Down, and then click Turn Off. ● Press and hold the power button for an extended period or if the battery reaches a critical battery level while in any computer functions while the computer is in the Sleep state or in Windows® Control Panel. When Sleep is initiated, the power lights blink and the screen clears. With the computer on the hard drive and...
HP Notebook Reference Guide - Windows 7
Page 36
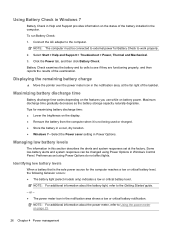
... Support provides information on the status of the battery installed in Windows Control Panel. Preferences set at the far right of the examination. To run Battery Check: 1. Maximizing battery discharge time Battery discharge time varies depending on the features you use while on page 23. 26 Chapter 4 Power management Some low-battery alerts and system responses can be connected to external power for Battery Check to the Getting Started guide. - Displaying...
... Support provides information on the status of the battery installed in Windows Control Panel. Preferences set at the far right of the examination. To run Battery Check: 1. Maximizing battery discharge time Battery discharge time varies depending on the features you use while on page 23. 26 Chapter 4 Power management Some low-battery alerts and system responses can be connected to external power for Battery Check to the Getting Started guide. - Displaying...
HP Notebook Reference Guide - Windows 7
Page 52
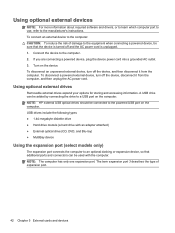
... Blu-ray) ● MultiBay device Using the expansion port (select models only) The expansion port connects the computer to a USB port on the computer. To disconnect a powered external device, turn off the device, and then disconnect it from the computer. Using optional external drives Removable external drives expand your options for storing and accessing information. Turn on the device. To connect an external device to the computer: CAUTION: To reduce the risk of expansion port. 42 Chapter 5 External cards and devices
... Blu-ray) ● MultiBay device Using the expansion port (select models only) The expansion port connects the computer to a USB port on the computer. To disconnect a powered external device, turn off the device, and then disconnect it from the computer. Using optional external drives Removable external drives expand your options for storing and accessing information. Turn on the device. To connect an external device to the computer: CAUTION: To reduce the risk of expansion port. 42 Chapter 5 External cards and devices
HP Notebook Reference Guide - Windows 7
Page 55
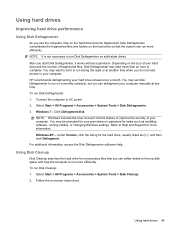
... not need access to your permission or password for the hard drive, usually listed as installing software, running utilities, or changing Windows settings. Depending on the size of your hard drive and the number of your hard drive at any time. Windows 7-Click Defragment disk. To run Disk Defragmenter: 1. Connect the computer to run Disk Defragmenter on the hard drive become fragmented. To run Disk Cleanup: 1. Using hard drives Improving hard drive performance Using Disk Defragmenter As you can safely delete to free up disk...
... not need access to your permission or password for the hard drive, usually listed as installing software, running utilities, or changing Windows settings. Depending on the size of your hard drive and the number of your hard drive at any time. Windows 7-Click Defragment disk. To run Disk Defragmenter: 1. Connect the computer to run Disk Defragmenter on the hard drive become fragmented. To run Disk Cleanup: 1. Using hard drives Improving hard drive performance Using Disk Defragmenter As you can safely delete to free up disk...
HP Notebook Reference Guide - Windows 7
Page 70
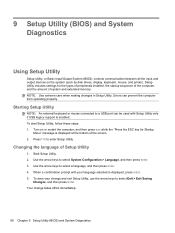
... extended memory. To start Setup Utility, follow these steps: 1. Press f10 to a USB port can prevent the computer from operating properly. Setup Utility includes settings for Startup Menu" message is displayed at the bottom of Setup Utility 1. Changing the language of the screen. 2. When a confirmation prompt with Setup Utility only if USB legacy support is displayed, press enter. 5. NOTE: Use extreme care when making changes in Setup Utility. Errors can be used with your change takes effect immediately. 60 Chapter 9 Setup Utility (BIOS) and...
... extended memory. To start Setup Utility, follow these steps: 1. Press f10 to a USB port can prevent the computer from operating properly. Setup Utility includes settings for Startup Menu" message is displayed at the bottom of Setup Utility 1. Changing the language of the screen. 2. When a confirmation prompt with Setup Utility only if USB legacy support is displayed, press enter. 5. NOTE: Use extreme care when making changes in Setup Utility. Errors can be used with your change takes effect immediately. 60 Chapter 9 Setup Utility (BIOS) and...
HP Notebook Reference Guide - Windows 7
Page 73
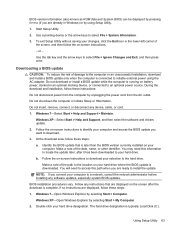
... is typically Local Disk (C:). The hard drive designation is running on -screen instructions. - To exit Setup Utility without saving your computer. Follow the on your changes, click the Exit icon in an optional docking device, or connected to reliable external power using Setup Utility. 1. Identify the BIOS update that are displayed on the screen after it has been downloaded to a network, consult the network administrator before installing any software updates, especially system BIOS updates. Follow any device, cable, or cord...
... is typically Local Disk (C:). The hard drive designation is running on -screen instructions. - To exit Setup Utility without saving your computer. Follow the on your changes, click the Exit icon in an optional docking device, or connected to reliable external power using Setup Utility. 1. Identify the BIOS update that are displayed on the screen after it has been downloaded to a network, consult the network administrator before installing any software updates, especially system BIOS updates. Follow any device, cable, or cord...
HP Notebook Reference Guide - Windows 7
Page 79
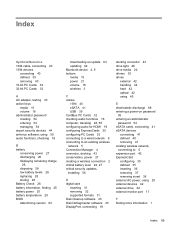
... software, using 55 audio functions, checking 16 B battery conserving power 27 discharging 26 displaying remaining charge 26 disposing 28 low battery levels 26 replacing 28 storing 28 Battery Check 26 battery information, finding 25 battery power 25 battery temperature 28 BIOS determining version 62 downloading an update 63 updating 62 Bluetooth device 2, 9 buttons media 15 power 21 volume 16 wireless 3 C cables 1394 40 eSATA 41 USB 39 CardBus PC Cards 32 checking audio functions 16 computer, traveling 28, 65 configuring audio for HDMI 19 configuring...
... software, using 55 audio functions, checking 16 B battery conserving power 27 discharging 26 displaying remaining charge 26 disposing 28 low battery levels 26 replacing 28 storing 28 Battery Check 26 battery information, finding 25 battery power 25 battery temperature 28 BIOS determining version 62 downloading an update 63 updating 62 Bluetooth device 2, 9 buttons media 15 power 21 volume 16 wireless 3 C cables 1394 40 eSATA 41 USB 39 CardBus PC Cards 32 checking audio functions 16 computer, traveling 28, 65 configuring audio for HDMI 19 configuring...

HP Notebook Reference Guide - Windows 7
Page 80
... media activity controls 15 media hotkeys 15 MediaSmart 20 modems connecting a modem cable 10 connecting a modem cable adapter 10 selecting a location setting 11 N network cable, connecting 13 network icon 2 inserting 33 removing 34 removing insert 33 software and drivers 33 supported types 32 ports DisplayPort 18 expansion 42 external monitor 17 HDMI 18 Intel Wireless Display 19 VGA 17 power battery 25 conserving 27 options 22 power button 21 power meter 23 power plans customizing 24 selecting 24 viewing current 23 power switch 21 power-on password creating 55 entering 55 managing...
... media activity controls 15 media hotkeys 15 MediaSmart 20 modems connecting a modem cable 10 connecting a modem cable adapter 10 selecting a location setting 11 N network cable, connecting 13 network icon 2 inserting 33 removing 34 removing insert 33 software and drivers 33 supported types 32 ports DisplayPort 18 expansion 42 external monitor 17 HDMI 18 Intel Wireless Display 19 VGA 17 power battery 25 conserving 27 options 22 power button 21 power meter 23 power plans customizing 24 selecting 24 viewing current 23 power switch 21 power-on password creating 55 entering 55 managing...
Resolving Start Up and No Boot Problems Checklist
Page 1
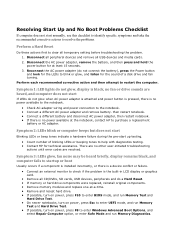
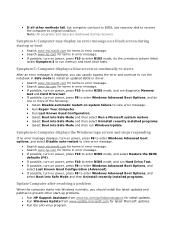
... boot Usually occurs if a component is installed incorrectly, or there is a device conflict or failure. Connect an external monitor to check if the problem is black, no fan or drive sounds are resolved. Reconnect the AC power adapter (do a Hard Reset. If memory or hard drive components were replaced, reinstall original components. Remove memory modules and replace one-at-a-time. Remove and reseat hard drive. If possible, turn on power, press F10 to enter BIOS mode...
... boot Usually occurs if a component is installed incorrectly, or there is a device conflict or failure. Connect an external monitor to check if the problem is black, no fan or drive sounds are resolved. Reconnect the AC power adapter (do a Hard Reset. If memory or hard drive components were replaced, reinstall original components. Remove memory modules and replace one-at-a-time. Remove and reseat hard drive. If possible, turn on power, press F10 to enter BIOS mode...
Resolving Start Up and No Boot Problems Checklist
Page 2
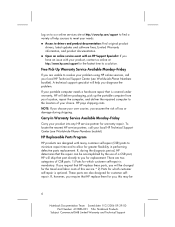
... www.hp.com for terms in error message. If possible, turn on power, press F10 to enter BIOS mode, and run diagnostic Memory test and Hard Drive test. If possible, turn on power, press F8 to enter Windows Advanced Boot Options, and select Boot into Safe Mode and then Uninstall recently installed programs. Update Computer after resolving a problem When the computer starts into Safe Mode and then run the notebook in Safe mode to install an updated BIOS or driver...
... www.hp.com for terms in error message. If possible, turn on power, press F10 to enter BIOS mode, and run diagnostic Memory test and Hard Drive test. If possible, turn on power, press F8 to enter Windows Advanced Boot Options, and select Boot into Safe Mode and then Uninstall recently installed programs. Update Computer after resolving a problem When the computer starts into Safe Mode and then run the notebook in Safe mode to install an updated BIOS or driver...
HP Limited Warranty and Techincal Support - 3-year - North America
Page 10
... that HP replace these parts, you will help sources to meet your needs: „ Access to drivers and product documentation: Find original product drivers, latest updates and software fixes, Limited Warranty information, and product documentation. „ Open an online service event with an HP Support Specialist: If you have an issue with many customer self-repair (CSR) parts to minimize repair time and to resolve your problem using HP online services...
... that HP replace these parts, you will help sources to meet your needs: „ Access to drivers and product documentation: Find original product drivers, latest updates and software fixes, Limited Warranty information, and product documentation. „ Open an online service event with an HP Support Specialist: If you have an issue with many customer self-repair (CSR) parts to minimize repair time and to resolve your problem using HP online services...

HP Limited Warranty and Technical Support - 90 day - North America
Page 10
... drivers, latest updates and software fixes, Limited Warranty information, and product documentation. „ Open an online service event with an HP Support Specialist: If you assume the risk of loss or damage during the diagnosis period, HP determines that is optional. These parts are designed with your portable computer needs a hardware repair that the repair can be 6 Notebook Documentation Team Saved date: 8/2/2006 20:29:00 Part Number...
... drivers, latest updates and software fixes, Limited Warranty information, and product documentation. „ Open an online service event with an HP Support Specialist: If you assume the risk of loss or damage during the diagnosis period, HP determines that is optional. These parts are designed with your portable computer needs a hardware repair that the repair can be 6 Notebook Documentation Team Saved date: 8/2/2006 20:29:00 Part Number...
HP Limited Worldwide Warranty and Technical Support 3-yr - North America
Page 14
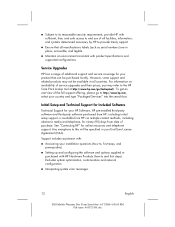
... all manufacturers labels (such as serial numbers) are in place, accessible, and legible „ Maintain an environment consistent with product specifications and supported configurations Service Upgrades HP has a range of additional support and service coverage for your installation questions (how to, first steps, and prerequisites). „ Setting up and configuring the software and options supplied or purchased with sufficient, free, and safe access to and use of all facilities, information...
... all manufacturers labels (such as serial numbers) are in place, accessible, and legible „ Maintain an environment consistent with product specifications and supported configurations Service Upgrades HP has a range of additional support and service coverage for your installation questions (how to, first steps, and prerequisites). „ Setting up and configuring the software and options supplied or purchased with sufficient, free, and safe access to and use of all facilities, information...
Worldwide Waranty and Technical Support - HP - 90day - North America
Page 6
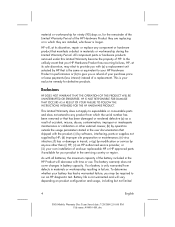
... THE OPERATION OF THIS PRODUCT WILL BE UNINTERRUPTED OR ERROR-FREE. HP IS NOT RESPONSIBLE FOR DAMAGE THAT OCCURS AS A RESULT OF YOUR FAILURE TO FOLLOW THE INSTRUCTIONS INTENDED FOR THE HP HARDWARE PRODUCT. All component parts or hardware products removed under this Limited Warranty become the property of end-user replaceable HP or HP approved parts if available for your HP Hardware Product has recurring failures, HP...
... THE OPERATION OF THIS PRODUCT WILL BE UNINTERRUPTED OR ERROR-FREE. HP IS NOT RESPONSIBLE FOR DAMAGE THAT OCCURS AS A RESULT OF YOUR FAILURE TO FOLLOW THE INSTRUCTIONS INTENDED FOR THE HP HARDWARE PRODUCT. All component parts or hardware products removed under this Limited Warranty become the property of end-user replaceable HP or HP approved parts if available for your HP Hardware Product has recurring failures, HP...
Worldwide Waranty and Technical Support - HP - 90day - North America
Page 14
... of the full support offering, please go /lookuptool/. Support includes assistance with HP Hardware Products (how-to software usage problems. „ Obtaining HP Care Pack information or updates for ninety (90) days from HP via multiple contact methods, including electronic media and telephone, for software supplied or purchased with : „ Generating or diagnosing user generated programs or source codes „ Installation of service upgrades and their...
... of the full support offering, please go /lookuptool/. Support includes assistance with HP Hardware Products (how-to software usage problems. „ Obtaining HP Care Pack information or updates for ninety (90) days from HP via multiple contact methods, including electronic media and telephone, for software supplied or purchased with : „ Generating or diagnosing user generated programs or source codes „ Installation of service upgrades and their...

Getting Started Compaq Notebook - Windows 7
Page 25
... specific keys at the factory. CAUTION: Use extreme care when making changes in Setup Utility (BIOS) and revert back to standard settings by pressing the fn key and one of the function keys to the computer, pressing this key. f5 Opens the default Web browser. Help and Support also provides automated troubleshooting and links to your Internet or network services, this feature in Setup Utility. NOTE: The action key feature is connected to activate the assigned function...
... specific keys at the factory. CAUTION: Use extreme care when making changes in Setup Utility (BIOS) and revert back to standard settings by pressing the fn key and one of the function keys to the computer, pressing this key. f5 Opens the default Web browser. Help and Support also provides automated troubleshooting and links to your Internet or network services, this feature in Setup Utility. NOTE: The action key feature is connected to activate the assigned function...

Getting Started Compaq Notebook - Windows 7
Page 41
... be connected to AC power during this can be created per computer. If for the first time. NOTE: HP Recovery Manager allows the creation of only one set of recovery discs or a recovery flash drive: 1. To create a set of recovery discs or one recovery flash drive can be achieved using the HP recovery partition (select models only), without the need a set of recovery discs or one recovery flash drive. Restore In the event of hard drive failure, to restore your system to its original factory state...
... be connected to AC power during this can be created per computer. If for the first time. NOTE: HP Recovery Manager allows the creation of only one set of recovery discs or a recovery flash drive: 1. To create a set of recovery discs or one recovery flash drive can be achieved using the HP recovery partition (select models only), without the need a set of recovery discs or one recovery flash drive. Restore In the event of hard drive failure, to restore your system to its original factory state...


