HP USB Digital Drive
Page 8
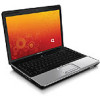
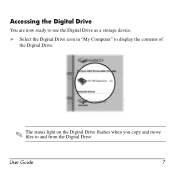
User Guide 7 Accessing the Digital Drive You are now ready to use the Digital Drive as a storage device. » Select the Digital Drive icon in "My Computer" to display the contents of the Digital Drive. ✎ The status light on the Digital Drive flashes when you copy and move files to and from the Digital Drive.
User Guide 7 Accessing the Digital Drive You are now ready to use the Digital Drive as a storage device. » Select the Digital Drive icon in "My Computer" to display the contents of the Digital Drive. ✎ The status light on the Digital Drive flashes when you copy and move files to and from the Digital Drive.

HP USB Digital Drive
Page 9
Gently unplug the Digital Drive from the USB port. ✎ If the USB connector cable is flashing. 1. A dialog box displays a list of connected devices. 2. Select the "Safely Remove Hardware" icon on your taskbar. Select the Digital Drive and wait until the "Safe to remove the Digital Drive when the status light on the Digital Drive is in the extended position, return it on its track for safe storage. 8 User Guide Disconnecting the Digital Drive ✎ Do not attempt to Remove Hardware" message appears on your screen. 3.
Gently unplug the Digital Drive from the USB port. ✎ If the USB connector cable is flashing. 1. A dialog box displays a list of connected devices. 2. Select the "Safely Remove Hardware" icon on your taskbar. Select the Digital Drive and wait until the "Safe to remove the Digital Drive when the status light on the Digital Drive is in the extended position, return it on its track for safe storage. 8 User Guide Disconnecting the Digital Drive ✎ Do not attempt to Remove Hardware" message appears on your screen. 3.
Wireless Setup Guide
Page 4
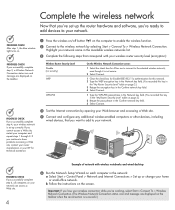
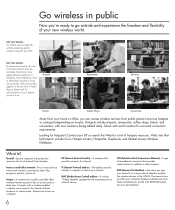
...your wireless connection while you're working, select Start > Connect To > Wireless Network Connection. (The Wireless Network Connection status icon and message are displayed on page 2.) 2 Retype the pass phrase in the Confirm network key field. 3 Select Connect. 4 Test the Internet connection by opening your ... the Network key field. (You recorded this key in the "My Router Security Level" table on the taskbar. Example of network with wireless notebooks and wired desktop PROGRESS CHECK If you successfully complete step 6, all computers on your network can access a Web site. 4 6 Run the ...
...your wireless connection while you're working, select Start > Connect To > Wireless Network Connection. (The Wireless Network Connection status icon and message are displayed on page 2.) 2 Retype the pass phrase in the Confirm network key field. 3 Select Connect. 4 Test the Internet connection by opening your ... the Network key field. (You recorded this key in the "My Router Security Level" table on the taskbar. Example of network with wireless notebooks and wired desktop PROGRESS CHECK If you successfully complete step 6, all computers on your network can access a Web site. 4 6 Run the ...
Wireless Setup Guide
Page 5
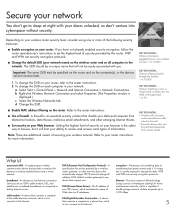
... device that provides a wireless link between a wireless-enabled device and a wired network. Depending on all computers in 10,000 DID YOU KNOW... A unique key is displayed.) c Select the Wireless Networks tab. b Right-click Wireless Network Connection and select Properties. (The Properties window is usually required to browse, but it . Secure your...
... device that provides a wireless link between a wireless-enabled device and a wired network. Depending on all computers in 10,000 DID YOU KNOW... A unique key is displayed.) c Select the Wireless Networks tab. b Right-click Wireless Network Connection and select Properties. (The Properties window is usually required to browse, but it . Secure your...
Wireless Setup Guide
Page 6
... applies to the use of wireless devices may apply aboard airplanes, in hospitals, near you. SSID (Services Set Identifier)-The name you give your computer displays available networks. Looking for a list of hotspots near explosives, and in the WLAN. IP (Internet Protocol) address-The address used by the wireless devices in...
... applies to the use of wireless devices may apply aboard airplanes, in hospitals, near you. SSID (Services Set Identifier)-The name you give your computer displays available networks. Looking for a list of hotspots near explosives, and in the WLAN. IP (Internet Protocol) address-The address used by the wireless devices in...

Security - Window Vista and Windows 7
Page 8
Because most passwords are not displayed as screen-saver passwords, select Start > Help and Support. 2 Chapter 2 Using passwords Use the following guidelines when setting a password in Setup Utility: ● A password can ...
Because most passwords are not displayed as screen-saver passwords, select Start > Help and Support. 2 Chapter 2 Using passwords Use the following guidelines when setting a password in Setup Utility: ● A password can ...

Security - Window Vista and Windows 7
Page 9
... password set in Windows Password Administrator password User password QuickLock Function Protects administrator-level access to computer contents. Setting passwords in Windows, nor is it displayed as it is set, entered, changed, or deleted. After this password is set , you must enter it each time you cannot turn on or restart...
... password set in Windows Password Administrator password User password QuickLock Function Protects administrator-level access to computer contents. Setting passwords in Windows, nor is it displayed as it is set, entered, changed, or deleted. After this password is set , you must enter it each time you cannot turn on or restart...

Security - Window Vista and Windows 7
Page 10
... an administrator password At the Enter Password prompt, type your administrator password, and then press enter. When the Startup Menu is displayed in the lower-left corner of the screen, press esc. Open the Setup Utility by turning on or restarting the computer. To.... 4 Chapter 2 Using passwords or - After this password, follow these steps: 1. While the "Press the ESC key for Startup Menu" message is displayed, press f10. 2. Managing an administrator password To set, change an administrator password, type your current password in the Enter Current Password field, type a ...
... an administrator password At the Enter Password prompt, type your administrator password, and then press enter. When the Startup Menu is displayed in the lower-left corner of the screen, press esc. Open the Setup Utility by turning on or restarting the computer. To.... 4 Chapter 2 Using passwords or - After this password, follow these steps: 1. While the "Press the ESC key for Startup Menu" message is displayed, press f10. 2. Managing an administrator password To set, change an administrator password, type your current password in the Enter Current Password field, type a ...

Security - Window Vista and Windows 7
Page 11
... password, you must restart the computer and try again. Setting passwords in Setup Utility 5 While the "Press the ESC key for Startup Menu" message is displayed, press f10. 2. Entering a power-on or restarting the computer. or - Use the arrow keys to select Security > Set Power-On Password, and then ... on or restarting the computer. While the "Press the ESC key for Startup Menu" message is displayed in the lower-left corner of the screen, press f10. - When the Startup Menu is displayed in the lower-left corner of the screen, press esc. Open the Setup Utility by turning on...
... password, you must restart the computer and try again. Setting passwords in Setup Utility 5 While the "Press the ESC key for Startup Menu" message is displayed, press f10. 2. Entering a power-on or restarting the computer. or - Use the arrow keys to select Security > Set Power-On Password, and then ... on or restarting the computer. While the "Press the ESC key for Startup Menu" message is displayed in the lower-left corner of the screen, press f10. - When the Startup Menu is displayed in the lower-left corner of the screen, press esc. Open the Setup Utility by turning on...
Security - Window Vista and Windows 7
Page 17
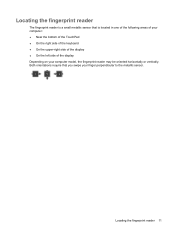
Both orientations require that is located in one of the following areas of your computer: ● Near the bottom of the TouchPad ● On the right side of the keyboard ● On the upper-right side of the display ● On the left side of the display Depending on your finger perpendicular to the metallic sensor. Locating the fingerprint reader 11 Locating the fingerprint reader The fingerprint reader is a small metallic sensor that you swipe your computer model, the fingerprint reader may be oriented horizontally or vertically.
Both orientations require that is located in one of the following areas of your computer: ● Near the bottom of the TouchPad ● On the right side of the keyboard ● On the upper-right side of the display ● On the left side of the display Depending on your finger perpendicular to the metallic sensor. Locating the fingerprint reader 11 Locating the fingerprint reader The fingerprint reader is a small metallic sensor that you swipe your computer model, the fingerprint reader may be oriented horizontally or vertically.
Setup Utility - Windows Vista and Windows 7
Page 3
Table of contents 1 Starting the Setup Utility 2 Using the Setup Utility Changing the language of the Setup Utility 2 Navigating and selecting in the Setup Utility 2 Displaying system information ...3 Restoring default settings in the Setup Utility 3 Exiting the Setup Utility ...4 3 Setup Utility menus Main menu ...5 Security menu ...5 System Configuration menu ...6 Diagnostics menu ...6 Index ...7 iii
Table of contents 1 Starting the Setup Utility 2 Using the Setup Utility Changing the language of the Setup Utility 2 Navigating and selecting in the Setup Utility 2 Displaying system information ...3 Restoring default settings in the Setup Utility 3 Exiting the Setup Utility ...4 3 Setup Utility menus Main menu ...5 Security menu ...5 System Configuration menu ...6 Diagnostics menu ...6 Index ...7 iii

Setup Utility - Windows Vista and Windows 7
Page 5
...Utility: ▲ Open the Setup Utility by turning on or restarting the computer. While the "Press the ESC key for Startup Menu" message is displayed in the lower-left corner of the screen, press esc. 2. 1 Starting the Setup Utility The Setup Utility is a ROM-based information and ... system is not working. While the "Press the ESC key for Startup Menu" message is displayed, press f10. 1 Open the Setup Utility by turning on or restarting the computer. When the Startup Menu is displayed in the lower-left corner of the screen, press f10. - NOTE: The fingerprint reader...
...Utility: ▲ Open the Setup Utility by turning on or restarting the computer. While the "Press the ESC key for Startup Menu" message is displayed in the lower-left corner of the screen, press esc. 2. 1 Starting the Setup Utility The Setup Utility is a ROM-based information and ... system is not working. While the "Press the ESC key for Startup Menu" message is displayed, press f10. 1 Open the Setup Utility by turning on or restarting the computer. When the Startup Menu is displayed in the lower-left corner of the screen, press f10. - NOTE: The fingerprint reader...

Setup Utility - Windows Vista and Windows 7
Page 6
...arrow keys. ● To choose an item in a list or to toggle a field, for Startup Menu" message is displayed in the Setup Utility Because the Setup Utility is displayed, press f10. 2. While the "Press the ESC key for example an Enable/Disable field, use the arrow keys to the... menu display, press esc. ● To display additional navigation and selection information while the Setup Utility is displayed, press enter. 5. Open the Setup Utility by turning on or restarting the computer. Use the ...
...arrow keys. ● To choose an item in a list or to toggle a field, for Startup Menu" message is displayed in the Setup Utility Because the Setup Utility is displayed, press f10. 2. While the "Press the ESC key for example an Enable/Disable field, use the arrow keys to the... menu display, press esc. ● To display additional navigation and selection information while the Setup Utility is displayed, press enter. 5. Open the Setup Utility by turning on or restarting the computer. Use the ...

Setup Utility - Windows Vista and Windows 7
Page 7
...the Setup Utility by turning on or restarting the computer. While the "Press the ESC key for Startup Menu" message is displayed in the Setup Utility The following procedure explains how to select Exit > Exit Saving Changes, and then press enter. When the ... password, security, and language settings are not changed when you restore the factory default settings. When the Startup Menu is displayed, press enter. 4. Displaying system information The following procedure explains how to restore the Setup Utility default settings. Restoring default settings in the lower-left...
...the Setup Utility by turning on or restarting the computer. While the "Press the ESC key for Startup Menu" message is displayed in the Setup Utility The following procedure explains how to select Exit > Exit Saving Changes, and then press enter. When the ... password, security, and language settings are not changed when you restore the factory default settings. When the Startup Menu is displayed, press enter. 4. Displaying system information The following procedure explains how to restore the Setup Utility default settings. Restoring default settings in the lower-left...
Setup Utility - Windows Vista and Windows 7
Page 8
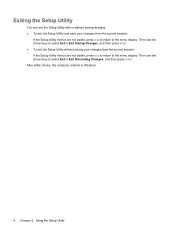
... with or without saving your changes from the current session: If the Setup Utility menus are not visible, press esc to return to the menu display. Then use the arrow keys to select Exit > Exit Saving Changes, and then press enter. ● To exit the Setup Utility without saving changes. ●..., and then press enter. After either choice, the computer restarts in Windows. 4 Chapter 2 Using the Setup Utility Then use the arrow keys to the menu display.
... with or without saving your changes from the current session: If the Setup Utility menus are not visible, press esc to return to the menu display. Then use the arrow keys to select Exit > Exit Saving Changes, and then press enter. ● To exit the Setup Utility without saving changes. ●..., and then press enter. After either choice, the computer restarts in Windows. 4 Chapter 2 Using the Setup Utility Then use the arrow keys to the menu display.
Setup Utility - Windows Vista and Windows 7
Page 11
Index Symbols/Numerics 1394 Power Saving 6 A administrator password 5 B boot options 6 boot order 6 button sound 6 C Card Reader Power Saving 6 changing the Setup Utility language 2 D Diagnostics menu 6 displaying system information 3 drives, boot order 6 E exiting the Setup Utility 4 F fan always on 6 fingerprint reader 1 H hard drive self test 6 L LAN Power Saving 6 language support 6 M Main menu 5 ...
Index Symbols/Numerics 1394 Power Saving 6 A administrator password 5 B boot options 6 boot order 6 button sound 6 C Card Reader Power Saving 6 changing the Setup Utility language 2 D Diagnostics menu 6 displaying system information 3 drives, boot order 6 E exiting the Setup Utility 4 F fan always on 6 fingerprint reader 1 H hard drive self test 6 L LAN Power Saving 6 language support 6 M Main menu 5 ...
Modem and Local Area Network - Windows Vista
Page 10
Click Regional and Language Options. Your location is displayed under Location. 4 Chapter 1 Using the modem (select models only) Click Clock, Language, and Region. 3. Selecting a location setting Viewing the current location selection To view the current location setting for the modem, follow these steps: 1. Select Start > Control Panel. 2.
Click Regional and Language Options. Your location is displayed under Location. 4 Chapter 1 Using the modem (select models only) Click Clock, Language, and Region. 3. Selecting a location setting Viewing the current location selection To view the current location setting for the modem, follow these steps: 1. Select Start > Control Panel. 2.

Modem and Local Area Network - Windows Vista
Page 11
... your own country or region as well as in other locations while preserving your home location configuration, add a new configuration for USA or UK is displayed by the modem, the Country/region selection for each location in which you purchased the computer. NOTE: You can switch among settings at any country...
... your own country or region as well as in other locations while preserving your home location configuration, add a new configuration for USA or UK is displayed by the modem, the Country/region selection for each location in which you purchased the computer. NOTE: You can switch among settings at any country...
Modem and Local Area Network - Windows Vista
Page 12
... modem. Clicks indicate that the telephone line supports tone dialing. Click OK twice. ● Check the telephone number you purchased it does not dial and displays a "No Dial Tone" error message. Click Start, click Control Panel, click Hardware and Sound, and then click Phone and Modem Options. 2. A telephone line described as...
... modem. Clicks indicate that the telephone line supports tone dialing. Click OK twice. ● Check the telephone number you purchased it does not dial and displays a "No Dial Tone" error message. Click Start, click Control Panel, click Hardware and Sound, and then click Phone and Modem Options. 2. A telephone line described as...

Software Update, Backup and Recovery - Windows Vista
Page 6
Access the page on the HP Web site that is later than those currently installed on the computer, ...the computer or an unsuccessful installation, download and install a BIOS update only when the computer is displayed in an optional docking device, or connected to an optional power source. If the Setup Utility does not open with... At the download area, follow these steps: a. Do not download or install a BIOS update while the computer is displayed. 3. Follow the instructions on your computer and access the BIOS update you currently have and then download and install the...
Access the page on the HP Web site that is later than those currently installed on the computer, ...the computer or an unsuccessful installation, download and install a BIOS update only when the computer is displayed in an optional docking device, or connected to an optional power source. If the Setup Utility does not open with... At the download area, follow these steps: a. Do not download or install a BIOS update while the computer is displayed. 3. Follow the instructions on your computer and access the BIOS update you currently have and then download and install the...


