User Guide - Windows 7
Page 7
...produces no sound or picture 52 A device driver must be reinstalled 52 Obtaining the latest HP device drivers 52 Obtaining the latest Windows device drivers 53 5 Power management Setting power options ...battery power ...58 Identifying batteries ...59 Finding battery information in Help and Support 59 Using Battery Check ...59 Displaying the remaining battery charge 59 Inserting or removing the battery 60 Charging a battery ...61 Maximizing battery discharge time 62 Managing low battery levels 62 Identifying low battery levels 62 Resolving a low battery level 62 Resolving a low battery...
...produces no sound or picture 52 A device driver must be reinstalled 52 Obtaining the latest HP device drivers 52 Obtaining the latest Windows device drivers 53 5 Power management Setting power options ...battery power ...58 Identifying batteries ...59 Finding battery information in Help and Support 59 Using Battery Check ...59 Displaying the remaining battery charge 59 Inserting or removing the battery 60 Charging a battery ...61 Maximizing battery discharge time 62 Managing low battery levels 62 Identifying low battery levels 62 Resolving a low battery level 62 Resolving a low battery...
User Guide - Windows 7
Page 8
...Disable Hibernation and Sleep 64 Step 3: Discharge the battery 64 Step 4: Fully recharge the battery 65 Step 5: Reenable Hibernation and Sleep 65 Conserving battery power 65 Storing a battery ...66 Disposing of a used battery 66 Replacing the battery ...66 Shutting down the computer ...66 6 Drives...hard drive performance ...75 Using Disk Defragmenter 75 Using Disk Cleanup ...76 Using HP ProtectSmart Hard Drive Protection 76 Identifying HP ProtectSmart Hard Drive Protection status 76 Using HP ProtectSmart Hard Drive Protection software 77 Replacing the hard drive ...77 7 External ...
...Disable Hibernation and Sleep 64 Step 3: Discharge the battery 64 Step 4: Fully recharge the battery 65 Step 5: Reenable Hibernation and Sleep 65 Conserving battery power 65 Storing a battery ...66 Disposing of a used battery 66 Replacing the battery ...66 Shutting down the computer ...66 6 Drives...hard drive performance ...75 Using Disk Defragmenter 75 Using Disk Cleanup ...76 Using HP ProtectSmart Hard Drive Protection 76 Identifying HP ProtectSmart Hard Drive Protection status 76 Using HP ProtectSmart Hard Drive Protection software 77 Replacing the hard drive ...77 7 External ...
User Guide - Windows 7
Page 13
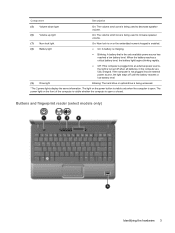
... an external power source, the light is turned off until the battery reaches a low battery level. (9) Drive light Blinking: The hard drive or optical drive is being used to increase speaker volume. (7) Num lock light (8) Battery light On: Num lock is on or the embedded numeric keypad ...is enabled. ● On: A battery is charging. ● Blinking: A battery that is the only available power source has reached a low battery level. Buttons and fingerprint reader (select models only) Identifying the hardware 3 The power light on the...
... an external power source, the light is turned off until the battery reaches a low battery level. (9) Drive light Blinking: The hard drive or optical drive is being used to increase speaker volume. (7) Num lock light (8) Battery light On: Num lock is on or the embedded numeric keypad ...is enabled. ● On: A battery is charging. ● Blinking: A battery that is the only available power source has reached a low battery level. Buttons and fingerprint reader (select models only) Identifying the hardware 3 The power light on the...
User Guide - Windows 7
Page 16
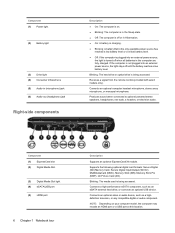
.../Output (SD I/O), MultiMediaCard (MMC), Memory Stick (MS), Memory Stick Pro (MSP), xD-Picture Card (XD). Component (1) Power light (2) Battery light (3) Drive light (4) Consumer infrared lens (5) Audio-in (microphone) jack (6) Audio-out (headphone) jack Right-side components Description ●... Component (1) ExpressCard slot (2) Digital Media Slot (3) Digital Media Slot light (4) eSATA/USB port (5) HDMI port 6 Chapter 1 Notebook tour Description Supports an optional ExpressCard/34 module. Receives a signal from the remote control (provided with select models only). Connects an ...
.../Output (SD I/O), MultiMediaCard (MMC), Memory Stick (MS), Memory Stick Pro (MSP), xD-Picture Card (XD). Component (1) Power light (2) Battery light (3) Drive light (4) Consumer infrared lens (5) Audio-in (microphone) jack (6) Audio-out (headphone) jack Right-side components Description ●... Component (1) ExpressCard slot (2) Digital Media Slot (3) Digital Media Slot light (4) eSATA/USB port (5) HDMI port 6 Chapter 1 Notebook tour Description Supports an optional ExpressCard/34 module. Receives a signal from the remote control (provided with select models only). Connects an ...

User Guide - Windows 7
Page 18
... then contact technical support through Help and Support. Holds a wireless LAN module. Holds the hard drive and the memory module slots. 8 Chapter 1 Notebook tour It is normal for use in the computer by the governmental agency that regulates wireless devices in your country or region. NOTE: To prevent... and prevent overheating. NOTE: The computer fan starts up automatically to cycle on and off during routine operation. Bottom components Component (1) Battery release latch (2) Battery bay (3) Wireless module compartment (4) Vents (5) (5) Hard drive bay Description Releases the...
... then contact technical support through Help and Support. Holds a wireless LAN module. Holds the hard drive and the memory module slots. 8 Chapter 1 Notebook tour It is normal for use in the computer by the governmental agency that regulates wireless devices in your country or region. NOTE: To prevent... and prevent overheating. NOTE: The computer fan starts up automatically to cycle on and off during routine operation. Bottom components Component (1) Battery release latch (2) Battery bay (3) Wireless module compartment (4) Vents (5) (5) Hard drive bay Description Releases the...
User Guide - Windows 7
Page 21
... is affixed to update or troubleshoot the operating system. You may need when you troubleshoot system problems or travel internationally with your notebook. ◦ Warranty period (5). The regulatory label is the product name affixed to each product. ◦ Part number/Product number...in appearance by region and country. Have this computer. This certificate is unique to the front of your notebook. ◦ Serial number (s/n) (2). Component Description (3) Battery* Powers the computer when the computer is the alphanumeric identifier you use . An optional device may need ...
... is affixed to update or troubleshoot the operating system. You may need when you troubleshoot system problems or travel internationally with your notebook. ◦ Warranty period (5). The regulatory label is the product name affixed to each product. ◦ Part number/Product number...in appearance by region and country. Have this computer. This certificate is unique to the front of your notebook. ◦ Serial number (s/n) (2). Component Description (3) Battery* Powers the computer when the computer is the alphanumeric identifier you use . An optional device may need ...

User Guide - Windows 7
Page 22
This label is located inside the battery bay. ● HP Mobile Broadband Module serial number label (select models only)-Provides the serial number of your HP Mobile Broadband Module. ● SIM (subscriber identity module) label (select models only)-Provides the ICCID (Integrated Circuit Card Identifier) of your SIM. This label is located inside the battery bay. 12 Chapter 1 Notebook tour
This label is located inside the battery bay. ● HP Mobile Broadband Module serial number label (select models only)-Provides the serial number of your HP Mobile Broadband Module. ● SIM (subscriber identity module) label (select models only)-Provides the ICCID (Integrated Circuit Card Identifier) of your SIM. This label is located inside the battery bay. 12 Chapter 1 Notebook tour
User Guide - Windows 7
Page 30
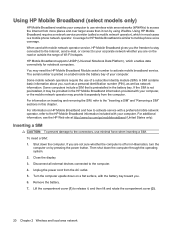
...places and over larger areas than it can by pressing the power button. HP Mobile Broadband supports UNDP (Universal Notebook Data Platform), which in the HP Mobile Broadband information provided with the battery bay toward you , such as a personal identification number (PIN), as well...down on a label inside the battery bay of a subscriber identity module (SIM). A SIM contains basic information about you . 6. For additional information, see the HP Web site at http://www.hp.com/go/mobilebroadband (United States only). Coverage for notebook computers. Some mobile network operators ...
...places and over larger areas than it can by pressing the power button. HP Mobile Broadband supports UNDP (Universal Notebook Data Platform), which in the HP Mobile Broadband information provided with the battery bay toward you , such as a personal identification number (PIN), as well...down on a label inside the battery bay of a subscriber identity module (SIM). A SIM contains basic information about you . 6. For additional information, see the HP Web site at http://www.hp.com/go/mobilebroadband (United States only). Coverage for notebook computers. Some mobile network operators ...
User Guide - Windows 7
Page 32
10. Replace the battery. Turn on the computer (1), and then rotate the cover downward until it snaps into the slot tray (1), swing the slot tray to the left and down (2), and then slide the slot tray to the left to secure it (3). 11. NOTE: HP Mobile Broadband will be disabled if the battery is not replaced. 13. Align the tabs on the compartment cover with the notches on the computer. 22 Chapter 2 Wireless and local area network Reconnect external devices. 15. Insert the SIM card into place (2). 12. Reconnect external power. 14.
10. Replace the battery. Turn on the computer (1), and then rotate the cover downward until it snaps into the slot tray (1), swing the slot tray to the left and down (2), and then slide the slot tray to the left to secure it (3). 11. NOTE: HP Mobile Broadband will be disabled if the battery is not replaced. 13. Align the tabs on the compartment cover with the notches on the computer. 22 Chapter 2 Wireless and local area network Reconnect external devices. 15. Insert the SIM card into place (2). 12. Reconnect external power. 14.
User Guide - Windows 7
Page 33
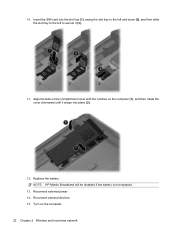
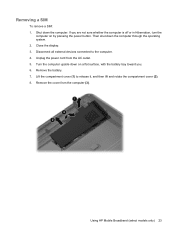
...the power cord from the computer (3). If you . 6. Using HP Mobile Broadband (select models only) 23 Shut down the computer through the operating system. 2. Turn the computer upside down on a flat surface, with the battery bay toward you are not sure whether the computer is off or ...button. Lift the compartment cover (1) to the computer. 4. Remove the cover from the AC outlet. 5. Close the display. 3. Remove the battery. 7. Removing a SIM To remove a SIM: 1. Disconnect all external devices connected to release it, and then lift and rotate the compartment cover (2). 8.
...the power cord from the computer (3). If you . 6. Using HP Mobile Broadband (select models only) 23 Shut down the computer through the operating system. 2. Turn the computer upside down on a flat surface, with the battery bay toward you are not sure whether the computer is off or ...button. Lift the compartment cover (1) to the computer. 4. Remove the cover from the AC outlet. 5. Close the display. 3. Remove the battery. 7. Removing a SIM To remove a SIM: 1. Disconnect all external devices connected to release it, and then lift and rotate the compartment cover (2). 8.
User Guide - Windows 7
Page 34
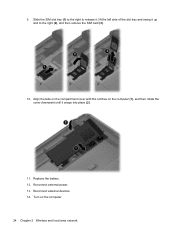
Reconnect external power. 13. Slide the SIM slot tray (1) to the right to the right (2), and then remove the SIM card (3). 10. Align the tabs on the compartment cover with the notches on the computer. 24 Chapter 2 Wireless and local area network Turn on the computer (1), and then rotate the cover downward until it up and to release it, lift the left side of the slot tray and swing it snaps into place (2). 11. Replace the battery. 12. 9. Reconnect external devices. 14.
Reconnect external power. 13. Slide the SIM slot tray (1) to the right to the right (2), and then remove the SIM card (3). 10. Align the tabs on the compartment cover with the notches on the computer. 24 Chapter 2 Wireless and local area network Turn on the computer (1), and then rotate the cover downward until it up and to release it, lift the left side of the slot tray and swing it snaps into place (2). 11. Replace the battery. 12. 9. Reconnect external devices. 14.
User Guide - Windows 7
Page 44
...before initiating Sleep. When Sleep is initiated, your information is Hibernate, but this setting can initiate Sleep. The factory setting for critical battery action is stored in Windows Control Panel. The fn+f4 hotkey can be accessed until a Windows user password or a Windows administrator... password is conserved. NOTE: If a critical battery level occurs while the computer is in the Sleep state, the computer initiates Hibernation and the information stored in jacks) NOTE: Composite ...
...before initiating Sleep. When Sleep is initiated, your information is Hibernate, but this setting can initiate Sleep. The factory setting for critical battery action is stored in Windows Control Panel. The fn+f4 hotkey can be accessed until a Windows user password or a Windows administrator... password is conserved. NOTE: If a critical battery level occurs while the computer is in the Sleep state, the computer initiates Hibernation and the information stored in jacks) NOTE: Composite ...

User Guide - Windows 7
Page 64
...or an external media card. When Hibernation is initiated, your work is in the Sleep state for an extended period or if the battery reaches a critical battery level while in Windows® Control Panel. 5 Power management Setting power options Using power-saving states The computer has two power-...saving states enabled at the factory to initiate Sleep after 15 minutes of inactivity when running on battery power and 30 minutes of inactivity when running on , you exit Sleep faster than exiting Hibernation. CAUTION: To prevent possible audio and...
...or an external media card. When Hibernation is initiated, your work is in the Sleep state for an extended period or if the battery reaches a critical battery level while in Windows® Control Panel. 5 Power management Setting power options Using power-saving states The computer has two power-...saving states enabled at the factory to initiate Sleep after 15 minutes of inactivity when running on battery power and 30 minutes of inactivity when running on , you exit Sleep faster than exiting Hibernation. CAUTION: To prevent possible audio and...
User Guide - Windows 7
Page 65
... to the Shut down button, and then click Hibernate. The power lights turn on either battery power or external power, or when the battery reaches a critical battery level. Different battery meter icons indicate whether the computer is running on and your work will return to initiate ... the power button. Power settings and timeouts can be required on and your work will return to quickly access power settings, view remaining battery charge, and select a different power plan. ● To display the percentage of the notification area). 2. Under Behaviors, select Show ...
... to the Shut down button, and then click Hibernate. The power lights turn on either battery power or external power, or when the battery reaches a critical battery level. Different battery meter icons indicate whether the computer is running on and your work will return to initiate ... the power button. Power settings and timeouts can be required on and your work will return to quickly access power settings, view remaining battery charge, and select a different power plan. ● To display the percentage of the notification area). 2. Under Behaviors, select Show ...

User Guide - Windows 7
Page 66
...the notification area, and then select a power plan from the list. or - Selecting a different power plan ▲ Click the battery meter icon in the notification area, at the far right of system settings that are currently unavailable. 4. Click Change Settings that manages ... follow these steps: 1. Select Start > Control Panel > System and Security > Power Options, and then select a power plan from the list. - Click the battery meter icon in the notification area and then click More power options. - Select Start > Control Panel > System and Security > Power Options. 2. NOTE: If ...
...the notification area, and then select a power plan from the list. or - Selecting a different power plan ▲ Click the battery meter icon in the notification area, at the far right of system settings that are currently unavailable. 4. Click Change Settings that manages ... follow these steps: 1. Select Start > Control Panel > System and Security > Power Options, and then select a power plan from the list. - Click the battery meter icon in the notification area and then click More power options. - Select Start > Control Panel > System and Security > Power Options. 2. NOTE: If ...
User Guide - Windows 7
Page 67
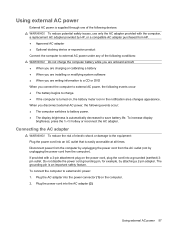
...battery life. Plug the power cord into an AC outlet that is easily accessible at all times. Connecting the AC adapter WARNING! Do not disable the power cord grounding pin, for example, by unplugging the power cord from the computer). Disconnect power from the computer by unplugging the power cord from HP... ● When you are writing information to a CD or DVD When you disconnect external AC power, the following events occur: ● The battery begins to the equipment: Plug the power cord into the AC adapter (2). If provided with the computer, a replacement AC adapter provided by...
...battery life. Plug the power cord into an AC outlet that is easily accessible at all times. Connecting the AC adapter WARNING! Do not disable the power cord grounding pin, for example, by unplugging the power cord from the computer). Disconnect power from the computer by unplugging the power cord from HP... ● When you are writing information to a CD or DVD When you disconnect external AC power, the following events occur: ● The battery begins to the equipment: Plug the power cord into the AC adapter (2). If provided with the computer, a replacement AC adapter provided by...
User Guide - Windows 7
Page 68
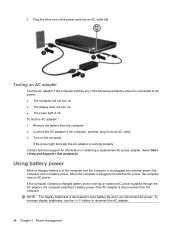
... brightness is off. To increase display brightness, use the fn+f8 hotkey or reconnect the AC adapter. 58 Chapter 5 Power management Remove the battery from the computer. Contact technical support for information on the computer. Plug the other end of the following symptoms when it into external power, ...the computer runs on battery power. Testing an AC adapter Test the AC adapter if the computer exhibits any of the power cord into external AC power, the computer...
... brightness is off. To increase display brightness, use the fn+f8 hotkey or reconnect the AC adapter. 58 Chapter 5 Power management Remove the battery from the computer. Contact technical support for information on the computer. Plug the other end of the following symptoms when it into external power, ...the computer runs on battery power. Testing an AC adapter Test the AC adapter if the computer exhibits any of the power cord into external AC power, the computer...
User Guide - Windows 7
Page 69
...factors. To reduce potential safety issues, use only the battery provided with the computer. ● An optional accessory battery can support 2 batteries: ● One lithium-ion battery is off and unplugged from HP. Computer battery life varies, depending on power management settings, programs running ... how you work in case of the battery installed in the computer slowly discharges when the computer is included with the computer, a replacement battery provided by HP, or a compatible battery purchased from external power. Finding battery information in the notification area, at the...
...factors. To reduce potential safety issues, use only the battery provided with the computer. ● An optional accessory battery can support 2 batteries: ● One lithium-ion battery is off and unplugged from HP. Computer battery life varies, depending on power management settings, programs running ... how you work in case of the battery installed in the computer slowly discharges when the computer is included with the computer, a replacement battery provided by HP, or a compatible battery purchased from external power. Finding battery information in the notification area, at the...

User Guide - Windows 7
Page 70
.... 2. Turn the computer upside down the computer through Windows before removing the battery. NOTE: The battery release latch automatically returns to release the battery. To insert the battery: 1. Slide the battery release latch (1) to its original position. 60 Chapter 5 Power management To remove the battery: 1. To prevent loss of information, initiate Hibernation or shut down on...
.... 2. Turn the computer upside down the computer through Windows before removing the battery. NOTE: The battery release latch automatically returns to release the battery. To insert the battery: 1. Slide the battery release latch (1) to its original position. 60 Chapter 5 Power management To remove the battery: 1. To prevent loss of information, initiate Hibernation or shut down on...
User Guide - Windows 7
Page 71
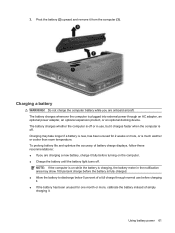
...are charging a new battery, charge it fully before charging it . 3. Charging a battery WARNING! Charging may show 100 percent charge before the battery is on the computer. ● Charge the battery until the battery light turns off . Using battery power 61 Do not charge the computer battery while you are onboard... NOTE: If the computer is fully charged. ● Allow the battery to discharge below 5 percent of simply charging it . ● If the battery has been unused for 2 weeks or more , calibrate the battery instead of a full charge through an AC adapter, an optional power...
...are charging a new battery, charge it fully before charging it . 3. Charging a battery WARNING! Charging may show 100 percent charge before the battery is on the computer. ● Charge the battery until the battery light turns off . Using battery power 61 Do not charge the computer battery while you are onboard... NOTE: If the computer is fully charged. ● Allow the battery to discharge below 5 percent of simply charging it . ● If the battery has been unused for 2 weeks or more , calibrate the battery instead of a full charge through an AC adapter, an optional power...


