Reference Guide
Page 4
... Up Password Protection 2-13 To Lock Your Notebook 2-13 To Attach an Optional Security Cable 2-14 To Protect Against Viruses 2-14 To Lock the Hard Drive 2-15 Taking Care of Your Notebook 2-15 To Protect Your Hard Drive 2-15 To Maintain Your Notebook 2-16 To Safeguard Your Data 2-16 To... Extend the Life of the Display 2-17 To Clean Your Notebook 2-17 3 Battery Packs and Power Management Managing ...
... Up Password Protection 2-13 To Lock Your Notebook 2-13 To Attach an Optional Security Cable 2-14 To Protect Against Viruses 2-14 To Lock the Hard Drive 2-15 Taking Care of Your Notebook 2-15 To Protect Your Hard Drive 2-15 To Maintain Your Notebook 2-16 To Safeguard Your Data 2-16 To... Extend the Life of the Display 2-17 To Clean Your Notebook 2-17 3 Battery Packs and Power Management Managing ...
Reference Guide
Page 5
.... . . . . 4-7 5 Add-On Devices Connecting External Devices 5-1 To Insert or Remove a PC Card 5-1 To Connect an Audio Device 5-3 To Connect a TV to Your Notebook (Select Models Only 5-4 Switching the Display to the External Monitor (Select Models Only 5-5 To Connect a... a RAM Expansion Module 5-9 To Remove a RAM Expansion Module 5-10 Replacing the Hard Drive 5-12 To Replace the Hard Drive 5-12 To Replace the Hard Drive Holder 5-13 To Prepare a New Hard Drive 5-14 6 Troubleshooting Troubleshooting Your Notebook 6-1 Audio Problems 6-2 CD-ROM and DVD Problems 6-3 Reference Guide v
.... . . . . 4-7 5 Add-On Devices Connecting External Devices 5-1 To Insert or Remove a PC Card 5-1 To Connect an Audio Device 5-3 To Connect a TV to Your Notebook (Select Models Only 5-4 Switching the Display to the External Monitor (Select Models Only 5-5 To Connect a... a RAM Expansion Module 5-9 To Remove a RAM Expansion Module 5-10 Replacing the Hard Drive 5-12 To Replace the Hard Drive 5-12 To Replace the Hard Drive Holder 5-13 To Prepare a New Hard Drive 5-14 6 Troubleshooting Troubleshooting Your Notebook 6-1 Audio Problems 6-2 CD-ROM and DVD Problems 6-3 Reference Guide v
Reference Guide
Page 6
... 6-4 Hard Drive Problems 6-5 Heat Problems 6-6 Infrared Problems 6-7 Keyboard and Pointing Device Problems 6-7 Local Area Network (LAN) Problems 6-8 Memory Problems 6-9 Modem Problems 6-10 PC Card (PCMCIA) Problems 6-13 Performance Problems 6-14 Power and Battery Pack Problems 6-15 Printing Problems 6-18 Serial, Parallel and USB Problems 6-19 Startup Problems 6-20 Wireless Problems 6-22 Configuring Your Notebook...
... 6-4 Hard Drive Problems 6-5 Heat Problems 6-6 Infrared Problems 6-7 Keyboard and Pointing Device Problems 6-7 Local Area Network (LAN) Problems 6-8 Memory Problems 6-9 Modem Problems 6-10 PC Card (PCMCIA) Problems 6-13 Performance Problems 6-14 Power and Battery Pack Problems 6-15 Printing Problems 6-18 Serial, Parallel and USB Problems 6-19 Startup Problems 6-20 Wireless Problems 6-22 Configuring Your Notebook...
Reference Guide
Page 8
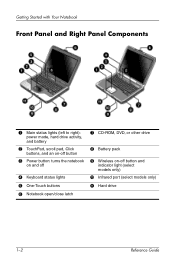
Infrared port (select models only) q Hard drive 1-2 Reference Guide Getting Started with Your Notebook Front Panel and Right Panel Components 1 Main status lights (left to right): power mode, hard drive activity, and battery 2 TouchPad, scroll pad, Click buttons, and an on-off button 3 Power button: turns the notebook on and off 4 Keyboard status lights 5 One-Touch buttons 6 Notebook open/close latch 7 CD-ROM, DVD, or other drive 8 Battery pack 9 Wireless on-off button and indicator light (select models only) -
Infrared port (select models only) q Hard drive 1-2 Reference Guide Getting Started with Your Notebook Front Panel and Right Panel Components 1 Main status lights (left to right): power mode, hard drive activity, and battery 2 TouchPad, scroll pad, Click buttons, and an on-off button 3 Power button: turns the notebook on and off 4 Keyboard status lights 5 One-Touch buttons 6 Notebook open/close latch 7 CD-ROM, DVD, or other drive 8 Battery pack 9 Wireless on-off button and indicator light (select models only) -
Reference Guide
Page 10
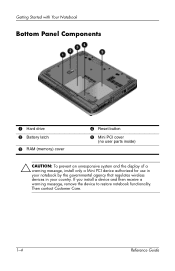
Getting Started with Your Notebook Bottom Panel Components 1 Hard drive 2 Battery latch 3 RAM (memory) cover 4 Reset button 5 Mini PCI cover (no user parts inside) Ä CAUTION: To prevent an unresponsive system and the display of a warning message, install only a Mini PCI device authorized for use in your notebook by the governmental agency that regulates wireless devices in your country. If you install a device and then receive a warning message, remove the device to restore notebook functionality. Then contact Customer Care. 1-4 Reference Guide
Getting Started with Your Notebook Bottom Panel Components 1 Hard drive 2 Battery latch 3 RAM (memory) cover 4 Reset button 5 Mini PCI cover (no user parts inside) Ä CAUTION: To prevent an unresponsive system and the display of a warning message, install only a Mini PCI device authorized for use in your notebook by the governmental agency that regulates wireless devices in your country. If you install a device and then receive a warning message, remove the device to restore notebook functionality. Then contact Customer Care. 1-4 Reference Guide
Reference Guide
Page 11
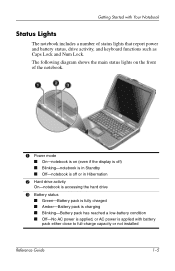
... diagram shows the main status lights on the front of the notebook. 1 Power mode ■ On-notebook is on (even if the display is off) ■ Blinking-notebook is in Standby ■ Off-notebook is off or in Hibernation 2 Hard drive activity On-notebook is accessing the hard drive 3 Battery status ■ Green-Battery pack is fully charged ■...
... diagram shows the main status lights on the front of the notebook. 1 Power mode ■ On-notebook is on (even if the display is off) ■ Blinking-notebook is in Standby ■ Off-notebook is off or in Hibernation 2 Hard drive activity On-notebook is accessing the hard drive 3 Battery status ■ Green-Battery pack is fully charged ■...
Reference Guide
Page 13
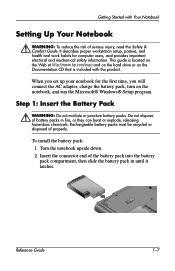
... pack: 1. Getting Started with the product. This guide is located on the Web at http://www.hp.com/ergo and on the hard drive or on the notebook, and run the Microsoft® Windows® Setup program. Turn the notebook upside down. 2. Insert the connector end of serious injury, read the Safety & Comfort Guide. Rechargeable...
... pack: 1. Getting Started with the product. This guide is located on the Web at http://www.hp.com/ergo and on the hard drive or on the notebook, and run the Microsoft® Windows® Setup program. Turn the notebook upside down. 2. Insert the connector end of serious injury, read the Safety & Comfort Guide. Rechargeable...
Reference Guide
Page 17
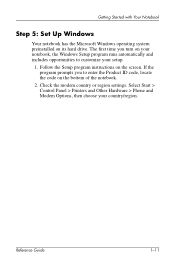
Check the modem country or region settings. Getting Started with Your Notebook Step 5: Set Up Windows Your notebook has the Microsoft Windows operating system preinstalled on the bottom of the notebook. 2. If the program prompts you turn on the screen. Select Start > Control Panel > ...then choose your setup. 1. Follow the Setup program instructions on your notebook, the Windows Setup program runs automatically and includes opportunities to enter the Product ID code, locate the code on its hard drive. Reference Guide 1-11 The first time you to customize your country/...
Check the modem country or region settings. Getting Started with Your Notebook Step 5: Set Up Windows Your notebook has the Microsoft Windows operating system preinstalled on the bottom of the notebook. 2. If the program prompts you turn on the screen. Select Start > Control Panel > ...then choose your setup. 1. Follow the Setup program instructions on your notebook, the Windows Setup program runs automatically and includes opportunities to enter the Product ID code, locate the code on its hard drive. Reference Guide 1-11 The first time you to customize your country/...
Reference Guide
Page 20
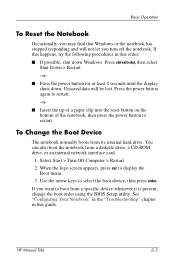
...you turn off the notebook. To Change the Boot Device The notebook normally boots from a diskette drive, a CD-ROM drive, or an internal network interface card. 1. You can also boot the notebook from its internal hard drive. When the logo screen appears, press esc to restart. Basic Operation To Reset the Notebook Occasionally, you may find... press the power button to display the Boot menu. 3. If you want to select the boot device, then press enter. HP Manual Title 2-3 Use the arrow keys to boot from a specific device whenever it is present, change the boot order using the BIOS Setup...
...you turn off the notebook. To Change the Boot Device The notebook normally boots from a diskette drive, a CD-ROM drive, or an internal network interface card. 1. You can also boot the notebook from its internal hard drive. When the logo screen appears, press esc to restart. Basic Operation To Reset the Notebook Occasionally, you may find... press the power button to display the Boot menu. 3. If you want to select the boot device, then press enter. HP Manual Title 2-3 Use the arrow keys to boot from a specific device whenever it is present, change the boot order using the BIOS Setup...
Reference Guide
Page 32
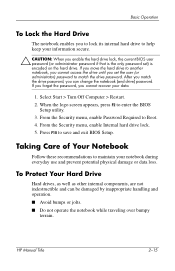
... notebook during everyday use and prevent potential physical damage or data loss. When the logo screen appears, press F2 to save and exit BIOS Setup. If you forget the password, you set ) is encoded on the hard drive. Press F10 to enter the BIOS Setup utility. 3. HP Manual Title 2-15 If you move the hard drive...
... notebook during everyday use and prevent potential physical damage or data loss. When the logo screen appears, press F2 to save and exit BIOS Setup. If you forget the password, you set ) is encoded on the hard drive. Press F10 to enter the BIOS Setup utility. 3. HP Manual Title 2-15 If you move the hard drive...

Reference Guide
Page 33
.... See the "Battery Packs and Power Management" chapter. This turns off the hard drive. Basic Operation ■ Put the notebook in the disk Properties window. 2-16 HP Manual Title If the notebook is operating could destroy data or damage the drive. ■ Carry the notebook in the rain or snow (inclement weather). Copy files to diskettes, CDs...
.... See the "Battery Packs and Power Management" chapter. This turns off the hard drive. Basic Operation ■ Put the notebook in the disk Properties window. 2-16 HP Manual Title If the notebook is operating could destroy data or damage the drive. ■ Carry the notebook in the rain or snow (inclement weather). Copy files to diskettes, CDs...
Reference Guide
Page 36
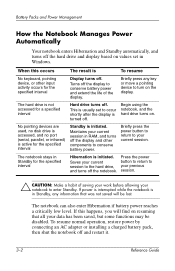
...button to return to your current session in RAM, and turns off the display and other input activity occurs for a specified interval Hard drive turns off. The notebook can also enter Hibernation if battery power reaches a critically low level. When this happens, you will find on resuming that was not... data has been saved, but some functions may be lost. Press the power Saves your current button to return to session to the hard drive, your notebook to enter Standby. If this occurs The result is not accessed for the specified interval Display turns off. This is usually set in...
...button to return to your current session in RAM, and turns off the display and other input activity occurs for a specified interval Hard drive turns off. The notebook can also enter Hibernation if battery power reaches a critically low level. When this happens, you will find on resuming that was not... data has been saved, but some functions may be lost. Press the power Saves your current button to return to session to the hard drive, your notebook to enter Standby. If this occurs The result is not accessed for the specified interval Display turns off. This is usually set in...
Reference Guide
Page 61
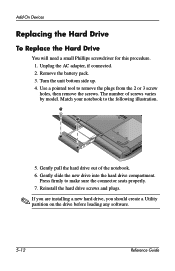
... up. 4. Use a pointed tool to the following illustration. 5. Match your notebook to remove the plugs from the 2 or 3 screw holes, then remove the screws. Gently pull the hard drive out of screws varies by model. Add-On Devices Replacing the Hard Drive To Replace the Hard Drive You will need a small Phillips screwdriver for this procedure. 1. Remove...
... up. 4. Use a pointed tool to the following illustration. 5. Match your notebook to remove the plugs from the 2 or 3 screw holes, then remove the screws. Gently pull the hard drive out of screws varies by model. Add-On Devices Replacing the Hard Drive To Replace the Hard Drive You will need a small Phillips screwdriver for this procedure. 1. Remove...
Reference Guide
Page 62
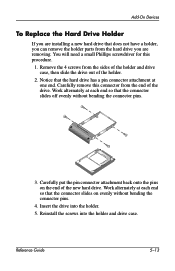
... end of the holder. 2. Work alternately at each end so that the connector slides on the end of the new hard drive. Carefully remove this procedure. 1. Work alternately at one end. Reinstall the screws into the holder. 5. Remove the 4 screws from the... hard drive you are removing. Reference Guide 5-13 Add-On Devices To Replace the Hard Drive Holder If you are installing a new hard drive that the connector slides off evenly without bending the connector pins. 4. Notice that the...
... end of the holder. 2. Work alternately at each end so that the connector slides on the end of the new hard drive. Carefully remove this procedure. 1. Work alternately at one end. Reinstall the screws into the holder. 5. Remove the 4 screws from the... hard drive you are removing. Reference Guide 5-13 Add-On Devices To Replace the Hard Drive Holder If you are installing a new hard drive that the connector slides off evenly without bending the connector pins. 4. Notice that the...
Reference Guide
Page 63
Add-On Devices To Prepare a New Hard Drive When you install a new hard drive, you want to work with your notebook, follow the system recovery procedures described in the "Troubleshooting" chapter of this guide. 5-14 Reference Guide If you also need to prepare it to be able to restore the Windows software and operating system that were originally installed on your notebook.
Add-On Devices To Prepare a New Hard Drive When you install a new hard drive, you want to work with your notebook, follow the system recovery procedures described in the "Troubleshooting" chapter of this guide. 5-14 Reference Guide If you also need to prepare it to be able to restore the Windows software and operating system that were originally installed on your notebook.
Reference Guide
Page 68
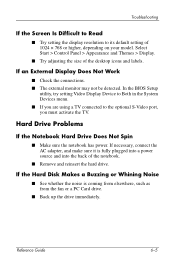
Hard Drive Problems If the Notebook Hard Drive Does Not Spin ■ Make sure the notebook has power. If necessary, connect the AC adapter, and make sure it is coming from elsewhere, such as from the fan or a PC Card drive. ■ Back up the drive immediately. Select Start > Control Panel > Appearance and Themes >...or Whining Noise ■ See whether the noise is fully plugged into a power source and into the back of the notebook. ■ Remove and reinsert the hard drive. If an External Display Does Not Work ■ Check the connections. ■ The external monitor may not be detected....
Hard Drive Problems If the Notebook Hard Drive Does Not Spin ■ Make sure the notebook has power. If necessary, connect the AC adapter, and make sure it is coming from elsewhere, such as from the fan or a PC Card drive. ■ Back up the drive immediately. Select Start > Control Panel > Appearance and Themes >...or Whining Noise ■ See whether the noise is fully plugged into a power source and into the back of the notebook. ■ Remove and reinsert the hard drive. If an External Display Does Not Work ■ Check the connections. ■ The external monitor may not be detected....

Reference Guide
Page 78
... power is not responding. ■ Press the power button for broken network connections to time out. ■ If the notebook hard drive frequently runs (as indicated by the hard drive light on the front of the notebook. One-Touch button to switch display devices while graphic-intensive applications are running . If this occurs frequently, consider installing...
... power is not responding. ■ Press the power button for broken network connections to time out. ■ If the notebook hard drive frequently runs (as indicated by the hard drive light on the front of the notebook. One-Touch button to switch display devices while graphic-intensive applications are running . If this occurs frequently, consider installing...
Reference Guide
Page 88
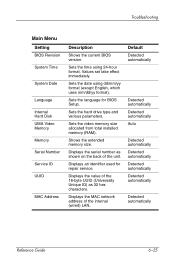
Values set take effect immediately. Sets the hard drive type and various parameters. Sets the language for repair service. Sets the video memory size allocated from total installed memory (RAM). Shows the extended memory ... using dd/mm/yy format (except English, which uses mm/dd/yy format). Troubleshooting Main Menu Setting BIOS Revision System Time System Date Language Internal Hard Disk UMA Video Memory Memory Serial Number Service ID UUID MAC Address Description Shows the current BIOS version. Displays the value of the internal (wired...
Values set take effect immediately. Sets the hard drive type and various parameters. Sets the language for repair service. Sets the video memory size allocated from total installed memory (RAM). Shows the extended memory ... using dd/mm/yy format (except English, which uses mm/dd/yy format). Troubleshooting Main Menu Setting BIOS Revision System Time System Date Language Internal Hard Disk UMA Video Memory Memory Serial Number Service ID UUID MAC Address Description Shows the current BIOS version. Displays the value of the internal (wired...
Reference Guide
Page 90
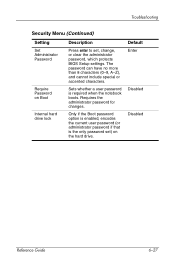
...notebook boots. Sets whether a user password is the only password set , change, or clear the administrator password, which protects BIOS Setup settings. Requires the administrator password for changes. Default Enter Disabled Disabled Reference Guide 6-27 Troubleshooting Security Menu (Continued) Setting Set Administrator Password Require Password on Boot Internal hard drive... lock Description Press enter to set ) on the hard drive.
...notebook boots. Sets whether a user password is the only password set , change, or clear the administrator password, which protects BIOS Setup settings. Requires the administrator password for changes. Default Enter Disabled Disabled Reference Guide 6-27 Troubleshooting Security Menu (Continued) Setting Set Administrator Password Require Password on Boot Internal hard drive... lock Description Press enter to set ) on the hard drive.
Reference Guide
Page 91
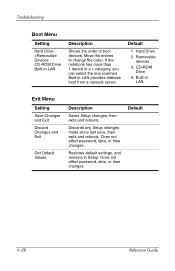
...notebook has more than 1 device in LAN Description Shows the order of boot devices. Discards any Setup changes made since last save, then exits and reboots. Default 1. Removable devices 3. Does not affect password, date, or time changes. Troubleshooting Boot Menu Setting Hard Drive +Removable Devices CD-ROM Drive... Built-in a + category, you can select the one scanned. Move the entries to change the order. Built-in LAN provides diskless boot from a network server. CD-ROM Drive 4. Default 6-28 ...
...notebook has more than 1 device in LAN Description Shows the order of boot devices. Discards any Setup changes made since last save, then exits and reboots. Default 1. Removable devices 3. Does not affect password, date, or time changes. Troubleshooting Boot Menu Setting Hard Drive +Removable Devices CD-ROM Drive... Built-in a + category, you can select the one scanned. Move the entries to change the order. Built-in LAN provides diskless boot from a network server. CD-ROM Drive 4. Default 6-28 ...


