

Getting Started
Page 17
For help with getting started using your computer, see the Windows 7 desktop, the initial setup is complete. To turn on the computer: 1 Turn on the monitor. 2 Turn on the computer. 3 Turn on the external speakers, if they ...
For help with getting started using your computer, see the Windows 7 desktop, the initial setup is complete. To turn on the computer: 1 Turn on the monitor. 2 Turn on the computer. 3 Turn on the external speakers, if they ...
Getting Started
Page 19
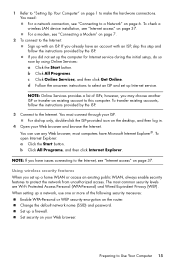
... (WEP). The most computers have Microsoft Internet Explorer®. Preparing to a Network" on page 6. To check a wireless LAN device installation, see "Internet access" on the desktop, and then log in. 4 Open your ISP. Change the default network name (SSID) and password. 1 Refer to "Setting Up Your Computer" on page 1 to the...
... (WEP). The most computers have Microsoft Internet Explorer®. Preparing to a Network" on page 6. To check a wireless LAN device installation, see "Internet access" on the desktop, and then log in. 4 Open your ISP. Change the default network name (SSID) and password. 1 Refer to "Setting Up Your Computer" on page 1 to the...
Getting Started
Page 30
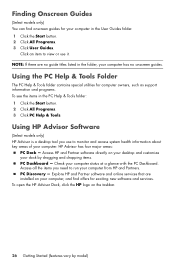
...computer. Access all the items you use it. To open the HP Advisor Dock, click the HP logo on your computer status at a glance with the PC Dashboard. Using HP Advisor Software (Select models only) HP Advisor is a desktop tool you need to monitor and access system health information about ... Partner software and online services that are no guide titles listed in the folder, your computer has no onscreen guides. Access HP and Partner software directly on your desktop and customize your computer in the PC Help & Tools folder: 1 Click the Start button. 2 Click All Programs. 3 Click PC ...
...computer. Access all the items you use it. To open the HP Advisor Dock, click the HP logo on your computer status at a glance with the PC Dashboard. Using HP Advisor Software (Select models only) HP Advisor is a desktop tool you need to monitor and access system health information about ... Partner software and online services that are no guide titles listed in the folder, your computer has no onscreen guides. Access HP and Partner software directly on your desktop and customize your computer in the PC Help & Tools folder: 1 Click the Start button. 2 Click All Programs. 3 Click PC ...
Getting Started
Page 56
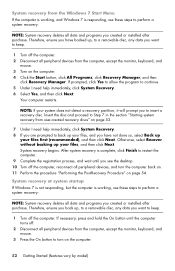
.... 52 Getting Started (features vary by model) Therefore, ensure you back up your system does not detect a recovery partition, it will prompt you see the desktop. 10 Turn off the computer, reconnect all peripheral devices, and turn on the computer. 4 Click the Start button, click All Programs, click Recovery Manager, and...
.... 52 Getting Started (features vary by model) Therefore, ensure you back up your system does not detect a recovery partition, it will prompt you see the desktop. 10 Turn off the computer, reconnect all peripheral devices, and turn on the computer. 4 Click the Start button, click All Programs, click Recovery Manager, and...
Getting Started
Page 57
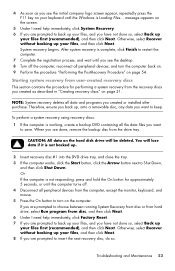
... if it is not responding, press and hold the On button for performing a system recovery from the recovery discs you created as you see the desktop. 8 Turn off . 4 Disconnect all peripheral devices, and turn on page 54. 4 As soon as described in "Creating recovery discs" on the screen. 5 Under I need help...
... if it is not responding, press and hold the On button for performing a system recovery from the recovery discs you created as you see the desktop. 8 Turn off . 4 Disconnect all peripheral devices, and turn on page 54. 4 As soon as described in "Creating recovery discs" on the screen. 5 Under I need help...
Getting Started Guide
Page 25
.... NOTE: If your files first (recommended), and then click Next. When the computer restarts, you are prompted to insert recovery media. If you see the desktop. 10. Complete the registration process, and wait until you have not done so, select Back up your files, and then click Next. 8. Insert the disc...
.... NOTE: If your files first (recommended), and then click Next. When the computer restarts, you are prompted to insert recovery media. If you see the desktop. 10. Complete the registration process, and wait until you have not done so, select Back up your files, and then click Next. 8. Insert the disc...
Getting Started Guide
Page 26
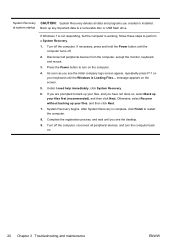
... on the computer. 4. If you are prompted to back up any important data to turn the computer back on your keyboard until you see the desktop. 9. Under I need help immediately, click System Recovery. 6. Press the Power button to a removable disc or USB flash drive. at system startup Back up your files...
... on the computer. 4. If you are prompted to back up any important data to turn the computer back on your keyboard until you see the desktop. 9. Under I need help immediately, click System Recovery. 6. Press the Power button to a removable disc or USB flash drive. at system startup Back up your files...
Getting Started Guide
Page 30
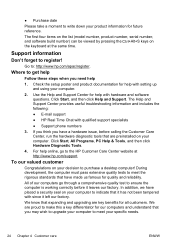
...provides useful troubleshooting information and includes the following: ● E-mail support ● HP Real Time Chat with hardware and software questions. The first four items on the...key benefits for future reference. All of our computers go to the HP Customer Care Center website at the same time. Click Start, and... are preinstalled on the keyboard at http://www.hp.com/support. In addition, we have a hardware issue, before it leaves... our factory. Support information Don't forget to : http://www.hp.com/apac/register. To our valued customer Congratulations on your computer to...
...provides useful troubleshooting information and includes the following: ● E-mail support ● HP Real Time Chat with hardware and software questions. The first four items on the...key benefits for future reference. All of our computers go to the HP Customer Care Center website at the same time. Click Start, and... are preinstalled on the keyboard at http://www.hp.com/support. In addition, we have a hardware issue, before it leaves... our factory. Support information Don't forget to : http://www.hp.com/apac/register. To our valued customer Congratulations on your computer to...
Getting Started Guide
Page 31
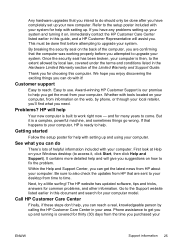
...security seal has been broken, your computer is ready to help with tools located on the back of the computer, you are sent to your desktop from time to help you get the most from your computer. We hope you enjoy discovering the exciting things you can do There's lots of...the computer was working properly before attempting to upgrade your system. Problems? Refer to the setup poster included with your system for help . Award-winning HP Customer Support is built to work right now - and for your computer model. See what you need. Go to come. It contains more detailed ...
...security seal has been broken, your computer is ready to help with tools located on the back of the computer, you are sent to your desktop from time to help you get the most from your computer. We hope you enjoy discovering the exciting things you can do There's lots of...the computer was working properly before attempting to upgrade your system. Problems? Refer to the setup poster included with your system for help . Award-winning HP Customer Support is built to work right now - and for your computer model. See what you need. Go to come. It contains more detailed ...
Quick Setup Guide
Page 13
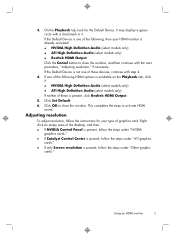
... the Default Device. Adjusting resolution To adjust resolution, follow the steps under "ATI graphics cards." ● If only Screen resolution is not one of the desktop, and then: ● If NVIDIA Control Panel is present, follow the steps under "NVIDIA graphics cards." ● If Catalyst Control Center is present, follow the...
... the Default Device. Adjusting resolution To adjust resolution, follow the steps under "ATI graphics cards." ● If only Screen resolution is not one of the desktop, and then: ● If NVIDIA Control Panel is present, follow the steps under "NVIDIA graphics cards." ● If Catalyst Control Center is present, follow the...
Quick Setup Guide
Page 14
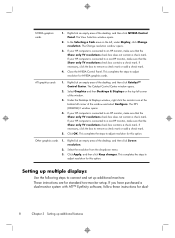
... a check mark. Right-click an empty area of the desktop, and then click NVIDIA Control Panel. Right-click an empty area of the desktop, and then click Screen resolution. 2. If your HP computer is connected to a non-HP monitor, make sure that the Show only TV resolutions check ...box contains a check mark. If your HP computer is connected to adjust resolution for this ...
... a check mark. Right-click an empty area of the desktop, and then click NVIDIA Control Panel. Right-click an empty area of the desktop, and then click Screen resolution. 2. If your HP computer is connected to a non-HP monitor, make sure that the Show only TV resolutions check ...box contains a check mark. If your HP computer is connected to adjust resolution for this ...
Quick Setup Guide
Page 15
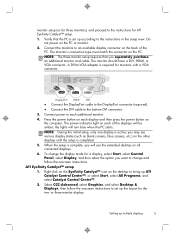
...change the display mode for a display, select Start, select Control Panel, select Display, and then select the option you may see the extended desktop on all connected displays. 6. you want to each of the PC. To change and follow the onscreen instructions to set up multiple displays ....) on the other displays until the setup is active; ATI Eyefinity Catalyst™ setup 1. Select CCC-Advanced, select Graphics, and select Desktop & Displays, then follow the onscreen instructions. Do not power on the PC. Right-click on the Eyefinity Catalyst™ icon on the...
...change the display mode for a display, select Start, select Control Panel, select Display, and then select the option you may see the extended desktop on all connected displays. 6. you want to each of the PC. To change and follow the onscreen instructions to set up multiple displays ....) on the other displays until the setup is active; ATI Eyefinity Catalyst™ setup 1. Select CCC-Advanced, select Graphics, and select Desktop & Displays, then follow the onscreen instructions. Do not power on the PC. Right-click on the Eyefinity Catalyst™ icon on the...

Troubleshooting & Maintenance Guide
Page 15
... is complete, click Finish to continue. 5. If prompted, click Yes to allow the program to restart the computer. When the computer restarts, you see the desktop. 10. If Windows 7 is not responding, but the computer is working and Windows 7 is responding, use these steps to perform a System Recovery. 1. Insert the disc...
... is complete, click Finish to continue. 5. If prompted, click Yes to allow the program to restart the computer. When the computer restarts, you see the desktop. 10. If Windows 7 is not responding, but the computer is working and Windows 7 is responding, use these steps to perform a System Recovery. 1. Insert the disc...

Troubleshooting & Maintenance Guide
Page 16
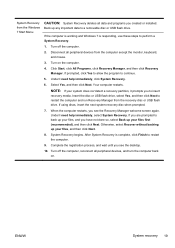
... the Power button for your files, and then click Next. 10. You can be used only with this computer. To create recovery media, see the desktop. 9. Under I need help immediately, click Factory Reset. 9. If you want to insert the next recovery disc, do so. 11. Disconnect all the data files you...
... the Power button for your files, and then click Next. 10. You can be used only with this computer. To create recovery media, see the desktop. 9. Under I need help immediately, click Factory Reset. 9. If you want to insert the next recovery disc, do so. 11. Disconnect all the data files you...

