
Resolving Start Up and No Boot Problems Checklist
Page 1
... startup or boot, and displays a black screen Usually occurs if a component is installed incorrectly, or there is no power available to BIOS mode (f10) and run Memory Test and Hard Drive Test If all USB devices and media cards. 2. Connect a different AC power adapter and remove battery. Connect an external monitor to check display Remove all CD/DVDs, SD cards, USB devices, peripherals and do hard reset If memory or hard drive components were replaced, reinstall original components Remove memory modules and replace one-at-a-time If possible, boot to the notebook...
... startup or boot, and displays a black screen Usually occurs if a component is installed incorrectly, or there is no power available to BIOS mode (f10) and run Memory Test and Hard Drive Test If all USB devices and media cards. 2. Connect a different AC power adapter and remove battery. Connect an external monitor to check display Remove all CD/DVDs, SD cards, USB devices, peripherals and do hard reset If memory or hard drive components were replaced, reinstall original components Remove memory modules and replace one-at-a-time If possible, boot to the notebook...
Resolving Start Up and No Boot Problems Checklist
Page 2
... www.hp.com for terms in error message May be able to start in error message Boot to BIOS mode (f10) and Restore the BIOS defaults (f9) Boot to BIOS mode (f10) and run Hard Drive Test Boot to Windows Advanced boot options (f8) and select Last Known Good Configuration (Advanced) Boot to Windows Advanced boot options (f8) and select Boot into Safe Mode and then Uninstall recently installed programs Symptom: Update Your Computer After Troubleshooting A Problem When the computer starts into Windows...
... www.hp.com for terms in error message May be able to start in error message Boot to BIOS mode (f10) and Restore the BIOS defaults (f9) Boot to BIOS mode (f10) and run Hard Drive Test Boot to Windows Advanced boot options (f8) and select Last Known Good Configuration (Advanced) Boot to Windows Advanced boot options (f8) and select Boot into Safe Mode and then Uninstall recently installed programs Symptom: Update Your Computer After Troubleshooting A Problem When the computer starts into Windows...
HP Notebook Reference Guide - Windows 7
Page 32
.... Windows XP-Select Start > Turn Off Computer > Stand By. If the computer is saved to memory, letting you can be changed using Power Options in the Sleep state, the computer initiates Hibernation. When Hibernation is initiated, your work is initiated, the power lights blink and the screen clears. With the computer on external power. CAUTION: To reduce the risk of possible audio and video degradation, loss of audio or video playback functionality...
.... Windows XP-Select Start > Turn Off Computer > Stand By. If the computer is saved to memory, letting you can be changed using Power Options in the Sleep state, the computer initiates Hibernation. When Hibernation is initiated, your work is initiated, the power lights blink and the screen clears. With the computer on external power. CAUTION: To reduce the risk of possible audio and video degradation, loss of audio or video playback functionality...
HP Notebook Reference Guide - Windows 7
Page 36
... the battery light, refer to the Getting Started guide. - Displaying the remaining battery charge ▲ Move the pointer over the power meter icon in the notification area shows a low or critical battery notification. Managing low battery levels The information in Windows Control Panel. Preferences set using Power Options in this section describes the alerts and system responses set at the far right of the taskbar. Select Start > Help and Support > Troubleshoot > Power, Thermal...
... the battery light, refer to the Getting Started guide. - Displaying the remaining battery charge ▲ Move the pointer over the power meter icon in the notification area shows a low or critical battery notification. Managing low battery levels The information in Windows Control Panel. Preferences set using Power Options in this section describes the alerts and system responses set at the far right of the taskbar. Select Start > Help and Support > Troubleshoot > Power, Thermal...
HP Notebook Reference Guide - Windows 7
Page 52
... powered USB port on the computer. USB drives include the following types: ● 1.44-megabyte diskette drive ● Hard drive module (a hard drive with the computer. Connect the device to the manufacturer's instructions. Turn on the computer. Using optional external drives Removable external drives expand your options for storing and accessing information. To disconnect an unpowered external device, turn off the device, disconnect it from the computer, and then unplug the AC power cord. A USB drive can be used with an adapter attached) ● External...
... powered USB port on the computer. USB drives include the following types: ● 1.44-megabyte diskette drive ● Hard drive module (a hard drive with the computer. Connect the device to the manufacturer's instructions. Turn on the computer. Using optional external drives Removable external drives expand your options for storing and accessing information. To disconnect an unpowered external device, turn off the device, disconnect it from the computer, and then unplug the AC power cord. A USB drive can be used with an adapter attached) ● External...
HP Notebook Reference Guide - Windows 7
Page 55
... need access to Help and Support for the hard drive, usually listed as installing software, running utilities, or changing Windows settings. Connect the computer to run Disk Defragmenter on -screen instructions. Select Start > All Programs > Accessories > System Tools > Disk Defragmenter. 3. Refer to your hard drive and the number of fragmented files, Disk Defragmenter may be prompted for your hard drive at any time. For additional information, access the Disk Defragmenter software Help. To run Disk Defragmenter: 1. You may set...
... need access to Help and Support for the hard drive, usually listed as installing software, running utilities, or changing Windows settings. Connect the computer to run Disk Defragmenter on -screen instructions. Select Start > All Programs > Accessories > System Tools > Disk Defragmenter. 3. Refer to your hard drive and the number of fragmented files, Disk Defragmenter may be prompted for your hard drive at any time. For additional information, access the Disk Defragmenter software Help. To run Disk Defragmenter: 1. You may set...
HP Notebook Reference Guide - Windows 7
Page 73
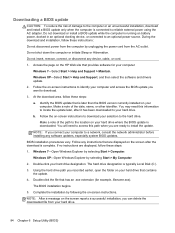
... when you are displayed, follow these steps: a. If no instructions are ready to install the update. Start Setup Utility. 2. or - Windows 7-Select Start > Help and Support > Maintain. BIOS installation procedures vary. The hard drive designation is running on battery power, docked in an optional docking device, or connected to an optional power source. Use a pointing device or the arrow keys to select File > Ignore Changes and Exit, and then press enter. Use the tab key and the arrow...
... when you are displayed, follow these steps: a. If no instructions are ready to install the update. Start Setup Utility. 2. or - Windows 7-Select Start > Help and Support > Maintain. BIOS installation procedures vary. The hard drive designation is running on battery power, docked in an optional docking device, or connected to an optional power source. Use a pointing device or the arrow keys to select File > Ignore Changes and Exit, and then press enter. Use the tab key and the arrow...

Getting Started HP Notebook - Windows 7
Page 36
..., in Sleep mode, or in Hibernation mode, press the power button to turn on the computer, and then use the operating system to the computer. 3. CAUTION: To prevent information loss or an unresponsive system: Shut down on a flat surface. 5. Save your work, shut down the computer. 1. The memory module tilts up. 30 Chapter 5 Maintenance Lift the service cover (2) away from the computer. 6. Remove the battery from...
..., in Sleep mode, or in Hibernation mode, press the power button to turn on the computer, and then use the operating system to the computer. 3. CAUTION: To prevent information loss or an unresponsive system: Shut down on a flat surface. 5. Save your work, shut down the computer. 1. The memory module tilts up. 30 Chapter 5 Maintenance Lift the service cover (2) away from the computer. 6. Remove the battery from...
Getting Started HP Notebook - Windows 7
Page 53
... media slot, identifying MultiMedia Card (MMC) 9 Secure Digital (SD) Memory Card 9 display image, switching 18 E esc key, identifying 7 external monitor port, identifying 9 F f11 36 fn key, identifying 7 H hard drive installing 28 removing 27 hard drive light, identifying 10 HDMI port, identifying 9 headphone (audio-out) jack 9 Help and Support action key 18 hotkeys Help and Support 18 I input power 45 integrated webcam light, identifying 11 internal microphone, identifying 11 Internet connection setup 15 ISP, using 14 J jacks audio-in (microphone) 9 audio-out (headphone) 9 network 9 RJ...
... media slot, identifying MultiMedia Card (MMC) 9 Secure Digital (SD) Memory Card 9 display image, switching 18 E esc key, identifying 7 external monitor port, identifying 9 F f11 36 fn key, identifying 7 H hard drive installing 28 removing 27 hard drive light, identifying 10 HDMI port, identifying 9 headphone (audio-out) jack 9 Help and Support action key 18 hotkeys Help and Support 18 I input power 45 integrated webcam light, identifying 11 internal microphone, identifying 11 Internet connection setup 15 ISP, using 14 J jacks audio-in (microphone) 9 audio-out (headphone) 9 network 9 RJ...
Getting Started HP Notebook - Windows 7
Page 54
... recovery partition 36 recovering from the recovery discs 37 recovery discs 35 Recovery Manager 36 recovery, system 36 regulatory information regulatory label 43 wireless certification labels 43 restore points 40 RJ-45 (network) jack, identifying 9 rotating TouchPad gesture 24 S screen brightness keys 18 screen image, switching 18 scrolling TouchPad gesture 23 security cable slot security cable slot, identifying 8 serial number 43 serial number, computer 43 service cover, identifying 12 setup of WLAN 15 supported discs 35 system recovery 36 system restore points 40 T TouchPad buttons 5 using...
... recovery partition 36 recovering from the recovery discs 37 recovery discs 35 Recovery Manager 36 recovery, system 36 regulatory information regulatory label 43 wireless certification labels 43 restore points 40 RJ-45 (network) jack, identifying 9 rotating TouchPad gesture 24 S screen brightness keys 18 screen image, switching 18 scrolling TouchPad gesture 23 security cable slot security cable slot, identifying 8 serial number 43 serial number, computer 43 service cover, identifying 12 setup of WLAN 15 supported discs 35 system recovery 36 system restore points 40 T TouchPad buttons 5 using...

HP G62 Notebook PC - Maintenance and Service Guide
Page 70
To replace the webcam module (select models only), lift the webcam module as the webcam module cable allows. 11. To replace the display hinge covers, remove the three Phillips 4.0 x 2.5 screws (1) that secure the covers to install the webcam module. 12. The webcam module is available using spare part number 640880-001. Reverse this procedure to the display enclosure. 62 Chapter 4 Removal and replacement procedures Disconnect the webcam module cable (1) from the display enclosure as far from the webcam module, and then remove the webcam module (2). 10.
To replace the webcam module (select models only), lift the webcam module as the webcam module cable allows. 11. To replace the display hinge covers, remove the three Phillips 4.0 x 2.5 screws (1) that secure the covers to install the webcam module. 12. The webcam module is available using spare part number 640880-001. Reverse this procedure to the display enclosure. 62 Chapter 4 Removal and replacement procedures Disconnect the webcam module cable (1) from the display enclosure as far from the webcam module, and then remove the webcam module (2). 10.

HP G62 Notebook PC - Maintenance and Service Guide
Page 91
... battery power, docked in an optional docking device, or connected to the hard drive. Identify the BIOS update that provides software for your computer. Access the page on the HP Web site that is running on the computer, you want to select Exit > Exit Discarding Changes, and then press enter. Some download packages contain a file named Readme.txt, which contains information regarding installing and troubleshooting the file. Start Setup Utility...
... battery power, docked in an optional docking device, or connected to the hard drive. Identify the BIOS update that provides software for your computer. Access the page on the HP Web site that is running on the computer, you want to select Exit > Exit Discarding Changes, and then press enter. Some download packages contain a file named Readme.txt, which contains information regarding installing and troubleshooting the file. Start Setup Utility...

HP G62 Notebook PC - Maintenance and Service Guide
Page 92
... any software updates, especially system BIOS updates. Windows 7-Open Windows Explorer by selecting Start > My Computer. 2. NOTE: After a message on your hard drive that has an .exe extension (for example, filename.exe). BIOS installation procedures vary. Using the hard drive path you recorded earlier, open the folder on the screen reports a successful installation, you connect your computer to a network, consult the network administrator before installing any instructions that are displayed on -screen instructions. The hard drive designation is downloaded. Make...
... any software updates, especially system BIOS updates. Windows 7-Open Windows Explorer by selecting Start > My Computer. 2. NOTE: After a message on your hard drive that has an .exe extension (for example, filename.exe). BIOS installation procedures vary. Using the hard drive path you recorded earlier, open the folder on the screen reports a successful installation, you connect your computer to a network, consult the network administrator before installing any instructions that are displayed on -screen instructions. The hard drive designation is downloaded. Make...
HP G62 Notebook PC - Maintenance and Service Guide
Page 108
...-ray ROM and DVD±R/RW SuperMulti Double-Layer Drive spare part number 24 buttons left TouchPad 6 power 8 right TouchPad 6 C cables, service considerations 31 camera module removal 62 spare part number 62 camera, product description 3 caps lock light, identifying 7 chipset, product description 2 components bottom 15 buttons 8 display 14 front 6, 10 keys 9 left side 12 lights 7 right side 11 top 6 computer feet locations 36 spare part number 36 computer specifications 76 connector, power 11 connectors, service considerations 31 D default settings, restoring 82 digital media slot...
...-ray ROM and DVD±R/RW SuperMulti Double-Layer Drive spare part number 24 buttons left TouchPad 6 power 8 right TouchPad 6 C cables, service considerations 31 camera module removal 62 spare part number 62 camera, product description 3 caps lock light, identifying 7 chipset, product description 2 components bottom 15 buttons 8 display 14 front 6, 10 keys 9 left side 12 lights 7 right side 11 top 6 computer feet locations 36 spare part number 36 computer specifications 76 connector, power 11 connectors, service considerations 31 D default settings, restoring 82 digital media slot...
HP G62 Notebook PC - Maintenance and Service Guide
Page 110
...Disc ROM and DVD±R/ RW SuperMulti Double-Layer Drive 80 T thermal paste, replacement 72 tools required 30 top cover removal 49 spare part number 18, 49 TouchPad buttons 6 removal 55 TouchPad button board spare part number 55 TouchPad light 6 transporting guidelines 33 U USB board removal 56 spare part number 18, 56 USB port, identifying 12 using system restore 91 V vents, identifying 12, 15 W webcam light, identifying 14 webcam module, spare part number 22 webcam, identifying 14 Windows applications key, identifying 9 Windows logo key, identifying 9 wireless antenna removal 64 spare part...
...Disc ROM and DVD±R/ RW SuperMulti Double-Layer Drive 80 T thermal paste, replacement 72 tools required 30 top cover removal 49 spare part number 18, 49 TouchPad buttons 6 removal 55 TouchPad button board spare part number 55 TouchPad light 6 transporting guidelines 33 U USB board removal 56 spare part number 18, 56 USB port, identifying 12 using system restore 91 V vents, identifying 12, 15 W webcam light, identifying 14 webcam module, spare part number 22 webcam, identifying 14 Windows applications key, identifying 9 Windows logo key, identifying 9 wireless antenna removal 64 spare part...

HP Pavilion G6 Notebook PC - Maintenance and Service Guide
Page 70
The webcam module is available using spare part number 640880-001. To replace the display hinge covers, remove the three Phillips 4.0 x 2.5 screws (1) that secure the covers to install the webcam module. 12. Disconnect the webcam module cable (1) from the display enclosure as far from the webcam module, and then remove the webcam module (2). To replace the webcam module (select models only), lift the webcam module as the webcam module cable allows. 11. 10. Reverse this procedure to the display enclosure. 62 Chapter 4 Removal and replacement procedures
The webcam module is available using spare part number 640880-001. To replace the display hinge covers, remove the three Phillips 4.0 x 2.5 screws (1) that secure the covers to install the webcam module. 12. Disconnect the webcam module cable (1) from the display enclosure as far from the webcam module, and then remove the webcam module (2). To replace the webcam module (select models only), lift the webcam module as the webcam module cable allows. 11. 10. Reverse this procedure to the display enclosure. 62 Chapter 4 Removal and replacement procedures
HP Pavilion G6 Notebook PC - Maintenance and Service Guide
Page 92
...: Windows 7-Select Start > Help and Support > Maintain. Using the hard drive path you are displayed, follow these steps: 1. Identify the BIOS update that is connected to reliable external power using the AC adapter. Do not shut down the computer or initiate Sleep or Hibernation. Make a note of the date, name, or other identifier. Windows XP-Select Start > Help and Support, and then select the software and drivers update. 2. Do not download or install a BIOS update while...
...: Windows 7-Select Start > Help and Support > Maintain. Using the hard drive path you are displayed, follow these steps: 1. Identify the BIOS update that is connected to reliable external power using the AC adapter. Do not shut down the computer or initiate Sleep or Hibernation. Make a note of the date, name, or other identifier. Windows XP-Select Start > Help and Support, and then select the software and drivers update. 2. Do not download or install a BIOS update while...

HP Pavilion G6 Notebook PC - Maintenance and Service Guide
Page 108
...-ray ROM and DVD±R/RW SuperMulti Double-Layer Drive spare part number 24 buttons left TouchPad 6 power 8 right TouchPad 6 C cables, service considerations 31 camera module removal 62 spare part number 62 camera, product description 3 caps lock light, identifying 7 chipset, product description 2 components bottom 15 buttons 8 display 14 front 6, 10 keys 9 left side 12 lights 7 right side 11 top 6 computer feet locations 36 spare part number 36 computer specifications 76 connector, power 11 connectors, service considerations 31 D default settings, restoring 82 digital media slot...
...-ray ROM and DVD±R/RW SuperMulti Double-Layer Drive spare part number 24 buttons left TouchPad 6 power 8 right TouchPad 6 C cables, service considerations 31 camera module removal 62 spare part number 62 camera, product description 3 caps lock light, identifying 7 chipset, product description 2 components bottom 15 buttons 8 display 14 front 6, 10 keys 9 left side 12 lights 7 right side 11 top 6 computer feet locations 36 spare part number 36 computer specifications 76 connector, power 11 connectors, service considerations 31 D default settings, restoring 82 digital media slot...

HP Pavilion G6 Notebook PC - Maintenance and Service Guide
Page 109
... adapter 11 caps lock 7 hard drive 13 power light 13 webcam 14 wireless 7 M mass storage devices, spare part numbers 24 memory module product description 2 removal 45 spare part numbers 21, 45 microphone (audio-in) jack, identifying 12 N network jack, identifying 12 O operating system, product description 5 optical drive precautions 31 product description 3 removal 41 spare part numbers 21, 24, 41 specifications 79, 80 optical drive board spare part number 18 P packing guidelines 33 plastic parts 30 pointing device, product description 5 ports HDMI 12 product description 4 USB 12 power button...
... adapter 11 caps lock 7 hard drive 13 power light 13 webcam 14 wireless 7 M mass storage devices, spare part numbers 24 memory module product description 2 removal 45 spare part numbers 21, 45 microphone (audio-in) jack, identifying 12 N network jack, identifying 12 O operating system, product description 5 optical drive precautions 31 product description 3 removal 41 spare part numbers 21, 24, 41 specifications 79, 80 optical drive board spare part number 18 P packing guidelines 33 plastic parts 30 pointing device, product description 5 ports HDMI 12 product description 4 USB 12 power button...
HP Pavilion G6 Notebook PC - Maintenance and Service Guide
Page 110
... cable lock removal 57 spare part number 57 security cable slot security cable slot, identifying 11 security lock bracket, spare part number 18 security, product description 5 serial number 16, 35 service access cover removal 38 spare part number 38 service considerations 30 service cover, identifying 15 serviceability, product description 5 Setup Utility changing the language 81 displaying system information 82 exiting 82 navigating 82 restoring default settings 82 selecting 82 starting 81 speaker assembly removal 54 spare part number 18, 54 specifications Blu-ray Disc ROM and DVD±...
... cable lock removal 57 spare part number 57 security cable slot security cable slot, identifying 11 security lock bracket, spare part number 18 security, product description 5 serial number 16, 35 service access cover removal 38 spare part number 38 service considerations 30 service cover, identifying 15 serviceability, product description 5 Setup Utility changing the language 81 displaying system information 82 exiting 82 navigating 82 restoring default settings 82 selecting 82 starting 81 speaker assembly removal 54 spare part number 18, 54 specifications Blu-ray Disc ROM and DVD±...


