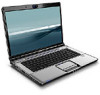

HP Pavilion dv6000 Notebook PC Maintenance and Service Guide
Page 14
...) S/PDIF jack (select models only) Provides enhanced audio performance, including surround sound and other high-end audio output. Audio-out (headphone) jack Provides sound when connected to establish a wireless connection. Consumer infrared lens (select models only) Receives a signal from the HP Remote Control. Wireless switch Turns the wireless feature on . Product Description Item...
...) S/PDIF jack (select models only) Provides enhanced audio performance, including surround sound and other high-end audio output. Audio-out (headphone) jack Provides sound when connected to establish a wireless connection. Consumer infrared lens (select models only) Receives a signal from the HP Remote Control. Wireless switch Turns the wireless feature on . Product Description Item...

HP Pavilion dv6000 Notebook PC Maintenance and Service Guide
Page 21
... press to exit standby. ■ In hibernation, briefly press to exit hibernation. Volume mute button Mutes and restores speaker sound. Slide your finger to the left to decrease volume and to the right to each microphone opening indicates that the computer has... internal microphones. Internal microphones (2, select models only) Record sound. ✎ A microphone icon next to increase volume. Product Description Item 1 2 3 4 5 6 7 8 Table 1-5 Top Components, Part 1 Component...
... press to exit standby. ■ In hibernation, briefly press to exit hibernation. Volume mute button Mutes and restores speaker sound. Slide your finger to the left to decrease volume and to the right to each microphone opening indicates that the computer has... internal microphones. Internal microphones (2, select models only) Record sound. ✎ A microphone icon next to increase volume. Product Description Item 1 2 3 4 5 6 7 8 Table 1-5 Top Components, Part 1 Component...

HP Pavilion dv6000 Notebook PC Maintenance and Service Guide
Page 41
Troubleshooting Table 2-3 System Configuration Menu Select Boot Options Button Sound (select models only) Video memory up to (select models only) To Do This Set the following boot options: ■ f10 and f12 Delay (sec.)-Set .../DVD ROM Drive ❐ Hard drive ❐ USB Diskette on Key ❐ USB Hard drive ❐ Network adapter Enable/disable the Quick Launch Button tapping sound. Select the amount of 5 seconds each (0, 5, 10, 15, 20). ■ CD-ROM boot-Enable/disable boot from CD-ROM. ■ Floppy boot-Enable/disable boot...
Troubleshooting Table 2-3 System Configuration Menu Select Boot Options Button Sound (select models only) Video memory up to (select models only) To Do This Set the following boot options: ■ f10 and f12 Delay (sec.)-Set .../DVD ROM Drive ❐ Hard drive ❐ USB Diskette on Key ❐ USB Hard drive ❐ Network adapter Enable/disable the Quick Launch Button tapping sound. Select the amount of 5 seconds each (0, 5, 10, 15, 20). ■ CD-ROM boot-Enable/disable boot from CD-ROM. ■ Floppy boot-Enable/disable boot...
HP Pavilion dv6000 Notebook PC Maintenance and Service Guide
Page 45
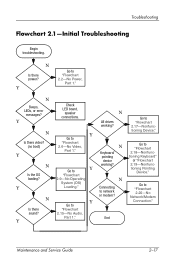
Y N Is there sound? N Connecting to "Flowchart 2.15-No Audio, Part 1." Maintenance and Service Guide 2-17 Y Go to network or modem? Y Go to "Flowchart 2.6-No Video, Part 1." Y N Is there ...
Y N Is there sound? N Connecting to "Flowchart 2.15-No Audio, Part 1." Maintenance and Service Guide 2-17 Y Go to network or modem? Y Go to "Flowchart 2.6-No Video, Part 1." Y N Is there ...

External Devices - Windows XP
Page 6
.... CAUTION To prevent damage to a USB connector, do not pull on the cable to indicate that a device has been detected. The operating system will issue a sound to disconnect the USB device.
.... CAUTION To prevent damage to a USB connector, do not pull on the cable to indicate that a device has been detected. The operating system will issue a sound to disconnect the USB device.

External Devices - Windows XP
Page 8
... minimal force to disconnect the 1394 device. NOTE To display the Safely Remove Hardware icon, click the Show Hidden Icons icon (< or You will hear a sound when the device has been detected. Stopping a 1394 device CAUTION To prevent loss of information or an unresponsive system, stop a 1394 device: 1. CAUTION To prevent...
... minimal force to disconnect the 1394 device. NOTE To display the Safely Remove Hardware icon, click the Show Hidden Icons icon (< or You will hear a sound when the device has been detected. Stopping a 1394 device CAUTION To prevent loss of information or an unresponsive system, stop a 1394 device: 1. CAUTION To prevent...
External Media Cards - Windows XP
Page 6
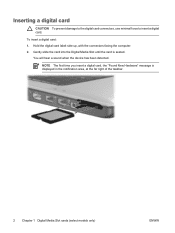
Inserting a digital card CAUTION To prevent damage to the digital card connectors, use minimal force to insert a digital card. You will hear a sound when the device has been detected. NOTE The first time you insert a digital card, the "Found New Hardware" message is seated. Hold the digital card label-side up, with the connectors facing the computer. 2. Gently slide the card into the Digital Media Slot until the card is displayed in the notification area, at the far right of the taskbar. 2 Chapter 1 Digital Media Slot cards (select models only) ENWW To insert a digital card: 1.
Inserting a digital card CAUTION To prevent damage to the digital card connectors, use minimal force to insert a digital card. You will hear a sound when the device has been detected. NOTE The first time you insert a digital card, the "Found New Hardware" message is seated. Hold the digital card label-side up, with the connectors facing the computer. 2. Gently slide the card into the Digital Media Slot until the card is displayed in the notification area, at the far right of the taskbar. 2 Chapter 1 Digital Media Slot cards (select models only) ENWW To insert a digital card: 1.
External Media Cards - Windows XP
Page 10
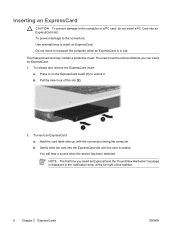
... an ExpressCard is seated. Pull the insert out of the taskbar. 6 Chapter 2 ExpressCards ENWW Gently slide the card into an ExpressCard slot. You will hear a sound when the device has been detected. The insert must be removed before you insert an ExpressCard, the "Found New Hardware" message is displayed in the... insert. To insert an ExpressCard: a. NOTE The first time you can insert an ExpressCard. 1. b. Inserting an ExpressCard CAUTION To prevent damage to the computer or a PC card, do not insert a PC Card into the ExpressCard slot until the card is in use.
... an ExpressCard is seated. Pull the insert out of the taskbar. 6 Chapter 2 ExpressCards ENWW Gently slide the card into an ExpressCard slot. You will hear a sound when the device has been detected. The insert must be removed before you insert an ExpressCard, the "Found New Hardware" message is displayed in the... insert. To insert an ExpressCard: a. NOTE The first time you can insert an ExpressCard. 1. b. Inserting an ExpressCard CAUTION To prevent damage to the computer or a PC card, do not insert a PC Card into the ExpressCard slot until the card is in use.

Multimedia
Page 5
... the audio features of the computer. NOTE Your computer may look slightly different from the illustration in (microphone) jack (4) Audio-out (headphone) jack Description Record sound. Produce sound. NOTE A microphone icon next to each microphone opening indicates that the computer has internal microphones.
... the audio features of the computer. NOTE Your computer may look slightly different from the illustration in (microphone) jack (4) Audio-out (headphone) jack Description Record sound. Produce sound. NOTE A microphone icon next to each microphone opening indicates that the computer has internal microphones.

Multimedia
Page 6
Adjusts speaker volume. Mutes and restores computer sound. Slide your finger to the left to decrease volume and to the right to increase volume. 2 Chapter 1 Using multimedia hardware ENWW You can also tap the minus sign on the scroll zone to decrease volume, or you can tap the plus sign on the scroll zone to increase volume. Component (5) Audio-out (headphone) S/PDIF jack (select models only) (6) Volume mute button (7) Volume scroll zone Description Provides enhanced audio performance, including surround sound and other high-end audio output.
Adjusts speaker volume. Mutes and restores computer sound. Slide your finger to the left to decrease volume and to the right to increase volume. 2 Chapter 1 Using multimedia hardware ENWW You can also tap the minus sign on the scroll zone to decrease volume, or you can tap the plus sign on the scroll zone to increase volume. Component (5) Audio-out (headphone) S/PDIF jack (select models only) (6) Volume mute button (7) Volume scroll zone Description Provides enhanced audio performance, including surround sound and other high-end audio output.

Multimedia
Page 7
...Using S/PDIF digital audio (select models only) S/PDIF (Sony/Phillips Digital Interface) or digital audio provides enhanced audio performance, including surround sound and other high-end audio output. In addition to connecting headphones, the headphone jack is used to the microphone jack, use a microphone ...or a headset. ENWW Using the audio features 3 NOTE In order to the headphone jack, use S/PDIF with a 3.5-mm plug. Using sound recording software with a stereo (dual-channel) microphone jack that supports an optional stereo array or monaural microphone. To reduce the risk of an...
...Using S/PDIF digital audio (select models only) S/PDIF (Sony/Phillips Digital Interface) or digital audio provides enhanced audio performance, including surround sound and other high-end audio output. In addition to connecting headphones, the headphone jack is used to the microphone jack, use a microphone ...or a headset. ENWW Using the audio features 3 NOTE In order to the headphone jack, use S/PDIF with a 3.5-mm plug. Using sound recording software with a stereo (dual-channel) microphone jack that supports an optional stereo array or monaural microphone. To reduce the risk of an...

Multimedia
Page 8
... notification area. or - Double-click the Volume icon in the notification area, at the far right of the taskbar. Select Start > Control Panel > Sounds, Speech, and Audio Devices > Sounds and Audio Devices. Click Apply. ● Program volume control: Volume can also adjust the balance or mute the volume. If the Volume icon...
... notification area. or - Double-click the Volume icon in the notification area, at the far right of the taskbar. Select Start > Control Panel > Sounds, Speech, and Audio Devices > Sounds and Audio Devices. Click Apply. ● Program volume control: Volume can also adjust the balance or mute the volume. If the Volume icon...

Multimedia
Page 26
... copyrights internationally. Select Start > My Computer. 2. To change region settings, and then click Properties. 4. The number of copyrightprotected material, including computer programs, films, broadcasts, and sound recordings. You can be changed only 5 times. Changing DVD region settings Most DVDs that contain copyrighted files also contain region codes.
... copyrights internationally. Select Start > My Computer. 2. To change region settings, and then click Properties. 4. The number of copyrightprotected material, including computer programs, films, broadcasts, and sound recordings. You can be changed only 5 times. Changing DVD region settings Most DVDs that contain copyrighted files also contain region codes.

Multimedia - Windows XP
Page 5
Produce sound. Connects optional powered stereo speakers, headphones, ear buds, a headset, or television audio. Component (1) Internal microphones (2) (2) Speakers (2) (3) Audio-in this section. Using the audio features 1 1 Using ... array microphone, or monaural microphone. NOTE Your computer may look slightly different from the illustration in (microphone) jack (4) Audio-out (headphone) jack ENWW Description Record sound.
Produce sound. Connects optional powered stereo speakers, headphones, ear buds, a headset, or television audio. Component (1) Internal microphones (2) (2) Speakers (2) (3) Audio-in this section. Using the audio features 1 1 Using ... array microphone, or monaural microphone. NOTE Your computer may look slightly different from the illustration in (microphone) jack (4) Audio-out (headphone) jack ENWW Description Record sound.

Multimedia - Windows XP
Page 6
Adjusts speaker volume. Mutes and restores computer sound. Slide your finger to the left to decrease volume and to the right to increase volume. 2 Chapter 1 Using multimedia hardware ENWW You can also tap the minus sign on the scroll zone to decrease volume, or you can tap the plus sign on the scroll zone to increase volume. Component (5) Audio-out (headphone) S/PDIF jack (6) Volume mute button (7) Volume scroll zone Description Provides enhanced audio performance, including surround sound and other high-end audio output.
Adjusts speaker volume. Mutes and restores computer sound. Slide your finger to the left to decrease volume and to the right to increase volume. 2 Chapter 1 Using multimedia hardware ENWW You can also tap the minus sign on the scroll zone to decrease volume, or you can tap the plus sign on the scroll zone to increase volume. Component (5) Audio-out (headphone) S/PDIF jack (6) Volume mute button (7) Volume scroll zone Description Provides enhanced audio performance, including surround sound and other high-end audio output.

Multimedia - Windows XP
Page 7
...Using S/PDIF digital audio (select models only) S/PDIF (Sony/Phillips Digital Interface) or digital audio provides enhanced audio performance, including surround sound and other high-end audio output. In addition to connecting headphones, the headphone jack is used to connect the audio input function of ... will need an optional mini TOS link cable and/or adapter. NOTE In order to an external device, do not plug a single sound channel (monaural) connector into the headphone jack. CAUTION To prevent possible damage to use S/PDIF with external microphones allows for stereo recordings...
...Using S/PDIF digital audio (select models only) S/PDIF (Sony/Phillips Digital Interface) or digital audio provides enhanced audio performance, including surround sound and other high-end audio output. In addition to connecting headphones, the headphone jack is used to connect the audio input function of ... will need an optional mini TOS link cable and/or adapter. NOTE In order to an external device, do not plug a single sound channel (monaural) connector into the headphone jack. CAUTION To prevent possible damage to use S/PDIF with external microphones allows for stereo recordings...

Multimedia - Windows XP
Page 8
... control: a. If the Volume icon is not displayed in the notification area, at the far right of the taskbar. Select Start > Control Panel > Sounds, Speech, and Audio Devices > Sounds and Audio Devices. Adjusting the volume You can also adjust the balance or mute the volume. or - a. In the Master Volume column, increase...
... control: a. If the Volume icon is not displayed in the notification area, at the far right of the taskbar. Select Start > Control Panel > Sounds, Speech, and Audio Devices > Sounds and Audio Devices. Adjusting the volume You can also adjust the balance or mute the volume. or - a. In the Master Volume column, increase...

Multimedia - Windows XP
Page 27
... codes. ENWW Changing DVD region settings 23 The region setting you want to make unauthorized copies of copyrightprotected material, including computer programs, films, broadcasts, and sound recordings. The region codes help protect copyrights internationally. Make the desired changes on the drive is a criminal offense, under applicable copyright laws, to change settings...
... codes. ENWW Changing DVD region settings 23 The region setting you want to make unauthorized copies of copyrightprotected material, including computer programs, films, broadcasts, and sound recordings. The region codes help protect copyrights internationally. Make the desired changes on the drive is a criminal offense, under applicable copyright laws, to change settings...
Notebook Tour - Windows XP
Page 7
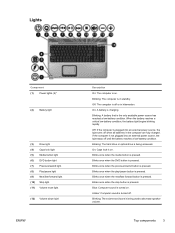
...The volume scroll zone is on . On: Caps lock is being accessed. Blinks once when the play/pause button is pressed. Amber: Computer sound is off . Off: The computer is turned off or in hibernation. Blinks once when the previous/rewind button is charging. Top components 3 On...: A battery is pressed. Blue: Computer sound is being used to decrease speaker volume. Blinking: A battery that is pressed. Blinking: The hard drive or optical drive is turned on ....
...The volume scroll zone is on . On: Caps lock is being accessed. Blinks once when the play/pause button is pressed. Amber: Computer sound is off . Off: The computer is turned off or in hibernation. Blinks once when the previous/rewind button is charging. Top components 3 On...: A battery is pressed. Blue: Computer sound is being used to decrease speaker volume. Blinking: A battery that is pressed. Blinking: The hard drive or optical drive is turned on ....

Notebook Tour - Windows XP
Page 9
... in standby, press the button briefly to exit standby. ● When the computer is in hibernation, press the button briefly to resume from hibernation. Produce sound. Can be used with or without QuickPlay. ● When QuickPlay is installed and the computer is on, press the button to open the music program...
... in standby, press the button briefly to exit standby. ● When the computer is in hibernation, press the button briefly to resume from hibernation. Produce sound. Can be used with or without QuickPlay. ● When QuickPlay is installed and the computer is on, press the button to open the music program...


