
HP Pavilion Entertainment PC - Quick Reference Guide
Page 12
...❏ Digital Subscriber Line (DSL) ❏ Satellite ❏ Other services For broadband access, additional hardware and/or software must be provided by HP, or a compatible AC adapter or battery purchased as broadband, wireless, or dial-up, and connecting to the Regulatory, Safety and Environmental Notices located in Help and Support. To access...-001.book Page 4 Wednesday, February 14, 2007 9:21 AM Next steps Å WARNING: To reduce potential safety issues, use only the AC adapter or battery provided with the computer, a replacement AC adapter or battery provided by your location.
...❏ Digital Subscriber Line (DSL) ❏ Satellite ❏ Other services For broadband access, additional hardware and/or software must be provided by HP, or a compatible AC adapter or battery purchased as broadband, wireless, or dial-up, and connecting to the Regulatory, Safety and Environmental Notices located in Help and Support. To access...-001.book Page 4 Wednesday, February 14, 2007 9:21 AM Next steps Å WARNING: To reduce potential safety issues, use only the AC adapter or battery provided with the computer, a replacement AC adapter or battery provided by your location.
HP Pavilion Entertainment PC - Quick Reference Guide
Page 18
.... The computer screen is blank If you determine the reason the computer screen is blinking, the battery has reached a low battery level, which may need to be replaced. ❏ If the battery light on the front of the computer is blank. ■ To exit Sleep or Hibernation, briefly press the power... button. To change these suggestions: ❏ Remove the primary battery and plug the computer into an AC outlet using the AC...
.... The computer screen is blank If you determine the reason the computer screen is blinking, the battery has reached a low battery level, which may need to be replaced. ❏ If the battery light on the front of the computer is blank. ■ To exit Sleep or Hibernation, briefly press the power... button. To change these suggestions: ❏ Remove the primary battery and plug the computer into an AC outlet using the AC...
HP Pavilion Entertainment PC - Quick Reference Guide
Page 27
... before you can go to the next step. 3. The software examines the image and displays the number of recovery discs, follow the on battery power, you are operating the computer on -screen instructions. 441259-001.book Page 5 Wednesday, February 14, 2007 9:21 AM Backup and ... Recovery Manager tool allows you to use, and then click Next. Select Recovery disc creation, and then click Next. 4. The Recovery Manager tool replaces corrupted system files and reinstalls deleted system files within the program. Select Start > All Programs > Recovery Manager > Recovery Manager. To create a ...
... before you can go to the next step. 3. The software examines the image and displays the number of recovery discs, follow the on battery power, you are operating the computer on -screen instructions. 441259-001.book Page 5 Wednesday, February 14, 2007 9:21 AM Backup and ... Recovery Manager tool allows you to use, and then click Next. Select Recovery disc creation, and then click Next. 4. The Recovery Manager tool replaces corrupted system files and reinstalls deleted system files within the program. Select Start > All Programs > Recovery Manager > Recovery Manager. To create a ...
HP Pavilion dv6000 Notebook PC Maintenance and Service Guide
Page 6
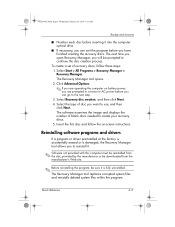
Contents 5 Removal and Replacement Procedures 5.1 Serial Number 5-2 5.2 Disassembly Sequence Chart 5-3 5.3 Preparing the Computer For Disassembly 5-5 5.4 Hard Drive 5-7 5.5 Computer Feet 5-11 5.6 Memory Module 5-12 5.7 RTC Battery 5-15 5.8 Mini Card Module 5-16 5.9 Optical Drive 5-21 5.10 Switch Cover 5-23 5.11 Keyboard 5-26 5.12 Speaker Assembly 5-30 5.13 Power Button Board 5-31 5.14 ...
Contents 5 Removal and Replacement Procedures 5.1 Serial Number 5-2 5.2 Disassembly Sequence Chart 5-3 5.3 Preparing the Computer For Disassembly 5-5 5.4 Hard Drive 5-7 5.5 Computer Feet 5-11 5.6 Memory Module 5-12 5.7 RTC Battery 5-15 5.8 Mini Card Module 5-16 5.9 Optical Drive 5-21 5.10 Switch Cover 5-23 5.11 Keyboard 5-26 5.12 Speaker Assembly 5-30 5.13 Power Button Board 5-31 5.14 ...

HP Pavilion dv6000 Notebook PC Maintenance and Service Guide
Page 11
...settings have been cleared. 1-4 Maintenance and Service Guide Remove the real-time clock (RTC) battery (refer to the computer. These steps also clear CMOS: 1. Replace the RTC battery and reassemble the computer. 5. Prepare the computer for disassembly (refer to clear the password. ...Do not reinsert any batteries at this time. 6. Product Description ❏ RJ-11 (modem) ❏ RJ-45 (network...
...settings have been cleared. 1-4 Maintenance and Service Guide Remove the real-time clock (RTC) battery (refer to the computer. These steps also clear CMOS: 1. Replace the RTC battery and reassemble the computer. 5. Prepare the computer for disassembly (refer to clear the password. ...Do not reinsert any batteries at this time. 6. Product Description ❏ RJ-11 (modem) ❏ RJ-45 (network...

HP Pavilion dv6000 Notebook PC Maintenance and Service Guide
Page 28
These conditions are affected by a temperature sensor and is designed to identify replacement parts, and Chapter 5, "Removal and Replacement Procedures," for ventilation. Maintenance and Service Guide 1-21 The fan is displaced through the ventilation grill ...of key parts and features of the computer. Exhaust air is controlled by high external temperatures, system power consumption, power management/battery conservation configurations, battery fast charging, and software. Refer to Chapter 3, "Illustrated Parts Catalog," to turn on automatically when high temperature conditions exist....
These conditions are affected by a temperature sensor and is designed to identify replacement parts, and Chapter 5, "Removal and Replacement Procedures," for ventilation. Maintenance and Service Guide 1-21 The fan is displaced through the ventilation grill ...of key parts and features of the computer. Exhaust air is controlled by high external temperatures, system power consumption, power management/battery conservation configurations, battery fast charging, and software. Refer to Chapter 3, "Illustrated Parts Catalog," to turn on automatically when high temperature conditions exist....

HP Pavilion dv6000 Notebook PC Maintenance and Service Guide
Page 47
N Power on ? Done Maintenance and Service Guide 2-19 Y Power on ? Y Replace power supply (if applicable). N Done Power on? Y Go to another computer, or replacing it. Done N Check battery by recharging it, moving it to "Flowchart 2.4-No Power, Part 3." Visually check for debris in battery socket and clean if necessary. Troubleshooting Flowchart 2.3-No Power, Part 2 Continued from "Flowchart 2.2-No Power, Part 1."
N Power on ? Done Maintenance and Service Guide 2-19 Y Power on ? Y Replace power supply (if applicable). N Done Power on? Y Go to another computer, or replacing it. Done N Check battery by recharging it, moving it to "Flowchart 2.4-No Power, Part 3." Visually check for debris in battery socket and clean if necessary. Troubleshooting Flowchart 2.3-No Power, Part 2 Continued from "Flowchart 2.2-No Power, Part 1."

HP Pavilion dv6000 Notebook PC Maintenance and Service Guide
Page 119
...Guide 5-3 Section 5.3 5.4 5.5 5.6 5.7 5.8 5.9 5.10 5.11 Disassembly Sequence Chart Description # of Screws Removed Preparing the Computer For Disassembly Battery 0 Hard Drive 2 loosened to remove the hard drive cover 6 removed to disassemble the hard drive Computer Feet 0 Memory Module 2 loosened to... be referenced when removing computer components. Removal and Replacement Procedures 5.2 Disassembly Sequence Chart Use the chart below to determine the section number to remove the memory module compartment cover RTC Battery 0 Mini Card Module 2 Ä To prevent an ...
...Guide 5-3 Section 5.3 5.4 5.5 5.6 5.7 5.8 5.9 5.10 5.11 Disassembly Sequence Chart Description # of Screws Removed Preparing the Computer For Disassembly Battery 0 Hard Drive 2 loosened to remove the hard drive cover 6 removed to disassemble the hard drive Computer Feet 0 Memory Module 2 loosened to... be referenced when removing computer components. Removal and Replacement Procedures 5.2 Disassembly Sequence Chart Use the chart below to determine the section number to remove the memory module compartment cover RTC Battery 0 Mini Card Module 2 Ä To prevent an ...
HP Pavilion dv6000 Notebook PC Maintenance and Service Guide
Page 121
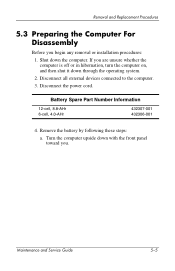
..., 8.8-AHr 6-cell, 4.0-AHr 432307-001 432306-001 4. Disconnect the power cord. Remove the battery by following these steps: a. Turn the computer upside down with the front panel toward you begin any removal or installation procedures: 1. Removal and Replacement Procedures 5.3 Preparing the Computer For Disassembly Before you . If you are unsure whether the...
..., 8.8-AHr 6-cell, 4.0-AHr 432307-001 432306-001 4. Disconnect the power cord. Remove the battery by following these steps: a. Turn the computer upside down with the front panel toward you begin any removal or installation procedures: 1. Removal and Replacement Procedures 5.3 Preparing the Computer For Disassembly Before you . If you are unsure whether the...
HP Pavilion dv6000 Notebook PC Maintenance and Service Guide
Page 122
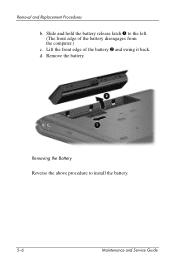
Slide and hold the battery release latch 1 to install the battery. 5-6 Maintenance and Service Guide d. Remove the battery. Removing the Battery Reverse the above procedure to the left. (The front edge of the battery 2 and swing it back. Removal and Replacement Procedures b. Lift the front edge of the battery disengages from the computer.) c.
Slide and hold the battery release latch 1 to install the battery. 5-6 Maintenance and Service Guide d. Remove the battery. Removing the Battery Reverse the above procedure to the left. (The front edge of the battery 2 and swing it back. Removal and Replacement Procedures b. Lift the front edge of the battery disengages from the computer.) c.

HP Pavilion dv6000 Notebook PC Maintenance and Service Guide
Page 131
... memory module compartment cover (Section 5.6). 3. Disconnect the RTC battery cable 1 from the system board. 4. Removal and Replacement Procedures 5.7 RTC Battery RTC Battery Spare Part Number Information RTC battery (includes 2-sided tape) 431436-001 1. Prepare the computer for disassembly (refer to install the RTC battery. Removing the RTC Battery Reverse the above procedure to Section 5.3). 2. Maintenance and Service...
... memory module compartment cover (Section 5.6). 3. Disconnect the RTC battery cable 1 from the system board. 4. Removal and Replacement Procedures 5.7 RTC Battery RTC Battery Spare Part Number Information RTC battery (includes 2-sided tape) 431436-001 1. Prepare the computer for disassembly (refer to install the RTC battery. Removing the RTC Battery Reverse the above procedure to Section 5.3). 2. Maintenance and Service...
HP Pavilion dv6000 Notebook PC Maintenance and Service Guide
Page 177
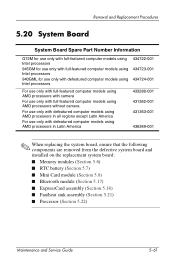
Removal and Replacement Procedures 5.20 System Board System Board Spare Part Number Information G72M for use only with full-featured computer models using Intel processors 945GM for use ... system board, ensure that the following components are removed from the defective system board and installed on the replacement system board: ■ Memory modules (Section 5.6) ■ RTC battery (Section 5.7) ■ Mini Card module (Section 5.8) ■ Bluetooth module (Section 5.17) ■ ExpressCard assembly (Section 5.18) ■ Fan/heat sink assembly (Section 5.21) ■...
Removal and Replacement Procedures 5.20 System Board System Board Spare Part Number Information G72M for use only with full-featured computer models using Intel processors 945GM for use ... system board, ensure that the following components are removed from the defective system board and installed on the replacement system board: ■ Memory modules (Section 5.6) ■ RTC battery (Section 5.7) ■ Mini Card module (Section 5.8) ■ Bluetooth module (Section 5.17) ■ ExpressCard assembly (Section 5.18) ■ Fan/heat sink assembly (Section 5.21) ■...

HP Pavilion dv6000 Notebook PC Maintenance and Service Guide
Page 242
...your computer, the reinstallation process does not affect your personal settings. Click Recovery disc creation, and then click Next. 4. Recovery Manager replaces corrupted system files and reinstalls deleted system files within the program. ■ In most cases, if the program you can exit ...will be prompted to AC power before you are operating the computer on -screen instructions. Maintenance and Service Guide C-5 Follow the on battery power, you will be prompted to connect to continue the disc creation process. Click Advanced Options. ✎ If you are reinstalling...
...your computer, the reinstallation process does not affect your personal settings. Click Recovery disc creation, and then click Next. 4. Recovery Manager replaces corrupted system files and reinstalls deleted system files within the program. ■ In most cases, if the program you can exit ...will be prompted to AC power before you are operating the computer on -screen instructions. Maintenance and Service Guide C-5 Follow the on battery power, you will be prompted to connect to continue the disc creation process. Click Advanced Options. ✎ If you are reinstalling...
HP Pavilion dv6000 Notebook PC Maintenance and Service Guide
Page 276
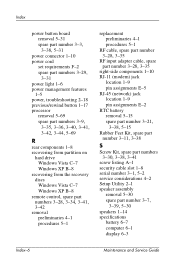
...from the recovery discs Windows Vista C-7 Windows XP B-8 remote control, spare part numbers 3-28, 3-34, 3-41, 3-42 removal preliminaries 4-1 procedures 5-1 replacement preliminaries 4-1 procedures 5-1 RF cable, spare part number 3-28, 3-35 RF input adapter cable, spare part number 3-28, 3-35 right-side components 1-10... RJ-11 (modem) jack location 1-9 pin assignments E-5 RJ-45 (network) jack location 1-9 pin assignments E-2 RTC battery removal 5-15 spare part number 3-21, 3-38, 5-15 Rubber Feet Kit, spare part number 3-11, 3-38 S Screw Kit, spare part numbers ...
...from the recovery discs Windows Vista C-7 Windows XP B-8 remote control, spare part numbers 3-28, 3-34, 3-41, 3-42 removal preliminaries 4-1 procedures 5-1 replacement preliminaries 4-1 procedures 5-1 RF cable, spare part number 3-28, 3-35 RF input adapter cable, spare part number 3-28, 3-35 right-side components 1-10... RJ-11 (modem) jack location 1-9 pin assignments E-5 RJ-45 (network) jack location 1-9 pin assignments E-2 RTC battery removal 5-15 spare part number 3-21, 3-38, 5-15 Rubber Feet Kit, spare part number 3-11, 3-38 S Screw Kit, spare part numbers ...
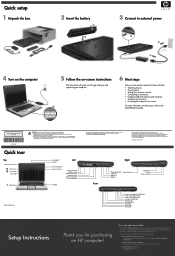
Setup Instructions
Page 2
...User Guides. Security support for your computer Learn how to Help and Support today! Replace this box with PI statement as constituting an additional warranty. Quick tour Top Internal microphones...: Product information and user guides Learn more safety and regulatory information, and for battery disposal information, refer to the Regulatory, Safety and Environmental Notices located in the ...Diagnostic tools (English only) •System Health Check •PC Tune Up Do not disable the power cord grounding pin, for HP products and services are set forth in Help and Support....
...User Guides. Security support for your computer Learn how to Help and Support today! Replace this box with PI statement as constituting an additional warranty. Quick tour Top Internal microphones...: Product information and user guides Learn more safety and regulatory information, and for battery disposal information, refer to the Regulatory, Safety and Environmental Notices located in the ...Diagnostic tools (English only) •System Health Check •PC Tune Up Do not disable the power cord grounding pin, for HP products and services are set forth in Help and Support....
Drives - Windows XP
Page 9
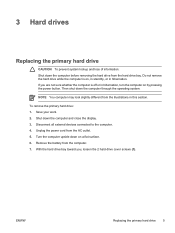
3 Hard drives Replacing the primary hard drive CAUTION To prevent system lockup and loss of information: Shut down the computer through the operating system. Unplug the power cord .... Save your work. 2. Turn the computer upside down the computer and close the display. 3. To remove the primary hard drive: 1. Remove the battery from the AC outlet. 5. ENWW Replacing the primary hard drive 5 Shut down on , in standby, or in this section. With the hard drive bay toward you are not sure...
3 Hard drives Replacing the primary hard drive CAUTION To prevent system lockup and loss of information: Shut down the computer through the operating system. Unplug the power cord .... Save your work. 2. Turn the computer upside down the computer and close the display. 3. To remove the primary hard drive: 1. Remove the battery from the AC outlet. 5. ENWW Replacing the primary hard drive 5 Shut down on , in standby, or in this section. With the hard drive bay toward you are not sure...
Memory Modules - Windows XP
Page 5
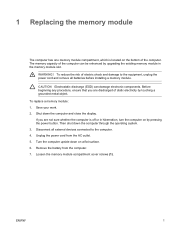
... flat surface. 6. Before beginning any procedure, ensure that you are discharged of the computer can damage electronic components. ENWW 1 To replace a memory module: 1. To reduce the risk of the computer. Shut down the computer through the operating system. 3. Turn the computer...unplug the power cord and remove all external devices connected to the computer. 4. Remove the battery from the AC outlet. 5. Disconnect all batteries before installing a memory module. 1 Replacing the memory module The computer has one memory module compartment, which is off or in ...
... flat surface. 6. Before beginning any procedure, ensure that you are discharged of the computer can damage electronic components. ENWW 1 To replace a memory module: 1. To reduce the risk of the computer. Shut down the computer through the operating system. 3. Turn the computer...unplug the power cord and remove all external devices connected to the computer. 4. Remove the battery from the AC outlet. 5. Disconnect all batteries before installing a memory module. 1 Replacing the memory module The computer has one memory module compartment, which is off or in ...

Memory Modules - Windows XP
Page 8
13. Reconnect external power and external devices. 16. Turn on the computer. 4 Chapter 1 Replacing the memory module ENWW Replace the battery. 15. Tighten the memory module compartment cover screws (3). 14.
13. Reconnect external power and external devices. 16. Turn on the computer. 4 Chapter 1 Replacing the memory module ENWW Replace the battery. 15. Tighten the memory module compartment cover screws (3). 14.
Power
Page 31
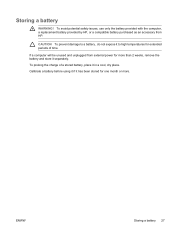
To avoid potential safety issues, use only the battery provided with the computer, a replacement battery provided by HP, or a compatible battery purchased as an accessory from external power for more . If a computer will be unused and unplugged from HP. To prolong the charge of time. ENWW Storing a battery 27 CAUTION To prevent damage to high temperatures for one...
To avoid potential safety issues, use only the battery provided with the computer, a replacement battery provided by HP, or a compatible battery purchased as an accessory from external power for more . If a computer will be unused and unplugged from HP. To prolong the charge of time. ENWW Storing a battery 27 CAUTION To prevent damage to high temperatures for one...
Power
Page 32
Disposing of a battery in fire or water. short the external contacts on a battery; or dispose of a used battery WARNING! Refer to temperatures above 60˚C (140˚F). To reduce the risk of fire or burns, do not disassemble, crush, or puncture a battery; Replace the battery only with a battery approved for battery disposal information. 28 Chapter 7 Batteries ENWW Do not expose a battery to the Regulatory, Safety, and Environmental Notices for this computer.
Disposing of a battery in fire or water. short the external contacts on a battery; or dispose of a used battery WARNING! Refer to temperatures above 60˚C (140˚F). To reduce the risk of fire or burns, do not disassemble, crush, or puncture a battery; Replace the battery only with a battery approved for battery disposal information. 28 Chapter 7 Batteries ENWW Do not expose a battery to the Regulatory, Safety, and Environmental Notices for this computer.


