
HP USB Digital Drive
Page 9
Select the Digital Drive and wait until the "Safe to remove the Digital Drive when the status light on your screen. 3. Gently unplug the Digital Drive from the USB port. ✎ If the USB connector cable is flashing. 1. A dialog box displays a list of connected devices. 2. Select the "Safely Remove Hardware" icon on the Digital Drive is in the extended position, return it on your taskbar. Disconnecting the Digital Drive ✎ Do not attempt to Remove Hardware" message appears on its track for safe storage. 8 User Guide
Select the Digital Drive and wait until the "Safe to remove the Digital Drive when the status light on your screen. 3. Gently unplug the Digital Drive from the USB port. ✎ If the USB connector cable is flashing. 1. A dialog box displays a list of connected devices. 2. Select the "Safely Remove Hardware" icon on the Digital Drive is in the extended position, return it on your taskbar. Disconnecting the Digital Drive ✎ Do not attempt to Remove Hardware" message appears on its track for safe storage. 8 User Guide
Backup and Recovery - Windows 7
Page 6
...drive (purchased separately) to create recovery discs, or you can exit the program before you have a much higher capacity than CDs. Follow the on-screen instructions. 2 Chapter 2 Creating recovery discs NOTE: If your computer does not include an internal optical drive, you can use CDs, up the ...computer for your computer from the HP Web site. All these discs carefully and keep them in a safe place. Select Start > All Programs > Recovery Manager > Recovery Disc Creation. 2....
...drive (purchased separately) to create recovery discs, or you can exit the program before you have a much higher capacity than CDs. Follow the on-screen instructions. 2 Chapter 2 Creating recovery discs NOTE: If your computer does not include an internal optical drive, you can use CDs, up the ...computer for your computer from the HP Web site. All these discs carefully and keep them in a safe place. Select Start > All Programs > Recovery Manager > Recovery Disc Creation. 2....
Backup and Recovery - Windows 7
Page 7
... on a regular basis to maintain a reasonably current backup. To copy the screen and paste it into a word-processing document, follow these steps: 1. Display the screen. 2. Open a word-processing document, and then select Edit > Paste. 4. The screen shot can back up your information to an optional external hard drive, a ...required. ● When backing up your system on the type of optical drive installed in a window, toolbar, or menu bar by taking a screen shot of your settings. 3 Backing up your information As you add new software and data files, you should back up to discs, number ...
... on a regular basis to maintain a reasonably current backup. To copy the screen and paste it into a word-processing document, follow these steps: 1. Display the screen. 2. Open a word-processing document, and then select Edit > Paste. 4. The screen shot can back up your information to an optional external hard drive, a ...required. ● When backing up your system on the type of optical drive installed in a window, toolbar, or menu bar by taking a screen shot of your settings. 3 Backing up your information As you add new software and data files, you should back up to discs, number ...
Backup and Recovery - Windows 7
Page 8
... may be prompted for your permission or password for more information. 4 Chapter 3 Backing up and create a backup. You may take over an hour, depending on -screen instructions to AC power before you start the backup process.
... may be prompted for your permission or password for more information. 4 Chapter 3 Backing up and create a backup. You may take over an hour, depending on -screen instructions to AC power before you start the backup process.
Backup and Recovery - Windows 7
Page 9
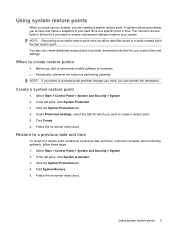
.... 2. Select Start > Control Panel > System and Security > System. 2. Click System Restore. 5. Click the System Protection tab. 4. Follow the on -screen instructions. Using system restore points 5 You can then recover back to that point if you want to a restore point (created at a specific point in time... files and settings. Under Protection Settings, select the disk for your mind, you are creating a system restore point. Follow the on -screen instructions. Restore to a previous date and time To revert to create a restore point. 5. NOTE: Recovering to an earlier restore point...
.... 2. Select Start > Control Panel > System and Security > System. 2. Click System Restore. 5. Click the System Protection tab. 4. Follow the on -screen instructions. Using system restore points 5 You can then recover back to that point if you want to a restore point (created at a specific point in time... files and settings. Under Protection Settings, select the disk for your mind, you are creating a system restore point. Follow the on -screen instructions. Restore to a previous date and time To revert to create a restore point. 5. NOTE: Recovering to an earlier restore point...
Backup and Recovery - Windows 7
Page 10
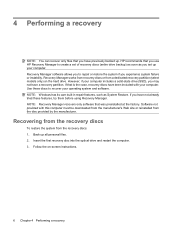
... recovers only software that you set of recovery discs (entire drive backup) as soon as System Restore. Software not provided with your computer. HP recommends that was preinstalled at the factory. Recovery Manager software allows you to create a set up your computer. NOTE: Windows has its own... built-in repair features, such as you use HP Recovery Manager to repair or restore the system if you may not have a recovery partition. Recovery Manager works from recovery discs or from a ...
... recovers only software that you set of recovery discs (entire drive backup) as soon as System Restore. Software not provided with your computer. HP recommends that was preinstalled at the factory. Recovery Manager software allows you to create a set up your computer. NOTE: Windows has its own... built-in repair features, such as you use HP Recovery Manager to repair or restore the system if you may not have a recovery partition. Recovery Manager works from recovery discs or from a ...
Backup and Recovery - Windows 7
Page 11
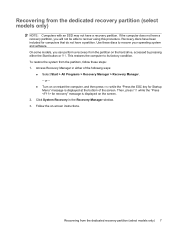
...; Select Start > All Programs > Recovery Manager > Recovery Manager. - Follow the on the hard drive, accessed by pressing either of the screen. On some models, you will not be able to recover using this procedure. This restores the computer to its factory condition. If the computer... does not have a partition. Access Recovery Manager in the Recovery Manager window. 3. Recovering from the partition on -screen instructions. Click System Recovery in either the Start button or f11. Use these steps: 1. Recovering from the partition, follow these discs to...
...; Select Start > All Programs > Recovery Manager > Recovery Manager. - Follow the on the hard drive, accessed by pressing either of the screen. On some models, you will not be able to recover using this procedure. This restores the computer to its factory condition. If the computer... does not have a partition. Access Recovery Manager in the Recovery Manager window. 3. Recovering from the partition on -screen instructions. Click System Recovery in either the Start button or f11. Use these steps: 1. Recovering from the partition, follow these discs to...
Drives - Windows 7
Page 5
... a drive to liquids. Security devices with , shipping, or storing a drive. The write process is connected to an external hard drive, initiate Sleep and allow the screen to temperature or humidity extremes. Avoid exposing a drive to clear, or properly disconnect the external hard drive. When the battery is the only source of...
... a drive to liquids. Security devices with , shipping, or storing a drive. The write process is connected to an external hard drive, initiate Sleep and allow the screen to temperature or humidity extremes. Avoid exposing a drive to clear, or properly disconnect the external hard drive. When the battery is the only source of...

Drives - Windows 7
Page 15
Click Copy at the bottom right of the screen. 4. Copying a CD or DVD 11 When prompted, remove the source disc from the optical drive and insert a blank disc into the optical drive. 3. After the information is copied, the disc you want to copy into the drive. Insert the disc you created ejects automatically. Select Start > All Programs > CyberLink DVD Suites > Power2Go. 2. Copying a CD or DVD 1.
Click Copy at the bottom right of the screen. 4. Copying a CD or DVD 11 When prompted, remove the source disc from the optical drive and insert a blank disc into the optical drive. 3. After the information is copied, the disc you want to copy into the drive. Insert the disc you created ejects automatically. Select Start > All Programs > CyberLink DVD Suites > Power2Go. 2. Copying a CD or DVD 1.

Drives - Windows 7
Page 23
Follow the on-screen instructions. Using Disk Cleanup 19 To run more efficiently. Select Start > All Programs > Accessories > System Tools > Disk Cleanup. 2. Using Disk Cleanup Disk Cleanup searches the hard drive for unnecessary files that you can safely delete to free up disk space and help the computer to run Disk Cleanup: 1.
Follow the on-screen instructions. Using Disk Cleanup 19 To run more efficiently. Select Start > All Programs > Accessories > System Tools > Disk Cleanup. 2. Using Disk Cleanup Disk Cleanup searches the hard drive for unnecessary files that you can safely delete to free up disk space and help the computer to run Disk Cleanup: 1.
Drives - Windows 7
Page 30
Wipe from the center of the computer desktop, and select Screen resolution. 2. Right-click on a blank area of the disc to the outer edge. ● Check the disc for scratches. Because the human eye cannot easily ...
Wipe from the center of the computer desktop, and select Screen resolution. 2. Right-click on a blank area of the disc to the outer edge. ● Check the disc for scratches. Because the human eye cannot easily ...
Drives - Windows 7
Page 34
... system for installed hardware and installs default drivers for any other Microsoft products. Follow the on -screen instructions. 30 Chapter 6 Troubleshooting Press enter, and then follow the on -screen instructions. Right-click the device listing and click Uninstall. In Device Manager, click the arrow next...drivers To use Windows Update: 1. Reopen Device Manager, if necessary, and then verify that you may need to obtain HP device drivers: 1. Obtaining Windows device drivers You can check for updates. 3. Open your Internet browser, go to restart ...
... system for installed hardware and installs default drivers for any other Microsoft products. Follow the on -screen instructions. 30 Chapter 6 Troubleshooting Press enter, and then follow the on -screen instructions. Right-click the device listing and click Uninstall. In Device Manager, click the arrow next...drivers To use Windows Update: 1. Reopen Device Manager, if necessary, and then verify that you may need to obtain HP device drivers: 1. Obtaining Windows device drivers You can check for updates. 3. Open your Internet browser, go to restart ...
Notebook Tour - Windows 7
Page 9
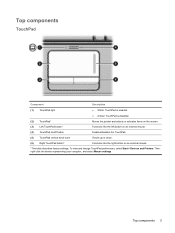
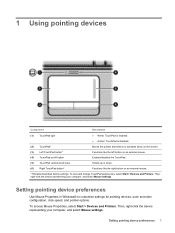
... Component Description (1) TouchPad light ● White: TouchPad is enabled. ● Amber: TouchPad is disabled. (2) TouchPad* Moves the pointer and selects or activates items on the screen. (3) Left TouchPad button* Functions like the left button on an external mouse. (4) TouchPad on/off button Enables/disables the TouchPad. (5) TouchPad vertical scroll zone Scrolls...
... Component Description (1) TouchPad light ● White: TouchPad is enabled. ● Amber: TouchPad is disabled. (2) TouchPad* Moves the pointer and selects or activates items on the screen. (3) Left TouchPad button* Functions like the left button on an external mouse. (4) TouchPad on/off button Enables/disables the TouchPad. (5) TouchPad vertical scroll zone Scrolls...
Notebook Tour - Windows 7
Page 18
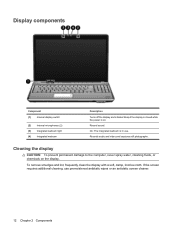
...and captures still photographs. To remove smudges and lint, frequently clean the display with a soft, damp, lint-free cloth. If the screen requires additional cleaning, use . Display components Component (1) Internal display switch (2) Internal microphones (2) (3) Integrated webcam light (4) Integrated webcam Description ...the display and initiates Sleep if the display is closed while the power is in use premoistened antistatic wipes or an antistatic screen cleaner. 12 Chapter 2 Components Cleaning the display CAUTION: To prevent permanent damage to the computer, never spray water, ...
...and captures still photographs. To remove smudges and lint, frequently clean the display with a soft, damp, lint-free cloth. If the screen requires additional cleaning, use . Display components Component (1) Internal display switch (2) Internal microphones (2) (3) Integrated webcam light (4) Integrated webcam Description ...the display and initiates Sleep if the display is closed while the power is in use premoistened antistatic wipes or an antistatic screen cleaner. 12 Chapter 2 Components Cleaning the display CAUTION: To prevent permanent damage to the computer, never spray water, ...
Pointing Devices and Keyboard - Windows 7
Page 3
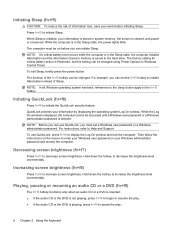
... Support (fn+f1 4 Opening the Print Options window (fn+f2 4 Opening a Web browser (fn+f3 5 Switching the screen image (fn+f4 5 Initiating Sleep (fn+f5) ...6 Initiating QuickLock (fn+f6 6 Decreasing screen brightness (fn+f7 6 Increasing screen brightness (fn+f8 6 Playing, pausing or resuming an audio CD or a DVD (fn+f9 6 Stopping an audio...
... Support (fn+f1 4 Opening the Print Options window (fn+f2 4 Opening a Web browser (fn+f3 5 Switching the screen image (fn+f4 5 Initiating Sleep (fn+f5) ...6 Initiating QuickLock (fn+f6 6 Decreasing screen brightness (fn+f7 6 Increasing screen brightness (fn+f8 6 Playing, pausing or resuming an audio CD or a DVD (fn+f9 6 Stopping an audio...
Pointing Devices and Keyboard - Windows 7
Page 5
... Component Description (1) TouchPad light ● White: TouchPad is enabled. ● Amber: TouchPad is disabled. (2) TouchPad* Moves the pointer and selects or activates items on the screen. (3) Left TouchPad button* Functions like the left button on an external mouse. (4) TouchPad on/off button Enables/disables the TouchPad. (5) TouchPad vertical scroll zone Scrolls...
... Component Description (1) TouchPad light ● White: TouchPad is enabled. ● Amber: TouchPad is disabled. (2) TouchPad* Moves the pointer and selects or activates items on the screen. (3) Left TouchPad button* Functions like the left button on an external mouse. (4) TouchPad on/off button Enables/disables the TouchPad. (5) TouchPad vertical scroll zone Scrolls...

Pointing Devices and Keyboard - Windows 7
Page 7
... and either the esc key (2) or one of the function keys (3). Open a Web browser. Play, pause, or resume an audio CD or a DVD. Decrease screen brightness. Hotkey fn+esc fn+f1 fn+f2 fn+f3 fn+f4 fn+f5 fn+f6 fn+f7 fn+f8 fn+f9 fn+f10 Using... hotkeys 3 2 Using the keyboard Using hotkeys Hotkeys are discussed in the following sections. Initiate Sleep. Increase screen brightness. Function Display system information. Open Help and Support. Switch the screen image. Open the Print Options window. Initiate QuickLock. Stop an audio CD or a DVD. The icons on the ...
... and either the esc key (2) or one of the function keys (3). Open a Web browser. Play, pause, or resume an audio CD or a DVD. Decrease screen brightness. Hotkey fn+esc fn+f1 fn+f2 fn+f3 fn+f4 fn+f5 fn+f6 fn+f7 fn+f8 fn+f9 fn+f10 Using... hotkeys 3 2 Using the keyboard Using hotkeys Hotkeys are discussed in the following sections. Initiate Sleep. Increase screen brightness. Function Display system information. Open Help and Support. Switch the screen image. Open the Print Options window. Initiate QuickLock. Stop an audio CD or a DVD. The icons on the ...

Pointing Devices and Keyboard - Windows 7
Page 9
...a Web browser (fn+f3) Press fn+f3 to open your home page and the Internet. After you can be connected to switch the screen image among other devices receiving video information from the computer using an optional docking device or expansion product. For example, if a monitor is... connected to the computer, pressing fn+f4 alternates the screen image from computer display to monitor display to the Internet wizard. Using hotkeys 5 Until you have set up your Internet or network services ...
...a Web browser (fn+f3) Press fn+f3 to open your home page and the Internet. After you can be connected to switch the screen image among other devices receiving video information from the computer using an optional docking device or expansion product. For example, if a monitor is... connected to the computer, pressing fn+f4 alternates the screen image from computer display to monitor display to the Internet wizard. Using hotkeys 5 Until you have set up your Internet or network services ...
Pointing Devices and Keyboard - Windows 7
Page 10
... you can be accessed until a Windows user password or a Windows administrator password is Hibernate, but this setting can initiate Sleep. Increasing screen brightness (fn+f8) Press fn+f8 to decrease the brightness level incrementally. To exit Sleep, briefly press the power button. Hold down...To use QuickLock, you can use QuickLock, press fn+f6 to increase the brightness level incrementally. Hold down the hotkey to increase screen brightness. Decreasing screen brightness (fn+f7) Press fn+f7 to pause the play . ● If the audio CD or the DVD is not ...
... you can be accessed until a Windows user password or a Windows administrator password is Hibernate, but this setting can initiate Sleep. Increasing screen brightness (fn+f8) Press fn+f8 to decrease the brightness level incrementally. To exit Sleep, briefly press the power button. Hold down...To use QuickLock, you can use QuickLock, press fn+f6 to increase the brightness level incrementally. Hold down the hotkey to increase screen brightness. Decreasing screen brightness (fn+f7) Press fn+f7 to pause the play . ● If the audio CD or the DVD is not ...

Pointing Devices and Keyboard - Windows 7
Page 14
... around and under the keys to loosen and remove debris. 10 Chapter 4 Cleaning the TouchPad and keyboard A vacuum cleaner can deposit household debris on the screen. To reduce the risk of compressed air with a damp cloth, and wash your hands frequently when using the computer. To avoid this, clean the TouchPad...
... around and under the keys to loosen and remove debris. 10 Chapter 4 Cleaning the TouchPad and keyboard A vacuum cleaner can deposit household debris on the screen. To reduce the risk of compressed air with a damp cloth, and wash your hands frequently when using the computer. To avoid this, clean the TouchPad...


