HP Notebook Reference Guide - Windows 7
Page 28
... guide to refer to both types of the following emergency procedures in Hibernation, you are connecting an external hardware device that does not connect to use the Windows Shut down . The term power button is to use the preceding shutdown procedures, try the following conditions: ● When you need to replace the battery or access components inside the computer ● When you are unable to a USB or video port...
... guide to refer to both types of the following emergency procedures in Hibernation, you are connecting an external hardware device that does not connect to use the Windows Shut down . The term power button is to use the preceding shutdown procedures, try the following conditions: ● When you need to replace the battery or access components inside the computer ● When you are unable to a USB or video port...
HP Notebook Reference Guide - Windows 7
Page 29
..., open the display. ● Press a key on , you can initiate Sleep in Windows® Control Panel. NOTE: You cannot initiate any type of networking connection or perform any of the following ways: ● Briefly press the power button. ● Close the display. ● Select Start, click the arrow next to the Shut down button, and then click Sleep. Power settings and timeouts can be changed using Power Options in any computer functions while...
..., open the display. ● Press a key on , you can initiate Sleep in Windows® Control Panel. NOTE: You cannot initiate any type of networking connection or perform any of the following ways: ● Briefly press the power button. ● Close the display. ● Select Start, click the arrow next to the Shut down button, and then click Sleep. Power settings and timeouts can be changed using Power Options in any computer functions while...

HP Notebook Reference Guide - Windows 7
Page 44
... the on-screen instructions. 3. USB drives include the following procedure to a USB port on the device. Remove the device. To disconnect an unpowered external device, turn off the device, and then disconnect it from the computer. Using optional external devices NOTE: For more information about required software and drivers, or to learn which computer port to use the following types: ● 1.44-megabyte diskette drive ● Hard drive module (a hard drive with an adapter attached) ● External optical drive (CD, DVD, and...
... the on-screen instructions. 3. USB drives include the following procedure to a USB port on the device. Remove the device. To disconnect an unpowered external device, turn off the device, and then disconnect it from the computer. Using optional external devices NOTE: For more information about required software and drivers, or to learn which computer port to use the following types: ● 1.44-megabyte diskette drive ● Hard drive module (a hard drive with an adapter attached) ● External optical drive (CD, DVD, and...
HP Notebook Reference Guide - Windows 7
Page 47
... Support for tasks such as installing software, running on -screen instructions. Connect the computer to run Disk Defragmenter on the hard drive become fragmented. For additional information, access the Disk Defragmenter software Help. Using Disk Cleanup Disk Cleanup searches the hard drive for unnecessary files that the system can safely delete to free up disk space and help the computer to AC power. 2. Follow the on battery power. Refer to run more efficiently. Using HP...
... Support for tasks such as installing software, running on -screen instructions. Connect the computer to run Disk Defragmenter on the hard drive become fragmented. For additional information, access the Disk Defragmenter software Help. Using Disk Cleanup Disk Cleanup searches the hard drive for unnecessary files that the system can safely delete to free up disk space and help the computer to AC power. 2. Follow the on battery power. Refer to run more efficiently. Using HP...
HP Notebook Reference Guide - Windows 7
Page 55
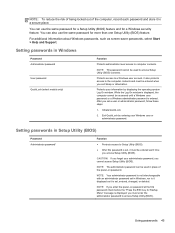
... the operating system Log On window. Setting passwords in Windows Password Administrator password User password QuickLock (select models only) Function Protects administrator-level access to a Windows user account. After you set , entered, changed, or deleted. Protects access to computer contents. You can also use the same password for a Setup Utility (BIOS) feature and for a Windows security feature. NOTE: This password cannot be used in Windows, nor is it displayed as screen-saver passwords, select Start > Help and Support. It also protects access to access Setup Utility...
... the operating system Log On window. Setting passwords in Windows Password Administrator password User password QuickLock (select models only) Function Protects administrator-level access to a Windows user account. After you set , entered, changed, or deleted. Protects access to computer contents. You can also use the same password for a Setup Utility (BIOS) feature and for a Windows security feature. NOTE: This password cannot be used in Windows, nor is it displayed as screen-saver passwords, select Start > Help and Support. It also protects access to access Setup Utility...
HP Notebook Reference Guide - Windows 7
Page 63
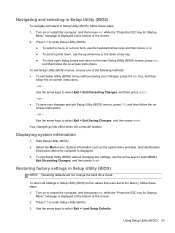
... enter. - Turn on -screen instructions. Press f10 to enter Setup Utility (BIOS). ● To select a menu or a menu item, use the keyboard arrow keys and then press enter. ● To scroll up and down arrow key. ● To close open dialog boxes and return to the values that were set at the bottom of the screen. 2. or - Restoring factory settings in Setup Utility (BIOS) NOTE: Restoring defaults will not change the hard drive mode. To return all settings in Setup Utility (BIOS) to the main Setup Utility (BIOS) screen...
... enter. - Turn on -screen instructions. Press f10 to enter Setup Utility (BIOS). ● To select a menu or a menu item, use the keyboard arrow keys and then press enter. ● To scroll up and down arrow key. ● To close open dialog boxes and return to the values that were set at the bottom of the screen. 2. or - Restoring factory settings in Setup Utility (BIOS) NOTE: Restoring defaults will not change the hard drive mode. To return all settings in Setup Utility (BIOS) to the main Setup Utility (BIOS) screen...
HP Notebook Reference Guide - Windows 7
Page 65
... Disk (C:). 3. b. The BIOS installation begins. 5. Using Setup Utility (BIOS) 55 Do not shut down the computer or initiate Sleep or Hibernation. Follow the on the screen after it has been downloaded to your hard drive designation. NOTE: If you want to a network, consult the network administrator before installing any device, cable, or cord. 1. Complete the installation by selecting Start > Computer. 2. Do not download or install a BIOS update while the computer is downloaded. If no instructions...
... Disk (C:). 3. b. The BIOS installation begins. 5. Using Setup Utility (BIOS) 55 Do not shut down the computer or initiate Sleep or Hibernation. Follow the on the screen after it has been downloaded to your hard drive designation. NOTE: If you want to a network, consult the network administrator before installing any device, cable, or cord. 1. Complete the installation by selecting Start > Computer. 2. Do not download or install a BIOS update while the computer is downloaded. If no instructions...
HP Notebook Reference Guide - Windows 7
Page 71
...displaying remaining charge 23 disposing 25 low battery levels 23 replacing 25 storing 24 Battery Check 22 battery information, finding 22 battery power 22 battery temperature 24 BIOS determining version 54 downloading an update 55 updating 54 Bluetooth device 2, 8 buttons media 13 power 18 volume 14 C cables 1394 32 eSATA 33 USB 31 checking audio functions 14 computer, traveling 24, 57 configuring audio for HDMI 17 configuring ExpressCards 28 connecting to a wired network 8 connecting to an existing wireless network 4 Connection Manager 3 conservation, power 24 creating a wireless connection...
...displaying remaining charge 23 disposing 25 low battery levels 23 replacing 25 storing 24 Battery Check 22 battery information, finding 22 battery power 22 battery temperature 24 BIOS determining version 54 downloading an update 55 updating 54 Bluetooth device 2, 8 buttons media 13 power 18 volume 14 C cables 1394 32 eSATA 33 USB 31 checking audio functions 14 computer, traveling 24, 57 configuring audio for HDMI 17 configuring ExpressCards 28 connecting to a wired network 8 connecting to an existing wireless network 4 Connection Manager 3 conservation, power 24 creating a wireless connection...
HP Pavilion dm1 Entertainment PC - Maintenance and Service Guide
Page 82
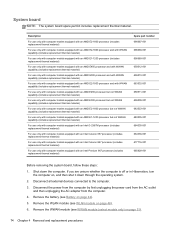
... all external devices connected to the computer. 3. Remove the WLAN module (see WLAN module on , and then shut it down the computer. Shut down through the operating system. 2. System board NOTE: The system board spare part kit includes replacement thermal material. Description For use only with computer models equipped with an AMD E2-1800 processor (includes replacement thermal material) For use only with computer models equipped...
... all external devices connected to the computer. 3. Remove the WLAN module (see WLAN module on , and then shut it down the computer. Shut down through the operating system. 2. System board NOTE: The system board spare part kit includes replacement thermal material. Description For use only with computer models equipped with an AMD E2-1800 processor (includes replacement thermal material) For use only with computer models equipped...
HP Pavilion dm1 Entertainment PC - Maintenance and Service Guide
Page 92
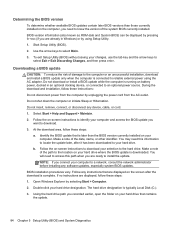
... Start > Computer. 2. Downloading a BIOS update CAUTION: To reduce the risk of the path to the location on -screen instructions to identify your computer and access the BIOS update you are displayed on battery power, docked in Windows) or by using the AC adapter. Make a note of the system BIOS currently installed. You may need this path when you are displayed, follow these steps: 1. The hard drive designation is connected to reliable external power using Setup Utility. 1. Do not download or install a BIOS update...
... Start > Computer. 2. Downloading a BIOS update CAUTION: To reduce the risk of the path to the location on -screen instructions to identify your computer and access the BIOS update you are displayed on battery power, docked in Windows) or by using the AC adapter. Make a note of the system BIOS currently installed. You may need this path when you are displayed, follow these steps: 1. The hard drive designation is connected to reliable external power using Setup Utility. 1. Do not download or install a BIOS update...

HP Pavilion dm1 Entertainment PC - Maintenance and Service Guide
Page 111
... display panel removal 46 spare part numbers 25, 32, 33 display panel cable removal 66 spare part number 26, 30, 67 display panel, product description 2 display switch 7 drives, preventing damage 38 DVD±RW and CD-RW Super Multi Double-Layer Combo Drive precautions 38 spare part number 28, 32 E electrostatic discharge 38 equipment guidelines 41 esc key 11 Ethernet, product description 3 external media cards, product description 4 external monitor port 15 F fan removal 77 spare part number 23, 33, 77 feet locations...
... display panel removal 46 spare part numbers 25, 32, 33 display panel cable removal 66 spare part number 26, 30, 67 display panel, product description 2 display switch 7 drives, preventing damage 38 DVD±RW and CD-RW Super Multi Double-Layer Combo Drive precautions 38 spare part number 28, 32 E electrostatic discharge 38 equipment guidelines 41 esc key 11 Ethernet, product description 3 external media cards, product description 4 external monitor port 15 F fan removal 77 spare part number 23, 33, 77 feet locations...
HP Pavilion dm1 Entertainment PC - Maintenance and Service Guide
Page 112
... 37 pointing device, product description 5 ports external monitor 15 HDMI 14 monitor port 15 product description 5 USB 14, 15 power button 10 power connector 14 power connector cable removal 76 spare part number 23, 32 power cord set requirements 97 spare part numbers 28, 29 power light 12 power requirements, product description 5 processor, product description 1 product description audio 3 chipset 1 display panel 2 Ethernet 3 external media cards 4 graphics 1 hard drives 2 keyboard 5 memory module 2 microphone 3 operating system 5 optical drive 3 pointing device 5 ports 5 power requirements...
... 37 pointing device, product description 5 ports external monitor 15 HDMI 14 monitor port 15 product description 5 USB 14, 15 power button 10 power connector 14 power connector cable removal 76 spare part number 23, 32 power cord set requirements 97 spare part numbers 28, 29 power light 12 power requirements, product description 5 processor, product description 1 product description audio 3 chipset 1 display panel 2 Ethernet 3 external media cards 4 graphics 1 hard drives 2 keyboard 5 memory module 2 microphone 3 operating system 5 optical drive 3 pointing device 5 ports 5 power requirements...
User Guide
Page 5
... your computer ...4 Finding your hardware and software information 4 Front ...4 Right side ...5 Left side ...7 Display ...8 Top ...9 TouchPad ...9 Lights ...10 Buttons, speakers, and fingerprint reader 12 Keys ...13 Bottom ...14 Labels ...16 3 Connecting to a network ...17 Connecting to a wireless network ...17 Using the wireless controls 17 Using the wireless button 17 Using HP Connection Manager (select models only 18 Using operating system controls 18 Using a WLAN ...18 Using an Internet service provider 18 Setting up a WLAN 20 Configuring a wireless router 20 Protecting your WLAN...
... your computer ...4 Finding your hardware and software information 4 Front ...4 Right side ...5 Left side ...7 Display ...8 Top ...9 TouchPad ...9 Lights ...10 Buttons, speakers, and fingerprint reader 12 Keys ...13 Bottom ...14 Labels ...16 3 Connecting to a network ...17 Connecting to a wireless network ...17 Using the wireless controls 17 Using the wireless button 17 Using HP Connection Manager (select models only 18 Using operating system controls 18 Using a WLAN ...18 Using an Internet service provider 18 Setting up a WLAN 20 Configuring a wireless router 20 Protecting your WLAN...
User Guide
Page 7
... 7 Managing and sharing information ...49 Using a USB device ...49 Connecting a USB device 50 Removing a USB device ...50 Connecting a powered USB device 50 Inserting and removing a digital storage card 51 Using optical drives ...52 Inserting an optical disc ...53 Removing an optical disc 53 Sharing drives on the network 54 8 Maintaining your computer ...55 Improving performance ...55 Handling drives ...55 Replacing a hard drive ...56 Using HP 3D DriveGuard (select models only 57 Using Disk Defragmenter 57 Using Disk Cleanup ...58 Adding or replacing memory modules 58 Updating programs...
... 7 Managing and sharing information ...49 Using a USB device ...49 Connecting a USB device 50 Removing a USB device ...50 Connecting a powered USB device 50 Inserting and removing a digital storage card 51 Using optical drives ...52 Inserting an optical disc ...53 Removing an optical disc 53 Sharing drives on the network 54 8 Maintaining your computer ...55 Improving performance ...55 Handling drives ...55 Replacing a hard drive ...56 Using HP 3D DriveGuard (select models only 57 Using Disk Defragmenter 57 Using Disk Cleanup ...58 Adding or replacing memory modules 58 Updating programs...

User Guide
Page 8
...67 Using firewall software ...67 Installing software updates ...67 Installing Windows security updates 67 Installing HP and third-party software updates 67 Securing your wireless network ...68 Backing up your software applications and information 68 Using an optional security cable lock 68 10 Using Setup Utility (BIOS) and System Diagnostics 69 Starting Setup Utility (BIOS) ...69 Updating the BIOS ...69 Determining the BIOS version 69 Downloading a BIOS update 70 Using System Diagnostics ...71 11 Backing up, restoring, and recovering ...72 Creating backups ...72 Creating recovery media...
...67 Using firewall software ...67 Installing software updates ...67 Installing Windows security updates 67 Installing HP and third-party software updates 67 Securing your wireless network ...68 Backing up your software applications and information 68 Using an optional security cable lock 68 10 Using Setup Utility (BIOS) and System Diagnostics 69 Starting Setup Utility (BIOS) ...69 Updating the BIOS ...69 Determining the BIOS version 69 Downloading a BIOS update 70 Using System Diagnostics ...71 11 Backing up, restoring, and recovering ...72 Creating backups ...72 Creating recovery media...
User Guide
Page 80
... optional docking device, or connected to your computer to reliable external power using Setup Utility (BIOS). 1. Use the arrow keys to install the update. To exit Setup Utility (BIOS) without saving your changes, use the tab key and the arrow keys to the location on -screen instructions to download your hard drive where the BIOS update is typically Local Disk (C:). 3. During the download and installation, follow these steps: a. Make a note of the date, name, or other identifier. BIOS installation procedures vary. If no instructions are displayed...
... optional docking device, or connected to your computer to reliable external power using Setup Utility (BIOS). 1. Use the arrow keys to install the update. To exit Setup Utility (BIOS) without saving your changes, use the tab key and the arrow keys to the location on -screen instructions to download your hard drive where the BIOS update is typically Local Disk (C:). 3. During the download and installation, follow these steps: a. Make a note of the date, name, or other identifier. BIOS installation procedures vary. If no instructions are displayed...
User Guide
Page 100
... service 16 wireless certification 16 WLAN 16 latch, battery release 14 lights AC adapter 6 caps lock 10 fingerprint reader 11 hard drive 5 mute 10 optical drive 5 power 5, 10 RJ-45 (network) jack 7 TouchPad 9, 11, 36 webcam 8, 24 wireless 10 M maintenance Disk Cleanup 58 Disk Defragmenter 57 memory module inserting 60 removing 59 replacing 58 memory module compartment, identifying 15 Microsoft Certificate of Authenticity label 16 mouse, external setting preferences 30 mute light, identifying 10 N network jack, identifying 7 num lock key, identifying 13, 35 O operating...
... service 16 wireless certification 16 WLAN 16 latch, battery release 14 lights AC adapter 6 caps lock 10 fingerprint reader 11 hard drive 5 mute 10 optical drive 5 power 5, 10 RJ-45 (network) jack 7 TouchPad 9, 11, 36 webcam 8, 24 wireless 10 M maintenance Disk Cleanup 58 Disk Defragmenter 57 memory module inserting 60 removing 59 replacing 58 memory module compartment, identifying 15 Microsoft Certificate of Authenticity label 16 mouse, external setting preferences 30 mute light, identifying 10 N network jack, identifying 7 num lock key, identifying 13, 35 O operating...
User Guide
Page 101
...(network) jack, identifying 7 rotating TouchPad gesture 40 S scrolling TouchPad gesture 39 security cable lock, installing 68 security cable slot, identifying 6 security, wireless 20 serial number, computer 16 service door 15 service label, computer 16 service labels locating 16 setting password protection on wakeup 42 setup of WLAN 20 Setup Utility (BIOS) passwords 65 shipping the computer 62 shutdown 47 Sleep exiting 42 initiating 42 slots Digital Media 4 security cable 6 software CyberLink PowerDVD 29 Disk Cleanup 58 Disk Defragmenter 57 HP Connection Manager 18 software updates, installing...
...(network) jack, identifying 7 rotating TouchPad gesture 40 S scrolling TouchPad gesture 39 security cable lock, installing 68 security cable slot, identifying 6 security, wireless 20 serial number, computer 16 service door 15 service label, computer 16 service labels locating 16 setting password protection on wakeup 42 setup of WLAN 20 Setup Utility (BIOS) passwords 65 shipping the computer 62 shutdown 47 Sleep exiting 42 initiating 42 slots Digital Media 4 security cable 6 software CyberLink PowerDVD 29 Disk Cleanup 58 Disk Defragmenter 57 HP Connection Manager 18 software updates, installing...
User Guide Notebook - Linux
Page 67
Start Setup Utility. 2. To exit Setup Utility, use the arrow keys to select the Main menu. Downloading a BIOS update CAUTION: To reduce the risk of damage to the computer or an unsuccessful installation, download and install a BIOS update only when the computer is connected to http://welcome.hp.com/country/us/en/wwcontact_us.html. support, go to reliable external power using Setup Utility. 1. Access the page on -screen instructions to the hard drive. Follow the on the HP website that provides...
Start Setup Utility. 2. To exit Setup Utility, use the arrow keys to select the Main menu. Downloading a BIOS update CAUTION: To reduce the risk of damage to the computer or an unsuccessful installation, download and install a BIOS update only when the computer is connected to http://welcome.hp.com/country/us/en/wwcontact_us.html. support, go to reliable external power using Setup Utility. 1. Access the page on -screen instructions to the hard drive. Follow the on the HP website that provides...

User Guide Notebook - Linux
Page 74
... operating system. ● Be sure that the computer is compatible with the user-accessible surface temperature limits defined by the International Standard for Safety of unsaved information. ● Press and hold the power button for at least 5 seconds. ● Disconnect the computer from obstructions while you suspect that the correct drivers are installed and updated. 64 Chapter 15 Troubleshooting and support...
... operating system. ● Be sure that the computer is compatible with the user-accessible surface temperature limits defined by the International Standard for Safety of unsaved information. ● Press and hold the power button for at least 5 seconds. ● Disconnect the computer from obstructions while you suspect that the correct drivers are installed and updated. 64 Chapter 15 Troubleshooting and support...


