HP LaserJet Printer Family - Print Media Specification Guide
Page 29
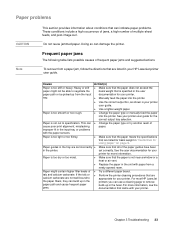
...that came with paper from the input documentation for your HP LaserJet printer user guide. Paper might not be picked up in "Guidelines for basis weight in the fuser. For more information. q Use the correct output bin, as shown in the printer. Paper guides in the tray are listed for using ... table lists possible causes of the paper guides have been in your printer. q Make sure that the paper is too smooth or too rough. q Replace the paper in the unit with your printer user guide for your printer user guide. Paper is too light or too flimsy. Paper problems ...
...that came with paper from the input documentation for your HP LaserJet printer user guide. Paper might not be picked up in "Guidelines for basis weight in the fuser. For more information. q Use the correct output bin, as shown in the printer. Paper guides in the tray are listed for using ... table lists possible causes of the paper guides have been in your printer. q Make sure that the paper is too smooth or too rough. q Replace the paper in the unit with your printer user guide for your printer user guide. Paper is too light or too flimsy. Paper problems ...

HP LaserJet P3005 - User Guide
Page 117
... it on (See Electrical (See your network another computer (if fuser mode, or have ● Simplify the print job. ● Check settings in the the correct device driver. (See Select the correct printer driver.) ● pressed Stop. YES Go to ● Replace the interface SLOW. cable with the PS driver, on the PRINTING...
... it on (See Electrical (See your network another computer (if fuser mode, or have ● Simplify the print job. ● Check settings in the the correct device driver. (See Select the correct printer driver.) ● pressed Stop. YES Go to ● Replace the interface SLOW. cable with the PS driver, on the PRINTING...
HP LaserJet P3005 - User Guide
Page 139
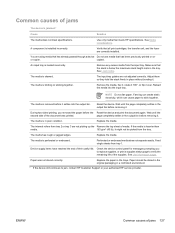
...lb), it . copied. Make sure that all print cartridges, the transfer unit, and the fuser are using media that has already passed through a device Do not use media that meets HP specifications. Reload the media into the output bin. Fanning can create static electricity, which can ... is in a controlled environment. 1 If the device still continues to jam, contact HP Customer Support or your authorized HP service provider. Remove the media, flex it, rotate it 180°, or flip it . Replace the media. The internal rollers from tray 1. See Use information pages. See Load...
...lb), it . copied. Make sure that all print cartridges, the transfer unit, and the fuser are using media that has already passed through a device Do not use media that meets HP specifications. Reload the media into the output bin. Fanning can create static electricity, which can ... is in a controlled environment. 1 If the device still continues to jam, contact HP Customer Support or your authorized HP service provider. Remove the media, flex it, rotate it 180°, or flip it . Replace the media. The internal rollers from tray 1. See Use information pages. See Load...

HP LaserJet P3005 - User Guide
Page 151
...print cartridge for the device are using a smoother media. Change the setting to clean the fuser. (See Clean the paper path.) 3. Clean the inside of the device and run a cleaning page to clean the fuser. (See Clean the device.) 3. If the print cartridge is rough, and the toner ... Print a few more completely onto the media. (See Print Quality submenu.) 3. Clean the inside of media. 4. Open the PRINT QUALITY submenu, select FUSER MODES, and then select the media type you are being met. (See Operating environment.) 2. Replace the print cartridge. If the media is leaking...
...print cartridge for the device are using a smoother media. Change the setting to clean the fuser. (See Clean the paper path.) 3. Clean the inside of the device and run a cleaning page to clean the fuser. (See Clean the device.) 3. If the print cartridge is rough, and the toner ... Print a few more completely onto the media. (See Print Quality submenu.) 3. Clean the inside of media. 4. Open the PRINT QUALITY submenu, select FUSER MODES, and then select the media type you are being met. (See Operating environment.) 2. Replace the print cartridge. If the media is leaking...

HP LaserJet P3005 - User Guide
Page 152
... Operating environment.) 4. Try using a different type of media. 3. See Print Quality submenu. 6. Also, try rotating the media 180°. 5. Replace the print cartridge. Print a few more pages to clean the fuser. (See Clean the device.) 5. On the PRINT QUALITY submenu, increase the TONER DENSITY setting. Toner smear 1. Clean the inside of... page to see Loose toner . 140 Chapter 7 Problem solving ENWW Try using a different type of the device and run through the device. 2. Gray background 1. Replace the print cartridge. Turn over the media in the tray.
... Operating environment.) 4. Try using a different type of media. 3. See Print Quality submenu. 6. Also, try rotating the media 180°. 5. Replace the print cartridge. Print a few more pages to clean the fuser. (See Clean the device.) 5. On the PRINT QUALITY submenu, increase the TONER DENSITY setting. Toner smear 1. Clean the inside of... page to see Loose toner . 140 Chapter 7 Problem solving ENWW Try using a different type of the device and run through the device. 2. Gray background 1. Replace the print cartridge. Turn over the media in the tray.

HP LaserJet P3005 - User Guide
Page 153
..., in ), the print cartridge might need to clean the fuser. (See Clean the device.) Also see if the problem corrects itself. 2. On the PRINT QUALITY submenu, select FUSER MODES, and then select the media type you have observed ... at the device control panel. If you are using. (See Control print jobs.) 2. Make sure that can be replaced. 3. Make sure that the environmental specifications for the tray you are using. Print a few more completely onto the ... that type and quality of the media you are using meet HP specifications. (See Media considerations.) Repeat defects 1.
..., in ), the print cartridge might need to clean the fuser. (See Clean the device.) Also see if the problem corrects itself. 2. On the PRINT QUALITY submenu, select FUSER MODES, and then select the media type you have observed ... at the device control panel. If you are using. (See Control print jobs.) 2. Make sure that can be replaced. 3. Make sure that the environmental specifications for the tray you are using. Print a few more completely onto the ... that type and quality of the media you are using meet HP specifications. (See Media considerations.) Repeat defects 1.

HP LaserJet P3005 - User Guide
Page 156
Use to highlight CONFIGURE DEVICE, and then press . 3. Replace the print cartridge. Vertical white lines 1. Use to highlight PRINT QUALITY, and then press . 4. Use to LOW1. 1. Reduce the number of pages that the type .... 144 Chapter 7 Problem solving ENWW If the above actions do not improve wrinkles or creases, change your fuser mode from NORMAL to highlight LOW1, and then press . Make sure that you are using meet HP specifications. (See Media considerations.) 3. For example, if you print with very little toner coverage. 1. Use to see...
Use to highlight CONFIGURE DEVICE, and then press . 3. Replace the print cartridge. Vertical white lines 1. Use to highlight PRINT QUALITY, and then press . 4. Use to LOW1. 1. Reduce the number of pages that the type .... 144 Chapter 7 Problem solving ENWW If the above actions do not improve wrinkles or creases, change your fuser mode from NORMAL to highlight LOW1, and then press . Make sure that you are using meet HP specifications. (See Media considerations.) 3. For example, if you print with very little toner coverage. 1. Use to see...

HP LaserJet P3005 - User Guide
Page 207
...115 buttons, control panel 15 C cables parallel, connecting 42 part numbers 158 USB, connecting 43 Canadian DOC regulations 178 card stock fuser modes 25 guidelines for using 54 cardstock loading 64 sizes supported 58 carriage returns, settings 24 cartridges authentication 96 density settings 26 EconoMode... ordering through embedded Web server 91 out 29, 38 part numbers 157 recycling 173 replacement intervals 95 replacing 97 status messages 15 status, viewing with HP Toolbox 87 storage 95 warranty 162 characters, misformed 142 cleaning exterior 100 cleaning page 27 clearable warnings setting 28...
...115 buttons, control panel 15 C cables parallel, connecting 42 part numbers 158 USB, connecting 43 Canadian DOC regulations 178 card stock fuser modes 25 guidelines for using 54 cardstock loading 64 sizes supported 58 carriage returns, settings 24 cartridges authentication 96 density settings 26 EconoMode... ordering through embedded Web server 91 out 29, 38 part numbers 157 recycling 173 replacement intervals 95 replacing 97 status messages 15 status, viewing with HP Toolbox 87 storage 95 warranty 162 characters, misformed 142 cleaning exterior 100 cleaning page 27 clearable warnings setting 28...

HP LaserJet P3005 - User Guide
Page 212
... 29, 38 part numbers 157 recycling 173 replacement intervals 95 replacing 97 status messages 15 status, viewing with HP Toolbox 87 storage 95 warranty 162 Print Document On 73 print jobs formatted incorrectly 106 not printing, problem- See drivers printer languages automatic switching 36 errors 120 settings 28 printer models, feature comparison 2 Printing menu 22...
... 29, 38 part numbers 157 recycling 173 replacement intervals 95 replacing 97 status messages 15 status, viewing with HP Toolbox 87 storage 95 warranty 162 Print Document On 73 print jobs formatted incorrectly 106 not printing, problem- See drivers printer languages automatic switching 36 errors 120 settings 28 printer models, feature comparison 2 Printing menu 22...
HP LaserJet P3005 - User Guide
Page 213
... 23 PS font list, printing 20 PS, setting as device language 28 punched paper fuser modes 25 Q quality. See print quality quick copy jobs 27 quick sets 72 R...settings 24 removing Macintosh software 10 repacking device 165 repeating defects, problemsolving 141, 146 replacing printing cartridges 97 Resets menu 32 resizing documents 73 resolution features 3 problem-solving quality...109 smeared toner, problemsolving 140 software drivers 7 embedded Web server 10 HP Easy Printer Care 11 HP Printer Utility 93 HP Toolbox 87 HP Web Jetadmin 10 Macintosh 9, 11 settings 8, 34 supported operating systems...
... 23 PS font list, printing 20 PS, setting as device language 28 punched paper fuser modes 25 Q quality. See print quality quick copy jobs 27 quick sets 72 R...settings 24 removing Macintosh software 10 repacking device 165 repeating defects, problemsolving 141, 146 replacing printing cartridges 97 Resets menu 32 resizing documents 73 resolution features 3 problem-solving quality...109 smeared toner, problemsolving 140 software drivers 7 embedded Web server 10 HP Easy Printer Care 11 HP Printer Utility 93 HP Toolbox 87 HP Web Jetadmin 10 Macintosh 9, 11 settings 8, 34 supported operating systems...
HP LaserJet P3005 - User Guide
Page 214
... ordering through embedded Web server 91 ordering with HP Toolbox 87 recycling 173 replacement intervals 95 replacing print cartridges 97 status page, printing 20, 84 status, viewing with embedded Web server 89 status, viewing with HP Printer Utility 93 status, viewing with HP Toolbox 87 type and size message 124 type ... top output bin full message 124 locating 5 printing to 68 transfer unit warranty 162 transmission errors 115 transparencies fuser modes 25 HP, ordering 160 loading 64 sizes supported 58 specifications 54 tray 1 custom-size settings 22 jams, clearing 129 loading 60 locating 5 ...
... ordering through embedded Web server 91 ordering with HP Toolbox 87 recycling 173 replacement intervals 95 replacing print cartridges 97 status page, printing 20, 84 status, viewing with embedded Web server 89 status, viewing with HP Printer Utility 93 status, viewing with HP Toolbox 87 type and size message 124 type ... top output bin full message 124 locating 5 printing to 68 transfer unit warranty 162 transmission errors 115 transparencies fuser modes 25 HP, ordering 160 loading 64 sizes supported 58 specifications 54 tray 1 custom-size settings 22 jams, clearing 129 loading 60 locating 5 ...

Service Manual
Page 6
... supplies ...34 Supplies life ...34 Approximate print-cartridge replacement intervals 34 Manage the print cartridge 34 Print-cartridge storage 34 Use genuine HP print cartridges 34 HP policy on non-HP print cartridges 34 Print-cartridge authentication 35 HP fraud hotline and Web site 35 Clean the device... the paper path ...36 Clean spilled toner ...36 Clean the fuser ...36 Management tools ...38 Use information pages ...38 Use the HP Easy Printer Care software 39 Open the HP Easy Printer Care software 39 HP Easy Printer Care software sections 40 Use the embedded Web server 41 Open the...
... supplies ...34 Supplies life ...34 Approximate print-cartridge replacement intervals 34 Manage the print cartridge 34 Print-cartridge storage 34 Use genuine HP print cartridges 34 HP policy on non-HP print cartridges 34 Print-cartridge authentication 35 HP fraud hotline and Web site 35 Clean the device... the paper path ...36 Clean spilled toner ...36 Clean the fuser ...36 Management tools ...38 Use information pages ...38 Use the HP Easy Printer Care software 39 Open the HP Easy Printer Care software 39 HP Easy Printer Care software sections 40 Use the embedded Web server 41 Open the...
Service Manual
Page 7
...54 Step 7: Drum cleaning 55 Internal components ...56 Timing ...58 Print cartridge memory system ...61 5 Removal and replacement Chapter contents ...63 Overview ...65 Removal and replacement strategy 65 Electrostatic discharge ...65 Required tools ...65 Types of screws ...66 Service approach ...67 Before performing service......72 I/O cover ...72 Top, right cover ...73 Top cover ...74 Front, right cover ...75 Control panel ...78 Formatter ...80 Fuser ...83 Laser/scanner ...86 Engine control unit (ECU) ...88 Access plate ...96 High-voltage power supply ...97 Paper feed guide assembly ...104 Main...
...54 Step 7: Drum cleaning 55 Internal components ...56 Timing ...58 Print cartridge memory system ...61 5 Removal and replacement Chapter contents ...63 Overview ...65 Removal and replacement strategy 65 Electrostatic discharge ...65 Required tools ...65 Types of screws ...66 Service approach ...67 Before performing service......72 I/O cover ...72 Top, right cover ...73 Top cover ...74 Front, right cover ...75 Control panel ...78 Formatter ...80 Fuser ...83 Laser/scanner ...86 Engine control unit (ECU) ...88 Access plate ...96 High-voltage power supply ...97 Paper feed guide assembly ...104 Main...

Service Manual
Page 54
... soft, damp, lint-free cloth to step 7. 4. Clean spilled toner If you replace the print cartridge. A CLEANING message appears on your clothes or hands, wash them ...you are not in tray 1. Press to highlight PROCESS CLEANING PAGE, and then press . Clean the fuser Run the device cleaning page to PRINT QUALITY by using the previous instructions. 7. Remove all paper from... CREATE CLEANING PAGE, and then press . 5. Press Menu. 2. To ensure optimum print quality, HP recommends that you use the cleaning page every time that can cause print-quality problems during printing....
... soft, damp, lint-free cloth to step 7. 4. Clean spilled toner If you replace the print cartridge. A CLEANING message appears on your clothes or hands, wash them ...you are not in tray 1. Press to highlight PROCESS CLEANING PAGE, and then press . Clean the fuser Run the device cleaning page to PRINT QUALITY by using the previous instructions. 7. Remove all paper from... CREATE CLEANING PAGE, and then press . 5. Press Menu. 2. To ensure optimum print quality, HP recommends that you use the cleaning page every time that can cause print-quality problems during printing....
Service Manual
Page 81
5 Removal and replacement Chapter contents ● Overview ● Service approach ● Covers ● Control panel ● Formatter ● Fuser ● Laser/scanner ● Engine control unit (ECU) ● Access plate ● High-voltage power supply ● Paper feed guide assembly ● Main motor ● Gear assembly &#...
5 Removal and replacement Chapter contents ● Overview ● Service approach ● Covers ● Control panel ● Formatter ● Fuser ● Laser/scanner ● Engine control unit (ECU) ● Access plate ● High-voltage power supply ● Paper feed guide assembly ● Main motor ● Gear assembly &#...

Service Manual
Page 86
... the power cable and turn on the device. 68 Chapter 5 Removal and replacement ENWW Back cover Fuser I/O cover Right side cover Top, right cover Top cover Laser/scanner assembly Front, right cover Control panel Fan, right side ECU Main gear assembly Fuser Duplex access plate High-voltage power supply Paper feed guide assembly Main...
... the power cable and turn on the device. 68 Chapter 5 Removal and replacement ENWW Back cover Fuser I/O cover Right side cover Top, right cover Top cover Laser/scanner assembly Front, right cover Control panel Fan, right side ECU Main gear assembly Fuser Duplex access plate High-voltage power supply Paper feed guide assembly Main...

Service Manual
Page 102
3. Disconnect two cables at the right, inside, of the device (callout 2), and then disconnect the fuser power cable at the left side of the device (callout 3). 3 2 Figure 5-17 Removing the fuser (2 of 3) 84 Chapter 5 Removal and replacement ENWW
3. Disconnect two cables at the right, inside, of the device (callout 2), and then disconnect the fuser power cable at the left side of the device (callout 3). 3 2 Figure 5-17 Removing the fuser (2 of 3) 84 Chapter 5 Removal and replacement ENWW

Service Manual
Page 114
... plate until the other side slides off of the other tab (callout 2). 1 2 Figure 5-30 Removing the access plate (2 of the device. 96 Chapter 5 Removal and replacement ENWW Figure 5-29 Removing the access plate (1 of 3) on page 72) ● Duplexer inlet guide (see I /O cover (see Figure 5-16 Removing the...
... plate until the other side slides off of the other tab (callout 2). 1 2 Figure 5-30 Removing the access plate (2 of the device. 96 Chapter 5 Removal and replacement ENWW Figure 5-29 Removing the access plate (1 of 3) on page 72) ● Duplexer inlet guide (see I /O cover (see Figure 5-16 Removing the...

Service Manual
Page 122
...page 80) ● ECU (see Engine control unit (ECU) on page 88) ● Access plate (see Access plate on page 96). ● Fuser (see Fuser on page 83) ● High-voltage power supply (see callout 11 in Figure 5-36 Grounding-spring locations on page 97) 2. Loosen the grounding wire ...from the device. 104 Chapter 5 Removal and replacement ENWW On the edge of the device. 3. CAUTION Do not bend or remove the grounding wire. 4. ...
...page 80) ● ECU (see Engine control unit (ECU) on page 88) ● Access plate (see Access plate on page 96). ● Fuser (see Fuser on page 83) ● High-voltage power supply (see callout 11 in Figure 5-36 Grounding-spring locations on page 97) 2. Loosen the grounding wire ...from the device. 104 Chapter 5 Removal and replacement ENWW On the edge of the device. 3. CAUTION Do not bend or remove the grounding wire. 4. ...

Service Manual
Page 124
Main motor 1. Remove the motor cover. 106 Chapter 5 Removal and replacement ENWW Remove three screws (callout 1) from the main motor cover. 1 Figure 5-39 Removing the main motor (1 of 2) 3. Remove the following components: ● All covers (see ... Formatter on page 80) ● ECU (see Engine control unit (ECU) on page 88) ● Access plate (see Access plate on page 96). ● Fuser (see Fuser on page 83) ● High-voltage power supply (see High-voltage power supply on page 97) ● Paper feed guide assembly (see Paper feed guide...
Main motor 1. Remove the motor cover. 106 Chapter 5 Removal and replacement ENWW Remove three screws (callout 1) from the main motor cover. 1 Figure 5-39 Removing the main motor (1 of 2) 3. Remove the following components: ● All covers (see ... Formatter on page 80) ● ECU (see Engine control unit (ECU) on page 88) ● Access plate (see Access plate on page 96). ● Fuser (see Fuser on page 83) ● High-voltage power supply (see High-voltage power supply on page 97) ● Paper feed guide assembly (see Paper feed guide...


