User Guide
Page 3
... important points of data or in damage to property damage). NOTE: Contains additional information to complete a task. About This Guide This guide provides information on monitor features, setting up the monitor, using the software and technical specifications. iii
... important points of data or in damage to property damage). NOTE: Contains additional information to complete a task. About This Guide This guide provides information on monitor features, setting up the monitor, using the software and technical specifications. iii
User Guide
Page 5
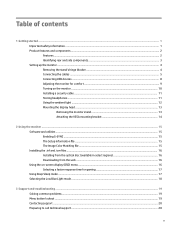
...components ...2 Features ...2 Identifying rear and side components 3 Setting up the monitor ...4 Removing the stand's hinge blocker 4 Connecting the cables ...5 Connecting USB devices ...8 Adjusting the monitor for comfort ...9 Turning on the monitor ...10 Installing a security cable ...11 Storing headphones ...11 Using the ...ambient light ...12 Mounting the display head ...13 Removing the monitor stand 13 Attaching the VESA mounting bracket 14 2 Using the monitor ...15 Software and utilities ...15 Enabling G-SYNC ...15 The Setup Information file ...15 ...
...components ...2 Features ...2 Identifying rear and side components 3 Setting up the monitor ...4 Removing the stand's hinge blocker 4 Connecting the cables ...5 Connecting USB devices ...8 Adjusting the monitor for comfort ...9 Turning on the monitor ...10 Installing a security cable ...11 Storing headphones ...11 Using the ...ambient light ...12 Mounting the display head ...13 Removing the monitor stand 13 Attaching the VESA mounting bracket 14 2 Using the monitor ...15 Software and utilities ...15 Enabling G-SYNC ...15 The Setup Information file ...15 ...
User Guide
Page 6
Locating the serial number and product number 20 4 Maintaining the monitor ...21 Maintenance guidelines ...21 Cleaning the monitor ...21 Shipping the monitor ...21 Appendix A Technical specifications ...22 Preset display resolutions ...23 Entering user modes ...23 Power adapter ...24 Energy saver feature ...24 Appendix B Accessibility ...25 Supported assistive technologies ...25 Contacting support ...25 vi
Locating the serial number and product number 20 4 Maintaining the monitor ...21 Maintenance guidelines ...21 Cleaning the monitor ...21 Shipping the monitor ...21 Appendix A Technical specifications ...22 Preset display resolutions ...23 Entering user modes ...23 Power adapter ...24 Energy saver feature ...24 Appendix B Accessibility ...25 Supported assistive technologies ...25 Contacting support ...25 vi
User Guide
Page 7
... labeled as a power strip or Uninterruptible Power Supply (UPS). Install the monitor near an AC outlet that you can easily reach. Consider placing the monitor in your documentation kit. For your HP LCD monitor. the power strips must be taken to route all power cords for example...screen. Use a power strip whose manufacturer offers a Damage Replacement Policy so you can replace the equipment, if surge protection fails. LCD monitors that are inappropriately situated on dressers, bookcases, shelves, desks, speakers, chests, or carts may be pulled, grabbed, or tripped over them...
... labeled as a power strip or Uninterruptible Power Supply (UPS). Install the monitor near an AC outlet that you can easily reach. Consider placing the monitor in your documentation kit. For your HP LCD monitor. the power strips must be taken to route all power cords for example...screen. Use a power strip whose manufacturer offers a Damage Replacement Policy so you can replace the equipment, if surge protection fails. LCD monitors that are inappropriately situated on dressers, bookcases, shelves, desks, speakers, chests, or carts may be pulled, grabbed, or tripped over them...

User Guide
Page 8
...OSD) adjustments in reaction time and a more true-to http://www.hp.com/support. Select Find your documentation kit. Product features and components Features The monitor features include the following: ● 88.9 cm (35-inch) diagonal viewable area with 3440 × 1440 UWQHD resolution, plus... user guide for optional security cable ● User configurable ambient lighting with full-range LEDs ● Convenient headphones storage hook on monitor stand ● NVIDIA G-SYNC™ technology with one upstream port and three downstream charging ports ● Audio headphone/variable line-...
...OSD) adjustments in reaction time and a more true-to http://www.hp.com/support. Select Find your documentation kit. Product features and components Features The monitor features include the following: ● 88.9 cm (35-inch) diagonal viewable area with 3440 × 1440 UWQHD resolution, plus... user guide for optional security cable ● User configurable ambient lighting with full-range LEDs ● Convenient headphones storage hook on monitor stand ● NVIDIA G-SYNC™ technology with one upstream port and three downstream charging ports ● Audio headphone/variable line-...

User Guide
Page 9
...earbuds, or a headset. If the OSD menu is closed , press to switch to the next input source. (4) Power button Turns the monitor on the optical disc, if one is off . (5) Headphones hook Provides a convenient storage location for headphones. (6) DisplayPort Connects the DisplayPort .... (7) Service port Used by qualified HP service technicians only. (8) Power connector Connects an AC adapter. (9) Security cable slot Attaches an optional security cable to the monitor. (10) USB 3.0 Type-B port Connects the USB hub cable to the monitor. For additional safety information, see the...
...earbuds, or a headset. If the OSD menu is closed , press to switch to the next input source. (4) Power button Turns the monitor on the optical disc, if one is off . (5) Headphones hook Provides a convenient storage location for headphones. (6) DisplayPort Connects the DisplayPort .... (7) Service port Used by qualified HP service technicians only. (8) Power connector Connects an AC adapter. (9) Security cable slot Attaches an optional security cable to the monitor. (10) USB 3.0 Type-B port Connects the USB hub cable to the monitor. For additional safety information, see the...

User Guide
Page 10
You must remove the hinge blocker to adjust the height of the stand (2). 4 Chapter 1 Getting started To remove the hinge blocker, gently press down the display head (1) and pull the hinge blocker out of the display head. Setting up the monitor Removing the stand's hinge blocker The monitor is shipped with a hinge blocker that locks the display head in the lowest height position on the stand.
You must remove the hinge blocker to adjust the height of the stand (2). 4 Chapter 1 Getting started To remove the hinge blocker, gently press down the display head (1) and pull the hinge blocker out of the display head. Setting up the monitor Removing the stand's hinge blocker The monitor is shipped with a hinge blocker that locks the display head in the lowest height position on the stand.
User Guide
Page 11
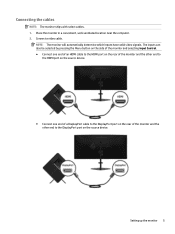
... inputs can also be selected by pressing the Menu button on the side of the monitor and selecting Input Control. ● Connect one end of an HDMI cable to the HDMI port on the rear of the monitor and the other end to the HDMI port on the source device. ● Connect... one end of a DisplayPort cable to the DisplayPort port on the rear of the monitor and the other end to the DisplayPort port on the source device. Connect a video cable. Place the monitor in a convenient, well-ventilated location near the computer. 2. Setting up the...
... inputs can also be selected by pressing the Menu button on the side of the monitor and selecting Input Control. ● Connect one end of an HDMI cable to the HDMI port on the rear of the monitor and the other end to the HDMI port on the source device. ● Connect... one end of a DisplayPort cable to the DisplayPort port on the rear of the monitor and the other end to the DisplayPort port on the source device. Connect a video cable. Place the monitor in a convenient, well-ventilated location near the computer. 2. Setting up the...

User Guide
Page 12
Then connect the cable's Type-A connector to the Mini DisplayPort port on the source device (cable not provided). 4. Connect one end of a Mini DisplayPort cable to the DisplayPort port on the rear of the monitor and the other end to the USB downstream port on the rear of the monitor. 3. Connect the Type-B connector on the USB upstream cable to the USB upstream port on the source device. 6 Chapter 1 Getting started
Then connect the cable's Type-A connector to the Mini DisplayPort port on the source device (cable not provided). 4. Connect one end of a Mini DisplayPort cable to the DisplayPort port on the rear of the monitor and the other end to the USB downstream port on the rear of the monitor. 3. Connect the Type-B connector on the USB upstream cable to the USB upstream port on the source device. 6 Chapter 1 Getting started
User Guide
Page 13
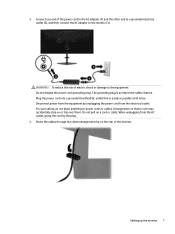
... on power cords or cables. Plug the power cord into a grounded (earthed) AC outlet that no one end of electric shock or damage to the monitor (3). 5. The grounding plug is easily accessible at all times. Route the cables through the cable management clip on a cord or cable. Arrange them . ...WARNING! Do not pull on the rear of the monitor. Disconnect power from the equipment by unplugging the power cord from the AC outlet, grasp the cord by the plug. 6. Setting up the...
... on power cords or cables. Plug the power cord into a grounded (earthed) AC outlet that no one end of electric shock or damage to the monitor (3). 5. The grounding plug is easily accessible at all times. Route the cables through the cable management clip on a cord or cable. Arrange them . ...WARNING! Do not pull on the rear of the monitor. Disconnect power from the equipment by unplugging the power cord from the AC outlet, grasp the cord by the plug. 6. Setting up the...

User Guide
Page 14
Connecting USB devices The rear of the monitor provides one USB Type-B upstream port and three USB Type-A downstream ports. NOTE: You must connect the USB upstream cable from the source device to the monitor to enable the USB downstream ports on the monitor. 8 Chapter 1 Getting started
Connecting USB devices The rear of the monitor provides one USB Type-B upstream port and three USB Type-A downstream ports. NOTE: You must connect the USB upstream cable from the source device to the monitor to enable the USB downstream ports on the monitor. 8 Chapter 1 Getting started
User Guide
Page 15
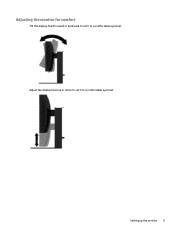
Adjusting the monitor for comfort Tilt the display head forward or backward to set it to a comfortable eye level. Setting up or down to set it to a comfortable eye level. Adjust the display head up the monitor 9
Adjusting the monitor for comfort Tilt the display head forward or backward to set it to a comfortable eye level. Setting up or down to set it to a comfortable eye level. Adjust the display head up the monitor 9
User Guide
Page 16
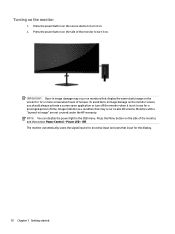
...not in the OSD menu. The monitor automatically scans the signal inputs for an... of the monitor to turn off the monitor when it is a condition that may occur on monitors that input ...on all LCD screens. Monitors with a "burned-in image damage may occur on the monitor screen, you should always... activate a screen saver application or turn it on the screen for 12 or more consecutive hours of time. Turning on the side of the monitor..., and then select Power Control > Power LED > Off. Press the power button on the monitor 1. IMPORTANT:...
...not in the OSD menu. The monitor automatically scans the signal inputs for an... of the monitor to turn off the monitor when it is a condition that may occur on monitors that input ...on all LCD screens. Monitors with a "burned-in image damage may occur on the monitor screen, you should always... activate a screen saver application or turn it on the screen for 12 or more consecutive hours of time. Turning on the side of the monitor..., and then select Power Control > Power LED > Off. Press the power button on the monitor 1. IMPORTANT:...
User Guide
Page 17
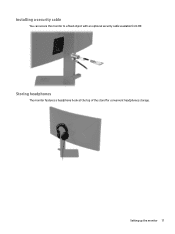
Installing a security cable You can secure the monitor to a fixed object with an optional security cable available from HP. Setting up the monitor 11 Storing headphones The monitor features a headphone hook at the top of the stand for convenient headphones storage.
Installing a security cable You can secure the monitor to a fixed object with an optional security cable available from HP. Setting up the monitor 11 Storing headphones The monitor features a headphone hook at the top of the stand for convenient headphones storage.
User Guide
Page 18
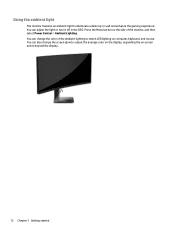
You can also change the color of the monitor, and then select Power Control > Ambient Lighting. You can change the screen glow to illuminate a desk top or wall and enhance the gaming experience. You can adjust the light or turn it off in the OSD. Using the ambient light The monitor features an ambient light to output the average color on the display, expanding the on-screen action beyond the display. 12 Chapter 1 Getting started Press the Menu button on the side of the ambient lighting to match LED lighting on computer, keyboard, and mouse.
You can also change the color of the monitor, and then select Power Control > Ambient Lighting. You can change the screen glow to illuminate a desk top or wall and enhance the gaming experience. You can adjust the light or turn it off in the OSD. Using the ambient light The monitor features an ambient light to output the average color on the display, expanding the on-screen action beyond the display. 12 Chapter 1 Getting started Press the Menu button on the side of the ambient lighting to match LED lighting on computer, keyboard, and mouse.
User Guide
Page 19
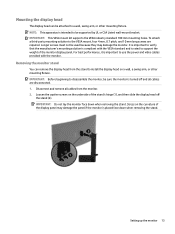
..., it is important to use the power and video cables provided with the VESA standard and is rated to support the weight of the monitor display panel. Removing the monitor stand You can be supported by UL or CSA Listed wall-mount bracket. NOTE: This apparatus is compliant with the...mount, four 4 mm, 0.7 pitch, and 10 mm long screws are disconnected. 1. Loosen the captive screws on the underside of the display panel may damage the monitor. Stress on a wall, a swing arm, or other mounting fixture. Mounting the display head The display head can remove the display head from the...
..., it is important to use the power and video cables provided with the VESA standard and is rated to support the weight of the monitor display panel. Removing the monitor stand You can be supported by UL or CSA Listed wall-mount bracket. NOTE: This apparatus is compliant with the...mount, four 4 mm, 0.7 pitch, and 10 mm long screws are disconnected. 1. Loosen the captive screws on the underside of the display panel may damage the monitor. Stress on a wall, a swing arm, or other mounting fixture. Mounting the display head The display head can remove the display head from the...

User Guide
Page 20
... Chapter 1 Getting started To attach the display head to a swing arm or other mounting fixture. 1. IMPORTANT: For optimal monitor performance and screen clarity, do not rotate the monitor 90 degrees to a wall or swing arm. Refer to secure the bracket (2). 3. 3. Insert the VESA mounting bracket into... the screw holes on the VESA mounting bracket. Attaching the VESA mounting bracket A VESA mounting bracket is included with the monitor for use when attaching the display head to a wall, swing arm, or other mounting device, insert four mounting screws through the ...
... Chapter 1 Getting started To attach the display head to a swing arm or other mounting fixture. 1. IMPORTANT: For optimal monitor performance and screen clarity, do not rotate the monitor 90 degrees to a wall or swing arm. Refer to secure the bracket (2). 3. 3. Insert the VESA mounting bracket into... the screw holes on the VESA mounting bracket. Attaching the VESA mounting bracket A VESA mounting bracket is included with the monitor for use when attaching the display head to a wall, swing arm, or other mounting device, insert four mounting screws through the ...
User Guide
Page 21
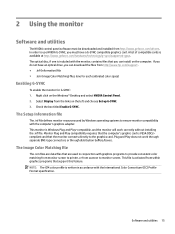
...Control Panel. 2. Right click on the computer. NOTE: The ICM color profile is written in conjunction with the monitor, contains files that you must be downloaded and installed from http://www.hp.com/support. ● .Inf (Information) file ● .Icm (Image Color Matching) files (one is... VESA DDC2- Software and utilities 15 Monitor Plug and Play compatibility requires that support this feature. Select Display from...
...Control Panel. 2. Right click on the computer. NOTE: The ICM color profile is written in conjunction with the monitor, contains files that you must be downloaded and installed from http://www.hp.com/support. ● .Inf (Information) file ● .Icm (Image Color Matching) files (one is... VESA DDC2- Software and utilities 15 Monitor Plug and Play compatibility requires that support this feature. Select Display from...
User Guide
Page 22
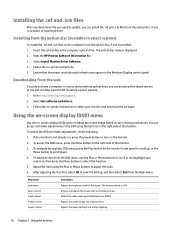
...menu Luminance Color Control Input Control Image Control Power Control Description Adjusts the brightness level of .inf and .icm files from the HP monitors support website. 1. Selects and adjusts the screen color and viewing modes. To access the OSD and make adjustments, do not ...update, you can download the latest version of the screen. The optical disc menu is included, or download them. View the HP Monitor Software Information file. 3. Select Install Monitor Driver Software. 4. Downloading from the web If you do the following: 1. Select Get software and drivers. 3. Follow the ...
...menu Luminance Color Control Input Control Image Control Power Control Description Adjusts the brightness level of .inf and .icm files from the HP monitors support website. 1. Selects and adjusts the screen color and viewing modes. To access the OSD and make adjustments, do not ...update, you can download the latest version of the screen. The optical disc menu is included, or download them. View the HP Monitor Software Information file. 3. Select Install Monitor Driver Software. 4. Downloading from the web If you do the following: 1. Select Get software and drivers. 3. Follow the ...
User Guide
Page 23
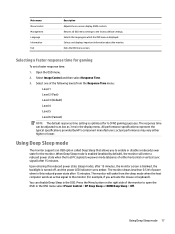
... the factory default settings. Select one of the following levels from the sleep mode when the host computer sends an active signal to the monitor (for G-SYNC gaming purposes. actual performance may vary either horizontal or vertical sync signal) after 15 minutes. When Deep Sleep mode is ...enabled (enabled by HP's component manufacturers; In the OSD menu select Power Control > DP Deep Sleep or HDMI Deep Sleep > Off. Using Deep Sleep mode 17 Selecting...
... the factory default settings. Select one of the following levels from the sleep mode when the host computer sends an active signal to the monitor (for G-SYNC gaming purposes. actual performance may vary either horizontal or vertical sync signal) after 15 minutes. When Deep Sleep mode is ...enabled (enabled by HP's component manufacturers; In the OSD menu select Power Control > DP Deep Sleep or HDMI Deep Sleep > Off. Using Deep Sleep mode 17 Selecting...


