
HP USB Digital Drive
Page 3
Remove the cap 1 of the Digital Drive. 2. If the SD memory card does not slide in properly, gently pull it out and reinsert it. 2 User Guide Installing the SD Memory Card 1. Insert the SD memory card into the SD slot 2 with the notched corner positioned on the lower left as shown.
Remove the cap 1 of the Digital Drive. 2. If the SD memory card does not slide in properly, gently pull it out and reinsert it. 2 User Guide Installing the SD Memory Card 1. Insert the SD memory card into the SD slot 2 with the notched corner positioned on the lower left as shown.
External Media Cards
Page 3
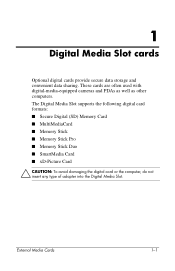
... used with digital-media-equipped cameras and PDAs as well as other computers. The Digital Media Slot supports the following digital card formats: ■ Secure Digital (SD) Memory Card ■ MultiMediaCard ■ Memory Stick ■ Memory Stick Pro ■ Memory Stick Duo ■ SmartMedia Card ■ xD-Picture Card Ä CAUTION: To avoid damaging the...
... used with digital-media-equipped cameras and PDAs as well as other computers. The Digital Media Slot supports the following digital card formats: ■ Secure Digital (SD) Memory Card ■ MultiMediaCard ■ Memory Stick ■ Memory Stick Pro ■ Memory Stick Duo ■ SmartMedia Card ■ xD-Picture Card Ä CAUTION: To avoid damaging the...

External Media Cards
Page 6
... your operating system. ■ Do not install any other PC Cards, install only the software required for the device. External Media Cards 2-1 The PC Card slot supports ■ 32-bit (CardBus) and 16-bit PC Cards. ■ Type I or Type II cards. ✎ Zoomed video PC Cards are instructed by the...
... your operating system. ■ Do not install any other PC Cards, install only the software required for the device. External Media Cards 2-1 The PC Card slot supports ■ 32-bit (CardBus) and 16-bit PC Cards. ■ Type I or Type II cards. ✎ Zoomed video PC Cards are instructed by the...

External Media Cards - Windows Vista
Page 3
External Media Cards 1-1 The Digital Media Slot supports the following digital card formats: ■ Secure Digital (SD) Memory Card ■ MultiMediaCard ■ Memory Stick ■ Memory Stick Pro ■ Memory Stick Duo ■ SmartMedia Card ■ xD-Picture Card Ä CAUTION: To avoid damaging the digital card or the computer, do not insert any type ...
External Media Cards 1-1 The Digital Media Slot supports the following digital card formats: ■ Secure Digital (SD) Memory Card ■ MultiMediaCard ■ Memory Stick ■ Memory Stick Pro ■ Memory Stick Duo ■ SmartMedia Card ■ xD-Picture Card Ä CAUTION: To avoid damaging the digital card or the computer, do not insert any type ...

External Media Cards - Windows Vista
Page 6
External Media Cards 2-1 Configuring a PC Card Ä CAUTION: To prevent loss of the Personal Computer Memory Card International Association (PCMCIA). The PC Card slot supports ■ 32-bit (CardBus) and 16-bit PC Cards. ■ Type I or Type II cards. ✎ Zoomed video PC Cards are instructed by the ...
External Media Cards 2-1 Configuring a PC Card Ä CAUTION: To prevent loss of the Personal Computer Memory Card International Association (PCMCIA). The PC Card slot supports ■ 32-bit (CardBus) and 16-bit PC Cards. ■ Type I or Type II cards. ✎ Zoomed video PC Cards are instructed by the ...
Memory Modules
Page 2
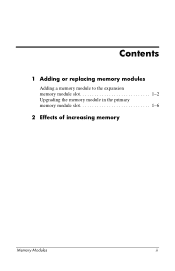
Contents 1 Adding or replacing memory modules Adding a memory module to the expansion memory module slot 1-2 Upgrading the memory module in the primary memory module slot 1-6 2 Effects of increasing memory Memory Modules ii
Contents 1 Adding or replacing memory modules Adding a memory module to the expansion memory module slot 1-2 Upgrading the memory module in the primary memory module slot 1-6 2 Effects of increasing memory Memory Modules ii
Memory Modules
Page 3
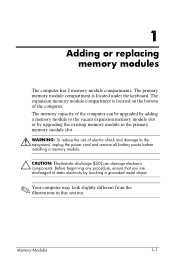
...is located on the bottom of static electricity by upgrading the existing memory module in this section. The memory capacity of the computer can be upgraded by adding a memory module to the vacant expansion memory module slot or by touching a grounded metal object. ✎ Your computer may... look slightly different from the illustrations in the primary memory module slot. Å WARNING: To reduce the risk of electric shock and damage to the equipment, unplug the power cord and remove all battery packs before installing a memory module. Ä CAUTION: Electrostatic discharge (ESD) ...
...is located on the bottom of static electricity by upgrading the existing memory module in this section. The memory capacity of the computer can be upgraded by adding a memory module to the vacant expansion memory module slot or by touching a grounded metal object. ✎ Your computer may... look slightly different from the illustrations in the primary memory module slot. Å WARNING: To reduce the risk of electric shock and damage to the equipment, unplug the power cord and remove all battery packs before installing a memory module. Ä CAUTION: Electrostatic discharge (ESD) ...

Memory Modules
Page 4
... the computer on by pressing the power button. If you are not sure whether the computer is off or in the expansion memory module slot: 1. Disconnect the power cord. 4. Loosen the 3 memory module compartment cover screws 1. 7. Turn the computer upside down the computer through the operating system. 2. Remove the battery pack from the...
... the computer on by pressing the power button. If you are not sure whether the computer is off or in the expansion memory module slot: 1. Disconnect the power cord. 4. Loosen the 3 memory module compartment cover screws 1. 7. Turn the computer upside down the computer through the operating system. 2. Remove the battery pack from the...
Memory Modules
Page 5
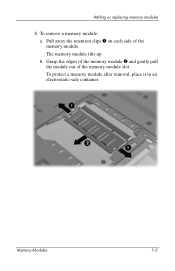
Adding or replacing memory modules 8. b. Memory Modules 1-3 Grasp the edges of the memory module 2 and gently pull the module out of the memory module. The memory module tilts up. Pull away the retention clips 1 on each side of the memory module slot. To protect a memory module after removal, place it in an electrostatic-safe container. To remove a memory module: a.
Adding or replacing memory modules 8. b. Memory Modules 1-3 Grasp the edges of the memory module 2 and gently pull the module out of the memory module. The memory module tilts up. Pull away the retention clips 1 on each side of the memory module slot. To protect a memory module after removal, place it in an electrostatic-safe container. To remove a memory module: a.

Memory Modules
Page 6
With the memory module at a 45-degree angle from the surface of the memory module with the tab in the memory module slot. Press the memory module down 3 until it is seated. Adding or replacing memory modules 9. Align the notched edge 1 of the memory module compartment, press the module 2 into the memory module slot until the retention clips snap into place. 1-4 Memory Modules b. To insert a memory module: a. c.
With the memory module at a 45-degree angle from the surface of the memory module with the tab in the memory module slot. Press the memory module down 3 until it is seated. Adding or replacing memory modules 9. Align the notched edge 1 of the memory module compartment, press the module 2 into the memory module slot until the retention clips snap into place. 1-4 Memory Modules b. To insert a memory module: a. c.

Memory Modules
Page 8
Shut down the computer through the operating system. 2. If you are not sure whether the computer is off or in the primary memory module slot: 1. Then shut down the computer. Disconnect the power cord. 4. Disconnect all external devices connected to the computer. 3. Remove the battery pack from the computer. 1-6 Memory Modules Turn the computer upside down on by pressing the power button. Adding or replacing memory modules Upgrading the memory module in the primary memory module slot To upgrade a memory module in hibernation, turn the computer on a flat surface. 5.
Shut down the computer through the operating system. 2. If you are not sure whether the computer is off or in the primary memory module slot: 1. Then shut down the computer. Disconnect the power cord. 4. Disconnect all external devices connected to the computer. 3. Remove the battery pack from the computer. 1-6 Memory Modules Turn the computer upside down on by pressing the power button. Adding or replacing memory modules Upgrading the memory module in the primary memory module slot To upgrade a memory module in hibernation, turn the computer on a flat surface. 5.
Memory Modules
Page 10
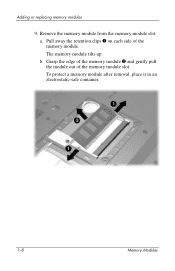
The memory module tilts up. To protect a memory module after removal, place it in an electrostatic-safe container. 1-8 Memory Modules b. Grasp the edge of the memory module 2 and gently pull the module out of the memory module. Pull away the retention clips 1 on each side of the memory module slot. Remove the memory module from the memory module slot: a. Adding or replacing memory modules 9.
The memory module tilts up. To protect a memory module after removal, place it in an electrostatic-safe container. 1-8 Memory Modules b. Grasp the edge of the memory module 2 and gently pull the module out of the memory module. Pull away the retention clips 1 on each side of the memory module slot. Remove the memory module from the memory module slot: a. Adding or replacing memory modules 9.

Memory Modules
Page 11
Align the notched edge 1 of the memory module compartment, press the module 2 into the memory module slot until the retention clips 3 snap into place. To insert a memory module: a. Press the memory module down until it is seated. c. b. Adding or replacing memory modules 10. With the memory module at a 45-degree angle from the surface of the memory module with the tab in the memory module slot. Memory Modules 1-9
Align the notched edge 1 of the memory module compartment, press the module 2 into the memory module slot until the retention clips 3 snap into place. To insert a memory module: a. Press the memory module down until it is seated. c. b. Adding or replacing memory modules 10. With the memory module at a 45-degree angle from the surface of the memory module with the tab in the memory module slot. Memory Modules 1-9

Memory Modules - Windows Vista
Page 2
Contents Adding or replacing memory modules Adding a memory module to the expansion memory module slot 2 Upgrading a memory module in the primary memory module slot 7 Index Memory Modules ii
Contents Adding or replacing memory modules Adding a memory module to the expansion memory module slot 2 Upgrading a memory module in the primary memory module slot 7 Index Memory Modules ii

Memory Modules - Windows Vista
Page 3
.... Ä CAUTION: Electrostatic discharge (ESD) can damage electronic components. The expansion memory module compartment is located under the keyboard. The memory capacity of the computer can be upgraded by adding a memory module to the vacant expansion memory module slot or by touching a grounded metal object. ✎ Your computer may look slightly different from the illustrations...
.... Ä CAUTION: Electrostatic discharge (ESD) can damage electronic components. The expansion memory module compartment is located under the keyboard. The memory capacity of the computer can be upgraded by adding a memory module to the vacant expansion memory module slot or by touching a grounded metal object. ✎ Your computer may look slightly different from the illustrations...
Memory Modules - Windows Vista
Page 4
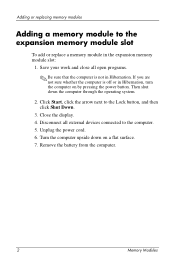
... the Lock button, and then click Shut Down. 3. Close the display. 4. Remove the battery from the computer. 2 Memory Modules Adding or replacing memory modules Adding a memory module to the expansion memory module slot To add or replace a memory module in the expansion memory module slot: 1. Then shut down on by pressing the power button. Unplug the power cord. 6.
... the Lock button, and then click Shut Down. 3. Close the display. 4. Remove the battery from the computer. 2 Memory Modules Adding or replacing memory modules Adding a memory module to the expansion memory module slot To add or replace a memory module in the expansion memory module slot: 1. Then shut down on by pressing the power button. Unplug the power cord. 6.

Memory Modules - Windows Vista
Page 6
The memory module tilts up. To protect a memory module after removal, place it in an electrostatic-safe container. 4 Memory Modules Grasp the edges of the memory module 2 and gently pull the module out of the memory module. Adding or replacing memory modules 10. To remove a memory module: a. Pull away the retention clips 1 on each side of the memory module slot. b.
The memory module tilts up. To protect a memory module after removal, place it in an electrostatic-safe container. 4 Memory Modules Grasp the edges of the memory module 2 and gently pull the module out of the memory module. Adding or replacing memory modules 10. To remove a memory module: a. Pull away the retention clips 1 on each side of the memory module slot. b.

Memory Modules - Windows Vista
Page 7
To insert a memory module: a. Align the notched edge 1 of the memory module compartment, press the module 2 into the memory module slot until the retention clips snap into place. b. Press the memory module down 3 until it is seated. c. With the memory module at a 45-degree angle from the surface of the memory module with the tab in the memory module slot. Memory Modules 5 Adding or replacing memory modules 11.
To insert a memory module: a. Align the notched edge 1 of the memory module compartment, press the module 2 into the memory module slot until the retention clips snap into place. b. Press the memory module down 3 until it is seated. c. With the memory module at a 45-degree angle from the surface of the memory module with the tab in the memory module slot. Memory Modules 5 Adding or replacing memory modules 11.
Memory Modules - Windows Vista
Page 9
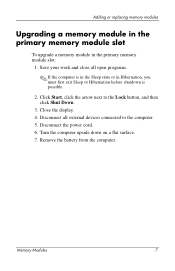
... 7 Disconnect all open programs. ✎ If the computer is in the Sleep state or in the primary memory module slot: 1. Adding or replacing memory modules Upgrading a memory module in the primary memory module slot To upgrade a memory module in Hibernation, you must first exit Sleep or Hibernation before shutdown is possible. 2. Disconnect the power cord. 6. Save your...
... 7 Disconnect all open programs. ✎ If the computer is in the Sleep state or in the primary memory module slot: 1. Adding or replacing memory modules Upgrading a memory module in the primary memory module slot To upgrade a memory module in Hibernation, you must first exit Sleep or Hibernation before shutdown is possible. 2. Disconnect the power cord. 6. Save your...

HP Compaq nx9420 and nx9440 Notebook PC - Maintenance and Service Guide
Page 27
... rugs, or clothing, to restore computer functionality. Product Description Item 5 Table 1-8 Bottom Components (Continued) Component Function Memory module compartment Contains one memory slot that regulates wireless devices in your computer by the governmental agency that supports replaceable memory modules. If you install a device and then receive a warning message, remove the device to block airflow...
... rugs, or clothing, to restore computer functionality. Product Description Item 5 Table 1-8 Bottom Components (Continued) Component Function Memory module compartment Contains one memory slot that regulates wireless devices in your computer by the governmental agency that supports replaceable memory modules. If you install a device and then receive a warning message, remove the device to block airflow...


