
End User License Agreement
Page 1
... may load the Software ON THE CONDITION THAT YOU Product into the local memory or storage device of download. BY purposes of Rights. Copying. An amendment or addendum to this EULA. DOWNLOADING, OR b. Storage. Use. d. You may accompany the HP Product. Notwithstanding the terms and conditions of the original Software Product's proprietary...
... may load the Software ON THE CONDITION THAT YOU Product into the local memory or storage device of download. BY purposes of Rights. Copying. An amendment or addendum to this EULA. DOWNLOADING, OR b. Storage. Use. d. You may accompany the HP Product. Notwithstanding the terms and conditions of the original Software Product's proprietary...

HP USB Digital Drive
Page 2
An SD memory card 2 may not be used with any HP authorized reseller. However, you will need an SD memory card to operate the Digital Drive. The Digital Drive can purchase one (in various storage capacities) from any computer that is a pocket-sized SD (Secure Digital) memory drive for storing and transferring files such as digital pictures, music, video, and data. You can be included. User Guide 1 The HP USB Digital Drive 1 is running Microsoft Windows XP Home, Windows XP Pro, or Windows 2000.
An SD memory card 2 may not be used with any HP authorized reseller. However, you will need an SD memory card to operate the Digital Drive. The Digital Drive can purchase one (in various storage capacities) from any computer that is a pocket-sized SD (Secure Digital) memory drive for storing and transferring files such as digital pictures, music, video, and data. You can be included. User Guide 1 The HP USB Digital Drive 1 is running Microsoft Windows XP Home, Windows XP Pro, or Windows 2000.

HP USB Digital Drive
Page 3
If the SD memory card does not slide in properly, gently pull it out and reinsert it. 2 User Guide Insert the SD memory card into the SD slot 2 with the notched corner positioned on the lower left as shown. Installing the SD Memory Card 1. Remove the cap 1 of the Digital Drive. 2.
If the SD memory card does not slide in properly, gently pull it out and reinsert it. 2 User Guide Insert the SD memory card into the SD slot 2 with the notched corner positioned on the lower left as shown. Installing the SD Memory Card 1. Remove the cap 1 of the Digital Drive. 2.
HP USB Digital Drive
Page 10
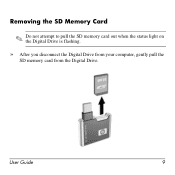
User Guide 9 Removing the SD Memory Card ✎ Do not attempt to pull the SD memory card out when the status light on the Digital Drive is flashing. » After you disconnect the Digital Drive from your computer, gently pull the SD memory card from the Digital Drive.
User Guide 9 Removing the SD Memory Card ✎ Do not attempt to pull the SD memory card out when the status light on the Digital Drive is flashing. » After you disconnect the Digital Drive from your computer, gently pull the SD memory card from the Digital Drive.
External Media Cards
Page 3
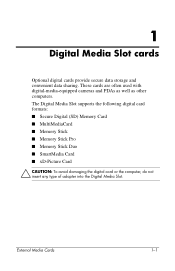
... and PDAs as well as other computers. The Digital Media Slot supports the following digital card formats: ■ Secure Digital (SD) Memory Card ■ MultiMediaCard ■ Memory Stick ■ Memory Stick Pro ■ Memory Stick Duo ■ SmartMedia Card ■ xD-Picture Card Ä CAUTION: To avoid damaging the digital card or the computer...
... and PDAs as well as other computers. The Digital Media Slot supports the following digital card formats: ■ Secure Digital (SD) Memory Card ■ MultiMediaCard ■ Memory Stick ■ Memory Stick Pro ■ Memory Stick Duo ■ SmartMedia Card ■ xD-Picture Card Ä CAUTION: To avoid damaging the digital card or the computer...

External Media Cards
Page 6
... the PC Card manufacturer to the standard specifications of support for the device. Configuring a PC Card Ä CAUTION: To prevent loss of the Personal Computer Memory Card International Association (PCMCIA). If you are not supported. 2 PC Cards A PC Card is a credit card-sized accessory designed to conform to install device drivers...
... the PC Card manufacturer to the standard specifications of support for the device. Configuring a PC Card Ä CAUTION: To prevent loss of the Personal Computer Memory Card International Association (PCMCIA). If you are not supported. 2 PC Cards A PC Card is a credit card-sized accessory designed to conform to install device drivers...
External Media Cards
Page 10
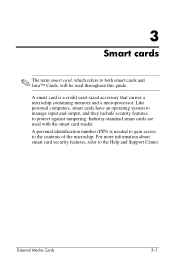
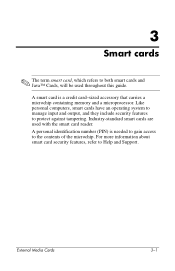
Industry-standard smart cards are used throughout this guide. External Media Cards 3-1 A personal identification number (PIN) is a credit card-sized accessory that carries a microchip containing memory and a microprocessor. Like personal computers, smart cards have an operating system to manage input and output, and they include security features to the contents of ...
Industry-standard smart cards are used throughout this guide. External Media Cards 3-1 A personal identification number (PIN) is a credit card-sized accessory that carries a microchip containing memory and a microprocessor. Like personal computers, smart cards have an operating system to manage input and output, and they include security features to the contents of ...

External Media Cards - Windows Vista
Page 3
The Digital Media Slot supports the following digital card formats: ■ Secure Digital (SD) Memory Card ■ MultiMediaCard ■ Memory Stick ■ Memory Stick Pro ■ Memory Stick Duo ■ SmartMedia Card ■ xD-Picture Card Ä CAUTION: To avoid damaging the digital card or the computer, do not insert any type ...
The Digital Media Slot supports the following digital card formats: ■ Secure Digital (SD) Memory Card ■ MultiMediaCard ■ Memory Stick ■ Memory Stick Pro ■ Memory Stick Duo ■ SmartMedia Card ■ xD-Picture Card Ä CAUTION: To avoid damaging the digital card or the computer, do not insert any type ...

External Media Cards - Windows Vista
Page 6
... the PC Card manufacturer to the standard specifications of support for the device. Configuring a PC Card Ä CAUTION: To prevent loss of the Personal Computer Memory Card International Association (PCMCIA). If you are not supported. External Media Cards 2-1 2 PC Cards A PC Card is a credit card-sized accessory designed to conform to...
... the PC Card manufacturer to the standard specifications of support for the device. Configuring a PC Card Ä CAUTION: To prevent loss of the Personal Computer Memory Card International Association (PCMCIA). If you are not supported. External Media Cards 2-1 2 PC Cards A PC Card is a credit card-sized accessory designed to conform to...
External Media Cards - Windows Vista
Page 10
... output, and they include security features to the contents of the microchip. A personal identification number (PIN) is a credit card-sized accessory that carries a microchip containing memory and a microprocessor. For more information about smart card security features, refer to both smart cards and Java™ Cards, will be used with the smart...
... output, and they include security features to the contents of the microchip. A personal identification number (PIN) is a credit card-sized accessory that carries a microchip containing memory and a microprocessor. For more information about smart card security features, refer to both smart cards and Java™ Cards, will be used with the smart...

Memory Modules
Page 1
Memory Modules Document Part Number: 396849-001 March 2006 This guide explains how to replace and upgrade memory in the computer.
Memory Modules Document Part Number: 396849-001 March 2006 This guide explains how to replace and upgrade memory in the computer.
Memory Modules
Page 2
Contents 1 Adding or replacing memory modules Adding a memory module to the expansion memory module slot 1-2 Upgrading the memory module in the primary memory module slot 1-6 2 Effects of increasing memory Memory Modules ii
Contents 1 Adding or replacing memory modules Adding a memory module to the expansion memory module slot 1-2 Upgrading the memory module in the primary memory module slot 1-6 2 Effects of increasing memory Memory Modules ii
Memory Modules
Page 3
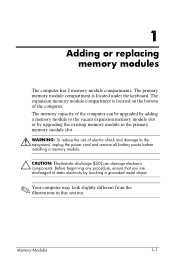
... equipment, unplug the power cord and remove all battery packs before installing a memory module. Ä CAUTION: Electrostatic discharge (ESD) can be upgraded by adding a memory module to the vacant expansion memory module slot or by touching a grounded metal object. ✎ Your computer... may look slightly different from the illustrations in the primary memory module slot. Å WARNING: To reduce the risk of the computer. The expansion memory module compartment is located under the keyboard. Memory Modules 1-1 Before beginning any procedure, ensure that you are ...
... equipment, unplug the power cord and remove all battery packs before installing a memory module. Ä CAUTION: Electrostatic discharge (ESD) can be upgraded by adding a memory module to the vacant expansion memory module slot or by touching a grounded metal object. ✎ Your computer... may look slightly different from the illustrations in the primary memory module slot. Å WARNING: To reduce the risk of the computer. The expansion memory module compartment is located under the keyboard. Memory Modules 1-1 Before beginning any procedure, ensure that you are ...

Memory Modules
Page 4
... . 5. Turn the computer upside down the computer through the operating system. 2. Disconnect the power cord. 4. Lift the memory module compartment cover 2 away from the computer. 6. Loosen the 3 memory module compartment cover screws 1. 7. Adding or replacing memory modules Adding a memory module to the computer. 3. Shut down the computer. Remove the battery pack from the computer...
... . 5. Turn the computer upside down the computer through the operating system. 2. Disconnect the power cord. 4. Lift the memory module compartment cover 2 away from the computer. 6. Loosen the 3 memory module compartment cover screws 1. 7. Adding or replacing memory modules Adding a memory module to the computer. 3. Shut down the computer. Remove the battery pack from the computer...
Memory Modules
Page 5
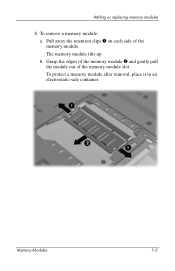
b. Grasp the edges of the memory module 2 and gently pull the module out of the memory module. Adding or replacing memory modules 8. Pull away the retention clips 1 on each side of the memory module slot. To protect a memory module after removal, place it in an electrostatic-safe container. Memory Modules 1-3 To remove a memory module: a. The memory module tilts up.
b. Grasp the edges of the memory module 2 and gently pull the module out of the memory module. Adding or replacing memory modules 8. Pull away the retention clips 1 on each side of the memory module slot. To protect a memory module after removal, place it in an electrostatic-safe container. Memory Modules 1-3 To remove a memory module: a. The memory module tilts up.

Memory Modules
Page 6
With the memory module at a 45-degree angle from the surface of the memory module with the tab in the memory module slot. c. Press the memory module down 3 until the retention clips snap into the memory module slot until it is seated. Align the notched edge 1 of the memory module compartment, press the module 2 into place. 1-4 Memory Modules b. Adding or replacing memory modules 9. To insert a memory module: a.
With the memory module at a 45-degree angle from the surface of the memory module with the tab in the memory module slot. c. Press the memory module down 3 until the retention clips snap into the memory module slot until it is seated. Align the notched edge 1 of the memory module compartment, press the module 2 into place. 1-4 Memory Modules b. Adding or replacing memory modules 9. To insert a memory module: a.
Memory Modules
Page 7
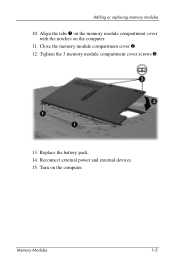
Close the memory module compartment cover 2. 12. Tighten the 3 memory module compartment cover screws 3. 13. Adding or replacing memory modules 10. Replace the battery pack. 14. Reconnect external power and external devices. 15. Align the tabs 1 on the memory module compartment cover with the notches on the computer. Turn on the computer. 11. Memory Modules 1-5
Close the memory module compartment cover 2. 12. Tighten the 3 memory module compartment cover screws 3. 13. Adding or replacing memory modules 10. Replace the battery pack. 14. Reconnect external power and external devices. 15. Align the tabs 1 on the memory module compartment cover with the notches on the computer. Turn on the computer. 11. Memory Modules 1-5

Memory Modules
Page 8
If you are not sure whether the computer is off or in the primary memory module slot: 1. Then shut down on by pressing the power button. Turn the computer upside down the computer through the operating system. 2. Remove the battery pack from the computer. 1-6 Memory Modules Adding or replacing memory modules Upgrading the memory module in the primary memory module slot To upgrade a memory module in hibernation, turn the computer on a flat surface. 5. Disconnect the power cord. 4. Disconnect all external devices connected to the computer. 3. Shut down the computer.
If you are not sure whether the computer is off or in the primary memory module slot: 1. Then shut down on by pressing the power button. Turn the computer upside down the computer through the operating system. 2. Remove the battery pack from the computer. 1-6 Memory Modules Adding or replacing memory modules Upgrading the memory module in the primary memory module slot To upgrade a memory module in hibernation, turn the computer on a flat surface. 5. Disconnect the power cord. 4. Disconnect all external devices connected to the computer. 3. Shut down the computer.
Memory Modules
Page 9
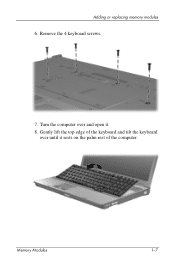
Gently lift the top edge of the keyboard and tilt the keyboard over and open it rests on the palm rest of the computer. Memory Modules 1-7 Remove the 4 keyboard screws. 7. Turn the computer over until it . 8. Adding or replacing memory modules 6.
Gently lift the top edge of the keyboard and tilt the keyboard over and open it rests on the palm rest of the computer. Memory Modules 1-7 Remove the 4 keyboard screws. 7. Turn the computer over until it . 8. Adding or replacing memory modules 6.
Memory Modules
Page 10
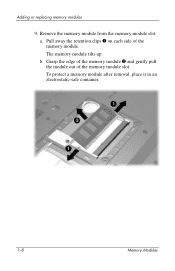
Remove the memory module from the memory module slot: a. Pull away the retention clips 1 on each side of the memory module slot. Grasp the edge of the memory module 2 and gently pull the module out of the memory module. To protect a memory module after removal, place it in an electrostatic-safe container. 1-8 Memory Modules b. Adding or replacing memory modules 9. The memory module tilts up.
Remove the memory module from the memory module slot: a. Pull away the retention clips 1 on each side of the memory module slot. Grasp the edge of the memory module 2 and gently pull the module out of the memory module. To protect a memory module after removal, place it in an electrostatic-safe container. 1-8 Memory Modules b. Adding or replacing memory modules 9. The memory module tilts up.


