HP Client Manager 6.1
Page 13
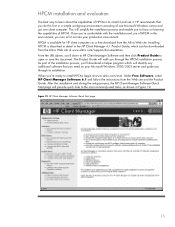
... Software and then click Product Guide to open or save this first in a simple workgroup environment consisting of one Microsoft Windows server and just one client computer. Under Free Software, select HP Client Manager Software 6.1 and follow the instructions from the Altiris Web site. As part of the installation process, you'...learn about the capabilities of HPCM is to install it and use of HPCM in this environment, you through its installation. HPCM is available for HP client computers as shown in Figure 10. HP recommends that you need on learning the capabilities of HPCM.
... Software and then click Product Guide to open or save this first in a simple workgroup environment consisting of one Microsoft Windows server and just one client computer. Under Free Software, select HP Client Manager Software 6.1 and follow the instructions from the Altiris Web site. As part of the installation process, you'...learn about the capabilities of HPCM is to install it and use of HPCM in this environment, you through its installation. HPCM is available for HP client computers as shown in Figure 10. HP recommends that you need on learning the capabilities of HPCM.
Using LightScribe (Select Models Only)
Page 9
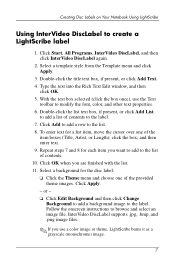
...text box, if present, or click Add Text. 4. Type the text into the Rich Text Edit window, and then click OK. 5. Double-click the list text box, if present, or click Add List... steps 7 and 8 for the disc label: ❏ Click the Theme menu and choose one of contents. 10. InterVideo DiscLabel supports .jpg, .bmp, and .png image files. ✎ If you are finished with the... then enter text. 9. Follow the onscreen instructions to the label. 7. Creating Disc Labels on Your Notebook Using LightScribe Using InterVideo DiscLabel to the list. 8. With the text box selected (click the box once...
...text box, if present, or click Add Text. 4. Type the text into the Rich Text Edit window, and then click OK. 5. Double-click the list text box, if present, or click Add List... steps 7 and 8 for the disc label: ❏ Click the Theme menu and choose one of contents. 10. InterVideo DiscLabel supports .jpg, .bmp, and .png image files. ✎ If you are finished with the... then enter text. 9. Follow the onscreen instructions to the label. 7. Creating Disc Labels on Your Notebook Using LightScribe Using InterVideo DiscLabel to the list. 8. With the text box selected (click the box once...
Using LightScribe (Select Models Only)
Page 12
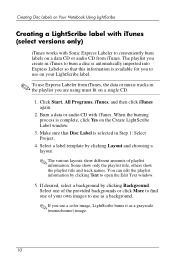
When the burning process is selected in iTunes to open the Edit Text window. 5. Click Start, All Programs, iTunes, and then click iTunes again. 2. Select a label template by clicking Layout and choosing a layout. ✎ The various ... you use as a grayscale (monochrome) image. 10 If desired, select a background by clicking Text to burn a disc is automatically imported into Express Labeler so that Disc Label is complete, click Yes on the Create LightScribe Label window. 3. Creating Disc Labels on Your Notebook Using LightScribe Creating a LightScribe label with iTunes (...
When the burning process is selected in iTunes to open the Edit Text window. 5. Click Start, All Programs, iTunes, and then click iTunes again. 2. Select a label template by clicking Layout and choosing a layout. ✎ The various ... you use as a grayscale (monochrome) image. 10 If desired, select a background by clicking Text to burn a disc is automatically imported into Express Labeler so that Disc Label is complete, click Yes on the Create LightScribe Label window. 3. Creating Disc Labels on Your Notebook Using LightScribe Creating a LightScribe label with iTunes (...
HP Compaq notebook single image white paper
Page 1
... 7 Determining the ROM version using HP Diagnostics for Windows 7 Determining the ROM Version Using Windows System Information 8 Determining the ROM version using QuickLaunch Buttons for Windows 8 Creating a ROMPaq diskette ...8 Upgrading the ROM...8 Appendix B: SoftPaqs...9 Unpacking a SoftPaq file...9 Appendix C: Known anomalies ...10 Appendix D: Questions and answers 11 For more information...12 HP Compaq notebook single image white paper Introduction...
... 7 Determining the ROM version using HP Diagnostics for Windows 7 Determining the ROM Version Using Windows System Information 8 Determining the ROM version using QuickLaunch Buttons for Windows 8 Creating a ROMPaq diskette ...8 Upgrading the ROM...8 Appendix B: SoftPaqs...9 Unpacking a SoftPaq file...9 Appendix C: Known anomalies ...10 Appendix D: Questions and answers 11 For more information...12 HP Compaq notebook single image white paper Introduction...
HP Compaq notebook single image white paper
Page 4
... into the nc6100. 9. Apply power to the nc6200 and allow the OS to enumerate all of the new devices. 10. Apply power to the nc6100 and allow the OS to enumerate all of the new devices. Apply power to the...enhancements IMPORTANT Upgrade the system ROM before beginning the Windows XP Professional installation. 4 Removal procedures are available in the Maintenance and Service Guide: "HP Compaq Business Notebook nc8200 Series." 3. Removal procedures are available in the Maintenance and Service Guide: "HP Compaq Business Notebook nc6100 Series." 8. Power down the nc6200 and ...
... into the nc6100. 9. Apply power to the nc6200 and allow the OS to enumerate all of the new devices. 10. Apply power to the nc6100 and allow the OS to enumerate all of the new devices. Apply power to the...enhancements IMPORTANT Upgrade the system ROM before beginning the Windows XP Professional installation. 4 Removal procedures are available in the Maintenance and Service Guide: "HP Compaq Business Notebook nc8200 Series." 3. Removal procedures are available in the Maintenance and Service Guide: "HP Compaq Business Notebook nc6100 Series." 8. Power down the nc6200 and ...
HP Compaq notebook single image white paper
Page 5
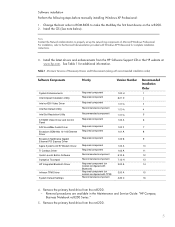
... Set Default Utility Intel Set Resolution Utility ATI 8200 Video Driver and Control Panel ADI SoundMax Audio Driver Broadcom BCM440x 10-100 Ethernet Driver Broadcom NetXtreme Gigabit Ethernet PCI Express Driver Agere Systems AC'97 Modem Driver TI Cardbus Driver Quick ... nc8200. 2. Install the OS (See note below). Change the boot order in the Maintenance and Service Guide: "HP Compaq Business Notebook nc8200 Series." 5. Note Contact the Network Administrators to make the Multibay the first boot device on models configured with Windows XP Professional for additional information.
... Set Default Utility Intel Set Resolution Utility ATI 8200 Video Driver and Control Panel ADI SoundMax Audio Driver Broadcom BCM440x 10-100 Ethernet Driver Broadcom NetXtreme Gigabit Ethernet PCI Express Driver Agere Systems AC'97 Modem Driver TI Cardbus Driver Quick ... nc8200. 2. Install the OS (See note below). Change the boot order in the Maintenance and Service Guide: "HP Compaq Business Notebook nc8200 Series." 5. Note Contact the Network Administrators to make the Multibay the first boot device on models configured with Windows XP Professional for additional information.
HP Compaq notebook single image white paper
Page 10
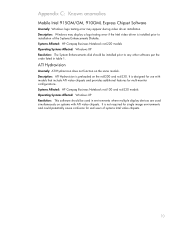
... preloaded on the some models. It is designed for multi-monitor configurations. Systems Affected: HP Compaq Business Notebook nc6100 and nc6220 models Operating Systems Affected: Windows XP Resolution: This software should be used simultaneously on systems with models that include ATI ...use with ATI video chipsets. Systems Affected: HP Compaq Business Notebook nc6220 models Operating Systems Affected: Windows XP Resolution: The System Enhancements disk should be installed prior to installation of systems Intel video chipsets. 10 Appendix C: Known anomalies Mobile Intel 915GM/GM,...
... preloaded on the some models. It is designed for multi-monitor configurations. Systems Affected: HP Compaq Business Notebook nc6100 and nc6220 models Operating Systems Affected: Windows XP Resolution: This software should be used simultaneously on systems with models that include ATI ...use with ATI video chipsets. Systems Affected: HP Compaq Business Notebook nc6220 models Operating Systems Affected: Windows XP Resolution: The System Enhancements disk should be installed prior to installation of systems Intel video chipsets. 10 Appendix C: Known anomalies Mobile Intel 915GM/GM,...
Hardware-Software Guide
Page 7
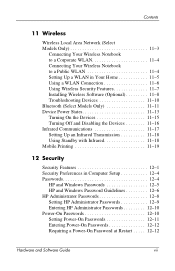
... Notebook to a Corporate WLAN 11-4 Connecting Your Wireless Notebook to a Public WLAN 11-4 Setting Up a WLAN in Your Home 11-5 Using a WLAN Connection 11-6 Using Wireless Security Features 11-7 Installing Wireless Software (Optional 11-8 Troubleshooting Devices 11-10 Bluetooth...Preferences in Computer Setup 12-4 Passwords 12-4 HP and Windows Passwords 12-5 HP and Windows Password Guidelines 12-6 HP Administrator Passwords 12-8 Setting HP Administrator Passwords 12-9 Entering HP Administrator Passwords 12-10 Power-On Passwords 12-10 Setting Power-On Passwords 12-11 Entering Power...
... Notebook to a Corporate WLAN 11-4 Connecting Your Wireless Notebook to a Public WLAN 11-4 Setting Up a WLAN in Your Home 11-5 Using a WLAN Connection 11-6 Using Wireless Security Features 11-7 Installing Wireless Software (Optional 11-8 Troubleshooting Devices 11-10 Bluetooth...Preferences in Computer Setup 12-4 Passwords 12-4 HP and Windows Passwords 12-5 HP and Windows Password Guidelines 12-6 HP Administrator Passwords 12-8 Setting HP Administrator Passwords 12-9 Entering HP Administrator Passwords 12-10 Power-On Passwords 12-10 Setting Power-On Passwords 12-11 Entering Power...
Hardware-Software Guide
Page 37
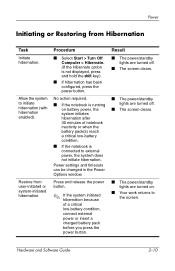
...or Restoring from user-initiated or system-initiated hibernation. No action required. ■ If the notebook is running on . ■ Your work returns to the screen. Hardware and Software Guide 2-10 Result ■ The power/standby lights are turned off. ■ The screen clears. &#...hibernation (with hibernation enabled). Power settings and timeouts can be changed in the Power Options window. Press and release the power button. ✎ If the system initiated hibernation because of notebook inactivity or when the battery pack(s) reach a critical low-battery condition. ■ ...
...or Restoring from user-initiated or system-initiated hibernation. No action required. ■ If the notebook is running on . ■ Your work returns to the screen. Hardware and Software Guide 2-10 Result ■ The power/standby lights are turned off. ■ The screen clears. &#...hibernation (with hibernation enabled). Power settings and timeouts can be changed in the Power Options window. Press and release the power button. ✎ If the system initiated hibernation because of notebook inactivity or when the battery pack(s) reach a critical low-battery condition. ■ ...

Hardware-Software Guide
Page 38
...The screen clears. ■ The power/standby lights are turned on battery power, the system initiates standby after 10 minutes of notebook inactivity. (Default setting) ■ If the notebook is attached to external power, the system does not initiate standby. Resume from Standby Task Initiate standby. Power ...or system-initiated standby. Power settings and timeouts can be changed in the Power Options window. ■ Press and release the power button. ■ If the display was closed while the notebook was in standby, open the display. Allow the system to the screen. Procedure &#...
...The screen clears. ■ The power/standby lights are turned on battery power, the system initiates standby after 10 minutes of notebook inactivity. (Default setting) ■ If the notebook is attached to external power, the system does not initiate standby. Resume from Standby Task Initiate standby. Power ...or system-initiated standby. Power settings and timeouts can be changed in the Power Options window. ■ Press and release the power button. ■ If the display was closed while the notebook was in standby, open the display. Allow the system to the screen. Procedure &#...
Hardware-Software Guide
Page 92
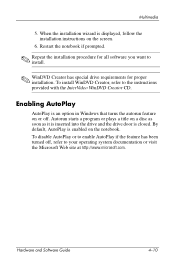
... To install WinDVD Creator, refer to install. ✎ WinDVD Creator has special drive requirements for proper installation. Hardware and Software Guide 4-10 Enabling AutoPlay AutoPlay is enabled on or off , refer to enable AutoPlay if the feature has been turned off . Autorun starts a ...program or plays a title on the screen. 6. By default, AutoPlay is an option in Windows that turns the autorun feature on the notebook. Multimedia 5. Restart the notebook if prompted. ✎ Repeat the installation procedure for all software you want to the instructions provided with ...
... To install WinDVD Creator, refer to install. ✎ WinDVD Creator has special drive requirements for proper installation. Hardware and Software Guide 4-10 Enabling AutoPlay AutoPlay is enabled on or off , refer to enable AutoPlay if the feature has been turned off . Autorun starts a ...program or plays a title on the screen. 6. By default, AutoPlay is an option in Windows that turns the autorun feature on the notebook. Multimedia 5. Restart the notebook if prompted. ✎ Repeat the installation procedure for all software you want to the instructions provided with ...
Hardware-Software Guide
Page 135
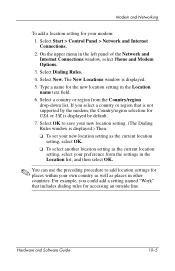
Hardware and Software Guide 10-5 Select Dialing Rules. 4. Type a name for the new location setting in the left panel of the Network and Internet Connections window, select Phone and Modem Options. 3. The New Locations window is displayed.) Then: ❏ To set your new location setting as the ...To add a location setting for your own country as well as the current location setting, select your new location setting. (The Dialing Rules window is displayed. 5. Select New. Select Start > Control Panel > Network and Internet Connections. 2. For example, you select a country or ...
Hardware and Software Guide 10-5 Select Dialing Rules. 4. Type a name for the new location setting in the left panel of the Network and Internet Connections window, select Phone and Modem Options. 3. The New Locations window is displayed.) Then: ❏ To set your new location setting as the ...To add a location setting for your own country as well as the current location setting, select your new location setting. (The Dialing Rules window is displayed. 5. Select New. Select Start > Control Panel > Network and Internet Connections. 2. For example, you select a country or ...

Hardware-Software Guide
Page 136
... the upper menu in the left panel of the country in which you purchased the notebook, the following suggestions might be the dialing mode supported by a telephone line, dial ... you experience connection problems while using the modem outside of the Network and Internet Connections window, select Phone and Modem Options. 3. Modem location settings include dialing mode options. To...the telephone line type. Select the Dialing Rules tab. 4. Select OK > OK. Hardware and Software Guide 10-6 An analog telephone line supports 1 of 2 dialing modes, pulse dialing or tone dialing. Select Start ...
... the upper menu in the left panel of the country in which you purchased the notebook, the following suggestions might be the dialing mode supported by a telephone line, dial ... you experience connection problems while using the modem outside of the Network and Internet Connections window, select Phone and Modem Options. 3. Modem location settings include dialing mode options. To...the telephone line type. Select the Dialing Rules tab. 4. Select OK > OK. Hardware and Software Guide 10-6 An analog telephone line supports 1 of 2 dialing modes, pulse dialing or tone dialing. Select Start ...

Hardware-Software Guide
Page 137
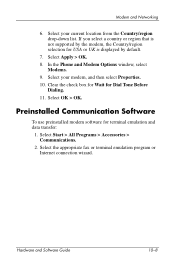
...dial and will display a "No Dial Tone" error message. On the upper menu in the left panel of the Network and Internet Connections window, select Phone and Modem Options. 3. Select your current modem location setting. 5. Select Edit. Modem and Networking ■ Check the telephone... number you continue to ignore all dial tones before dialing: 1. Select OK > OK. Hardware and Software Guide 10-7 Select Modem. 7. Select Properties. 6. Dial the telephone number on the telephone, make sure there is a response from the remote modem, and...
...dial and will display a "No Dial Tone" error message. On the upper menu in the left panel of the Network and Internet Connections window, select Phone and Modem Options. 3. Select your current modem location setting. 5. Select Edit. Modem and Networking ■ Check the telephone... number you continue to ignore all dial tones before dialing: 1. Select OK > OK. Hardware and Software Guide 10-7 Select Modem. 7. Select Properties. 6. Dial the telephone number on the telephone, make sure there is a response from the remote modem, and...
Hardware-Software Guide
Page 138
...transfer: 1. Preinstalled Communication Software To use preinstalled modem software for Dial Tone Before Dialing. 11. Hardware and Software Guide 10-8 Select Apply > OK. 8. In the Phone and Modem Options window, select Modems. 9. If you select a country or region that is not supported by the modem, the Country/region...Accessories > Communications. 2. Select your current location from the Country/region drop-down list. Modem and Networking 6. Select your modem, and then select Properties. 10. Select the appropriate fax or terminal emulation program or Internet connection wizard.
...transfer: 1. Preinstalled Communication Software To use preinstalled modem software for Dial Tone Before Dialing. 11. Hardware and Software Guide 10-8 Select Apply > OK. 8. In the Phone and Modem Options window, select Modems. 9. If you select a country or region that is not supported by the modem, the Country/region...Accessories > Communications. 2. Select your current location from the Country/region drop-down list. Modem and Networking 6. Select your modem, and then select Properties. 10. Select the appropriate fax or terminal emulation program or Internet connection wizard.
Hardware-Software Guide
Page 208
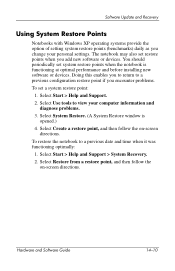
... Software Guide 14-10 Select Use tools to a previous date and time when it was functioning optimally: 1. Select Restore from a restore point, and then follow the on -screen directions. Software Update and Recovery Using System Restore Points Notebooks with Windows XP operating systems ...provide the option of setting system restore points (benchmarks) daily as you add new software or devices. To restore the notebook to view your personal settings. Select Start > ...
... Software Guide 14-10 Select Use tools to a previous date and time when it was functioning optimally: 1. Select Restore from a restore point, and then follow the on -screen directions. Software Update and Recovery Using System Restore Points Notebooks with Windows XP operating systems ...provide the option of setting system restore points (benchmarks) daily as you add new software or devices. To restore the notebook to view your personal settings. Select Start > ...

Hardware-Software Guide
Page 212
... the drivers are reinstalled, you must reinstall drivers. Follow the installation instructions provided with the notebook: 1. Hardware and Software Guide 14-14 Press F to complete. While running Windows, insert the Driver Recovery disc into the optical drive. Then type D:\SWSETUP\APPINSTL\SETUP.EXE (where... Software Update and Recovery 10. If you added to continue setup using the NTFS file system (Quick), and then press enter. Ä CAUTION: Formatting a drive deletes all current files. 12. Press C to the notebook. The notebook restarts in Windows when the process is ...
... the drivers are reinstalled, you must reinstall drivers. Follow the installation instructions provided with the notebook: 1. Hardware and Software Guide 14-14 Press F to complete. While running Windows, insert the Driver Recovery disc into the optical drive. Then type D:\SWSETUP\APPINSTL\SETUP.EXE (where... Software Update and Recovery 10. If you added to continue setup using the NTFS file system (Quick), and then press enter. Ä CAUTION: Formatting a drive deletes all current files. 12. Press C to the notebook. The notebook restarts in Windows when the process is ...
Hardware-Software Guide
Page 239
... primary hard drive description 5-3 installing 5-6 removing 5-4 USB 5-1 See also hard drive DVD drives 5-10, 5-11 See also hard drive DVD region settings 4-10 DVDs See recovery discs E edge motion 3-4 embedded security chip 13-6 Embedded Security for Windows XP 12-24 D default boot sequence B-1 deployment C-2 device disabling 12-18 device options in Computer Setup...
... primary hard drive description 5-3 installing 5-6 removing 5-4 USB 5-1 See also hard drive DVD drives 5-10, 5-11 See also hard drive DVD region settings 4-10 DVDs See recovery discs E edge motion 3-4 embedded security chip 13-6 Embedded Security for Windows XP 12-24 D default boot sequence B-1 deployment C-2 device disabling 12-18 device options in Computer Setup...
Hardware-Software Guide
Page 240
...jack 1-10, 4-2 hibernation avoiding while playing a disc 5-15 defined 2-5 enabling 2-6 hibernation file 8-11 initiating 2-6, 2-10 restoring from 2-10 home WLAN 11-5 hotkeys 3-5, 3-10 HP administrator password 12-8 HP Client Manager Software C-3 HP password 12-5 HP password guidelines 12-6 HP ProtectTools ...jacks headphone 1-10, 4-2 microphone 1-10, 4-1 RJ-11 1-11 RJ-45 1-11 S-Video-out 1-9, 4-6 K keyboard cleaning 15-3 external 3-10 keypad keys 1-6 keypad, embedded numeric 3-18 keypad, external numeric 3-21 keys fn 1-6 function 1-6, 2-3 keypad 1-6 Windows application 1-6 Windows logo 1-6 ...
...jack 1-10, 4-2 hibernation avoiding while playing a disc 5-15 defined 2-5 enabling 2-6 hibernation file 8-11 initiating 2-6, 2-10 restoring from 2-10 home WLAN 11-5 hotkeys 3-5, 3-10 HP administrator password 12-8 HP Client Manager Software C-3 HP password 12-5 HP password guidelines 12-6 HP ProtectTools ...jacks headphone 1-10, 4-2 microphone 1-10, 4-1 RJ-11 1-11 RJ-45 1-11 S-Video-out 1-9, 4-6 K keyboard cleaning 15-3 external 3-10 keypad keys 1-6 keypad, embedded numeric 3-18 keypad, external numeric 3-21 keys fn 1-6 function 1-6, 2-3 keypad 1-6 Windows application 1-6 Windows logo 1-6 ...
Hardware-Software Guide
Page 242
...10 removing 5-11 MultiBay II, location 1-10 MultiBoot B-1 multimedia software 4-8 mute button 4-1 N network cable 10-6 network jack 1-11 network, noise suppression circuitry 10-6 noise suppression circuitry modem cable 10-1 network cable 10-6 Norton AntiVirus 12-21 notebook care 15-2 notebook information 14-2 num lock light 1-2 numeric keypad 3-19 O opening the notebook... 5-10, 5-11 P Palm Check 3-4 passwords coordinating 12-6 DriveLock 12-14, 13-5 forgetting 12-4 HP 12-5 HP administrator 12-8, 13-5 HP guidelines 12-6 power-on 12-10, 13-5 security 2-14 using 12-4 Windows 12-5 Windows guidelines...
...10 removing 5-11 MultiBay II, location 1-10 MultiBoot B-1 multimedia software 4-8 mute button 4-1 N network cable 10-6 network jack 1-11 network, noise suppression circuitry 10-6 noise suppression circuitry modem cable 10-1 network cable 10-6 Norton AntiVirus 12-21 notebook care 15-2 notebook information 14-2 num lock light 1-2 numeric keypad 3-19 O opening the notebook... 5-10, 5-11 P Palm Check 3-4 passwords coordinating 12-6 DriveLock 12-14, 13-5 forgetting 12-4 HP 12-5 HP administrator 12-8, 13-5 HP guidelines 12-6 power-on 12-10, 13-5 security 2-14 using 12-4 Windows 12-5 Windows guidelines...


