
Hardware-Software Guide
Page 58
...9632; Disconnect external devices you are not using that you are not using. ■ Use the fn+f9 and fn+f10 hotkeys to adjust screen brightness as you need it . ■ Use optional powered speakers instead of the internal speakers, or use the volume buttons to adjust system volume as you... use the notebook: ■ Turn off wireless connections and exit modem applications when you are not using them. ■ Turn off a device connected to an external ...
...9632; Disconnect external devices you are not using that you are not using. ■ Use the fn+f9 and fn+f10 hotkeys to adjust screen brightness as you need it . ■ Use optional powered speakers instead of the internal speakers, or use the volume buttons to adjust system volume as you... use the notebook: ■ Turn off wireless connections and exit modem applications when you are not using them. ■ Turn off a device connected to an external ...

Hardware-Software Guide
Page 67
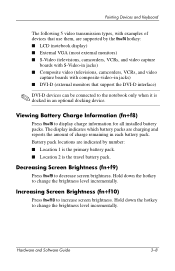
Pointing Devices and Keyboard Hotkey Quick Reference Function Key Combination to Activate Function Initiate standby fn+f3 Switch between notebook display and external display fn+f4 View battery information fn+f8 Decrease screen brightness fn+f9 Increase screen brightness fn+f10 Turn on and off the ambient light sensor fn+f11 Display system information fn+esc Key Combination to Deactivate Function Power button fn+f4 fn+f8 N/A N/A fn+f11 fn+esc Hardware and Software Guide 3-6
Pointing Devices and Keyboard Hotkey Quick Reference Function Key Combination to Activate Function Initiate standby fn+f3 Switch between notebook display and external display fn+f4 View battery information fn+f8 Decrease screen brightness fn+f9 Increase screen brightness fn+f10 Turn on and off the ambient light sensor fn+f11 Display system information fn+esc Key Combination to Deactivate Function Power button fn+f4 fn+f8 N/A N/A fn+f11 fn+esc Hardware and Software Guide 3-6
Hardware-Software Guide
Page 69
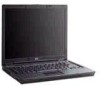
... battery pack. ■ Location 2 is docked in an optional docking device. Hold down the hotkey to change the brightness level incrementally. Battery pack locations are indicated by the fn+f4 hotkey: ■ LCD (notebook display) ■ External VGA (most external monitors) ■ S-Video (televisions, camcorders, VCRs, and video capture boards with S-Video...
... battery pack. ■ Location 2 is docked in an optional docking device. Hold down the hotkey to change the brightness level incrementally. Battery pack locations are indicated by the fn+f4 hotkey: ■ LCD (notebook display) ■ External VGA (most external monitors) ■ S-Video (televisions, camcorders, VCRs, and video capture boards with S-Video...
Hardware-Software Guide
Page 76
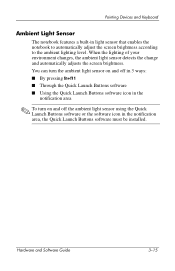
... 3-15 Pointing Devices and Keyboard Ambient Light Sensor The notebook features a built-in the notification area, the Quick Launch Buttons software must be installed. When the lighting of your environment changes, the ambient light sensor detects the change and automatically adjusts the screen brightness. You can turn the ambient light sensor on...; To turn on and off the ambient light sensor using the Quick Launch Buttons software or the software icon in light sensor that enables the notebook to automatically adjust the screen brightness according to the ambient lighting level.
... 3-15 Pointing Devices and Keyboard Ambient Light Sensor The notebook features a built-in the notification area, the Quick Launch Buttons software must be installed. When the lighting of your environment changes, the ambient light sensor detects the change and automatically adjusts the screen brightness. You can turn the ambient light sensor on...; To turn on and off the ambient light sensor using the Quick Launch Buttons software or the software icon in light sensor that enables the notebook to automatically adjust the screen brightness according to the ambient lighting level.
Hardware-Software Guide
Page 243
... the cap 3-3 using 3-13 Presentation mode button, location 1-5, 3-11, 3-13 Printing, Mobile 11-19 processor performance controls 2-14 Product Key 1-17 product name and number, notebook 1-17 projector, connecting 4-7 public WLAN 11-4 Q Quick Launch buttons location 3-11 software 3-12 Quick Tile 3-17 R rated input power specifications A-2 rear components 1-9 recovery discs ... 14-11, 14-12 restore points 14-10 right-side components 1-10 RJ-11 jack 1-11 RJ-45 jack 1-11 S safeguarding data 14-8 screen brightness 3-5, 3-8 Hardware and Software Guide Index-7 shutdown procedures; hibernation;
... the cap 3-3 using 3-13 Presentation mode button, location 1-5, 3-11, 3-13 Printing, Mobile 11-19 processor performance controls 2-14 Product Key 1-17 product name and number, notebook 1-17 projector, connecting 4-7 public WLAN 11-4 Q Quick Launch buttons location 3-11 software 3-12 Quick Tile 3-17 R rated input power specifications A-2 rear components 1-9 recovery discs ... 14-11, 14-12 restore points 14-10 right-side components 1-10 RJ-11 jack 1-11 RJ-45 jack 1-11 S safeguarding data 14-8 screen brightness 3-5, 3-8 Hardware and Software Guide Index-7 shutdown procedures; hibernation;
HP Compaq nc6220 and nc6230 Notebook PC - Maintenance and Service Guide
Page 40
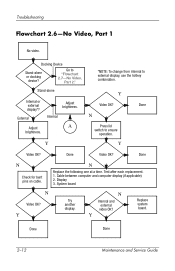
... Device Stand-alone or docking device? Done Video OK? Display 3. Y Replace system board. Stand-alone Y Internal or external Adjust brightness. Done display*? Troubleshooting Flowchart 2.6-No Video, Part 1 No video. External Internal N Adjust brightness. A Press lid switch to external display, use the hotkey combination. N Replace the following one at a time. Y Y Video OK? Y Try...
... Device Stand-alone or docking device? Done Video OK? Display 3. Y Replace system board. Stand-alone Y Internal or external Adjust brightness. Done display*? Troubleshooting Flowchart 2.6-No Video, Part 1 No video. External Internal N Adjust brightness. A Press lid switch to external display, use the hotkey combination. N Replace the following one at a time. Y Y Video OK? Y Try...

HP Compaq nc6220 and nc6230 Notebook PC - Maintenance and Service Guide
Page 41
Try another external monitor. Check brightness of external monitor. Done 2.6-No Video, Part 1." Y Video OK? Maintenance and Service Guide 2-13 Y N Check that computer is properly seated in Video OK? N Y Internal Done ..., for bent pins on cable, and for monitor connection. N Adjust external monitor display. Remove computer from "Flowchart 2.6-No Video, Part 1." "Flowchart Video OK? Adjust display brightness. N Y Go to "Flowchart 2.8-Nonfunctioning Docking Device (if applicable)."
Try another external monitor. Check brightness of external monitor. Done 2.6-No Video, Part 1." Y Video OK? Maintenance and Service Guide 2-13 Y N Check that computer is properly seated in Video OK? N Y Internal Done ..., for bent pins on cable, and for monitor connection. N Adjust external monitor display. Remove computer from "Flowchart 2.6-No Video, Part 1." "Flowchart Video OK? Adjust display brightness. N Y Go to "Flowchart 2.8-Nonfunctioning Docking Device (if applicable)."

HP Compaq nc6220 and nc6230 Notebook PC - Maintenance and Service Guide
Page 159
Specifications Table 7-2 14.1-inch, SXGA, TFT Display Dimensions Height Width Diagonal Number of colors Contrast ratio Brightness Pixel resolution Pitch Format Configuration Backlight Character display Total power consumption Viewing angle 28.5 cm 21.3 cm 35.8 cm Up to 16.8 million 200:1 180 nits typical7 11.2 in 8.4 in 14.1 in 0.197 × 0.197 mm 1680 × 1050 RGB vertical stripe Edge lit 80 × 25 5.5 W +/-35° horizontal, +15/-35° vertical typical Maintenance and Service Guide 7-3
Specifications Table 7-2 14.1-inch, SXGA, TFT Display Dimensions Height Width Diagonal Number of colors Contrast ratio Brightness Pixel resolution Pitch Format Configuration Backlight Character display Total power consumption Viewing angle 28.5 cm 21.3 cm 35.8 cm Up to 16.8 million 200:1 180 nits typical7 11.2 in 8.4 in 14.1 in 0.197 × 0.197 mm 1680 × 1050 RGB vertical stripe Edge lit 80 × 25 5.5 W +/-35° horizontal, +15/-35° vertical typical Maintenance and Service Guide 7-3
HP Compaq nc6220 and nc6230 Notebook PC - Maintenance and Service Guide
Page 160
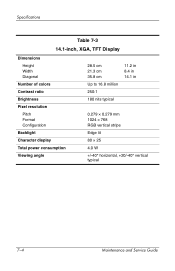
Specifications Table 7-3 14.1-inch, XGA, TFT Display Dimensions Height Width Diagonal Number of colors Contrast ratio Brightness Pixel resolution Pitch Format Configuration Backlight Character display Total power consumption Viewing angle 28.5 cm 21.3 cm 35.8 cm Up to 16.8 million 250:1 180 nits typical 11.2 in 8.4 in 14.1 in 0.279 × 0.279 mm 1024 × 768 RGB vertical stripe Edge lit 80 × 25 4.0 W +/-40° horizontal, +20/-40° vertical typical 7-4 Maintenance and Service Guide
Specifications Table 7-3 14.1-inch, XGA, TFT Display Dimensions Height Width Diagonal Number of colors Contrast ratio Brightness Pixel resolution Pitch Format Configuration Backlight Character display Total power consumption Viewing angle 28.5 cm 21.3 cm 35.8 cm Up to 16.8 million 250:1 180 nits typical 11.2 in 8.4 in 14.1 in 0.279 × 0.279 mm 1024 × 768 RGB vertical stripe Edge lit 80 × 25 4.0 W +/-40° horizontal, +20/-40° vertical typical 7-4 Maintenance and Service Guide


