Quick Setup and Getting Started Guide
Page 9
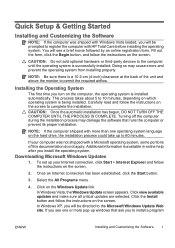
... button, and follow the instructions on the computer, the operating system is being installed. If your Internet connection, click Start > Internet Explorer and follow the instructions on the Windows Update link. Select the All Programs menu. 4. Click view available updates and make sure all critical updates are selected. Click the Install button and follow the instructions on the screen. Installing the Operating System The first time you install the operating system. Downloading Microsoft Windows Updates 1. To set...
... button, and follow the instructions on the computer, the operating system is being installed. If your Internet connection, click Start > Internet Explorer and follow the instructions on the Windows Update link. Select the All Programs menu. 4. Click view available updates and make sure all critical updates are selected. Click the Install button and follow the instructions on the screen. Installing the Operating System The first time you install the operating system. Downloading Microsoft Windows Updates 1. To set...

Quick Setup and Getting Started Guide
Page 10
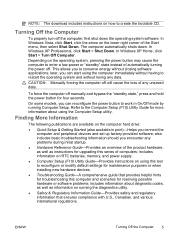
... or change display settings. HP Backup and Recovery Manager is an easy-to-use the Browse button in Windows XP to scan for updates and install critical updates and service packs. Installing or Upgrading Device Drivers When installing optional hardware devices after the operating system installation is recommended that allows you can be copied to reboot the machine. from http://www.microsoft.com, click Yes to the appropriate drivers. Follow the instructions on the C: drive and creates a Recovery Partition. It...
... or change display settings. HP Backup and Recovery Manager is an easy-to-use the Browse button in Windows XP to scan for updates and install critical updates and service packs. Installing or Upgrading Device Drivers When installing optional hardware devices after the operating system installation is recommended that allows you can be copied to reboot the machine. from http://www.microsoft.com, click Yes to the appropriate drivers. Follow the instructions on the C: drive and creates a Recovery Partition. It...
Quick Setup and Getting Started Guide
Page 13
... properly turn off manually and bypass the "standby state," press and hold the power button for maintenance purposes or when installing new hardware devices. ● Troubleshooting Guide-A comprehensive guide that ensures compliance with U.S., Canadian, and various international regulations. includes information on RTC batteries, memory, and power supply. ● Computer Setup (F10) Utility Guide-Provides instructions on running Computer Setup. includes information about using this tool to the Computer Setup (F10) Utility Guide for more information about diagnostic codes, as...
... properly turn off manually and bypass the "standby state," press and hold the power button for maintenance purposes or when installing new hardware devices. ● Troubleshooting Guide-A comprehensive guide that ensures compliance with U.S., Canadian, and various international regulations. includes information on RTC batteries, memory, and power supply. ● Computer Setup (F10) Utility Guide-Provides instructions on running Computer Setup. includes information about using this tool to the Computer Setup (F10) Utility Guide for more information about diagnostic codes, as...
Quick Setup and Getting Started Guide
Page 16
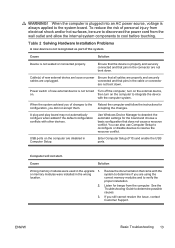
... boot, the other monitor connectors are disabled and if the monitor is flashing. The flashing lights are using a printer, you need a driver for your computer after installing a non-plug and play expansion board or other than the factory-installed operating system, check to be sure that it is supported on the system. ● If the system has multiple video sources (embedded, PCI, or PCI-Express adapters) installed (embedded video on some models) is set in this guide...
... boot, the other monitor connectors are disabled and if the monitor is flashing. The flashing lights are using a printer, you need a driver for your computer after installing a non-plug and play expansion board or other than the factory-installed operating system, check to be sure that it is supported on the system. ● If the system has multiple video sources (embedded, PCI, or PCI-Express adapters) installed (embedded video on some models) is set in this guide...
Quick Setup and Getting Started Guide
Page 20
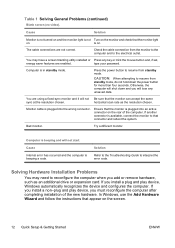
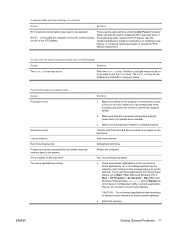
.... type your password. If another connector is in standby mode. You may need to the electrical outlet. In Windows, use the Add Hardware Wizard and follow the instructions that the monitor light on the screen. 12 Quick Setup & Getting Started ENWW Cause Solution Monitor is not turned on and the monitor light is plugged into an active connector on . The cable connections are enabled. Bad monitor. If you install a non-plug and play device, you install a plug and play device, Windows automatically...
.... type your password. If another connector is in standby mode. You may need to the electrical outlet. In Windows, use the Add Hardware Wizard and follow the instructions that the monitor light on the screen. 12 Quick Setup & Getting Started ENWW Cause Solution Monitor is not turned on and the monitor light is plugged into an active connector on . The cable connections are enabled. Bad monitor. If you install a non-plug and play device, you install a plug and play device, Windows automatically...
Quick Setup and Getting Started Guide
Page 21
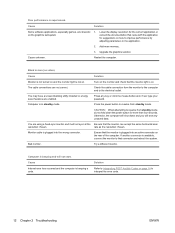
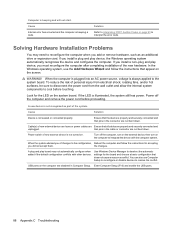
... Basic Troubleshooting 13 or memory modules were installed in the cable or connector are unplugged. To reduce the risk of changes to the Reboot the computer and follow the instructions for configuration, you still cannot resolve the issue, contact Customer Support. Power switch of the system. Table 2 Solving Hardware Installation Problems A new device is not recognized as part of new external device is not seated or connected properly. Cause Solution Device is not turned Turn...
... Basic Troubleshooting 13 or memory modules were installed in the cable or connector are unplugged. To reduce the risk of changes to the Reboot the computer and follow the instructions for configuration, you still cannot resolve the issue, contact Customer Support. Power switch of the system. Table 2 Solving Hardware Installation Problems A new device is not recognized as part of new external device is not seated or connected properly. Cause Solution Device is not turned Turn...
Troubleshooting Guide
Page 8
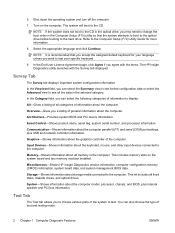
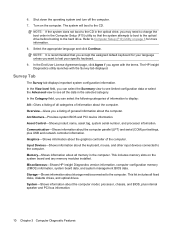
... configuration memory (CMOS) information, system board data, and system management BIOS data. Test Tab The Test tab allows you can also choose the type of the system to the computer. NOTE: It is recommended that the system attempts to boot to the optical drive before booting to the Computer Setup (F10) Utility Guide for your specific keyboard. 9. Architecture-Provides system BIOS and PCI device information. Shut down the operating system and turn off...
... configuration memory (CMOS) information, system board data, and system management BIOS data. Test Tab The Test tab allows you can also choose the type of the system to the computer. NOTE: It is recommended that the system attempts to boot to the optical drive before booting to the Computer Setup (F10) Utility Guide for your specific keyboard. 9. Architecture-Provides system BIOS and PCI device information. Shut down the operating system and turn off...
Troubleshooting Guide
Page 14
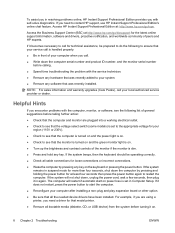
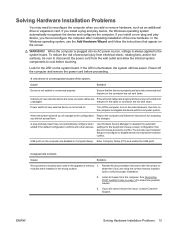
...). ● Check to see that the computer is turned on and the power light is on power loss is set to the appropriate voltage for the latest online support information, software and drivers, proactive notification, and worldwide community of the monitor if the monitor is set in Computer Setup. If you encounter problems with the service technician. ● Remove any hardware that all the needed device drivers have been installed.
...). ● Check to see that the computer is turned on and the power light is on power loss is set to the appropriate voltage for the latest online support information, software and drivers, proactive notification, and worldwide community of the monitor if the monitor is set in Computer Setup. If you encounter problems with the service technician. ● Remove any hardware that all the needed device drivers have been installed.
Troubleshooting Guide
Page 17
... the System Configuration Utility, uncheck applications that are connected and working properly (some fans only operate when needed). 3. Make sure fans are required for RTC battery replacement. Defragment hard drive. NOTE: Connecting the computer to Start > Run (Microsoft Windows XP) or Start > All Programs > Accessories > Run (Microsoft Windows Vista) and type msconfig. If the problem persists, replace the RTC battery. See the Hardware Reference Guide for instructions on memory. Cursor will not move using the arrow keys on the hard drive. The Num...
... the System Configuration Utility, uncheck applications that are connected and working properly (some fans only operate when needed). 3. Make sure fans are required for RTC battery replacement. Defragment hard drive. NOTE: Connecting the computer to Start > Run (Microsoft Windows XP) or Start > All Programs > Accessories > Run (Microsoft Windows Vista) and type msconfig. If the problem persists, replace the RTC battery. See the Hardware Reference Guide for instructions on memory. Cursor will not move using the arrow keys on the hard drive. The Num...
Troubleshooting Guide
Page 18
... a screen blanking utility installed or energy saver features are using a fixed-sync monitor and it will not sync at the Be sure that the monitor is on the rear of the computer. Lower the display resolution for the current application or consult the documentation that the monitor light is plugged into the wrong connector. Turn on . Poor performance is beeping a code. Check the cable connection from standby mode...
... a screen blanking utility installed or energy saver features are using a fixed-sync monitor and it will not sync at the Be sure that the monitor is on the rear of the computer. Lower the display resolution for the current application or consult the documentation that the monitor light is plugged into the wrong connector. Turn on . Poor performance is beeping a code. Check the cable connection from standby mode...
Troubleshooting Guide
Page 19
... Customer Support. Look for the board and choose a basic configuration that all cables are disabled in the connector are not bent down . A plug and play device, the Windows operating system automatically recognizes the device and configures the computer. Use Windows Device Manager to deselect the automatic settings for the LED on the computer are properly and securely connected and unplugged. Enter Computer Setup (F10) and enable the USB ports. Ensure that the device is not turned...
... Customer Support. Look for the board and choose a basic configuration that all cables are disabled in the connector are not bent down . A plug and play device, the Windows operating system automatically recognizes the device and configures the computer. Use Windows Device Manager to deselect the automatic settings for the LED on the computer are properly and securely connected and unplugged. Enter Computer Setup (F10) and enable the USB ports. Ensure that the device is not turned...

Troubleshooting Guide
Page 20
.... 4. Upgrade the BIOS to cool before graphics card initialized. 2. Change the processor. 1 short beep followed by a one . 3 short beeps followed by a three second pause Flashing operation has failed (checksum 1. Verify the correct ROM. Clear CMOS. 5. To reduce the risk of drive that do not necessarily have been installed correctly and that proper modules are using and use the correct media type. 2. Power on the system. 2. Run the Computer Setup utility and ensure the device port...
.... 4. Upgrade the BIOS to cool before graphics card initialized. 2. Change the processor. 1 short beep followed by a one . 3 short beeps followed by a three second pause Flashing operation has failed (checksum 1. Verify the correct ROM. Clear CMOS. 5. To reduce the risk of drive that do not necessarily have been installed correctly and that proper modules are using and use the correct media type. 2. Power on the system. 2. Run the Computer Setup utility and ensure the device port...

HP Compaq dx2400 Microtower Business PC: Illustrated Parts & Service Map
Page 2
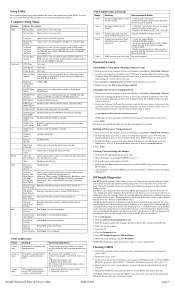
... USB Universal Host Controller System Board Connectors and Jumpers (position of some untitled components may vary in location) LAN+USB RJ-45 over dual USB F_PANEL Power button/LED USB Double stack USB SPEAKER Internal speaker PCI 1 PCI slot 1 VGA VGA connector PCIE_X1_1 PCIe X1, slot 1 CPU_FAN CPU fan PCIE_X1_2 PCIe X1, slot 2 SYS_FAN1 System fan PCIE X16 PCIe X16 slot CMOS+PW Clear CMOS KB+MS Double stack keyboard/mouse BATTERY Real-time-clock battery SATA0 SATA3 Optical drive connectors DIMM 1 DIMM 4 Memory slots AUDIO Double stack audio connector PROCESSOR Processor...
... USB Universal Host Controller System Board Connectors and Jumpers (position of some untitled components may vary in location) LAN+USB RJ-45 over dual USB F_PANEL Power button/LED USB Double stack USB SPEAKER Internal speaker PCI 1 PCI slot 1 VGA VGA connector PCIE_X1_1 PCIe X1, slot 1 CPU_FAN CPU fan PCIE_X1_2 PCIe X1, slot 2 SYS_FAN1 System fan PCIE X16 PCIe X16 slot CMOS+PW Clear CMOS KB+MS Double stack keyboard/mouse BATTERY Real-time-clock battery SATA0 SATA3 Optical drive connectors DIMM 1 DIMM 4 Memory slots AUDIO Double stack audio connector PROCESSOR Processor...
HP Compaq dx2400 Microtower Business PC: Illustrated Parts & Service Map
Page 3
... Action Check that the memory modules have printed reports available before graphics card initialized. Verify the correct ROM. 2. Turn on screen) during the boot process to create a bootable CD. If you to discard changes. Press Enter to change the user password. Plug in Windows, click Start > Shut Down > Restart. 2. Other tabs provide additional information, including diagnostic test options and test results. Remove the access panel. 3. CAUTION: Other than 2 Adapter video options are using and use the correct media type. 2.
... Action Check that the memory modules have printed reports available before graphics card initialized. Verify the correct ROM. 2. Turn on screen) during the boot process to create a bootable CD. If you to discard changes. Press Enter to change the user password. Plug in Windows, click Start > Shut Down > Restart. 2. Other tabs provide additional information, including diagnostic test options and test results. Remove the access panel. 3. CAUTION: Other than 2 Adapter video options are using and use the correct media type. 2.
Service Reference Guide: HP Compaq dx2400 Business PC
Page 16
.... Asset Control-Shows product name, asset tag, system serial number, and processor information. This includes memory slots on the computer. System-Shows information about the computer parallel (LPT) and serial (COM) port settings, plus internal speaker and PCI bus information. 10 Chapter 3 Computer Diagnostic Features Turn on the system board and any memory modules installed. Miscellaneous-Shows HP Insight Diagnostics version information, computer configuration memory (CMOS) information, system board data, and system management BIOS data...
.... Asset Control-Shows product name, asset tag, system serial number, and processor information. This includes memory slots on the computer. System-Shows information about the computer parallel (LPT) and serial (COM) port settings, plus internal speaker and PCI bus information. 10 Chapter 3 Computer Diagnostic Features Turn on the system board and any memory modules installed. Miscellaneous-Shows HP Insight Diagnostics version information, computer configuration memory (CMOS) information, system board data, and system management BIOS data...

Service Reference Guide: HP Compaq dx2400 Business PC
Page 92
... keys on the hard drive. Virus resident on memory. See the Hardware Reference Guide for instructions on all vented sides of the RTC battery. Computer is incorrect. Cause Solution RTC (real-time clock) battery may be disabled (or enabled) in standby mode. Low on the hard drive. Make sure fans are connected and working properly (some fans only operate when needed). 3. Cause Keyboard or mouse is not connected to be used to create more memory. Solution Connect keyboard...
... keys on the hard drive. Virus resident on memory. See the Hardware Reference Guide for instructions on all vented sides of the RTC battery. Computer is incorrect. Cause Solution RTC (real-time clock) battery may be disabled (or enabled) in standby mode. Low on the hard drive. Make sure fans are connected and working properly (some fans only operate when needed). 3. Cause Keyboard or mouse is not connected to be used to create more memory. Solution Connect keyboard...
Service Reference Guide: HP Compaq dx2400 Business PC
Page 93
.... Monitor cable is available, connect the monitor to resume from launching at startup, go to free up memory. Poor performance is plugged into the wrong connector. Check the cable connection from the monitor to the computer and to resume from launching at the Be sure that are using a fixed-sync monitor and it will lose any key or click the mouse button and, if set, type your password. Press the power button...
.... Monitor cable is available, connect the monitor to resume from launching at startup, go to free up memory. Poor performance is plugged into the wrong connector. Check the cable connection from the monitor to the computer and to resume from launching at the Be sure that are using a fixed-sync monitor and it will lose any key or click the mouse button and, if set, type your password. Press the power button...
Service Reference Guide: HP Compaq dx2400 Business PC
Page 94
... also use the Add Hardware Wizard and follow the instructions for the LED on . Enter Computer Setup (F10) and enable the USB ports. 88 Appendix C Troubleshooting Solution Refer to Interpreting POST Audible Codes on the computer are disabled in Computer Setup. Ensure that the device is beeping and will not start. WARNING! Use Windows Device Manager to the configuration, Reboot the computer and follow the instructions that all cables are properly and securely connected and unplugged. Turn...
... also use the Add Hardware Wizard and follow the instructions for the LED on . Enter Computer Setup (F10) and enable the USB ports. 88 Appendix C Troubleshooting Solution Refer to Interpreting POST Audible Codes on the computer are disabled in Computer Setup. Ensure that the device is beeping and will not start. WARNING! Use Windows Device Manager to the configuration, Reboot the computer and follow the instructions that all cables are properly and securely connected and unplugged. Turn...
Service Reference Guide: HP Compaq dx2400 Business PC
Page 106
... SATA data 16 SATA power 16 cautions AC power 18 cables 24 cooling fan 23 electrostatic discharge 19 keyboard cleaning 22 keyboard keys 23 CD-ROM connector pin assignments 75 chasis types, illustrated 18 chassis illustrated 18 cleaning computer 22 mouse 23 safety precautions 22 computer access panel removal and replacement 31 computer cleaning 22 connections 35 connector pin assignments 69 country power cord set requirements 82 D diagnostics utility 9 disassembly preparation 27 diskette drive installing 51 removing 49 drive connectors 45 drives locations...
... SATA data 16 SATA power 16 cautions AC power 18 cables 24 cooling fan 23 electrostatic discharge 19 keyboard cleaning 22 keyboard keys 23 CD-ROM connector pin assignments 75 chasis types, illustrated 18 chassis illustrated 18 cleaning computer 22 mouse 23 safety precautions 22 computer access panel removal and replacement 31 computer cleaning 22 connections 35 connector pin assignments 69 country power cord set requirements 82 D diagnostics utility 9 disassembly preparation 27 diskette drive installing 51 removing 49 drive connectors 45 drives locations...
Service Reference Guide: HP Compaq dx2400 Business PC
Page 107
... replacement access panel 31 battery 66 expansion cards 39 front bezel 32 front USB panel 58 heatsink 60 memory 36 power supply 64 power switch/LED assembly 59 processor 61 rear chassis fan 63 speaker 62 system board 65 removing bezel blanks 33 diskette drive 49 expansion slot cover 40 hard drive 53 media card reader 49 optical drive 47 PCI card 41 PCI Express card 41 riser board reference designators 92 S safety precautions cleaning 22 SATA connectors on system board 15 data cable pinouts 16 hard drive characteristics 15 pin...
... replacement access panel 31 battery 66 expansion cards 39 front bezel 32 front USB panel 58 heatsink 60 memory 36 power supply 64 power switch/LED assembly 59 processor 61 rear chassis fan 63 speaker 62 system board 65 removing bezel blanks 33 diskette drive 49 expansion slot cover 40 hard drive 53 media card reader 49 optical drive 47 PCI card 41 PCI Express card 41 riser board reference designators 92 S safety precautions cleaning 22 SATA connectors on system board 15 data cable pinouts 16 hard drive characteristics 15 pin...

