
Advanced Setup Guide
Page 10
You must use the Audio In connector, which is connected to the motherboard and located on the back of the computer, to record audio only (select models only). NOTE: This Audio In connector is connected to the TV .... Mouse connector to headphones. Headphones Out connector (green) to connect to connect a mouse. You must use the Audio In connector, which is connected to the motherboard and located on the back of the computer, to record audio only (select models only). Power connector. Secondary Right audio input connector (red). Microphone In...
You must use the Audio In connector, which is connected to the motherboard and located on the back of the computer, to record audio only (select models only). NOTE: This Audio In connector is connected to the TV .... Mouse connector to headphones. Headphones Out connector (green) to connect to connect a mouse. You must use the Audio In connector, which is connected to the motherboard and located on the back of the computer, to record audio only (select models only). Power connector. Secondary Right audio input connector (red). Microphone In...

Advanced Setup Guide
Page 12
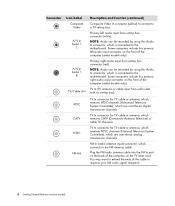
...or cable input from set -top box). NOTE: Audio can be recorded by using this Audio In connector, which is connected to the motherboard. Primary right audio input from wall outlet with no set -top box connector (red). NOTE: Audio can be recorded by using this ... digital transmission channels. TV In connector for TV cable or antenna, which receives ATSC channels (Advanced Television System Committee), which connects to the motherboard. Some computers include this primary left audio input from set -top box. You may want to improve your FM radio signal reception. 6 ...
...or cable input from set -top box). NOTE: Audio can be recorded by using this Audio In connector, which is connected to the motherboard. Primary right audio input from wall outlet with no set -top box connector (red). NOTE: Audio can be recorded by using this ... digital transmission channels. TV In connector for TV cable or antenna, which receives ATSC channels (Advanced Television System Committee), which connects to the motherboard. Some computers include this primary left audio input from set -top box. You may want to improve your FM radio signal reception. 6 ...
Getting Started Guide
Page 14
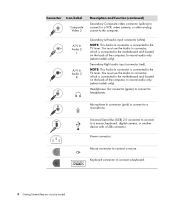
Secondary Right audio input connector (red). You must use the Audio In connector, which is connected to the motherboard and located on the back of the computer, to the TV tuner. Headphones Out connector (green) to connect to a microphone. Microphone In connector ... connector. A/V In Audio 2 L A/V In Audio 2 R Secondary Left audio input connector (white). You must use the Audio In connector, which is connected to the motherboard and located on the back of the computer, to the TV tuner. NOTE: This Audio In connector is connected to record audio only (select models...
Secondary Right audio input connector (red). You must use the Audio In connector, which is connected to the motherboard and located on the back of the computer, to the TV tuner. Headphones Out connector (green) to connect to a microphone. Microphone In connector ... connector. A/V In Audio 2 L A/V In Audio 2 R Secondary Left audio input connector (white). You must use the Audio In connector, which is connected to the motherboard and located on the back of the computer, to the TV tuner. NOTE: This Audio In connector is connected to record audio only (select models...
Getting Started Guide
Page 16
...the cable to improve your FM radio signal reception. 6 Getting Started (features vary by using this Audio In connector, which is connected to the motherboard. NOTE: Audio can be recorded by model) TV In (TV antenna or cable input from set -top box). Plug the FM radio antenna ...connect to a TV set -top box connector (red). NOTE: Audio can be recorded by using this Audio In connector, which is connected to the motherboard. Primary right audio input from set -top box. TV In connector for TV cable or antenna, which receives ATSC channels (Advanced Television System Committee), ...
...the cable to improve your FM radio signal reception. 6 Getting Started (features vary by using this Audio In connector, which is connected to the motherboard. NOTE: Audio can be recorded by model) TV In (TV antenna or cable input from set -top box). Plug the FM radio antenna ...connect to a TV set -top box connector (red). NOTE: Audio can be recorded by using this Audio In connector, which is connected to the motherboard. Primary right audio input from set -top box. TV In connector for TV cable or antenna, which receives ATSC channels (Advanced Television System Committee), ...
Upgrading and Servicing Guide
Page 13
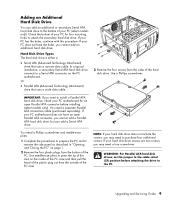
...the PC and to attach the secondary hard disk drive. NOTE: If your PC motherboard for four mounting holes to remove the side panel as described in "Opening and Closing the PC" on the... PC motherboard. You need a separate Parallel ATA connection cable (purchased separately). WARNING: For Parallel ATA hard ...ATA (Advanced Technology Attachment) drive that uses a narrow data cable. If your PC motherboard does not have the holes, you want to the PC. If your PC has the holes, continue with this procedure....
...the PC and to attach the secondary hard disk drive. NOTE: If your PC motherboard for four mounting holes to remove the side panel as described in "Opening and Closing the PC" on the... PC motherboard. You need a separate Parallel ATA connection cable (purchased separately). WARNING: For Parallel ATA hard ...ATA (Advanced Technology Attachment) drive that uses a narrow data cable. If your PC motherboard does not have the holes, you want to the PC. If your PC has the holes, continue with this procedure....
Upgrading and Servicing Guide
Page 15
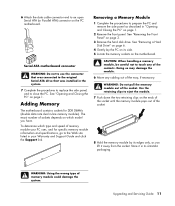
...Attach the data cable connector end to an open Serial ATA (or Parallel ATA) connector on page 3. 3 Remove the hard disk drive. Serial ATA motherboard connector WARNING: Do not to use the connector that was connected to the original Serial ATA drive that was installed in the system. 7 Complete the... socket until the memory module pops out of the contacts. To determine which model you lift it in "Opening and Closing the PC" on the motherboard. Use the retaining clips to eject the module. 7 Push down the two retaining clips on page 1. Removing a Memory Module 1 Complete the procedures to...
...Attach the data cable connector end to an open Serial ATA (or Parallel ATA) connector on page 3. 3 Remove the hard disk drive. Serial ATA motherboard connector WARNING: Do not to use the connector that was connected to the original Serial ATA drive that was installed in the system. 7 Complete the... socket until the memory module pops out of the contacts. To determine which model you lift it in "Opening and Closing the PC" on the motherboard. Use the retaining clips to eject the module. 7 Push down the two retaining clips on page 1. Removing a Memory Module 1 Complete the procedures to...
Upgrading and Servicing Guide
Page 17
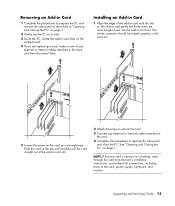
The whole connector should be seated properly in the card slot. 5 Loosen the screw on the motherboard. 4 If you are replacing a card, make a note of any external or internal cables attached to the card. 4 Complete the procedures to the card, power supply, ...
The whole connector should be seated properly in the card slot. 5 Loosen the screw on the motherboard. 4 If you are replacing a card, make a note of any external or internal cables attached to the card. 4 Complete the procedures to the card, power supply, ...
Upgrading and Servicing Guide
Page 18
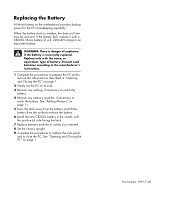
... battery. 6 Install the new CR2032 battery in "Opening and Closing the PC" on page 1. 2 Gently lay the PC on page 1. See "Adding Memory" on the motherboard provides backup power for the PC's timekeeping capability.
... battery. 6 Install the new CR2032 battery in "Opening and Closing the PC" on page 1. 2 Gently lay the PC on page 1. See "Adding Memory" on the motherboard provides backup power for the PC's timekeeping capability.

