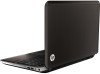
Service Guide
Page 5
... ...1 2 External component identification 11 Display ...11 Buttons, speakers, and fingerprint reader (select models only 12 Keys ...13 Lights ...14 TouchPad ...15 Front ...16 Rear ...16 Left side ...17 Right side ...18 Bottom ...19 3 Illustrated parts catalog 20 Service tag ...20 Computer major components 22 Cable Kit ...32 Display assembly subcomponents 34 Mass storage devices ...36 Miscellaneous parts ...37 Sequential part number listing 38 4 Removal and replacement procedures 52 Preliminary replacement...
... ...1 2 External component identification 11 Display ...11 Buttons, speakers, and fingerprint reader (select models only 12 Keys ...13 Lights ...14 TouchPad ...15 Front ...16 Rear ...16 Left side ...17 Right side ...18 Bottom ...19 3 Illustrated parts catalog 20 Service tag ...20 Computer major components 22 Cable Kit ...32 Display assembly subcomponents 34 Mass storage devices ...36 Miscellaneous parts ...37 Sequential part number listing 38 4 Removal and replacement procedures 52 Preliminary replacement...

Service Guide
Page 6
... replacement procedures 57 Service tag ...57 Computer feet ...58 Battery ...59 Optical drive ...60 Hard drive ...62 RTC battery ...65 Memory module ...66 WLAN module ...67 Keyboard ...70 Top cover ...74 Power button board 77 Fingerprint reader board 78 Bluetooth module ...79 USB board ...82 Power connector cable 83 System board ...85 Fan/heat sink assembly 90 Processor ...95 Speakers ...99 Optical drive connector cable 102 Display assembly 103 5 Setup Utility (BIOS) and System Diagnostics 112 Using Setup Utility ...112 Starting Setup Utility 112 Changing the language of Setup Utility...
... replacement procedures 57 Service tag ...57 Computer feet ...58 Battery ...59 Optical drive ...60 Hard drive ...62 RTC battery ...65 Memory module ...66 WLAN module ...67 Keyboard ...70 Top cover ...74 Power button board 77 Fingerprint reader board 78 Bluetooth module ...79 USB board ...82 Power connector cable 83 System board ...85 Fan/heat sink assembly 90 Processor ...95 Speakers ...99 Optical drive connector cable 102 Display assembly 103 5 Setup Utility (BIOS) and System Diagnostics 112 Using Setup Utility ...112 Starting Setup Utility 112 Changing the language of Setup Utility...

Service Guide
Page 7
... dedicated recovery partition (select models only 123 Restoring using the restore media 124 Changing the computer boot order 124 Backing up and recovering your information 125 Using Windows Backup and Restore 126 Using Windows system restore points 126 When to create restore points 126 Create a system restore point 127 Restore to a previous date and time 127 8 Power cord set requirements 128 Requirements for all countries 128 Requirements for specific countries and regions 129 9 Recycling ...130 Battery ...130 Display...
... dedicated recovery partition (select models only 123 Restoring using the restore media 124 Changing the computer boot order 124 Backing up and recovering your information 125 Using Windows Backup and Restore 126 Using Windows system restore points 126 When to create restore points 126 Create a system restore point 127 Restore to a previous date and time 127 8 Power cord set requirements 128 Requirements for all countries 128 Requirements for specific countries and regions 129 9 Recycling ...130 Battery ...130 Display...
Service Guide
Page 13
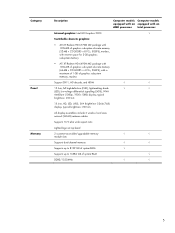
...; √ √ √ √ √ 5 typical brightness: 200 nits All display assemblies include 2 wireless local area network (WLAN) antenna cables Supports 16:9 ultra wide aspect ratio Lighted logo on top bezel 2 customer-accessible/upgradable memory module slots Supports dual-channel memory Supports up to 8192 GB of system RAM Supports up to 16384 GB of graphics subsystem memory, muxless Support DX11, HD decode, and HDMI √ √ 15.6-in , HD...
...; √ √ √ √ √ 5 typical brightness: 200 nits All display assemblies include 2 wireless local area network (WLAN) antenna cables Supports 16:9 ultra wide aspect ratio Lighted logo on top bezel 2 customer-accessible/upgradable memory module slots Supports dual-channel memory Supports up to 8192 GB of system RAM Supports up to 16384 GB of graphics subsystem memory, muxless Support DX11, HD decode, and HDMI √ √ 15.6-in , HD...

Service Guide
Page 25
... optional powered stereo speakers, headphones, ear buds, a headset, or television audio. Produce sound when connected to cool internal components and prevent overheating. NOTE: When a device is normal for the internal fan to a headphone jack, the computer speakers are also compatible with USB 1.0 and USB 2.0 devices. Connects a network cable. Connects an optional video or audio device, such as a high-definition television, or any compatible digital or audio component. Left side Item (1) (2) (3) (4) (5) (6) (7) Component Vent External monitor port HDMI port...
... optional powered stereo speakers, headphones, ear buds, a headset, or television audio. Produce sound when connected to cool internal components and prevent overheating. NOTE: When a device is normal for the internal fan to a headphone jack, the computer speakers are also compatible with USB 1.0 and USB 2.0 devices. Connects a network cable. Connects an optional video or audio device, such as a high-definition television, or any compatible digital or audio component. Left side Item (1) (2) (3) (4) (5) (6) (7) Component Vent External monitor port HDMI port...

Service Guide
Page 26
... is connected to the computer. Connect optional USB devices. Attaches an optional security cable to external power and the battery is fully charged. ● Amber: A battery is charging. ● Blinking amber: The battery has reached a low battery level, or there is a battery error. Ejects the optical drive. ● White: the computer is on HP ProtectSmart Hard Drive Protection, refer to the HP Notebook Reference Guide. Connects an AC adapter. 18 Chapter 2 External component identification NOTE: The security cable is...
... is connected to the computer. Connect optional USB devices. Attaches an optional security cable to external power and the battery is fully charged. ● Amber: A battery is charging. ● Blinking amber: The battery has reached a low battery level, or there is a battery error. Ejects the optical drive. ● White: the computer is on HP ProtectSmart Hard Drive Protection, refer to the HP Notebook Reference Guide. Connects an AC adapter. 18 Chapter 2 External component identification NOTE: The security cable is...

Service Guide
Page 50
... drive connector cable, hard drive connector cable, power button board cable, fingerprint reader board cable, TouchPad cable, TouchPad button board cable, and USB board cable) NOTE: See Cable Kit on page 32 for more Cable Kit spare part information. The fingerprint reader board cable is not included in the Cable Kit, spare part number 640422-001. Display Cable Kit for use only with computer models in butter gold, espresso black, linen white, Pacific blue, pearl pink, ruby red, and Sonoma red finish (includes display panel cable and webcam/microphone module cable) Power connector cable...
... drive connector cable, hard drive connector cable, power button board cable, fingerprint reader board cable, TouchPad cable, TouchPad button board cable, and USB board cable) NOTE: See Cable Kit on page 32 for more Cable Kit spare part information. The fingerprint reader board cable is not included in the Cable Kit, spare part number 640422-001. Display Cable Kit for use only with computer models in butter gold, espresso black, linen white, Pacific blue, pearl pink, ruby red, and Sonoma red finish (includes display panel cable and webcam/microphone module cable) Power connector cable...

Service Guide
Page 75
.... 3. Remove the service cover (see Battery on page 60). Component replacement procedures 67 Remove the battery (see Optical drive on page 59). 5. If you are unsure whether the computer is off or in Hibernation, turn the computer on all external devices connected to restore device functionality, and then contact technical support. Shut down through the operating system. 2. Disconnect all computer models: Atheros 9485GN 802.11b/g/n 1×1 WiFi and 3012 Bluetooth...
.... 3. Remove the service cover (see Battery on page 60). Component replacement procedures 67 Remove the battery (see Optical drive on page 59). 5. If you are unsure whether the computer is off or in Hibernation, turn the computer on all external devices connected to restore device functionality, and then contact technical support. Shut down through the operating system. 2. Disconnect all computer models: Atheros 9485GN 802.11b/g/n 1×1 WiFi and 3012 Bluetooth...

Service Guide
Page 105
Use a flat-bladed screw driver to turn the processor locking screw one-half turn the computer on page 90) Remove the processor: 1. Description Spare part number Intel Core i5-2430M 2.40-GHz (SC turbo up to...Remove the battery (see Battery on page 59), and then remove the following components: ● Optical drive (see Optical drive on page 60) ● Hard drive (see Hard drive on page 62) ● WLAN module (see WLAN module on page 67) ● Keyboard (see Keyboard on page 70) ● Top cover (see Top cover on page 74) ● System board (see System board on page 85) ● Fan...
Use a flat-bladed screw driver to turn the processor locking screw one-half turn the computer on page 90) Remove the processor: 1. Description Spare part number Intel Core i5-2430M 2.40-GHz (SC turbo up to...Remove the battery (see Battery on page 59), and then remove the following components: ● Optical drive (see Optical drive on page 60) ● Hard drive (see Hard drive on page 62) ● WLAN module (see WLAN module on page 67) ● Keyboard (see Keyboard on page 70) ● Top cover (see Top cover on page 74) ● System board (see System board on page 85) ● Fan...

Service Guide
Page 120
... disk drives, display, keyboard, mouse, and printer). When a confirmation prompt with Setup Utility only if USB legacy support is enabled. Use the arrow keys to select System Configuration > Language, and then press enter. 3. Your change and exit Setup Utility, use the arrow keys to select Exit > Exit Saving Changes, and then press enter. Changing the language of Setup Utility 1. Errors can be used with your change takes effect immediately. 112 Chapter 5 Setup Utility (BIOS) and System Diagnostics Starting Setup Utility NOTE: An external keyboard or mouse connected...
... disk drives, display, keyboard, mouse, and printer). When a confirmation prompt with Setup Utility only if USB legacy support is enabled. Use the arrow keys to select System Configuration > Language, and then press enter. 3. Your change and exit Setup Utility, use the arrow keys to select Exit > Exit Saving Changes, and then press enter. Changing the language of Setup Utility 1. Errors can be used with your change takes effect immediately. 112 Chapter 5 Setup Utility (BIOS) and System Diagnostics Starting Setup Utility NOTE: An external keyboard or mouse connected...

Service Guide
Page 121
... exit Setup Utility menus without changing any settings, use either a pointing device (TouchPad, pointing stick, or USB mouse) or the keyboard to select File > Save Changes and Exit, and then press enter. To exit Setup Utility menus, choose one of the screen, and then follow the on or restart the computer, and then press esc while the "Press the ESC key for Startup Menu" message is displayed. 3. Your changes go...
... exit Setup Utility menus without changing any settings, use either a pointing device (TouchPad, pointing stick, or USB mouse) or the keyboard to select File > Save Changes and Exit, and then press enter. To exit Setup Utility menus, choose one of the screen, and then follow the on or restart the computer, and then press esc while the "Press the ESC key for Startup Menu" message is displayed. 3. Your changes go...

Service Guide
Page 122
... key for Startup Menu" message is displayed at the factory, follow the on the HP Web site are not changed when you restore the factory settings. To return all settings in the lower-left corner of the screen, and then follow these steps: 1. NOTE: Your password settings and security settings are packaged in Setup Utility NOTE: Restoring defaults will not change the hard drive mode. Then use the arrow keys to select Exit > Exit Saving Changes...
... key for Startup Menu" message is displayed at the factory, follow the on the HP Web site are not changed when you restore the factory settings. To return all settings in the lower-left corner of the screen, and then follow these steps: 1. NOTE: Your password settings and security settings are packaged in Setup Utility NOTE: Restoring defaults will not change the hard drive mode. Then use the arrow keys to select Exit > Exit Saving Changes...
Service Guide
Page 123
... install a BIOS update only when the computer is downloaded. Make a note of damage to a network, consult the network administrator before installing any device, cable, or cord. 1. Windows 7-Select Start > Help and Support > Maintain. You may need to access this information to locate the update later, after it has been downloaded to reliable external power using Setup Utility. 1. Use a pointing device or the arrow keys to select File > Ignore Changes and Exit, and then press enter. Make a note of the screen...
... install a BIOS update only when the computer is downloaded. Make a note of damage to a network, consult the network administrator before installing any device, cable, or cord. 1. Windows 7-Select Start > Help and Support > Maintain. You may need to access this information to locate the update later, after it has been downloaded to reliable external power using Setup Utility. 1. Use a pointing device or the arrow keys to select File > Ignore Changes and Exit, and then press enter. Make a note of the screen...

Service Guide
Page 124
... Startup Menu" message is running, press esc. 116 Chapter 5 Setup Utility (BIOS) and System Diagnostics Using System Diagnostics System Diagnostics allows you recorded earlier, open the folder on -screen instructions. If it is displayed in test-This test repeats the start-up test and checks for intermittent problems that contains the update. 4. If the battery fails the test, contact HP support to a good sector. ● Memory test...
... Startup Menu" message is running, press esc. 116 Chapter 5 Setup Utility (BIOS) and System Diagnostics Using System Diagnostics System Diagnostics allows you recorded earlier, open the folder on -screen instructions. If it is displayed in test-This test repeats the start-up test and checks for intermittent problems that contains the update. 4. If the battery fails the test, contact HP support to a good sector. ● Memory test...
Service Guide
Page 128
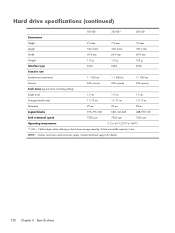
Actual accessible capacity is less. Contact technical support for details. 120 Chapter 6 Specifications Hard drive specifications (continued) 500-GB* 320-GB* 250-GB* Dimensions Height 9.5 mm 7.0 mm 7.0 mm Length 100.4 mm 100.4 mm 100.4 mm Width 69.9 mm 69.9 mm 69.9 mm Weight 110 g 110 g 105 g Interface type SATA SATA SATA ...setting) Single track 1.5 ms 1.5 ms 1.5 ms Average (read/write) 11/13 ms 11/13 ms 11/13 ms Maximum 22 ms 22 ms 22 ms Logical blocks 976,773,168 628,142,448 488,397,168 Disk rotational speed 7200 rpm 7200 rpm 7200 rpm Operating...
Actual accessible capacity is less. Contact technical support for details. 120 Chapter 6 Specifications Hard drive specifications (continued) 500-GB* 320-GB* 250-GB* Dimensions Height 9.5 mm 7.0 mm 7.0 mm Length 100.4 mm 100.4 mm 100.4 mm Width 69.9 mm 69.9 mm 69.9 mm Weight 110 g 110 g 105 g Interface type SATA SATA SATA ...setting) Single track 1.5 ms 1.5 ms 1.5 ms Average (read/write) 11/13 ms 11/13 ms 11/13 ms Maximum 22 ms 22 ms 22 ms Logical blocks 976,773,168 628,142,448 488,397,168 Disk rotational speed 7200 rpm 7200 rpm 7200 rpm Operating...
Service Guide
Page 129
... a recovery flash drive immediately after software setup. Software not provided with this computer must be achieved using HP Recovery Manager. This chapter provides information on the following topics: ● Creating a set of recovery discs or a recovery flash drive (Recovery Manager software feature) ● Performing a system restore (from the partition, recovery discs, or a recovery flash drive) ● Backing up your information ● Recovering a program or driver Restore In the event of hard drive failure, to restore your information and restore it if ever needed. Restore 121...
... a recovery flash drive immediately after software setup. Software not provided with this computer must be achieved using HP Recovery Manager. This chapter provides information on the following topics: ● Creating a set of recovery discs or a recovery flash drive (Recovery Manager software feature) ● Performing a system restore (from the partition, recovery discs, or a recovery flash drive) ● Backing up your information ● Recovering a program or driver Restore In the event of hard drive failure, to restore your information and restore it if ever needed. Restore 121...

Service Guide
Page 130
... optical drive, you can use an external optical drive, it must be connected to continue the backup creation process. NOTE: HP Recovery Manager allows the creation of only one set of recovery discs or one recovery flash drive can purchase recovery discs for your computer from the HP Web site. If you use an optional external optical drive (purchased separately) to a USB port on -screen instructions. 122 Chapter 7 Backup and recovery Creating restore media HP recommends that you create either a set of recovery discs or a recovery flash drive to...
... optical drive, you can use an external optical drive, it must be connected to continue the backup creation process. NOTE: HP Recovery Manager allows the creation of only one set of recovery discs or one recovery flash drive can purchase recovery discs for your computer from the HP Web site. If you use an optional external optical drive (purchased separately) to a USB port on -screen instructions. 122 Chapter 7 Backup and recovery Creating restore media HP recommends that you create either a set of recovery discs or a recovery flash drive to...

Service Guide
Page 134
... create a backup: 1. NOTE: Recovering to Help and Support for your files and settings. NOTE: Windows includes the User Account Control feature to improve the security of your permission or password for your hard drive at a specific point in time. You may take over an hour. Follow the on file sizes, it may be prompted for tasks such as installing software, running utilities, or changing Windows settings. When to create restore...
... create a backup: 1. NOTE: Recovering to Help and Support for your files and settings. NOTE: Windows includes the User Account Control feature to improve the security of your permission or password for your hard drive at a specific point in time. You may take over an hour. Follow the on file sizes, it may be prompted for tasks such as installing software, running utilities, or changing Windows settings. When to create restore...

Service Guide
Page 145
... light components 14 lights battery 18 caps lock 14 drive 18 fingerprint reader 15 mute 14 optical drive 18 power 14, 18 TouchPad off 15 TouchPad on 15 webcam 11 wireless 15 M mass storage device precautions 53 removal 62 spare part numbers 36, 62 memory module product description 5 removal 66 spare part numbers 31, 40, 41, 66 microphone locations 11 product description 7 microphone jack 17 model description 21, 58 model name 1 monitor port 17 mute light 14 N network jack 17 num lk key...
... light components 14 lights battery 18 caps lock 14 drive 18 fingerprint reader 15 mute 14 optical drive 18 power 14, 18 TouchPad off 15 TouchPad on 15 webcam 11 wireless 15 M mass storage device precautions 53 removal 62 spare part numbers 36, 62 memory module product description 5 removal 66 spare part numbers 31, 40, 41, 66 microphone locations 11 product description 7 microphone jack 17 model description 21, 58 model name 1 monitor port 17 mute light 14 N network jack 17 num lk key...

Service Guide
Page 146
... audio 7 chipset 3 display panel 5 Ethernet 7 external media cards 8 graphics 4 hard drives 6 keyboard 9 memory module 5 microphone 7 operating system 10 optical drive 7 pointing device 9 ports 9 power requirements 9 processors 1 product name 1 security 10 serviceability 10 video 7 wireless 7 product name 1, 20, 57 product number 21, 57 R rear component 16 remote control, spare part number 38 removal/replacement preliminaries 52 procedures 57 right-side components 18 RJ-45 jack 17 RTC battery removal 65 spare part number 31, 39, 65 S Screw Kit, spare part number 38, 44 security cable slot...
... audio 7 chipset 3 display panel 5 Ethernet 7 external media cards 8 graphics 4 hard drives 6 keyboard 9 memory module 5 microphone 7 operating system 10 optical drive 7 pointing device 9 ports 9 power requirements 9 processors 1 product name 1 security 10 serviceability 10 video 7 wireless 7 product name 1, 20, 57 product number 21, 57 R rear component 16 remote control, spare part number 38 removal/replacement preliminaries 52 procedures 57 right-side components 18 RJ-45 jack 17 RTC battery removal 65 spare part number 31, 39, 65 S Screw Kit, spare part number 38, 44 security cable slot...


