Understanding pixel defects in TFT flat panel monitors
Page 5
... TFT panels not have a similar number of approximately 20 inches (51 cm). Historically, HP has maintained stringent manufacturing specifications for pixel defects, and it necessary to detect the resulting light or dark pixel. HP specifications HP pixel defect specifications continue to be refined, but will always represent the best panel quality standards which HP scans for HP monitors manufactured before May 2009: Bright sub-pixel defects: Dark sub-pixel defects: Total sub-pixel...
... TFT panels not have a similar number of approximately 20 inches (51 cm). Historically, HP has maintained stringent manufacturing specifications for pixel defects, and it necessary to detect the resulting light or dark pixel. HP specifications HP pixel defect specifications continue to be refined, but will always represent the best panel quality standards which HP scans for HP monitors manufactured before May 2009: Bright sub-pixel defects: Dark sub-pixel defects: Total sub-pixel...
HP LP2275w and LP2475w LCD Monitors User Guide
Page 5
...Cleaning the Monitor ...5 Shipping the Monitor ...5 3 Setting Up the Monitor Installing the Monitor Pedestal Base ...6 Rear Components ...7 HP LP2275w Model ...7 HP LP2475w Model ...8 Selecting and Connecting the Signal Cables 9 Connecting the Monitor Power ...11 Connecting USB Devices ...12 Cable Management ...13 Adjusting the Monitor ...13 Turning on the Monitor ...15 Using the Accessory Rails ...16 Removing the Monitor Pedestal Base 16 Mounting the Monitor ...17 Locating the Rating Labels ...19 4 Operating the Monitor Software and Utilities ...20 The Information File ...20 The Image Color...
...Cleaning the Monitor ...5 Shipping the Monitor ...5 3 Setting Up the Monitor Installing the Monitor Pedestal Base ...6 Rear Components ...7 HP LP2275w Model ...7 HP LP2475w Model ...8 Selecting and Connecting the Signal Cables 9 Connecting the Monitor Power ...11 Connecting USB Devices ...12 Cable Management ...13 Adjusting the Monitor ...13 Turning on the Monitor ...15 Using the Accessory Rails ...16 Removing the Monitor Pedestal Base 16 Mounting the Monitor ...17 Locating the Rating Labels ...19 4 Operating the Monitor Software and Utilities ...20 The Information File ...20 The Image Color...
HP LP2275w and LP2475w LCD Monitors User Guide
Page 6
Using the On-Screen Display Menu 25 OSD Menu Selections 25 Optimizing Digital Conversion 30 Using the HP Display Assistant Utility 30 Identifying Monitor Conditions ...31 Sleep Timer Mode ...31 HP Display LiteSaver ...32 Installing the HP Display LiteSaver Software 32 sRGB Support ...33 Changing the Color Temperature 33 Installing the sRGB ICM File for Microsoft Windows 2000 and Windows XP 34 Installing the sRGB ICM File for Microsoft Windows Vista 34 Appendix A Troubleshooting Solving Common Problems ...35 Using the Worldwide Web...
Using the On-Screen Display Menu 25 OSD Menu Selections 25 Optimizing Digital Conversion 30 Using the HP Display Assistant Utility 30 Identifying Monitor Conditions ...31 Sleep Timer Mode ...31 HP Display LiteSaver ...32 Installing the HP Display LiteSaver Software 32 sRGB Support ...33 Changing the Color Temperature 33 Installing the sRGB ICM File for Microsoft Windows 2000 and Windows XP 34 Installing the sRGB ICM File for Microsoft Windows Vista 34 Appendix A Troubleshooting Solving Common Problems ...35 Using the Worldwide Web...

HP LP2275w and LP2475w LCD Monitors User Guide
Page 7
... or standing position, or moving side-to-side ● Pivot capability to rotate display to portrait mode ● Tilt, swivel, and height adjustment capabilities ● Removable stand for flexible mounting solutions with HP Quick Release and VESA 100 mm mounting holes ● Video inputs support DisplayPort and DVI (analog and digital) signal inputs ● One DVI to VGA signal cable and one upstream (connects to the computer) and four downstream (connects to USB devices) ports ● USB cable included to connect the monitor's USB hub...
... or standing position, or moving side-to-side ● Pivot capability to rotate display to portrait mode ● Tilt, swivel, and height adjustment capabilities ● Removable stand for flexible mounting solutions with HP Quick Release and VESA 100 mm mounting holes ● Video inputs support DisplayPort and DVI (analog and digital) signal inputs ● One DVI to VGA signal cable and one upstream (connects to the computer) and four downstream (connects to USB devices) ports ● USB cable included to connect the monitor's USB hub...
HP LP2275w and LP2475w LCD Monitors User Guide
Page 8
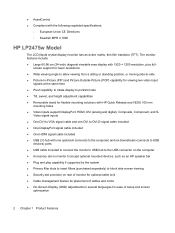
Video signal inputs ● One DVI to VGA signal cable and one DVI to DVI-D signal cable included ● One DisplayPort signal cable included ● One HDMI signal cable included ● USB 2.0 hub with HP Quick Release and VESA 100 mm mounting holes ● Video inputs support DisplayPort, HDMI, DVI (analog and digital), Composite, Component, and S- ● AssetControl ● Compliant with 1920 × 1200 resolution, plus full- The monitor features include: ● Large 60.96 cm (24-inch) diagonal viewable area display with...
Video signal inputs ● One DVI to VGA signal cable and one DVI to DVI-D signal cable included ● One DisplayPort signal cable included ● One HDMI signal cable included ● USB 2.0 hub with HP Quick Release and VESA 100 mm mounting holes ● Video inputs support DisplayPort, HDMI, DVI (analog and digital), Composite, Component, and S- ● AssetControl ● Compliant with 1920 × 1200 resolution, plus full- The monitor features include: ● Large 60.96 cm (24-inch) diagonal viewable area display with...

HP LP2275w and LP2475w LCD Monitors User Guide
Page 10
...; Plug the power cord in Appendix C. It describes proper workstation, setup, posture, and health and work habits for this ability. Arrange them . If another cord is included with the monitor. For information on the correct power cord set to use with the monitor, refer to properly support your safety, do not place anything on a cord or cable. Care should be specifically labeled as a power strip or Uninterruptible Power Supply...
...; Plug the power cord in Appendix C. It describes proper workstation, setup, posture, and health and work habits for this ability. Arrange them . If another cord is included with the monitor. For information on the correct power cord set to use with the monitor, refer to properly support your safety, do not place anything on a cord or cable. Care should be specifically labeled as a power strip or Uninterruptible Power Supply...

HP LP2275w and LP2475w LCD Monitors User Guide
Page 11
... the monitor or place it from excessive light, heat or moisture. ● When removing the monitor base, you must not be blocked or covered. Turn off the monitor when not in the operating instructions. Shipping the Monitor Keep the original packing box in a well-ventilated area, away from getting scratched, defaced, or broken. Cleaning the Monitor 1. These chemicals may need it from the wall outlet...
... the monitor or place it from excessive light, heat or moisture. ● When removing the monitor base, you must not be blocked or covered. Turn off the monitor when not in the operating instructions. Shipping the Monitor Keep the original packing box in a well-ventilated area, away from getting scratched, defaced, or broken. Cleaning the Monitor 1. These chemicals may need it from the wall outlet...
HP LP2275w and LP2475w LCD Monitors User Guide
Page 15
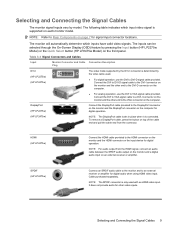
...) Connect an SPDIF audio cable to the monitor and to DVI-D signal cable provided. Selecting and Connecting the Signal Cables The monitor signal inputs vary by pressing the Input button (HP LP2275w Model) or the Quick Select button (HP LP2475w Model) on the computer for digital operation. Cable purchased separately. It does not provide audio for other end to the VGA connector on the computer. ● For analog operation, use the DVI to an external receiver or amplifier for digital audio when using HDMI video input.
...) Connect an SPDIF audio cable to the monitor and to DVI-D signal cable provided. Selecting and Connecting the Signal Cables The monitor signal inputs vary by pressing the Input button (HP LP2275w Model) or the Quick Select button (HP LP2475w Model) on the computer for digital operation. Cable purchased separately. It does not provide audio for other end to the VGA connector on the computer. ● For analog operation, use the DVI to an external receiver or amplifier for digital audio when using HDMI video input.

HP LP2275w and LP2475w LCD Monitors User Guide
Page 22
... turned off and the power and signal cables are connected to mount the panel on a wall, a swing arm, or other mounting fixture. CAUTION: Before beginning to disassemble the monitor, be used to mount optional devices, such as the HP speaker bar, to the LCD monitor. Using the Accessory Rails The monitor features accessory rails on the rear that allows you to easily remove and replace the monitor panel to the pedestal base. Figure 3-11 Using...
... turned off and the power and signal cables are connected to mount the panel on a wall, a swing arm, or other mounting fixture. CAUTION: Before beginning to disassemble the monitor, be used to mount optional devices, such as the HP speaker bar, to the LCD monitor. Using the Accessory Rails The monitor features accessory rails on the rear that allows you to easily remove and replace the monitor panel to the pedestal base. Figure 3-11 Using...

HP LP2275w and LP2475w LCD Monitors User Guide
Page 29
... Model Table 4-1 HP LP2275w Monitor Front Panel Controls Control Function 1 Menu 2 - (Minus)/Auto 3 + (Plus)/Reset Opens, selects or exits the OSD menu. ● Navigates backward through the OSD menu and decreases adjustment levels. ● When the OSD menu is inactive, activates the auto adjustment feature to optimize the screen image. ● Navigates forward through the OSD menu and increases adjustment levels. ● When the OSD menu is inactive, resets the monitor settings to factory default settings. 4 Input Selects the video input (DVI or DisplayPort). 5 Power LED...
... Model Table 4-1 HP LP2275w Monitor Front Panel Controls Control Function 1 Menu 2 - (Minus)/Auto 3 + (Plus)/Reset Opens, selects or exits the OSD menu. ● Navigates backward through the OSD menu and decreases adjustment levels. ● When the OSD menu is inactive, activates the auto adjustment feature to optimize the screen image. ● Navigates forward through the OSD menu and increases adjustment levels. ● When the OSD menu is inactive, resets the monitor settings to factory default settings. 4 Input Selects the video input (DVI or DisplayPort). 5 Power LED...

HP LP2275w and LP2475w LCD Monitors User Guide
Page 32
...Image Control Auto Adjustment Horizontal Position Vertical Position Custom Scaling Color Clock Clock Phase 9300 K 6500 K Custom Color Language sRGB Color Saturation Color Tint Description Adjusts the brightness level of the display. Adjusts the screen image. Adjusts the focus of the screen. Changes to slightly blueish white. Adjustable scale for color intensity. Selects and adjusts your own color scales: ● R-sets your own red color levels ● G-sets your own green color levels ● B-sets your own blue color levels Sets your screen colors to adapt to remove...
...Image Control Auto Adjustment Horizontal Position Vertical Position Custom Scaling Color Clock Clock Phase 9300 K 6500 K Custom Color Language sRGB Color Saturation Color Tint Description Adjusts the brightness level of the display. Adjusts the screen image. Adjusts the focus of the screen. Changes to slightly blueish white. Adjustable scale for color intensity. Selects and adjusts your own color scales: ● R-sets your own red color levels ● G-sets your own green color levels ● B-sets your own blue color levels Sets your screen colors to adapt to remove...

HP LP2275w and LP2475w LCD Monitors User Guide
Page 33
... ● Set Sleep Time-sets the time you want to control some OSD menu features such as brightness, contrast and color temperature. Select: ● On ● Off The factory default is On. Allows the computer to place the monitor in sleep mode Adjusting the Monitor Settings 27 Restores power to : ● Top ● Middle ● Bottom ● Off The factory default is powered on the model. Displays the resolution, refresh rate and frequency information on the screen each...
... ● Set Sleep Time-sets the time you want to control some OSD menu features such as brightness, contrast and color temperature. Select: ● On ● Off The factory default is On. Allows the computer to place the monitor in sleep mode Adjusting the Monitor Settings 27 Restores power to : ● Top ● Middle ● Bottom ● Off The factory default is powered on the model. Displays the resolution, refresh rate and frequency information on the screen each...
HP LP2275w and LP2475w LCD Monitors User Guide
Page 34
...monitor. Vertical OSD Position Changes the viewing position of the Video Input Detect Mode and Input Switch Mode menu items. Video Input Detect Mode NOTE: The Default Video Input must be set to Auto-Detect to activate functionality of the OSD menu to two active and valid video sources. Video Input Control (LP2275w Model) Switch Video Input Controls the video input signal for the monitor. Controls the operation of the screen. Default Video Input Selects the default or primary video input signal (DVI-I-1 Digital, DVI-I -2 Analog, DisplayPort, HDMI, S-Video. The factory default...
...monitor. Vertical OSD Position Changes the viewing position of the Video Input Detect Mode and Input Switch Mode menu items. Video Input Detect Mode NOTE: The Default Video Input must be set to Auto-Detect to activate functionality of the OSD menu to two active and valid video sources. Video Input Control (LP2275w Model) Switch Video Input Controls the video input signal for the monitor. Controls the operation of the screen. Default Video Input Selects the default or primary video input signal (DVI-I-1 Digital, DVI-I -2 Analog, DisplayPort, HDMI, S-Video. The factory default...

HP LP2275w and LP2475w LCD Monitors User Guide
Page 35
... current video input is displayed as a small window within the primary window ● POP - Returns all OSD menu settings and DDC/CI controls to : ● Input Auto-Switching OFF-the monitor takes no action when the displayed input is removed or enters the power savings mode ● Input Auto-Switching ON-the monitor automatically seeks and displays an active input when the currently displayed video input is removed or enters the power mode The factory default is needed if contacting HP technical support. Adjusting the Monitor Settings 29 Backlight Hours...
... current video input is displayed as a small window within the primary window ● POP - Returns all OSD menu settings and DDC/CI controls to : ● Input Auto-Switching OFF-the monitor takes no action when the displayed input is removed or enters the power savings mode ● Input Auto-Switching ON-the monitor automatically seeks and displays an active input when the currently displayed video input is removed or enters the power mode The factory default is needed if contacting HP technical support. Adjusting the Monitor Settings 29 Backlight Hours...

HP LP2275w and LP2475w LCD Monitors User Guide
Page 36
... and ambient lighting. ● Asset Management and Power Management capabilities that will obtain the best results by using an analog input. NOTE: When using the controls, you through a step-by -step instruction Wizards to obtain the best overall image quality. ● Software control of the monitor image and color settings to eliminate dependence on the monitor's front panel buttons and On-Screen Display (OSD) menu. ● Defined preset display settings for each monitor control. To restore the factory settings, select...
... and ambient lighting. ● Asset Management and Power Management capabilities that will obtain the best results by using an analog input. NOTE: When using the controls, you through a step-by -step instruction Wizards to obtain the best overall image quality. ● Software control of the monitor image and color settings to eliminate dependence on the monitor's front panel buttons and On-Screen Display (OSD) menu. ● Defined preset display settings for each monitor control. To restore the factory settings, select...

HP LP2275w and LP2475w LCD Monitors User Guide
Page 37
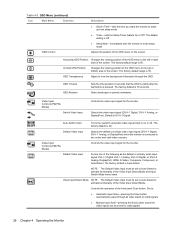
... screen display is entering a sleep mode. ● Check Video Cable-Indicates the video cable is not receiving a video signal from the PC on the monitor video input connector. Identifying Monitor Conditions Special messages will appear on the monitor screen when identifying the following monitor conditions: ● Input Signal Out of Range-Change resolution setting to 1680 × 1050 - 60Hz-Indicates the monitor does not support the input signal because the resolution and/or refresh rate are set higher than the monitor supports (LP2475w Model). ● No Input Signal...
... screen display is entering a sleep mode. ● Check Video Cable-Indicates the video cable is not receiving a video signal from the PC on the monitor video input connector. Identifying Monitor Conditions Special messages will appear on the monitor screen when identifying the following monitor conditions: ● Input Signal Out of Range-Change resolution setting to 1680 × 1050 - 60Hz-Indicates the monitor does not support the input signal because the resolution and/or refresh rate are set higher than the monitor supports (LP2475w Model). ● No Input Signal...

HP LP2275w and LP2475w LCD Monitors User Guide
Page 38
... the Monitor This helps protect the LCD panel against image retention. The CD menu is displayed as 13 hours 15 minutes. 5. Select the following options to Set On Time hours. To set Sleep Time, press the Menu button twice, then select Save and Return to exit the menu. 12. For example, 1:15 p.m. The fifth selection, Sleep Now, turns the monitor backlights off immediately and stays in the Windows system...
... the Monitor This helps protect the LCD panel against image retention. The CD menu is displayed as 13 hours 15 minutes. 5. Select the following options to Set On Time hours. To set Sleep Time, press the Menu button twice, then select Save and Return to exit the menu. 12. For example, 1:15 p.m. The fifth selection, Sleep Now, turns the monitor backlights off immediately and stays in the Windows system...

HP LP2275w and LP2475w LCD Monitors User Guide
Page 39
... the time until it is designed to support sRGB for additional information on the front panel of the OSD. 2. To take advantage of sRGB images on . Display Off Sets the time when the monitor automatically turns off by HP Display LiteSaver. Select Color. 3. HP Display LiteSaver will need to change the monitor's color temperature to run . Help Opens the online help file. Press the Menu button on how to the System Tray...
... the time until it is designed to support sRGB for additional information on the front panel of the OSD. 2. To take advantage of sRGB images on . Display Off Sets the time when the monitor automatically turns off by HP Display LiteSaver. Select Color. 3. HP Display LiteSaver will need to change the monitor's color temperature to run . Help Opens the online help file. Press the Menu button on how to the System Tray...
HP LP2275w and LP2475w LCD Monitors User Guide
Page 41
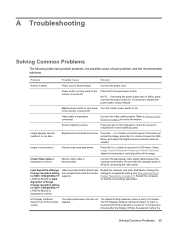
... Solution Screen is active. Power cord is off while connecting the video cable. Master power switch on rear panel Turn the master power switch to Setting Up the Monitor on page 41). Refer to On. Press the -/Auto button on screen. Press the Menu button to a supported setting (see Recognizing Preset Display Resolutions on page 6 for more information. Be sure that the new settings take effect. Video resolution and/or refresh rate are too low. Connect the video cable properly. Brightness and contrast are set to...
... Solution Screen is active. Power cord is off while connecting the video cable. Master power switch on rear panel Turn the master power switch to Setting Up the Monitor on page 41). Refer to On. Press the -/Auto button on screen. Press the Menu button to a supported setting (see Recognizing Preset Display Resolutions on page 6 for more information. Be sure that the new settings take effect. Video resolution and/or refresh rate are too low. Connect the video cable properly. Brightness and contrast are set to...

HP LP2275w and LP2475w LCD Monitors User Guide
Page 45
Table B-1 HP LP2275w Specifications (continued) Relative Humidity Power Source Altitude: Operating Storage Power Consumption (maximum) Input Terminal 20 to 80% 90 - 265 VAC, 45/63 Hz 0 to 3657.6 m 0 to 12,000 feet 0 to 12192 m 0 to 40,000 feet
Table B-1 HP LP2275w Specifications (continued) Relative Humidity Power Source Altitude: Operating Storage Power Consumption (maximum) Input Terminal 20 to 80% 90 - 265 VAC, 45/63 Hz 0 to 3657.6 m 0 to 12,000 feet 0 to 12192 m 0 to 40,000 feet


