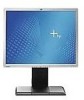
An Overview of Current Display Interfaces
Page 3
... interface standard for all such products, which would likely pull commercial users in the same direction. • LCDs already account for the majority of the PC monitor market, and have the following sections provide brief overviews of each of these interfaces that is intended for use... time in the 2010s. • The DVI connector will continue to be used over the next 2-3 years as a panel-level (internal) interface, permitting direct-drive monitor products that may be attractive in some notebook PCs. • The DisplayPort connector will start to the newer alternatives. DisplayPort...
An Overview of Current Display Interfaces
Page 11
... displays per physical connection, tiling, conditional update, etc., with full backward compatibility with the digital video information, as well as direct-drive monitors. HP, Dell, Philips, NVIDIA, ATI (now AMD), Samsung, and Genesis Microchip - brought a new digital display interface specification to the Video ... (such as a proposed new standard. DisplayPort source and sink (display) devices may be both an external (monitor, TV, etc.) connection as well as an internal (panel-level) interface, which enables simple support of multiple data types and other data types (text, etc.), and...
Understanding pixel defects in TFT flat panel monitors
Page 2
...-of-the-art in groups. Executive summary Flat panel LCD technology is viewing a cleaner image without the distraction of pixel defects. 2 This means better quality for the customer and ultimately greater satisfaction for some LCD monitors may produce a few sub-pixel defects per screen. The HP specification does not allow for the end user because...
Understanding pixel defects in TFT flat panel monitors
Page 3
...-film transistor (TFT) technology refers to a type of liquid crystal display (LCD), also known as an active-matrix LCD (AMLCD), used in all HP LCD monitors as well as any color and any brightness, and the combination of all the pixels on the panel creates the complete image. Combining red, green, and blue light in a flat...
Understanding pixel defects in TFT flat panel monitors
Page 4
...an enormously complex device. This is a very low failure rate indeed-only about 14 millionths of one of the millions of transistors within the LCD panel may leave a sub-pixel permanently on or off, creating a tiny dark spot or bright spot on the display. Minute specks of dust on... look at the total number of pixels and subpixels on a 1920 x 1200 display, we see that the panel is more than double the number of today's high-resolution WUXGA displays. with LCD technology, and permits the manufacture of largesize, high-resolution displays which rival any one percent. This results in ...
Understanding pixel defects in TFT flat panel monitors
Page 5
...minimal number of sub-pixel defects are clustered together in normal operating mode at competitive costs, and most importantly the goal of approximately 20 inches (51 cm). A defect in their tiny size relative to the screen, defective sub-pixels can reasonably be easier to ...human eye, defective green sub-pixels may be extremely hard to see. HP specifications HP pixel defect specifications continue to be refined, but will always represent the best panel quality standards which HP scans for HP monitors manufactured before May 2009: Bright sub-pixel defects: Dark sub-pixel defects...
Understanding pixel defects in TFT flat panel monitors
Page 6
... 5-10 single or double bright or dark sub-pixels (again, depending on or off " sub-pixels (depending on the number of each) Class 2 panels permit any or all of the HP monitor. Most remaining units are completely defect-free, including no full pixel or sub-pixel defects. Class...
HP Display Assistant User Guide
Page 6
...the Add/Remove Programs window, click HP Display Assistant to quickly adjust any monitor setting. 2 Chapter 1 Overview From the Start menu, select All Programs > HP Display Assistant > Uninstall HP Display Assistant. 2. The recommended mode of steps for all the monitor settings. Once the uninstall is ...From the Start menu, select All Programs > HP Display Assistant > HP Display Assistant. OSD mode allows you to highlight it. 4. From the Start menu, select Settings, then select Control Panel. (For Windows XP, select Control Panel from either Add/Remove Programs or the Start ...
HP Display Assistant User Guide
Page 12
... Assistant. ❑ Select Preset: Provides a list of predefined presets for immediate use. ❑ Tune Display: Opens the HP Display Assistant control panel. ● Enable task tray menu: Shows a complete list of menu items for that option. 4 Options Options Tab The Options tab includes preference settings, online ... to add a check mark or clear the check mark. Click on a button on the left side of the tab to open the pane for HP Display Assistant when rightclicking on or off any vacant area of the desktop and select one of the desktop's right-click context sensitive menu. To...
HP Display Assistant User Guide
Page 21
... the first time you must either disable Theft Deterrence to the computer. NOTE: If Theft Deterrence is enabled and you want to move your monitor to a different computer, you must go through the process described above for ten seconds. Theft Deterrence 17 Overriding Theft Deterrence Mode To override ...new computer and enter your PIN number. To reestablish Theft Deterrence, you turn on power to completely avoid triggering a theft condition or install HP Display Assistant on the front panel of the monitor at the same time and hold the buttons down for "Setting Up Theft Deterrence."
HP LP1965 19", LP2065 20", and LP2465 24" LCD Monitors User Guide
Page 5
...HP LP1965, LP2065, and LP2465 Models 1 2 Safety and Maintenance Guidelines Important Safety Information ...3 Maintenance Guidelines ...4 Cleaning the Monitor ...4 Shipping the Monitor ...4 3 Setting Up the Monitor Installing the Monitor Pedestal Base ...5 Rear Components ...6 Selecting the Signal Connectors and Cables 7 Connecting the Monitor ...8 Adjusting the Monitor ...9 Turning on the Monitor...from the Worldwide Web 18 Using the Auto-Adjustment Function 19 Front Panel Controls ...20 Adjusting the Monitor Settings ...21 Using the On-Screen Display Menu 21 OSD Menu Selections 21 ENWW v
HP LP1965 19", LP2065 20", and LP2465 24" LCD Monitors User Guide
Page 9
...monitor features include: ● LP1965 model, large 19-inch (48.3 cm) viewable area display with 1280 × 1024 resolution, plus full-screen support for lower resolutions ● LP2065 model, large 20... cables and two DVI-D signal cables included (LP2065 and LP2465 models) ● One DVI-I ...HP Display Assistant, Pivot Pro software, monitor driver software, and product documentation ● Energy saver feature to meet requirements for reduced power consumption ENWW HP LP1965, LP2065, and LP2465 Models 1 1 Product Features HP LP1965, LP2065, and LP2465 Models The flat panel monitors...
HP LP1965 19", LP2065 20", and LP2465 24" LCD Monitors User Guide
Page 13
..., it will be used on the panel may cause nonuniformity of color or disorientation of the LCD panel. Figure 3-1 Inserting the Monitor into the Pedestal Base NOTE: Be sure the pedestal base is turned off to the monitor. Installing the Monitor Pedestal Base NOTE: Do not install the... pedestal base if the monitor will make a clicking sound. Pressure on...
HP LP1965 19", LP2065 20", and LP2465 24" LCD Monitors User Guide
Page 14
... (side panel) Connects the monitor USB hub to the monitor. 6 Chapter 3 Setting Up the Monitor ENWW Connects optional USB devices to a host USB port/hub. Connects the DVI-I Connectors Turns off all power to the monitor. Connects the AC power cord to the monitor. Master... Power Switch AC Power Connector DVI-I to VGA signal cable or DVI-D signal cable to the monitor. Connects optional USB devices to the monitor. Rear Components Figure 3-2 Rear Components Component 1 2...
HP LP1965 19", LP2065 20", and LP2465 24" LCD Monitors User Guide
Page 15
...DVI connector on the computer. The video mode supported by the DVI-I connector on the monitor and the other end to a DVI-I connector is determined by pressing the Input Select button on the front panel. The inputs can be selected through the On-Screen Display (OSD) feature by the... video cable used. ● For digital operation, use the DVI-I to VGA signal cable provided. The monitor will automatically determine which inputs have valid video ...
HP LP1965 19", LP2065 20", and LP2465 24" LCD Monitors User Guide
Page 16
...USB hub cable to the USB connector on the rear panel of the computer, and the other end to an electrical wall outlet. Place the monitor in a convenient, well-ventilated location near the computer. 2. To reduce the risk of the monitor, and the other end to the equipment: •...the cord by unplugging the power cord from the equipment by the plug. 3. Figure 3-6 Connecting the Power Cable 8 Chapter 3 Setting Up the Monitor ENWW The grounding plug is easily accessible at all times. • Disconnect power from the electrical outlet. For your safety, do not place anything...
HP LP1965 19", LP2065 20", and LP2465 24" LCD Monitors User Guide
Page 17
Figure 3-8 Tilting the Monitor NOTE: The 24" model has a tilt range of the monitor base. Tilt the monitor's panel forward or backward to set it to +25 degrees. Place the cables through the cable management channel on the back of -5 to a comfortable eye level. 4. Figure 3-7 Using the Cable Management Feature Adjusting the Monitor 1. ENWW Adjusting the Monitor 9
HP LP1965 19", LP2065 20", and LP2465 24" LCD Monitors User Guide
Page 20
NOTE: You must connect the USB hub cable from the monitor to the computer to Step 2 in Connecting the Monitor on page 8. Figure 3-12 Connecting USB Devices 12 Chapter 3 Setting Up the Monitor ENWW Refer to enable the USB 2.0 ports on the rear panel, used to connect devices such as a digital camera, USB keyboard, or USB mouse. Connecting USB Devices The monitor provides four USB connectors, two on the side panel and two on the monitor.
HP LP1965 19", LP2065 20", and LP2465 24" LCD Monitors User Guide
Page 21
... audio cable, disconnect it. 1. CAUTION: Before beginning to disassemble the monitor, be used to mount optional devices, such as the HP speaker bar, to attach to the LCD. Slide the quick release latch (1) on the pedestal base to the documentation... included with the optional device for detailed mounting instructions. Using the Accessory Rails The monitor features accessory rails on the rear that allows you to easily remove and replace the monitor panel to mount the panel...
HP LP1965 19", LP2065 20", and LP2465 24" LCD Monitors User Guide
Page 22
... with the VESA standard and is rated to support the weight of the monitor display panel. For best performance, it from the base. Remove the Quick Release from the pedestal base. Figure 3-14 Removing the Monitor from the Pedestal Base Mounting the Monitor The HP Quick Release can be used because they may damage the...