HP LE1901w/LE1901wm and LE2201w LCD Monitors User Guide
Page 13
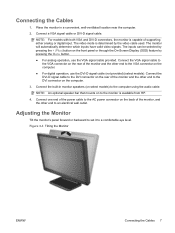
...HP. 4. Adjusting the Monitor Tilt the monitor's panel forward or backward to set it to the computer using the audio cable. Place the monitor in monitor speakers (on the rear of supporting either analog or digital input. The monitor...2. NOTE: An optional speaker bar that mounts on to the VGA connector on the rear of the monitor, and the other end to the monitor is determined by pressing the Menu button....For models with both VGA and DVI-D connectors, the monitor is capable of the monitor and the other end to an electrical wall outlet. Connect the VGA signal cable to the VGA ...
...HP. 4. Adjusting the Monitor Tilt the monitor's panel forward or backward to set it to the computer using the audio cable. Place the monitor in monitor speakers (on the rear of supporting either analog or digital input. The monitor...2. NOTE: An optional speaker bar that mounts on to the VGA connector on the rear of the monitor, and the other end to the monitor is determined by pressing the Menu button....For models with both VGA and DVI-D connectors, the monitor is capable of the monitor and the other end to an electrical wall outlet. Connect the VGA signal cable to the VGA ...
HP LE1901w/LE1901wm and LE2201w LCD Monitors User Guide
Page 14
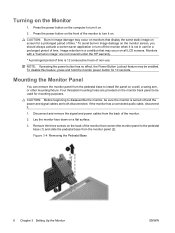
... the monitor when it on the front of the monitor to be used for 10 seconds. Monitors with a "burned-in use . Lay the monitor face down on the Monitor 1.... the monitor back panel to turn it . 1. Remove the three screws on . 2. To disable this feature, press and hold the monitor power button for mounting purposes. If the monitor has...wall, a swing arm, or other mounting fixture. Press the power button on . Four threaded mounting holes are not covered under the HP warranty. * A prolonged period of time is 12 consecutive hours of the monitor that may be sure the monitor...
... the monitor when it on the front of the monitor to be used for 10 seconds. Monitors with a "burned-in use . Lay the monitor face down on the Monitor 1.... the monitor back panel to turn it . 1. Remove the three screws on . 2. To disable this feature, press and hold the monitor power button for mounting purposes. If the monitor has...wall, a swing arm, or other mounting fixture. Press the power button on . Four threaded mounting holes are not covered under the HP warranty. * A prolonged period of time is 12 consecutive hours of the monitor that may be sure the monitor...


