Security - Windows Vista
Page 8
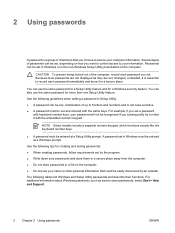
... most passwords are not displayed as screen-saver passwords, select Start > Help and Support. 2 Chapter 2 Using passwords ENWW Use the following topics list Windows and Setup Utility passwords and describe their functions. A password set , depending on the computer. Several types of characters that could be set , changed, or deleted, it with the same keys. Passwords can also use the same password for a Setup Utility feature and for more than one Setup Utility feature. You can be set a password with keyboard number keys, your password...
... most passwords are not displayed as screen-saver passwords, select Start > Help and Support. 2 Chapter 2 Using passwords ENWW Use the following topics list Windows and Setup Utility passwords and describe their functions. A password set , depending on the computer. Several types of characters that could be set , changed, or deleted, it with the same keys. Passwords can also use the same password for a Setup Utility feature and for more than one Setup Utility feature. You can be set a password with keyboard number keys, your password...
Security - Windows Vista
Page 18
... optional external fingerprint reader, connect the reader to the computer before registering at least 2 fingers, an error message is the default finger for a different Windows user, log on the screen turns green. When the VeriSoft Access Manager Registration Wizard opens, click Next, and then slowly swipe your finger across the sensor. You can use a fingerprint logon to Windows. Whether you are using a Windows password. In Windows, double-click the VeriSoft Access Manager...
... optional external fingerprint reader, connect the reader to the computer before registering at least 2 fingers, an error message is the default finger for a different Windows user, log on the screen turns green. When the VeriSoft Access Manager Registration Wizard opens, click Next, and then slowly swipe your finger across the sensor. You can use a fingerprint logon to Windows. Whether you are using a Windows password. In Windows, double-click the VeriSoft Access Manager...
Setup Utility - Windows Vista and XP
Page 8
... Support, which is accessible only when the computer is started or restarted in the lower-left corner of the following procedures: ● Press f10, and then follow the instructions on the screen. - When you use the arrow keys to select Exit > Exit Saving Changes, and then press enter. The Setup Utility features available for advanced users include a hard drive self-test, a Network Service Boot, and settings for all users...
... Support, which is accessible only when the computer is started or restarted in the lower-left corner of the following procedures: ● Press f10, and then follow the instructions on the screen. - When you use the arrow keys to select Exit > Exit Saving Changes, and then press enter. The Setup Utility features available for advanced users include a hard drive self-test, a Network Service Boot, and settings for all users...
Software Update, Backup, and Recovery - Windows Vista
Page 5
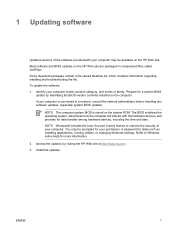
... computer is stored on the HP Web site are packaged in compressed files called SoftPaqs. 1 Updating software Updated versions of your computer model, product category, and series or family. If your permission or password for more information. 2. NOTE The computer system BIOS is connected to Windows online Help for tasks such as installing applications, running utilities, or changing Windows settings. Most software and BIOS updates on the system...
... computer is stored on the HP Web site are packaged in compressed files called SoftPaqs. 1 Updating software Updated versions of your computer model, product category, and series or family. If your permission or password for more information. 2. NOTE The computer system BIOS is connected to Windows online Help for tasks such as installing applications, running utilities, or changing Windows settings. Most software and BIOS updates on the system...

Software Update, Backup, and Recovery - Windows Vista
Page 6
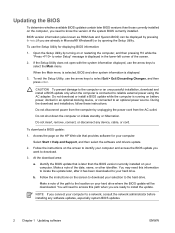
... Discarding Changes, and then press enter. Do not shut down the computer or initiate Sleep or Hibernation. Follow the instructions on the screen to identify your computer and access the BIOS update you connect your hard drive where the BIOS update will need to a network, consult the network administrator before installing any device, cable, or cord. b. Follow the instructions on the screen to download your computer. When the Main menu is connected to the hard drive...
... Discarding Changes, and then press enter. Do not shut down the computer or initiate Sleep or Hibernation. Follow the instructions on the screen to identify your computer and access the BIOS update you connect your hard drive where the BIOS update will need to a network, consult the network administrator before installing any device, cable, or cord. b. Follow the instructions on the screen to download your computer. When the Main menu is connected to the hard drive...
Software Update, Backup, and Recovery - Windows Vista
Page 13
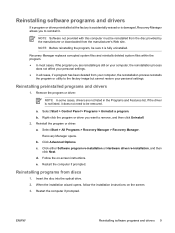
Select Start > Control Panel > Programs > Uninstall a program. Select Start > All Programs > Recovery Manager > Recovery Manager. c. Click either Software program re-installation or Hardware driver re-installation, and then click Next. Reinstalling preinstalled programs and drivers 1. Right-click the program or driver you want to remove, and then click Uninstall. 2. b. When the installation wizard opens, follow the installation instructions on -screen instructions. ENWW Reinstalling software programs and drivers 9 NOTE Software not provided with this computer must be...
Select Start > Control Panel > Programs > Uninstall a program. Select Start > All Programs > Recovery Manager > Recovery Manager. c. Click either Software program re-installation or Hardware driver re-installation, and then click Next. Reinstalling preinstalled programs and drivers 1. Right-click the program or driver you want to remove, and then click Uninstall. 2. b. When the installation wizard opens, follow the installation instructions on -screen instructions. ENWW Reinstalling software programs and drivers 9 NOTE Software not provided with this computer must be...

Wireless (Select Models Only) - Windows Vista
Page 11
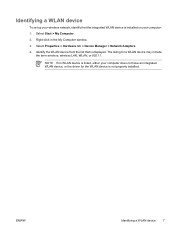
Select Start > Computer > System properties tab. 2. NOTE If no WLAN device is listed, either your computer does not have an integrated WLAN device, or the driver for a WLAN device may be prompted for your permission or password for tasks such as installing applications, running utilities, or changing Windows settings. In the left pane, click Device Manager. 3. ENWW Identifying a WLAN device 7 Identifying a WLAN device To set up your wireless network, identify...
Select Start > Computer > System properties tab. 2. NOTE If no WLAN device is listed, either your computer does not have an integrated WLAN device, or the driver for a WLAN device may be prompted for your permission or password for tasks such as installing applications, running utilities, or changing Windows settings. In the left pane, click Device Manager. 3. ENWW Identifying a WLAN device 7 Identifying a WLAN device To set up your wireless network, identify...
Security - Windows XP
Page 6
... set a password with keyboard number keys, your password will not be set . NOTE Select models include a separate numeric keypad, which functions exactly like the keyboard number keys. ● A password must be entered at a Setup Utility prompt. Several types of passwords can be recognized if you set , depending on how you choose to your computer information. A password set and entered with the embedded numeric keypad. 2 Using passwords A password is not case sensitive. ● A password must be set in Windows...
... set a password with keyboard number keys, your password will not be set . NOTE Select models include a separate numeric keypad, which functions exactly like the keyboard number keys. ● A password must be entered at a Setup Utility prompt. Several types of passwords can be recognized if you set , depending on how you choose to your computer information. A password set and entered with the embedded numeric keypad. 2 Using passwords A password is not case sensitive. ● A password must be set in Windows...
Software Update, Backup and Recovery - Windows XP
Page 6
... need to access this information to locate the update later, after it has been downloaded to your computer to select Exit > Exit Discarding Changes, and then press enter. NOTE If you are already in Microsoft® Windows®) or by turning on battery power, docked in the lower-left corner of the screen. 2. To use the arrow keys to a network, consult the network administrator before installing any device, cable...
... need to access this information to locate the update later, after it has been downloaded to your computer to select Exit > Exit Discarding Changes, and then press enter. NOTE If you are already in Microsoft® Windows®) or by turning on battery power, docked in the lower-left corner of the screen. 2. To use the arrow keys to a network, consult the network administrator before installing any device, cable...
Wireless (Select Models Only) - Windows XP
Page 11
... WLAN device, or the driver for a WLAN device may include the term wireless, wireless LAN, WLAN, or 802.11. Select Properties > Hardware tab > Device Manager > Network Adapters. 4. Select Start > My Computer. 2. ENWW Identifying a WLAN device 7 The listing for the WLAN device is not properly installed. Identify the WLAN device from the list that the integrated WLAN device is installed on your computer: 1. Identifying a WLAN device To set up your wireless network, identify that is displayed.
... WLAN device, or the driver for a WLAN device may include the term wireless, wireless LAN, WLAN, or 802.11. Select Properties > Hardware tab > Device Manager > Network Adapters. 4. Select Start > My Computer. 2. ENWW Identifying a WLAN device 7 The listing for the WLAN device is not properly installed. Identify the WLAN device from the list that the integrated WLAN device is installed on your computer: 1. Identifying a WLAN device To set up your wireless network, identify that is displayed.
Routine Care
Page 8
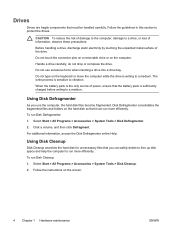
... section to a medium. Do not touch the connector pins on a removable drive or on the screen. 4 Chapter 1 Hardware maintenance ENWW Select Start > All Programs > Accessories > System Tools > Disk Cleanup. 2. When the battery pack is the only source of power, ensure that must be handled carefully. The write process is sufficiently charged before writing to protect the drives. Using Disk Defragmenter As you can run...
... section to a medium. Do not touch the connector pins on a removable drive or on the screen. 4 Chapter 1 Hardware maintenance ENWW Select Start > All Programs > Accessories > System Tools > Disk Cleanup. 2. When the battery pack is the only source of power, ensure that must be handled carefully. The write process is sufficiently charged before writing to protect the drives. Using Disk Defragmenter As you can run...
Troubleshooting
Page 10
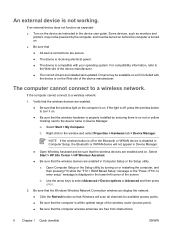
... your operating system. If an external device does not function as expected: ● Turn on the device as monitors and printers, may be available on a CD included with the device or on . ● Be sure that ● All device connections are secure. ● The device is receiving electrical power. ● The device is not working. Use the arrow keys to a wireless network. The computer cannot connect to select Advanced > Device options...
... your operating system. If an external device does not function as expected: ● Turn on the device as monitors and printers, may be available on a CD included with the device or on . ● Be sure that ● All device connections are secure. ● The device is receiving electrical power. ● The device is not working. Use the arrow keys to a wireless network. The computer cannot connect to select Advanced > Device options...
Notebook PC User Guide - Windows Vista
Page 5
... Multimedia hardware ...46 Using the optical drive ...46 Identifying the installed optical drive 46 Inserting an optical disc 47 Removing an optical disc (with power 48 Removing an optical disc (without power 49 Using media activity hotkeys 50 Using the audio features ...51 Using the audio-in (microphone) jack 51 Using the audio-out (headphone) jack 51 Adjusting the volume 52 Using the video features ...53 Using the external monitor port 53 Using the S-Video-out jack 54 Multimedia software ...55 Identifying preinstalled multimedia software 55 Installing multimedia software from...
... Multimedia hardware ...46 Using the optical drive ...46 Identifying the installed optical drive 46 Inserting an optical disc 47 Removing an optical disc (with power 48 Removing an optical disc (without power 49 Using media activity hotkeys 50 Using the audio features ...51 Using the audio-in (microphone) jack 51 Using the audio-out (headphone) jack 51 Adjusting the volume 52 Using the video features ...53 Using the external monitor port 53 Using the S-Video-out jack 54 Multimedia software ...55 Identifying preinstalled multimedia software 55 Installing multimedia software from...
Notebook PC User Guide - Windows Vista
Page 33
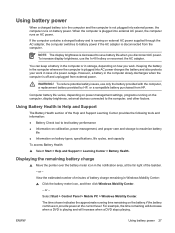
... and unplugged from external power. However, a battery in storage, depending on the computer, display brightness, external devices connected to battery power if the AC adapter is disconnected from HP. Computer battery life varies, depending on power management settings, programs running on how you disconnect AC power. Using battery power When a charged battery is in case of a power outage. To increase display brightness, use only the battery provided with the computer, a replacement battery provided by HP, or a compatible battery purchased from the...
... and unplugged from external power. However, a battery in storage, depending on the computer, display brightness, external devices connected to battery power if the AC adapter is disconnected from HP. Computer battery life varies, depending on power management settings, programs running on how you disconnect AC power. Using battery power When a charged battery is in case of a power outage. To increase display brightness, use only the battery provided with the computer, a replacement battery provided by HP, or a compatible battery purchased from the...
Notebook PC User Guide - Windows Vista
Page 37
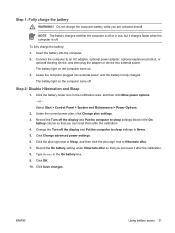
... battery light on . 3. Step 2: Disable Hibernation and Sleep 1. Under the current power plan, click Change plan settings. 3. Record the Turn off . Click Change advanced power settings. 6. Do not charge the computer battery while you can reset them after the calibration. 8. Click OK. 10. Select Start > Control Panel > System and Maintenance > Power Options. 2. Record the On battery setting under Hibernate after so that you can reset it charges faster when the computer is fully charged. ENWW Using battery power...
... battery light on . 3. Step 2: Disable Hibernation and Sleep 1. Under the current power plan, click Change plan settings. 3. Record the Turn off . Click Change advanced power settings. 6. Do not charge the computer battery while you can reset them after the calibration. 8. Click OK. 10. Select Start > Control Panel > System and Maintenance > Power Options. 2. Record the On battery setting under Hibernate after so that you can reset it charges faster when the computer is fully charged. ENWW Using battery power...
Notebook PC User Guide - Windows Vista
Page 38
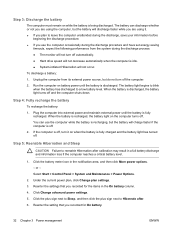
... into external power and maintain external power until the battery is off . Click Change advanced power settings. 5. The battery light begins to blink when the battery has discharged to leave the computer unattended during the discharge process: ● The monitor will not occur. Step 4: Fully recharge the battery To recharge the battery: 1. If the computer is discharged. Select Start > Control Panel > System and Maintenance > Power Options. 2. Reenter the setting that you use the...
... into external power and maintain external power until the battery is off . Click Change advanced power settings. 5. The battery light begins to blink when the battery has discharged to leave the computer unattended during the discharge process: ● The monitor will not occur. Step 4: Fully recharge the battery To recharge the battery: 1. If the computer is discharged. Select Start > Control Panel > System and Maintenance > Power Options. 2. Reenter the setting that you use the...
Notebook PC User Guide - Windows Vista
Page 41
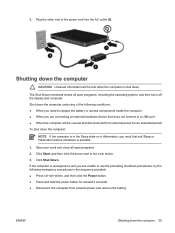
... to use the preceding shutdown procedures, try the following conditions: ● When you need to replace the battery or access components inside the computer ● When you must first exit Sleep or Hibernation before shutdown is unresponsive and you are connecting an external hardware device that does not connect to the Lock button. 3. 3. The Shut Down command closes all open programs, including the operating system...
... to use the preceding shutdown procedures, try the following conditions: ● When you need to replace the battery or access components inside the computer ● When you must first exit Sleep or Hibernation before shutdown is unresponsive and you are connecting an external hardware device that does not connect to the Lock button. 3. 3. The Shut Down command closes all open programs, including the operating system...
Notebook PC User Guide - Windows Vista
Page 70
... 2 connection, external power 34 connector, power 8 conservation, power 33 copyright warning 58 cord, power, identifying 12 critical battery level 30 D display image, switching 18, 20 screen brightness hotkeys 18, 21 display release button 6 drives caring for 36 IDE drive light 37 optical 8 See also hard drive, optical drive drives. 37 See also hard drive; optical drive DVD region settings 58 DVDPlay using 55 E environmental specifications 14 external monitor port 9, 53 F fn key hotkeys 17 identifying 2 function keys hotkeys 17 identifying 2 H hard drive installing 39 removing 38 hard drive...
... 2 connection, external power 34 connector, power 8 conservation, power 33 copyright warning 58 cord, power, identifying 12 critical battery level 30 D display image, switching 18, 20 screen brightness hotkeys 18, 21 display release button 6 drives caring for 36 IDE drive light 37 optical 8 See also hard drive, optical drive drives. 37 See also hard drive; optical drive DVD region settings 58 DVDPlay using 55 E environmental specifications 14 external monitor port 9, 53 F fn key hotkeys 17 identifying 2 function keys hotkeys 17 identifying 2 H hard drive installing 39 removing 38 hard drive...
Notebook PC User Guide - Windows Vista
Page 71
... 50 media controls, hotkeys 18, 21 memory adding or replacing memory modules 61 memory module compartment 10 memory module compartment cover removing 62 replacing 63 memory modules adding 61 replacing 61 microphone (audio-in) jack 8 microphones, supported 51 Microsoft Certificate of Authenticity label 13 modem approval label 13 monitor port, external 9 mouse, external setting preferences 16 using 16 multimedia software described 55 identifying 55 installing 55 using 56 mute button 4, 51, 52 mute light 5 N network (RJ-45) jack 9 num lock light 5 num lock mode, external keypad 23 O operating...
... 50 media controls, hotkeys 18, 21 memory adding or replacing memory modules 61 memory module compartment 10 memory module compartment cover removing 62 replacing 63 memory modules adding 61 replacing 61 microphone (audio-in) jack 8 microphones, supported 51 Microsoft Certificate of Authenticity label 13 modem approval label 13 monitor port, external 9 mouse, external setting preferences 16 using 16 multimedia software described 55 identifying 55 installing 55 using 56 mute button 4, 51, 52 mute light 5 N network (RJ-45) jack 9 num lock light 5 num lock mode, external keypad 23 O operating...

Notebook PC User Guide - Windows Vista
Page 72
... (network) jack 9 S S-Video 20 S-Video-out jack 9, 53, 54 screen brightness hotkeys 18, 21 screen image, switching 18, 20 scroll zones, TouchPad 3, 15 security cable slot 9 serial number, computer 13 service tag 13 shutdown 35 shutting down 35 Sleep exiting 24 initiating 24 writing to CD or DVD 45 slots memory module 10 security cable 9 software multimedia 55 USB devices 60 speakers 6, 51 specifications operating environment 14 rated input power 14 storing battery 33 system information hotkey 18 system information hotkey 18 U USB cable, connecting...
... (network) jack 9 S S-Video 20 S-Video-out jack 9, 53, 54 screen brightness hotkeys 18, 21 screen image, switching 18, 20 scroll zones, TouchPad 3, 15 security cable slot 9 serial number, computer 13 service tag 13 shutdown 35 shutting down 35 Sleep exiting 24 initiating 24 writing to CD or DVD 45 slots memory module 10 security cable 9 software multimedia 55 USB devices 60 speakers 6, 51 specifications operating environment 14 rated input power 14 storing battery 33 system information hotkey 18 system information hotkey 18 U USB cable, connecting...


