
HP Notebook Hard Drives & Solid State Drives Identifying, Preventing, Diagnosing and Recovering from Drive Failures Care and Mai
Page 6
... link power management with Serial ATA hard disk drives. Updates to SATA AHCI mode Using Sysprep with Intel Matrix Storage Manager Technology. To download the latest version of the Intel Matrix Storage Technology driver: http://www8.hp.com/us/en/support-drivers.html Installing SATA drivers SATA Native Mode is a storage interface technology that provides up to 150MB/sec transfer rate for adding SATA drivers to RIS (Remote Installation Service) installation...
... link power management with Serial ATA hard disk drives. Updates to SATA AHCI mode Using Sysprep with Intel Matrix Storage Manager Technology. To download the latest version of the Intel Matrix Storage Technology driver: http://www8.hp.com/us/en/support-drivers.html Installing SATA drivers SATA Native Mode is a storage interface technology that provides up to 150MB/sec transfer rate for adding SATA drivers to RIS (Remote Installation Service) installation...
HP Notebook Hard Drives & Solid State Drives Identifying, Preventing, Diagnosing and Recovering from Drive Failures Care and Mai
Page 7
... the Maintenance and Service guide for your HP Business Notebook, refer to the following Microsoft Knowledge Base articles for your hard drive: Page 7 also known as word processors) that do not have used , you work with physical sectors (disk media). For example, adjust the power management settings if you may be found at 4 KB. eight times larger than current drive technology. More information can use an Advanced Format drive...
... the Maintenance and Service guide for your HP Business Notebook, refer to the following Microsoft Knowledge Base articles for your hard drive: Page 7 also known as word processors) that do not have used , you work with physical sectors (disk media). For example, adjust the power management settings if you may be found at 4 KB. eight times larger than current drive technology. More information can use an Advanced Format drive...
HP ENVY15 Getting Started - Windows 7
Page 9
... Using the keyboard ...25 Using the action keys ...25 Using pointing devices ...27 Setting pointing device preferences 27 Using the Imagepad ...28 Turning the Imagepad off or on 28 Navigating ...29 Selecting ...29 Using Imagepad gestures 29 Scrolling 30 Pinching/Zooming 30 Rotating 31 Flicking 31 5 Maintenance ...32 Using a factory-sealed battery ...32 Replacing or upgrading the hard drive 33 Removing the hard drive ...33 Installing the hard drive ...36 Adding or replacing memory modules 38 6 Backup and recovery ...43 Restore ...44 Creating recovery media...
... Using the keyboard ...25 Using the action keys ...25 Using pointing devices ...27 Setting pointing device preferences 27 Using the Imagepad ...28 Turning the Imagepad off or on 28 Navigating ...29 Selecting ...29 Using Imagepad gestures 29 Scrolling 30 Pinching/Zooming 30 Rotating 31 Flicking 31 5 Maintenance ...32 Using a factory-sealed battery ...32 Replacing or upgrading the hard drive 33 Removing the hard drive ...33 Installing the hard drive ...36 Adding or replacing memory modules 38 6 Backup and recovery ...43 Restore ...44 Creating recovery media...
HP ENVY15 Getting Started - Windows 7
Page 12
... sections are included in this chapter: ● What's new ● Finding information Before you set up your computer, plug the AC adapter into the computer and connect to begin charging the battery, and then follow the on page 25. 4. Create recovery discs or a recovery flash drive. Set up and register your wired or wireless network. With external power connected, press the power button to external power. 1 Welcome The following steps: 1. After you...
... sections are included in this chapter: ● What's new ● Finding information Before you set up your computer, plug the AC adapter into the computer and connect to begin charging the battery, and then follow the on page 25. 4. Create recovery discs or a recovery flash drive. Set up and register your wired or wireless network. With external power connected, press the power button to external power. 1 Welcome The following steps: 1. After you...
HP ENVY15 Getting Started - Windows 7
Page 16
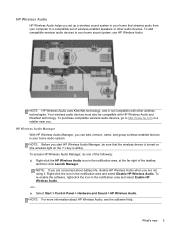
..., use HP Wireless Audio. NOTE: For more information about battery life, disable HP Wireless Audio when you . To purchase compatible wireless audio devices, go to your home audio system. HP Wireless Audio Manager With HP Wireless Audio Manager, you can add, remove, name, and group wireless-enabled devices in the notification area, at the far right of wireless-enabled speakers or other wireless technologies. Right-click the icon in the notification area and select Enable HP Wireless Audio. -or- ▲ Select Start > Control Panel > Hardware and Sound > HP Wireless Audio...
..., use HP Wireless Audio. NOTE: For more information about battery life, disable HP Wireless Audio when you . To purchase compatible wireless audio devices, go to your home audio system. HP Wireless Audio Manager With HP Wireless Audio Manager, you can add, remove, name, and group wireless-enabled devices in the notification area, at the far right of wireless-enabled speakers or other wireless technologies. Right-click the icon in the notification area and select Enable HP Wireless Audio. -or- ▲ Select Start > Control Panel > Hardware and Sound > HP Wireless Audio...
HP ENVY15 Getting Started - Windows 7
Page 17
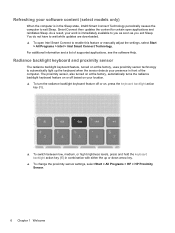
... open Intel Smart Connect to enable this feature or manually adjust the settings, select Start > All Programs > Intel > Intel Smart Connect Technology. Radiance backlight keyboard and proximity sensor The radiance backlight keyboard feature, turned on , press the keyboard backlight action key (f5). ▲ To switch between low, medium, or high brightness levels, press and hold the keyboard backlight action key (f5) in front of supported applications, see the software...
... open Intel Smart Connect to enable this feature or manually adjust the settings, select Start > All Programs > Intel > Intel Smart Connect Technology. Radiance backlight keyboard and proximity sensor The radiance backlight keyboard feature, turned on , press the keyboard backlight action key (f5). ▲ To switch between low, medium, or high brightness levels, press and hold the keyboard backlight action key (f5) in front of supported applications, see the software...
HP ENVY15 Getting Started - Windows 7
Page 18
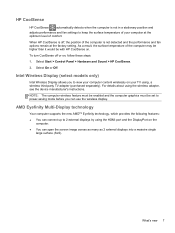
... 2 external displays by using the wireless adapter, see the device manufacturer's instructions. Select Start > Control Panel > Hardware and Sound > HP CoolSense. 2. For details about using the HDMI port and the DisplayPort on . What's new 7 HP CoolSense HP CoolSense automatically detects when the computer is not detected and the performance and fan options remain at the optimum level of comfort. When HP CoolSense is off or on your computer at the factory setting. Intel Wireless Display (select models...
... 2 external displays by using the wireless adapter, see the device manufacturer's instructions. Select Start > Control Panel > Hardware and Sound > HP CoolSense. 2. For details about using the HDMI port and the DisplayPort on . What's new 7 HP CoolSense HP CoolSense automatically detects when the computer is not detected and the performance and fan options remain at the optimum level of comfort. When HP CoolSense is off or on your computer at the factory setting. Intel Wireless Display (select models...
HP ENVY15 Getting Started - Windows 7
Page 19
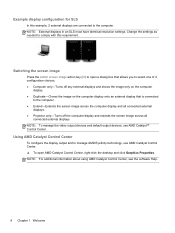
... all connected external displays. Example display configuration for SLS In this requirement. NOTE: For additional information about using AMD Catalyst Control Center, see the software Help. 8 Chapter 1 Welcome Switching the screen image Press the switch screen image action key (f4) to the computer. NOTE: External displays in an SLS must have identical resolution settings. Change the settings as needed to comply with this example, 2 external displays are connected to open AMD Catalyst Control Center...
... all connected external displays. Example display configuration for SLS In this requirement. NOTE: For additional information about using AMD Catalyst Control Center, see the software Help. 8 Chapter 1 Welcome Switching the screen image Press the switch screen image action key (f4) to the computer. NOTE: External displays in an SLS must have identical resolution settings. Change the settings as needed to comply with this example, 2 external displays are connected to open AMD Catalyst Control Center...
HP ENVY15 Getting Started - Windows 7
Page 20
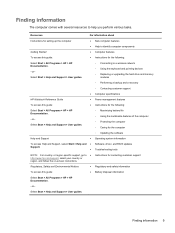
...to a wireless network ◦ Using the keyboard and pointing devices ◦ Replacing or upgrading the hard drive and memory modules ◦ Performing a backup and a recovery ◦ Contacting customer support ● Computer specifications HP Notebook Reference Guide ● Power management features To access this guide: ● Instructions for the computer ◦ Updating the software Help and Support ● Operating system information To access Help and Support, select Start > Help and ● Software, driver, and BIOS updates Support. ● Troubleshooting tools...
...to a wireless network ◦ Using the keyboard and pointing devices ◦ Replacing or upgrading the hard drive and memory modules ◦ Performing a backup and a recovery ◦ Contacting customer support ● Computer specifications HP Notebook Reference Guide ● Power management features To access this guide: ● Instructions for the computer ◦ Updating the software Help and Support ● Operating system information To access Help and Support, select Start > Help and ● Software, driver, and BIOS updates Support. ● Troubleshooting tools...
HP ENVY15 Getting Started - Windows 7
Page 27
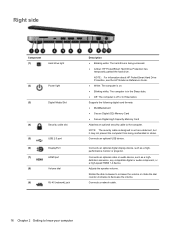
...Power light (3) Digital Media Slot (4) Security cable slot (5) USB 2.0 port (6) DisplayPort (7) HDMI port (8) Volume dial (9) RJ-45 (network) jack Description ● Blinking white: The hard drive is being mishandled or stolen. Supports the following digital card formats: ● MultiMediaCard ● Secure Digital (SD) Memory Card ● Secure Digital High Capacity Memory Card Attaches an optional security cable to decrease the volume. Connects an optional video or audio device, such as a highperformance monitor or projector. Connects an optional digital display device...
...Power light (3) Digital Media Slot (4) Security cable slot (5) USB 2.0 port (6) DisplayPort (7) HDMI port (8) Volume dial (9) RJ-45 (network) jack Description ● Blinking white: The hard drive is being mishandled or stolen. Supports the following digital card formats: ● MultiMediaCard ● Secure Digital (SD) Memory Card ● Secure Digital High Capacity Memory Card Attaches an optional security cable to decrease the volume. Connects an optional video or audio device, such as a highperformance monitor or projector. Connects an optional digital display device...
HP ENVY15 Getting Started - Windows 7
Page 33
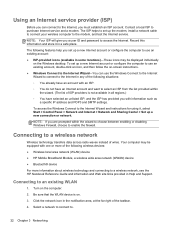
..., install a network cable to connect your wireless computer to a wireless network, see the HP Notebook Reference Guide and information and Web site links provided in Help and Support. Using an Internet service provider (ISP) Before you can use an existing account: ● ISP-provided icons (available in some locations)-These icons may be displayed individually on the Windows desktop. To set up a new Internet account or configure the computer to use the Windows Connect to...
..., install a network cable to connect your wireless computer to a wireless network, see the HP Notebook Reference Guide and information and Web site links provided in Help and Support. Using an Internet service provider (ISP) Before you can use an existing account: ● ISP-provided icons (available in some locations)-These icons may be displayed individually on the Windows desktop. To set up a new Internet account or configure the computer to use the Windows Connect to...
HP ENVY15 Getting Started - Windows 7
Page 36
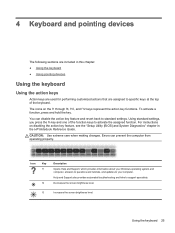
... Support, which provides information about your Windows operating system and computer, answers to questions and tutorials, and updates to standard settings. 4 Keyboard and pointing devices The following sections are included in the HP Notebook Reference Guide. The icons on disabling the action key feature, see the "Setup Utility (BIOS) and System Diagnostics" chapter in this chapter: ● Using the keyboard ● Using pointing devices Using the keyboard Using the action keys Action keys are used...
... Support, which provides information about your Windows operating system and computer, answers to questions and tutorials, and updates to standard settings. 4 Keyboard and pointing devices The following sections are included in the HP Notebook Reference Guide. The icons on disabling the action key feature, see the "Setup Utility (BIOS) and System Diagnostics" chapter in this chapter: ● Using the keyboard ● Using pointing devices Using the keyboard Using the action keys Action keys are used...
HP ENVY15 Getting Started - Windows 7
Page 38
Using pointing devices 27 Then right-click the device representing your computer, you can use an external USB mouse (purchased separately) by connecting it to one of the USB ports on the computer. To access Mouse Properties, select Start > Devices and Printers. Setting pointing device preferences Use Mouse Properties in Windows to customize settings for pointing devices, such as button configuration, click speed, and pointer options. Using pointing devices NOTE: In addition to the pointing devices included with your computer, and select Mouse settings.
Using pointing devices 27 Then right-click the device representing your computer, you can use an external USB mouse (purchased separately) by connecting it to one of the USB ports on the computer. To access Mouse Properties, select Start > Devices and Printers. Setting pointing device preferences Use Mouse Properties in Windows to customize settings for pointing devices, such as button configuration, click speed, and pointer options. Using pointing devices NOTE: In addition to the pointing devices included with your computer, and select Mouse settings.
HP ENVY15 Getting Started - Windows 7
Page 44
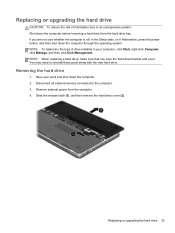
... the operating system. Removing the hard drive 1. Save your computer, click Start, right-click Computer, click Manage, and then click Disk Management. Replacing or upgrading the hard drive 33 NOTE: When replacing a hard drive, make sure that you are not sure whether the computer is off, in the Sleep state, or in your work and shut down the computer. 2. If you save the hard drive bracket and cover. Disconnect all external devices connected to...
... the operating system. Removing the hard drive 1. Save your computer, click Start, right-click Computer, click Manage, and then click Disk Management. Replacing or upgrading the hard drive 33 NOTE: When replacing a hard drive, make sure that you are not sure whether the computer is off, in the Sleep state, or in your work and shut down the computer. 2. If you save the hard drive bracket and cover. Disconnect all external devices connected to...
HP ENVY15 Getting Started - Windows 7
Page 49
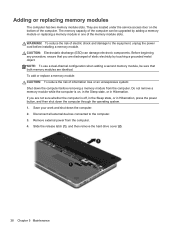
... the power button, and then shut down the computer through the operating system. 1. To add or replace a memory module: CAUTION: To reduce the risk of electric shock and damage to the computer. 3. Slide the release latch (1), and then remove the hard drive cover (2). 38 Chapter 5 Maintenance Do not remove a memory module while the computer is off, in the Sleep state, or in Hibernation. Save your work...
... the power button, and then shut down the computer through the operating system. 1. To add or replace a memory module: CAUTION: To reduce the risk of electric shock and damage to the computer. 3. Slide the release latch (1), and then remove the hard drive cover (2). 38 Chapter 5 Maintenance Do not remove a memory module while the computer is off, in the Sleep state, or in Hibernation. Save your work...
HP ENVY15 Getting Started - Windows 7
Page 52
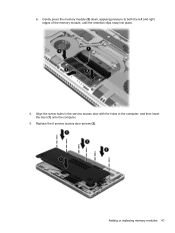
Replace the 6 service access door screws (2). Adding or replacing memory modules 41 Gently press the memory module (3) down, applying pressure to both the left and right edges of the memory module, until the retention clips snap into place. 8. Align the screw holes in the service access door with the holes in the computer, and then lower the door (1) onto the computer. 9. c.
Replace the 6 service access door screws (2). Adding or replacing memory modules 41 Gently press the memory module (3) down, applying pressure to both the left and right edges of the memory module, until the retention clips snap into place. 8. Align the screw holes in the service access door with the holes in the computer, and then lower the door (1) onto the computer. 9. c.

HP ENVY15 Getting Started - Windows 7
Page 56
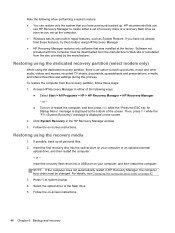
... in a safe place. Handle these discs or the flash drive after setting up the computer for any functional computer issues fail. If you use an optional external optical drive (purchased separately) to create recovery discs, or you can exit the program before inserting it must be connected directly to a USB port on the hard drive. Performing a system restore HP Recovery Manager software allows you can purchase recovery discs for your computer from a dedicated recovery partition (select models only...
... in a safe place. Handle these discs or the flash drive after setting up the computer for any functional computer issues fail. If you use an optional external optical drive (purchased separately) to create recovery discs, or you can exit the program before inserting it must be connected directly to a USB port on the hard drive. Performing a system restore HP Recovery Manager software allows you can purchase recovery discs for your computer from a dedicated recovery partition (select models only...
HP ENVY15 Getting Started - Windows 7
Page 57
... the ESC key for Startup Menu" message is displayed at system bootup. 4. Restoring using HP Recovery Manager. ● HP Recovery Manager restores only software that was installed at the factory. Insert the recovery flash drive into the optical drive on your computer or an optional external optical drive, and then restart the computer. - Select the optical drive or the flash drive. 5. or - Press f9 at the bottom of recovery discs or a recovery flash drive as soon as System Restore. To restore the computer...
... the ESC key for Startup Menu" message is displayed at system bootup. 4. Restoring using HP Recovery Manager. ● HP Recovery Manager restores only software that was installed at the factory. Insert the recovery flash drive into the optical drive on your computer or an optional external optical drive, and then restart the computer. - Select the optical drive or the flash drive. 5. or - Press f9 at the bottom of recovery discs or a recovery flash drive as soon as System Restore. To restore the computer...
HP ENVY15 Getting Started - Windows 7
Page 66
... 20 hard drive light 16 HDMI port, identifying 16 headphone jack 18 Help and Support key 25 HP Recovery Manager 45 HP Wireless Audio Manager 5 I Imagepad buttons 12 identifying 11 navigating 29 selecting 29 using 28 Imagepad gestures flicking 31 pinching 30 rotating 31 scrolling 30 zooming 30 Imagepad light 11, 12 Imagepad on/off button 11 Imagepad zone, identifying 12 input power 53 integrated webcam light, identifying 19 Intel Smart Connect Technology 6 Intel Wireless Display 7 internal display switch...
... 20 hard drive light 16 HDMI port, identifying 16 headphone jack 18 Help and Support key 25 HP Recovery Manager 45 HP Wireless Audio Manager 5 I Imagepad buttons 12 identifying 11 navigating 29 selecting 29 using 28 Imagepad gestures flicking 31 pinching 30 rotating 31 scrolling 30 zooming 30 Imagepad light 11, 12 Imagepad on/off button 11 Imagepad zone, identifying 12 input power 53 integrated webcam light, identifying 19 Intel Smart Connect Technology 6 Intel Wireless Display 7 internal display switch...

HP ENVY15 Getting Started - Windows 7
Page 67
... (network) jack, identifying 16 rotating Imagepad gesture 31 S screen brightness keys 25 screen image, switching 26 scrolling Imagepad gesture 30 security cable slot, identifying 16 serial number label 51 serial number, computer 51 service access door identifying 20 removing 39 setup of WLAN 23 single large surface 8 slots Digital Media Slot 16 security cable 16 speaker, top, identifying 13 speakers, front, identifying 15 subwoofer, identifying 20 supported discs 45 system recovery performing 45 using recovery discs 46 using the dedicated recovery partition...
... (network) jack, identifying 16 rotating Imagepad gesture 31 S screen brightness keys 25 screen image, switching 26 scrolling Imagepad gesture 30 security cable slot, identifying 16 serial number label 51 serial number, computer 51 service access door identifying 20 removing 39 setup of WLAN 23 single large surface 8 slots Digital Media Slot 16 security cable 16 speaker, top, identifying 13 speakers, front, identifying 15 subwoofer, identifying 20 supported discs 45 system recovery performing 45 using recovery discs 46 using the dedicated recovery partition...


