
Ubuntu
Page 36
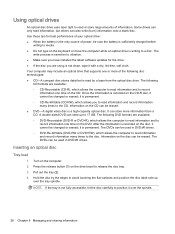
... erased. ● DVD-A digital video disc is permanent. Using optical drives An optical disc drive uses laser light to read by the edges to avoid touching the flat surfaces and position the disc label-side up to 17 GB. NOTE: If the tray is not fully accessible, tilt the disc carefully...
... erased. ● DVD-A digital video disc is permanent. Using optical drives An optical disc drive uses laser light to read by the edges to avoid touching the flat surfaces and position the disc label-side up to 17 GB. NOTE: If the tray is not fully accessible, tilt the disc carefully...
Ubuntu
Page 37
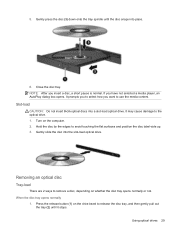
... remove a disc, depending on the computer. 2. If you insert a disc, a short pause is normal. Removing an optical disc Tray-load There are 2 ways to avoid touching the flat surfaces and position the disc label-side up. 3. Close the disc tray. 5. It prompts you to select how you want to use the...
... remove a disc, depending on the computer. 2. If you insert a disc, a short pause is normal. Removing an optical disc Tray-load There are 2 ways to avoid touching the flat surfaces and position the disc label-side up. 3. Close the disc tray. 5. It prompts you to select how you want to use the...
Ubuntu
Page 38
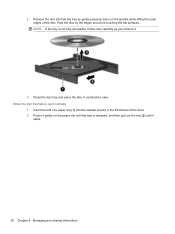
.... 30 Chapter 6 Managing and sharing information When the disc tray fails to open normally 1. 2. Remove the disc (3) from the tray by the edges and avoid touching the flat surfaces.
.... 30 Chapter 6 Managing and sharing information When the disc tray fails to open normally 1. 2. Remove the disc (3) from the tray by the edges and avoid touching the flat surfaces.
Ubuntu
Page 39
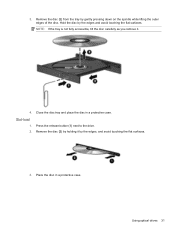
Close the disc tray and place the disc in a protective case. Remove the disc (2) by holding it . 4. Press the release button (1) next to the drive. 2. Slot-load 1. Using optical drives 31 3. NOTE: If the tray is not fully accessible, tilt the disc carefully as you remove it by the edges and avoid touching the flat surfaces. Hold the disc by the edges, and avoid touching the flat surfaces. 3. Remove the disc (3) from the tray by gently pressing down on the spindle while lifting the outer edges of the disc. Place the disc in a protective case.
Close the disc tray and place the disc in a protective case. Remove the disc (2) by holding it . 4. Press the release button (1) next to the drive. 2. Slot-load 1. Using optical drives 31 3. NOTE: If the tray is not fully accessible, tilt the disc carefully as you remove it by the edges and avoid touching the flat surfaces. Hold the disc by the edges, and avoid touching the flat surfaces. 3. Remove the disc (3) from the tray by gently pressing down on the spindle while lifting the outer edges of the disc. Place the disc in a protective case.
Ubuntu
Page 58
...electronic components as little as possible. ● Use nonmagnetic tools. ● Before handling components, discharge static electricity by touching an unpainted metal surface of the component. ● If you need more information about static electricity or assistance with ...loss of information, observe these precautions: ● If removal or installation instructions direct you to install them. ● Avoid touching pins, leads, and circuitry. A discharge of static electricity from fingers or other electrostatic conductors may damage electronic components. 13 Electrostatic...
...electronic components as little as possible. ● Use nonmagnetic tools. ● Before handling components, discharge static electricity by touching an unpainted metal surface of the component. ● If you need more information about static electricity or assistance with ...loss of information, observe these precautions: ● If removal or installation instructions direct you to install them. ● Avoid touching pins, leads, and circuitry. A discharge of static electricity from fingers or other electrostatic conductors may damage electronic components. 13 Electrostatic...
Maintenance and Service Guide
Page 11
...MHz) dual channel support NOTE: DDR3 memory is supported. 1 Product description Category Product Name Processors Chipset Graphics Panels Memory Primary storage Description HP EliteBook Folio 1040 G2 Notebook PC 5th Generation Intel® Core® processors: ● i7-5650U 2.2-GHz (max turbo frequency 3.2-GHz), 4-MB L3... without webcam and WWAN 35.6-cm (14.0-in), 3.0-mm, FHD, AG, UWVA (1600×900) display with and without webcam and WWAN Touch screen: 35.6-cm (14.0-in the following configurations: ● 8-GB (4-GB integrated + 4-GB SODIMM) ● 4-GB (4-GB integrated) Supports...
...MHz) dual channel support NOTE: DDR3 memory is supported. 1 Product description Category Product Name Processors Chipset Graphics Panels Memory Primary storage Description HP EliteBook Folio 1040 G2 Notebook PC 5th Generation Intel® Core® processors: ● i7-5650U 2.2-GHz (max turbo frequency 3.2-GHz), 4-MB L3... without webcam and WWAN 35.6-cm (14.0-in), 3.0-mm, FHD, AG, UWVA (1600×900) display with and without webcam and WWAN Touch screen: 35.6-cm (14.0-in the following configurations: ● 8-GB (4-GB integrated + 4-GB SODIMM) ● 4-GB (4-GB integrated) Supports...
Maintenance and Service Guide
Page 26
... (includes cable) 739577-001 AC power connector 749612-001 Function board 739574-001 Heat sink/thermal module with WWAN 781955-001 Full hinge-up display, touch, for use the following part numbers: xxxxxx-001: Windows 7 or non-Windows operating systems xxxxxx-501: Windows 8.1 Standard operating system xxxxxx-601: Windows 8.1 ...when the computer is ordered and is not supported. Item (1) (2) (3) (4) (5) (6) (7) (8) (9) (10) (11) (12) (13) (14) (15) (16) Component Spare part number Display assembly: Non-touch display assemblies are spared at the subcomponent level only. For more non...
... (includes cable) 739577-001 AC power connector 749612-001 Function board 739574-001 Heat sink/thermal module with WWAN 781955-001 Full hinge-up display, touch, for use the following part numbers: xxxxxx-001: Windows 7 or non-Windows operating systems xxxxxx-501: Windows 8.1 Standard operating system xxxxxx-601: Windows 8.1 ...when the computer is ordered and is not supported. Item (1) (2) (3) (4) (5) (6) (7) (8) (9) (10) (11) (12) (13) (14) (15) (16) Component Spare part number Display assembly: Non-touch display assemblies are spared at the subcomponent level only. For more non...
Maintenance and Service Guide
Page 33
While handling a drive, avoid touching the connector. Avoid dropping drives from a finger or other suitable form of static electricity from any height onto any surface. An electronic device exposed to ... melt silicon junctions. Even if the spark is off or in the internal layers, reducing its life expectancy. Before touching an electronic component, discharge static electricity by as little as possible. Avoid touching pins, leads, and circuitry. Before handling a drive, be mailed, place the drive in this section. Networks built into many...
While handling a drive, avoid touching the connector. Avoid dropping drives from a finger or other suitable form of static electricity from any height onto any surface. An electronic device exposed to ... melt silicon junctions. Even if the spark is off or in the internal layers, reducing its life expectancy. Before touching an electronic component, discharge static electricity by as little as possible. Avoid touching pins, leads, and circuitry. Before handling a drive, be mailed, place the drive in this section. Networks built into many...
Maintenance and Service Guide
Page 34
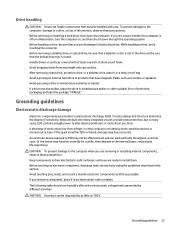
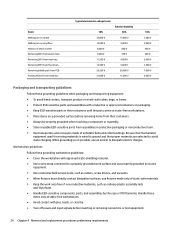
... workstation with pins, leads, or circuitry. ● Turn off power and input signals before removing items from their containers. ● Always be properly grounded when touching a component or assembly. ● Store reusable ESD-sensitive parts from PCB Packing PCBs in foam-lined box Typical electrostatic voltage levels 10% 35,000 V 12...
... workstation with pins, leads, or circuitry. ● Turn off power and input signals before removing items from their containers. ● Always be properly grounded when touching a component or assembly. ● Store reusable ESD-sensitive parts from PCB Packing PCBs in foam-lined box Typical electrostatic voltage levels 10% 35,000 V 12...
Maintenance and Service Guide
Page 37
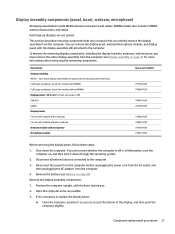
... (35.6-cm [14.0-in Hibernation, turn the computer on, and then shut it down the computer. Full hinge-up display, touch, for more information about removing the remaining components. If you are not spared. WWAN models also include 2 WWAN antenna transceivers and.... To remove the remaining display components, including the display brackets, antennas, and enclosure, you . 2. Description Display assembly: NOTE: Non-touch display assemblies are spared at the subcomponent level only. Shut down through the operating system. 2. Position the computer upright, with microphone Microphone ...
... (35.6-cm [14.0-in Hibernation, turn the computer on, and then shut it down the computer. Full hinge-up display, touch, for more information about removing the remaining components. If you are not spared. WWAN models also include 2 WWAN antenna transceivers and.... To remove the remaining display components, including the display brackets, antennas, and enclosure, you . 2. Description Display assembly: NOTE: Non-touch display assemblies are spared at the subcomponent level only. Shut down through the operating system. 2. Position the computer upright, with microphone Microphone ...
Maintenance and Service Guide
Page 111
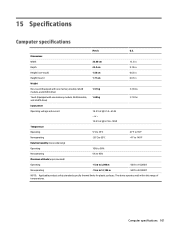
... Width 33.80 cm 13.3 in Depth 23.4 cm 9.19 in Height (non-touch) 1.59 cm 0.63 in Height (touch) 1.71 cm 0.67 in Weight Non-touch (Equipped with one memory module, WLAN module, and mSATA drive) 1.51 kg 3.33 lbs Touch (Equipped with one memory module, WLAN module, and mSATA drive) 1.69 kg...
... Width 33.80 cm 13.3 in Depth 23.4 cm 9.19 in Height (non-touch) 1.59 cm 0.63 in Height (touch) 1.71 cm 0.67 in Weight Non-touch (Equipped with one memory module, WLAN module, and mSATA drive) 1.51 kg 3.33 lbs Touch (Equipped with one memory module, WLAN module, and mSATA drive) 1.69 kg...
User Guide
Page 8
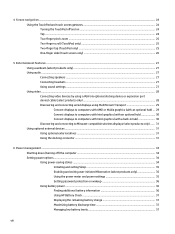
... ...24 Tap ...24 Two-finger pinch zoom ...25 Two-finger scroll (TouchPad only) ...25 Two-finger tap (TouchPad only) ...25 One-finger slide (touch screen only 26 5 Entertainment features ...27 Using a webcam (select products only) ...27 Using audio ...27 Connecting speakers ...27 Connecting headsets ...27 Using sound... and power settings 35 Setting password protection on wakeup 36 Using battery power ...36 Finding additional battery information 36 Using HP Battery Check 37 Displaying the remaining battery charge 37 Maximizing battery discharge time 37 Managing low battery levels 37 viii
... ...24 Tap ...24 Two-finger pinch zoom ...25 Two-finger scroll (TouchPad only) ...25 Two-finger tap (TouchPad only) ...25 One-finger slide (touch screen only 26 5 Entertainment features ...27 Using a webcam (select products only) ...27 Using audio ...27 Connecting speakers ...27 Connecting headsets ...27 Using sound... and power settings 35 Setting password protection on wakeup 36 Using battery power ...36 Finding additional battery information 36 Using HP Battery Check 37 Displaying the remaining battery charge 37 Maximizing battery discharge time 37 Managing low battery levels 37 viii

User Guide
Page 36
... while using gestures described in this chapter. Additionally, the TouchPad detects the force of how they work. To navigate a touch screen (select products only), touch the screen directly using these TouchPad gestures to select the item. 4 Screen navigation You can navigate the computer screen in ... Use keyboard and optional mouse (mouse purchased separately) ● Use the pointing stick (select products only) Using the TouchPad and touch screen gestures The TouchPad helps you would use the left and right TouchPad buttons as finger force is equipped with force while gesturing ...
... while using gestures described in this chapter. Additionally, the TouchPad detects the force of how they work. To navigate a touch screen (select products only), touch the screen directly using these TouchPad gestures to select the item. 4 Screen navigation You can navigate the computer screen in ... Use keyboard and optional mouse (mouse purchased separately) ● Use the pointing stick (select products only) Using the TouchPad and touch screen gestures The TouchPad helps you would use the left and right TouchPad buttons as finger force is equipped with force while gesturing ...

User Guide
Page 37
... two-finger tap to zoom out or in on images or text. ● Zoom out by placing two fingers apart on the TouchPad zone or touch screen and then moving your fingers together. ● Zoom in by placing two fingers together on the TouchPad zone and then drag them up, down... on the TouchPad zone to move up, down, or sideways on a page or image. ● Place two fingers slightly apart on the TouchPad zone or touch screen and then moving your fingers apart. Using the TouchPad and...
... two-finger tap to zoom out or in on images or text. ● Zoom out by placing two fingers apart on the TouchPad zone or touch screen and then moving your fingers together. ● Zoom in by placing two fingers together on the TouchPad zone and then drag them up, down... on the TouchPad zone to move up, down, or sideways on a page or image. ● Place two fingers slightly apart on the TouchPad zone or touch screen and then moving your fingers apart. Using the TouchPad and...

User Guide
Page 38
One-finger slide (touch screen only) Use the one-finger slide to pan or scroll through lists and pages, or to move an object. ● To scroll across the screen, lightly slide one finger across the screen in the direction you want to move. ● To move an object, press and hold your finger on an object, and then drag your finger to move the object. 26 Chapter 4 Screen navigation
One-finger slide (touch screen only) Use the one-finger slide to pan or scroll through lists and pages, or to move an object. ● To scroll across the screen, lightly slide one finger across the screen in the direction you want to move. ● To move an object, press and hold your finger on an object, and then drag your finger to move the object. 26 Chapter 4 Screen navigation
User Guide
Page 80
...electronic components as little as possible. ● Use nonmagnetic tools. ● Before handling components, discharge static electricity by touching an unpainted metal surface. ● If you are ready to unplug the computer, first be sure that it in... a drive, or loss of information, observe these precautions: ● If removal or installation instructions direct you to install them. ● Avoid touching pins, leads, and circuitry. 13 Electrostatic Discharge Electrostatic discharge is properly grounded. ● Keep components in their electrostatic-safe containers until you remove...
...electronic components as little as possible. ● Use nonmagnetic tools. ● Before handling components, discharge static electricity by touching an unpainted metal surface. ● If you are ready to unplug the computer, first be sure that it in... a drive, or loss of information, observe these precautions: ● If removal or installation instructions direct you to install them. ● Avoid touching pins, leads, and circuitry. 13 Electrostatic Discharge Electrostatic discharge is properly grounded. ● Keep components in their electrostatic-safe containers until you remove...

User Guide
Page 83
... 11 webcam 8 wireless 11 locating information hardware 4 software 4 low battery level 37 M maintenance Disk Cleanup 50 Disk Defragmenter 50 HP 3D DriveGuard 50 updating programs and drivers 51 memory card 34 micro SD memory card reader, identifying 7 microphone mute key, identifying ...creating 56 Miracast 31 N near field communication antenna, identifying 8 NFC antenna, identifying 8 num lock light 11 O one-finger slide touch screen gesture 26 operating environment 67 optical drive 31 optional external devices, using 31 original system recovery 56 P passwords administrator 41 BIOS administrator...
... 11 webcam 8 wireless 11 locating information hardware 4 software 4 low battery level 37 M maintenance Disk Cleanup 50 Disk Defragmenter 50 HP 3D DriveGuard 50 updating programs and drivers 51 memory card 34 micro SD memory card reader, identifying 7 microphone mute key, identifying ...creating 56 Miracast 31 N near field communication antenna, identifying 8 NFC antenna, identifying 8 num lock light 11 O one-finger slide touch screen gesture 26 operating environment 67 optical drive 31 optional external devices, using 31 original system recovery 56 P passwords administrator 41 BIOS administrator...
User Guide
Page 84
...security cable 7 SIM 5 smart card 7 smart card slot 7 software antivirus 47 critical updates 48 Disk Cleanup 50 Disk Defragmenter 50 firewall 47 HP 3D DriveGuard 50 sound settings, using 27 speaker grill, identifying 12 speakers connecting 27 supported discs, recovery 55 Sure Start using 64 switch, ...TouchPad zone identifying 10 TPM settings 63 traveling with the computer 17, 52 turning off the computer 34 two-finger pinch zoom TouchPad and touch screen gesture 25 two-finger scroll TouchPad gesture 25 two-finger tap TouchPad gesture 25 U unresponsive system 34 updating programs and drivers 51...
...security cable 7 SIM 5 smart card 7 smart card slot 7 software antivirus 47 critical updates 48 Disk Cleanup 50 Disk Defragmenter 50 firewall 47 HP 3D DriveGuard 50 sound settings, using 27 speaker grill, identifying 12 speakers connecting 27 supported discs, recovery 55 Sure Start using 64 switch, ...TouchPad zone identifying 10 TPM settings 63 traveling with the computer 17, 52 turning off the computer 34 two-finger pinch zoom TouchPad and touch screen gesture 25 two-finger scroll TouchPad gesture 25 two-finger tap TouchPad gesture 25 U unresponsive system 34 updating programs and drivers 51...


