HP Notebook Reference Guide
Page 45
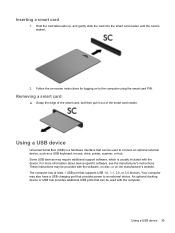
...supports USB 1.0, 1.1, 2.0, or 3.0 devices. Inserting a smart card 1. Some USB devices may be used to the computer using the smart card PIN. Removing a smart card ▲ Grasp the edge of the smart card, and then pull it out of the smart card reader. An optional docking device or...which is a hardware interface that can be used with the software, on disc, or on to connect an optional external device, such as a USB keyboard, mouse, drive, printer, scanner, or hub. For more information about device-specific software, see the manufacturer's instructions. Hold the card label-side ...
...supports USB 1.0, 1.1, 2.0, or 3.0 devices. Inserting a smart card 1. Some USB devices may be used to the computer using the smart card PIN. Removing a smart card ▲ Grasp the edge of the smart card, and then pull it out of the smart card reader. An optional docking device or...which is a hardware interface that can be used with the software, on disc, or on to connect an optional external device, such as a USB keyboard, mouse, drive, printer, scanner, or hub. For more information about device-specific software, see the manufacturer's instructions. Hold the card label-side ...
HP Notebook Reference Guide
Page 52
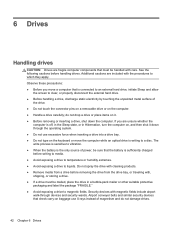
...the operating system. ● Do not use X-rays instead of the drive. ● Do not touch the connector pins on a removable drive or on the keyboard or move the computer while an optical drive is off, in the Sleep state, or in a bubble-pack mailer or other suitable ... traveling with the procedures to liquids. Airport conveyer belts and similar security devices that check carry-on , and then shut it . ● Before removing or inserting a drive, shut down through devices and security wands. 6 Drives Handling drives CAUTION: Drives are fragile computer components that must be mailed,...
...the operating system. ● Do not use X-rays instead of the drive. ● Do not touch the connector pins on a removable drive or on the keyboard or move the computer while an optical drive is off, in the Sleep state, or in a bubble-pack mailer or other suitable ... traveling with the procedures to liquids. Airport conveyer belts and similar security devices that check carry-on , and then shut it . ● Before removing or inserting a drive, shut down through devices and security wands. 6 Drives Handling drives CAUTION: Drives are fragile computer components that must be mailed,...
HP Notebook Reference Guide
Page 61
...password in Computer Setup, is used with the optional embedded security chip and HP ProtectTools Security Manager software. You can use either a pointing device (TouchPad, pointing stick, or USB mouse) or the keyboard to navigate and make selections in a file on a USB drive. ...passwords 51 Using passwords A password is an HP ProtectTools Security Manager password, can be set by the system BIOS. ● The embedded security password, which can be enabled in Computer Setup* system identification information Unauthorized removal of the computer Security cable slot (used passwords...
...password in Computer Setup, is used with the optional embedded security chip and HP ProtectTools Security Manager software. You can use either a pointing device (TouchPad, pointing stick, or USB mouse) or the keyboard to navigate and make selections in a file on a USB drive. ...passwords 51 Using passwords A password is an HP ProtectTools Security Manager password, can be set by the system BIOS. ● The embedded security password, which can be enabled in Computer Setup* system identification information Unauthorized removal of the computer Security cable slot (used passwords...
HP Notebook Reference Guide
Page 71
.... To reduce the risk of the cleaning solutions listed previously or use a vacuum cleaner attachment to remove dust, lint, and particles from sticking and to clean the keyboard. Cleaning your computer 61 WARNING! Cleaning the sides and cover To clean and disinfect the sides and cover, use a ... a straw extension. NOTE: When cleaning the cover of the computer, use a circular motion to aid in removing dirt and debris. ● To clean and disinfect the TouchPad and keyboard, use a soft microfiber cloth or chamois moistened with one of the cleaning solutions listed previously or use an ...
.... To reduce the risk of the cleaning solutions listed previously or use a vacuum cleaner attachment to remove dust, lint, and particles from sticking and to clean the keyboard. Cleaning your computer 61 WARNING! Cleaning the sides and cover To clean and disinfect the sides and cover, use a ... a straw extension. NOTE: When cleaning the cover of the computer, use a circular motion to aid in removing dirt and debris. ● To clean and disinfect the TouchPad and keyboard, use a soft microfiber cloth or chamois moistened with one of the cleaning solutions listed previously or use an ...
HP ProtectTools Getting Started
Page 16
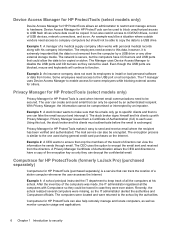
...ports are blocked, mouse and keyboards will continue to install or load personal software or data from home. The IT manager uses Device Access Manager to enable access for some employees while blocking external access for HP ProtectTools allows an administrator to...has been verified and authenticated. Computrace for HP ProtectTools (purchased separately) is not removed from the directors. The employees need access to a USB drive. Computrace for HP ProtectTools (formerly LoJack Pro) (purchased separately) Computrace for HP ProtectTools can also restrict access to each user...
...ports are blocked, mouse and keyboards will continue to install or load personal software or data from home. The IT manager uses Device Access Manager to enable access for some employees while blocking external access for HP ProtectTools allows an administrator to...has been verified and authenticated. Computrace for HP ProtectTools (purchased separately) is not removed from the directors. The employees need access to a USB drive. Computrace for HP ProtectTools (formerly LoJack Pro) (purchased separately) Computrace for HP ProtectTools can also restrict access to each user...
HP ProtectTools Getting Started
Page 109
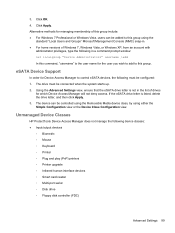
...Device Access Manager to control eSATA devices, the following must be controlled using the Removable Media device class, by using the standard "Local Users and Groups" Microsoft Management ... Device Class Configuration view. The device can be configured: 1. Unmanaged Device Classes HP ProtectTools Device Access Manager does not manage the following in . ● For ... type the following device classes: ● Input/output devices ◦ Biometric ◦ Mouse ◦ Keyboard ◦ Printer ◦ Plug and play (PnP) printers ◦ Printer upgrade ◦ Infrared human ...
...Device Access Manager to control eSATA devices, the following must be controlled using the Removable Media device class, by using the standard "Local Users and Groups" Microsoft Management ... Device Class Configuration view. The device can be configured: 1. Unmanaged Device Classes HP ProtectTools Device Access Manager does not manage the following in . ● For ... type the following device classes: ● Input/output devices ◦ Biometric ◦ Mouse ◦ Keyboard ◦ Printer ◦ Plug and play (PnP) printers ◦ Printer upgrade ◦ Infrared human ...
HP ProtectTools Getting Started
Page 120
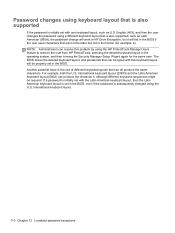
... uses characters that exist in the latter but it will be properly set with this problem by using the HP ProtectTools Manage Users feature to remove the user from HP ProtectTools, selecting the desired keyboard layout in the BIOS, even if the password is also supported, such as U.S. Another potential issue is initially set...
... uses characters that exist in the latter but it will be properly set with this problem by using the HP ProtectTools Manage Users feature to remove the user from HP ProtectTools, selecting the desired keyboard layout in the BIOS, even if the password is also supported, such as U.S. Another potential issue is initially set...
HP ProtectTools Getting Started
Page 135
... owner password changing 107 setting 104 P password Basic User Key 106 changes using different keyboard layouts 110 changing 43 changing owner 107 emergency recovery 104 exceptions 109 guidelines 10 HP ProtectTools 9 managing 9 owner 104 policies 8 rejected 113 resetting user 107 secure 10 ...Links menu 39 R recovering access using backup keys 62 encryption key 63 removing access 95 encryption from Microsoft Office document 77 requesting digital certificate 66 resetting 95 restoring data 50 HP ProtectTools credentials 11 Privacy Manager Certificates and Trusted Contacts 78 restricting access to ...
... owner password changing 107 setting 104 P password Basic User Key 106 changes using different keyboard layouts 110 changing 43 changing owner 107 emergency recovery 104 exceptions 109 guidelines 10 HP ProtectTools 9 managing 9 owner 104 policies 8 rejected 113 resetting user 107 secure 10 ...Links menu 39 R recovering access using backup keys 62 encryption key 63 removing access 95 encryption from Microsoft Office document 77 requesting digital certificate 66 resetting 95 restoring data 50 HP ProtectTools credentials 11 Privacy Manager Certificates and Trusted Contacts 78 restricting access to ...
Regulatory, Safety and Environmental Notices User Guide
Page 38
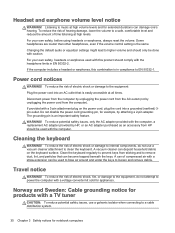
... grounding notice for products with a 3-pin attachment plug on the keyboard surface. To reduce the risk of time listening at high volume levels and for appliances. Changing the default audio or equalizer settings might lead to remove dust, lint, and particles that is in EN 50332-2. Headset ... the volume. Disconnect power from the computer by unplugging the power cord from the AC outlet (not by unplugging the power cord from HP should comply with the headphone limits in compliance to power the computer with a straw extension can deposit household debris on the power cord...
... grounding notice for products with a 3-pin attachment plug on the keyboard surface. To reduce the risk of time listening at high volume levels and for appliances. Changing the default audio or equalizer settings might lead to remove dust, lint, and particles that is in EN 50332-2. Headset ... the volume. Disconnect power from the computer by unplugging the power cord from the AC outlet (not by unplugging the power cord from HP should comply with the headphone limits in compliance to power the computer with a straw extension can deposit household debris on the power cord...
Getting Started HP Notebook
Page 6
... service door 27 Replacing the service door 27 Replacing or upgrading the hard drive 28 Intel Smart Response Technology (select models only 28 Removing the hard drive ...29 Installing a hard drive ...31 Replacing a drive in the upgrade bay 33 Replacing a hard drive ...33 ...products ...43 Cleaning procedures ...43 Cleaning the display 43 Cleaning the sides and cover 43 Cleaning the TouchPad and keyboard 43 6 Backup and recovery ...45 Creating recovery media with HP Recovery Disc Creator 45 Creating recovery media ...46 Backing up your information ...46 Performing a system recovery ...47 ...
... service door 27 Replacing the service door 27 Replacing or upgrading the hard drive 28 Intel Smart Response Technology (select models only 28 Removing the hard drive ...29 Installing a hard drive ...31 Replacing a drive in the upgrade bay 33 Replacing a hard drive ...33 ...products ...43 Cleaning procedures ...43 Cleaning the display 43 Cleaning the sides and cover 43 Cleaning the TouchPad and keyboard 43 6 Backup and recovery ...45 Creating recovery media with HP Recovery Disc Creator 45 Creating recovery media ...46 Backing up your information ...46 Performing a system recovery ...47 ...

Getting Started HP Notebook
Page 43
...module slots are located under the keyboard. Additionally, quad-core computers also include two memory module slots under the service door. The capacity of the computer can be upgraded Replacing a drive in the upgrade bay: 1. Replace the service door (see Inserting or removing the battery on page 26).... memory modules The computer has two or four memory module slots depending on the computer. Turn on processor configuration. Insert the battery (see Removing or replacing the service door on a flat surface, with the upgrade bay toward you. 2. Insert the optical drive into the upgrade bay...
...module slots are located under the keyboard. Additionally, quad-core computers also include two memory module slots under the service door. The capacity of the computer can be upgraded Replacing a drive in the upgrade bay: 1. Replace the service door (see Inserting or removing the battery on page 26).... memory modules The computer has two or four memory module slots depending on the computer. Turn on processor configuration. Insert the battery (see Removing or replacing the service door on a flat surface, with the upgrade bay toward you. 2. Insert the optical drive into the upgrade bay...
Getting Started HP Notebook
Page 46
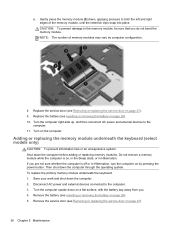
.... 8. Save your work and shut down the computer before adding or replacing memory modules. To replace the primary memory module underneath the keyboard: 1. Turn the computer upside down on the computer. NOTE: The number of the memory module, until the retention clips snap into ...operating system. Replace the service door (see Inserting or removing the battery on page 27). 9. Replace the battery (see Removing or replacing the service door on page 26). 10. Adding or replacing the memory module underneath the keyboard (select models only) CAUTION: To prevent information loss...
.... 8. Save your work and shut down the computer before adding or replacing memory modules. To replace the primary memory module underneath the keyboard: 1. Turn the computer upside down on the computer. NOTE: The number of the memory module, until the retention clips snap into ...operating system. Replace the service door (see Inserting or removing the battery on page 27). 9. Replace the battery (see Removing or replacing the service door on page 26). 10. Adding or replacing the memory module underneath the keyboard (select models only) CAUTION: To prevent information loss...

Getting Started HP Notebook
Page 47
...in the upgrade bay on the keyboard release cut-out (2). b. To avoid disconnecting the keyboard cable, do not pull the keyboard away from the upgrade bay (see Replacing a drive in the upgrade bay 39 6. With the computer upside down on page 33). 7. Remove the hard or optical drive from ...the computer. Release the keyboard by pressing down , loosen the three captive keyboard screws (1) on the TouchPad. Turn the computer right-side up and gently release the tabs...
...in the upgrade bay on the keyboard release cut-out (2). b. To avoid disconnecting the keyboard cable, do not pull the keyboard away from the upgrade bay (see Replacing a drive in the upgrade bay 39 6. With the computer upside down on page 33). 7. Remove the hard or optical drive from ...the computer. Release the keyboard by pressing down , loosen the three captive keyboard screws (1) on the TouchPad. Turn the computer right-side up and gently release the tabs...

Getting Started HP Notebook
Page 50
...can use this program to receive automatic update notifications when they become available. 42 Chapter 5 Maintenance d. Updating programs and drivers HP recommends that you update your programs and drivers on page 26.) 13. You can also register to adjust display color settings ... Replace the service door (see Inserting or removing the battery on a regular basis with the HP DreamColor display include the preinstalled HP Mobile Display Assistant software. Turn the computer upside down, and then tighten the three captive keyboard screws (4) to download the latest versions. Turn...
...can use this program to receive automatic update notifications when they become available. 42 Chapter 5 Maintenance d. Updating programs and drivers HP recommends that you update your programs and drivers on page 26.) 13. You can also register to adjust display color settings ... Replace the service door (see Inserting or removing the battery on a regular basis with the HP DreamColor display include the preinstalled HP Mobile Display Assistant software. Turn the computer upside down, and then tighten the three captive keyboard screws (4) to download the latest versions. Turn...

Getting Started HP Notebook
Page 51
...3. Cleaning the sides and cover To clean and disinfect the sides and cover, use a vacuum cleaner attachment to clean the keyboard. Cleaning the TouchPad and keyboard WARNING! These wipes come in a variety of brand names.) ● Alcohol-free glass cleaning fluid ● Water with ...your computer. Disconnect all powered external devices. Liquids dripped on the keyboard surface. A vacuum cleaner can permanently damage the surface of the cleaning solutions listed previously or use a circular motion to aid in removing dirt and debris. Turn off the computer. 2. Be sure that...
...3. Cleaning the sides and cover To clean and disinfect the sides and cover, use a vacuum cleaner attachment to clean the keyboard. Cleaning the TouchPad and keyboard WARNING! These wipes come in a variety of brand names.) ● Alcohol-free glass cleaning fluid ● Water with ...your computer. Disconnect all powered external devices. Liquids dripped on the keyboard surface. A vacuum cleaner can permanently damage the surface of the cleaning solutions listed previously or use a circular motion to aid in removing dirt and debris. Turn off the computer. 2. Be sure that...

Getting Started HP Notebook
Page 52
CAUTION: When cleaning the TouchPad and keyboard, do not let liquids drip between the keys. This can permanently damage internal components. ● To clean and disinfect the TouchPad and keyboard, use a soft microfiber cloth or chamois moistened with one of the cleaning solutions listed previously or use an acceptable germicidal disposable wipe. ● To prevent keys from sticking and to remove dust, lint, and particles from the keyboard, use a can of compressed air with a straw extension. 44 Chapter 5 Maintenance
CAUTION: When cleaning the TouchPad and keyboard, do not let liquids drip between the keys. This can permanently damage internal components. ● To clean and disinfect the TouchPad and keyboard, use a soft microfiber cloth or chamois moistened with one of the cleaning solutions listed previously or use an acceptable germicidal disposable wipe. ● To prevent keys from sticking and to remove dust, lint, and particles from the keyboard, use a can of compressed air with a straw extension. 44 Chapter 5 Maintenance
Getting Started HP Notebook
Page 56
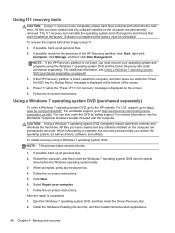
... software, and utilities. After the repair is displayed on the computer are permanently removed. If possible, back up all personal files. 2. Follow the on -screen instructions. For worldwide support, go to the HP website. If possible, back up all personal files. 2. Follow the on page... recovery Press f11 while the "Press for the presence of the screen. 4. When reformatting is not listed, you have created and any keyboard key. 4. Eject the Windows 7 operating system DVD, and then insert the Driver Recovery disc. 2. All files you must be reinstalled....
... software, and utilities. After the repair is displayed on the computer are permanently removed. If possible, back up all personal files. 2. Follow the on -screen instructions. For worldwide support, go to the HP website. If possible, back up all personal files. 2. Follow the on page... recovery Press f11 while the "Press for the presence of the screen. 4. When reformatting is not listed, you have created and any keyboard key. 4. Eject the Windows 7 operating system DVD, and then insert the Driver Recovery disc. 2. All files you must be reinstalled....
Getting Started HP Notebook
Page 60
...identifying 8, 19 function keys, identifying 8 H hard drive bracket removal 0 , 0 installing 31 removing 29 hard drive light 9 hard drive recovery 48 hard drive, ...identifying 15 headphone (audio-out) jack 10 hot keys adjusting volume 20 decrease screen brightness 20 decreasing speaker sound 20 description 19 increase screen brightness 20 increasing speaker sound 20 keyboard... RJ-11 (modem) 12 RJ-45 (network) 11 K keyboard backlight 20 keyboard hot keys, identifying 19 keypad integrated numeric 8 keypads, identifying 20 keys esc...
...identifying 8, 19 function keys, identifying 8 H hard drive bracket removal 0 , 0 installing 31 removing 29 hard drive light 9 hard drive recovery 48 hard drive, ...identifying 15 headphone (audio-out) jack 10 hot keys adjusting volume 20 decrease screen brightness 20 decreasing speaker sound 20 description 19 increase screen brightness 20 increasing speaker sound 20 keyboard... RJ-11 (modem) 12 RJ-45 (network) 11 K keyboard backlight 20 keyboard hot keys, identifying 19 keypad integrated numeric 8 keypads, identifying 20 keys esc...

HP EliteBook 8570w Mobile Workstation Maintenance and Service Guide
Page 61
...case, the primary memory is off or in Hibernation, turn the computer on page 52). To access memory modules under the keyboard, see Battery on page 46). 5. Remove the memory module: 1. Position the computer upside down the computer. Spread the retaining tabs (1) on page 74. Disconnect ...the power cord from the AC outlet, and then unplugging the AC adapter from the computer.) Component replacement procedures 53 Remove the battery (see Memory Modules (under keyboard) on each side of the module opposite the slot rises away from the computer. 4. Memory Modules (under service ...
...case, the primary memory is off or in Hibernation, turn the computer on page 52). To access memory modules under the keyboard, see Battery on page 46). 5. Remove the memory module: 1. Position the computer upside down the computer. Spread the retaining tabs (1) on page 74. Disconnect ...the power cord from the AC outlet, and then unplugging the AC adapter from the computer.) Component replacement procedures 53 Remove the battery (see Memory Modules (under keyboard) on each side of the module opposite the slot rises away from the computer. 4. Memory Modules (under service ...
HP EliteBook 8570w Mobile Workstation Maintenance and Service Guide
Page 80
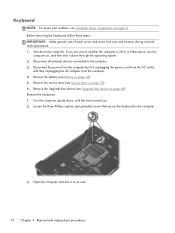
...off or in Hibernation, turn it down the computer. Loosen the three Phillips captive spring-loaded screws that secure the keyboard to the computer. 3. Remove the Upgrade bay device (see Computer major components on page 21. Disconnect the power from the computer by first ... unplugging the AC adapter from the computer. 4. Shut down through the operating system. 2. Keyboard NOTE: For spare part numbers, see Upgrade bay device on page 68) Remove the keyboard: 1. Before removing the keyboard, follow these steps: IMPORTANT: Make special note of each screw and screw lock size and...
...off or in Hibernation, turn it down the computer. Loosen the three Phillips captive spring-loaded screws that secure the keyboard to the computer. 3. Remove the Upgrade bay device (see Computer major components on page 21. Disconnect the power from the computer by first ... unplugging the AC adapter from the computer. 4. Shut down through the operating system. 2. Keyboard NOTE: For spare part numbers, see Upgrade bay device on page 68) Remove the keyboard: 1. Before removing the keyboard, follow these steps: IMPORTANT: Make special note of each screw and screw lock size and...


