Illustrated Parts & Service Map: HP Elite 7100 Series Microtower PC
Page 3
... CD-ROM group, Hard drive group, Network boot group. HP Vision Diagnostics The Hewlett-Packard Vision Diagnostics utility allows you to several categories of information about the hardware configuration of the computer and perform hardware diagnostic tests on the subsystems... with integrated graphics, replace the system board. 3 short, 1 long, 3 sec pause CPU configuration error or invalid CPU detected before graphics card initialized. 1. Replace the system board. 5 short, 1 sec pause BIOS recovery was suc- No action required. cessful. HP Elite 7100 MT Series 606037-001 page 3
... CD-ROM group, Hard drive group, Network boot group. HP Vision Diagnostics The Hewlett-Packard Vision Diagnostics utility allows you to several categories of information about the hardware configuration of the computer and perform hardware diagnostic tests on the subsystems... with integrated graphics, replace the system board. 3 short, 1 long, 3 sec pause CPU configuration error or invalid CPU detected before graphics card initialized. 1. Replace the system board. 5 short, 1 sec pause BIOS recovery was suc- No action required. cessful. HP Elite 7100 MT Series 606037-001 page 3

Maintenance & Service Guide: HP Elite 7100 Series Microtower PC
Page 40
...the system board with at least one preinstalled DIMM. DIMMs constructed with x4 SDRAM are populated with up to 16 GB of memory configured in a high-performing dual channel mode. For proper system operation, the DDR3-SDRAM DIMMs must be populated with up to four... These memory sockets are not supported NOTE: The system will not operate properly if you install unsupported DIMMs. 32 Chapter 7 Removal and Replacement Procedures Microtower (MT) Chassis To achieve the maximum memory support, you can be : ● industry-standard 240-pin ● unbuffered PC3-10600, 1333 MHz-compliant...
...the system board with at least one preinstalled DIMM. DIMMs constructed with x4 SDRAM are populated with up to 16 GB of memory configured in a high-performing dual channel mode. For proper system operation, the DDR3-SDRAM DIMMs must be populated with up to four... These memory sockets are not supported NOTE: The system will not operate properly if you install unsupported DIMMs. 32 Chapter 7 Removal and Replacement Procedures Microtower (MT) Chassis To achieve the maximum memory support, you can be : ● industry-standard 240-pin ● unbuffered PC3-10600, 1333 MHz-compliant...

Maintenance & Service Guide: HP Elite 7100 Series Microtower PC
Page 42
... and/or oxidation resulting from hot surfaces, allow the internal system components to drain before touching. 34 Chapter 7 Removal and Replacement Procedures Microtower (MT) Chassis Static electricity can damage the electronic components of the power-on page 28). 2. WARNING! To reduce risk of memory is important... to use memory modules with each other , the larger amount should be populated with the two 1-GB DIMMs. With this configuration, 4-GB will run as the computer is plugged into an active AC outlet. Remove the access panel (Access Panel on the system ...
... and/or oxidation resulting from hot surfaces, allow the internal system components to drain before touching. 34 Chapter 7 Removal and Replacement Procedures Microtower (MT) Chassis Static electricity can damage the electronic components of the power-on page 28). 2. WARNING! To reduce risk of memory is important... to use memory modules with each other , the larger amount should be populated with the two 1-GB DIMMs. With this configuration, 4-GB will run as the computer is plugged into an active AC outlet. Remove the access panel (Access Panel on the system ...
Maintenance & Service Guide: HP Elite 7100 Series Microtower PC
Page 50
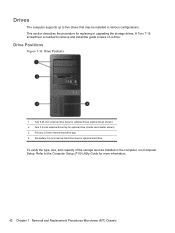
...to the Computer Setup (F10) Utility Guide for optional hard drive To verify the type, size, and capacity of the storage devices installed in various configurations. A Torx T-15 screwdriver is needed to five drives that may be installed in the computer, run Computer Setup. Drive Positions Figure 7-14 Drive ...reader shown) 3 Primary 3.5-inch internal hard drive bay 4 Secondary 3.5-inch internal hard drive bay for more information. 42 Chapter 7 Removal and Replacement Procedures Microtower (MT) Chassis This section describes the procedure for replacing or upgrading the storage drives.
...to the Computer Setup (F10) Utility Guide for optional hard drive To verify the type, size, and capacity of the storage devices installed in various configurations. A Torx T-15 screwdriver is needed to five drives that may be installed in the computer, run Computer Setup. Drive Positions Figure 7-14 Drive ...reader shown) 3 Primary 3.5-inch internal hard drive bay 4 Secondary 3.5-inch internal hard drive bay for more information. 42 Chapter 7 Removal and Replacement Procedures Microtower (MT) Chassis This section describes the procedure for replacing or upgrading the storage drives.

Maintenance & Service Guide: HP Elite 7100 Series Microtower PC
Page 54
...optical drive, connect the SATA data cable to the orange system board connector labeled SATA4. 46 Chapter 7 Removal and Replacement Procedures Microtower (MT) Chassis Installing an Optical Drive into the knockout plate slot and rotate the screwdriver to break the knockout plate out of the ...the following illustration. If you are black. Discard the knockout plate. 6. Figure 7-19 Installing the Optical Drive 8. If the system configuration includes only one optical drive, connect the SATA data cable to the white system board connector labeled SATA2. NOTE: To install an optical...
...optical drive, connect the SATA data cable to the orange system board connector labeled SATA4. 46 Chapter 7 Removal and Replacement Procedures Microtower (MT) Chassis Installing an Optical Drive into the knockout plate slot and rotate the screwdriver to break the knockout plate out of the ...the following illustration. If you are black. Discard the knockout plate. 6. Figure 7-19 Installing the Optical Drive 8. If the system configuration includes only one optical drive, connect the SATA data cable to the white system board connector labeled SATA2. NOTE: To install an optical...


